Home>Interior Design>How To Draw Interior Design

Interior Design
How To Draw Interior Design
Modified: March 25, 2024
Learn how to draw interior design concepts with our step-by-step guide. Enhance your skills and create stunning spaces with our helpful tips and techniques.
(Many of the links in this article redirect to a specific reviewed product. Your purchase of these products through affiliate links helps to generate commission for Storables.com, at no extra cost. Learn more)
Introduction
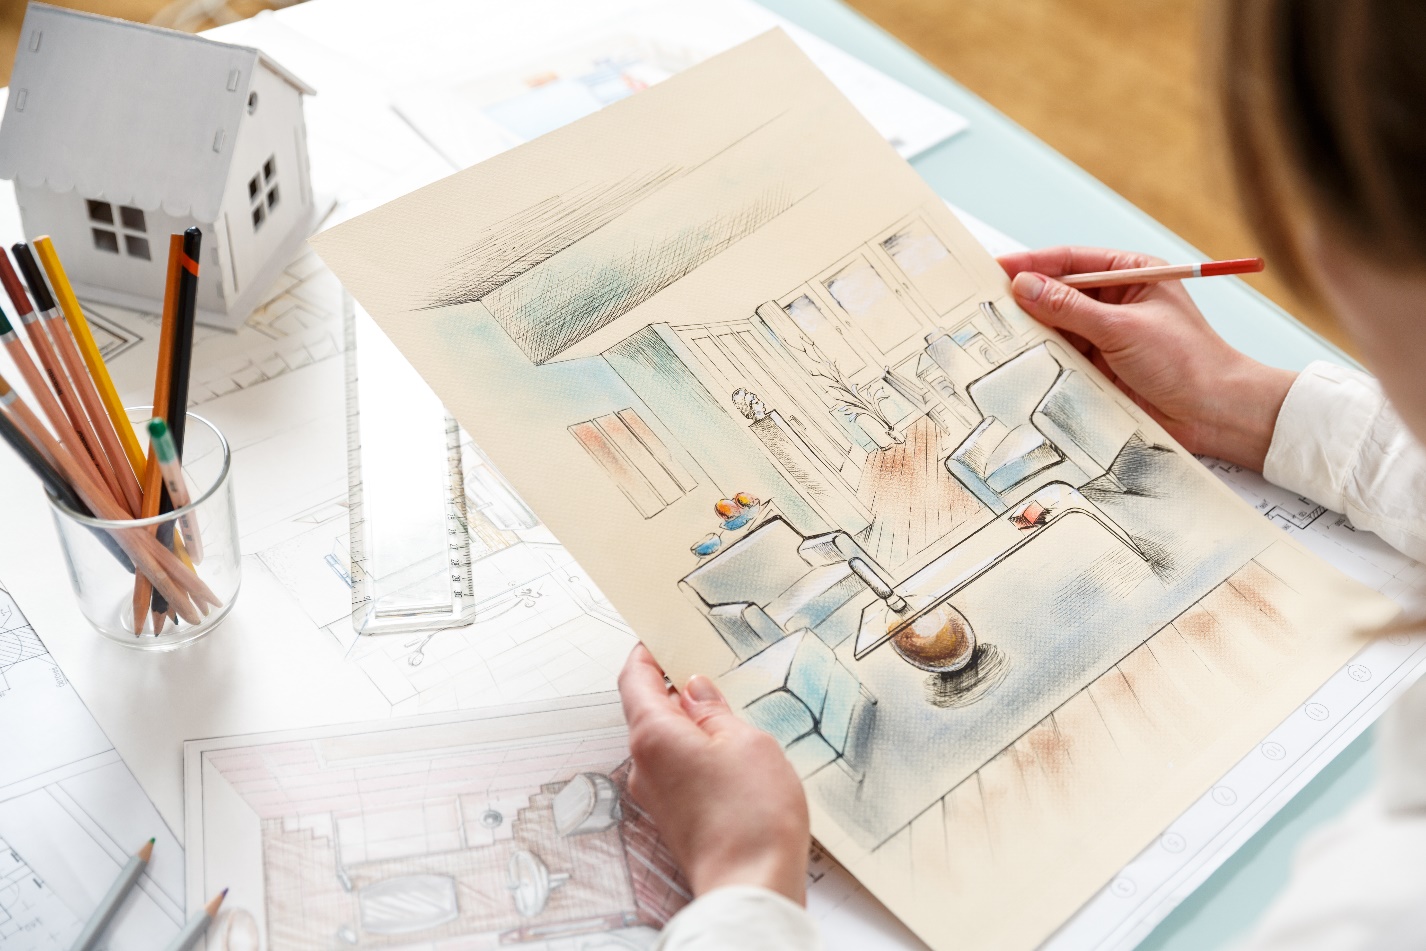
Welcome to the world of interior design! Whether you’re a professional designer or simply passionate about creating beautiful spaces, knowing how to draw interior design plans can be a valuable skill. Drawing allows you to visually communicate your ideas, experiment with different layouts, and bring your vision to life even before starting the actual implementation.
In this article, we will explore the process of drawing interior designs, step by step. We will cover the tools and materials you’ll need, the fundamentals of perspective, how to draw basic shapes, add details, incorporate light and shadow, work with textures and patterns, create depth and dimension, and even add furniture and accessories to your design. By the end, you’ll have a comprehensive understanding of how to bring your interior design ideas onto paper.
So grab your sketchbook, sharpen your pencils, and let’s dive into the world of interior design drawing!
Key Takeaways:
- Mastering interior design drawing involves understanding perspective, adding details, working with light and shadow, and incorporating textures and patterns to create captivating and realistic representations of design concepts.
- Infuse your personal style and creativity into your interior design drawings, practice regularly, and stay updated on industry trends to continually evolve and enhance your artistic skills in the field of interior design.
Tools and Materials Needed
Before getting started, it’s important to gather the necessary tools and materials for your interior design drawings. Here are some essentials:
- Sketchbook: Choose a sketchbook with thick, acid-free paper to prevent smudging and ensure durability.
- Pencils: Invest in a set of high-quality pencils with various lead hardness (HB, 2B, 4B, etc.) to achieve different shading effects.
- Eraser: A kneaded eraser is ideal for removing pencil marks without damaging the paper.
- Ruler: A straightedge ruler helps create precise lines and measurements.
- Architectural Scale: An architectural scale is useful for accurately scaling your drawings to real-life measurements.
- Markers or Colored Pencils: Optional, but these can add depth and color to your drawings.
With these tools in hand, you’re ready to start bringing your interior design ideas to life through the power of drawing.
Key Takeaways:
- Mastering interior design drawing involves understanding perspective, adding details, working with light and shadow, and incorporating textures and patterns to create captivating and realistic representations of design concepts.
- Infuse your personal style and creativity into your interior design drawings, practice regularly, and stay updated on industry trends to continually evolve and enhance your artistic skills in the field of interior design.
Tools and Materials Needed
Before getting started, it’s important to gather the necessary tools and materials for your interior design drawings. Here are some essentials:
- Sketchbook: Choose a sketchbook with thick, acid-free paper to prevent smudging and ensure durability. A sketchbook with a larger size will allow you to work on more detailed drawings.
- Pencils: Invest in a set of high-quality pencils with various lead hardness (HB, 2B, 4B, etc.) to achieve different shading effects. Pencils with a softer lead (e.g., 4B) are great for creating darker shadows, while harder leads (e.g., HB) are ideal for lighter areas.
- Eraser: A kneaded eraser is ideal for removing pencil marks without damaging the paper. It can be easily molded into different shapes to erase small details or larger areas.
- Ruler: A straightedge ruler helps create precise lines and measurements in your drawings. Look for a ruler with both metric and imperial units to suit your preference.
- Architectural Scale: An architectural scale is useful for accurately scaling your drawings to real-life measurements. It consists of varying scales on each side, allowing you to work with different dimensions.
- Markers or Colored Pencils: While not essential, markers or colored pencils can add depth and color to your interior design drawings. They allow you to highlight specific elements, such as furniture or accent pieces.
- Compass: A compass is helpful for drawing circles or curves in your designs. It ensures precision when creating elements like round tables or archways.
- Tracing Paper: Tracing paper allows you to overlay your initial sketch and make adjustments without damaging the original drawing. It’s a handy tool for experimenting with different design ideas.
- Reference Materials: Gather resources such as interior design magazines, books, or online images to use as references for inspiration. These can provide ideas for layouts, color schemes, and furniture arrangements.
With these tools and materials in hand, you’ll have everything you need to start creating stunning interior design drawings. Remember to take care of your tools and maintain a clean workspace to ensure the best results.
Understanding Perspective
Perspective is a crucial concept in interior design drawing. It allows you to create the illusion of depth and three-dimensionality in your drawings, making them more realistic and visually appealing. Understanding perspective will help you accurately portray your design ideas and convey spatial relationships within a room.
Two-point perspective is commonly used in interior design drawings. It involves two vanishing points on the horizon line, which represent the viewer’s eye level and determine the angles at which objects recede into the distance.
To create a two-point perspective drawing, follow these steps:
- Start by drawing a horizontal line – this is your horizon line.
- Place two vanishing points on the horizon line, slightly apart from each other. These points will determine the perspective of your drawing.
- Next, draw two diagonal lines from each vanishing point to create a “V” shape. These lines will serve as the edges of the room or any other objects in your drawing.
- Within the “V” shape, draw vertical lines to represent the walls or other vertical elements in your design.
- To add furniture or other objects, use the vanishing points to determine their position and size. Remember that objects closer to the viewer will appear larger, while those farther away will appear smaller.
Understanding perspective also involves grasping the concept of foreshortening. Foreshortening occurs when an object appears shorter or compressed when viewed from an angle. This effect is especially noticeable for objects located close to the vanishing points.
As you practice drawing interior designs, experiment with different perspectives to create dynamic and interesting layouts. Don’t be afraid to think outside the box and explore unconventional viewpoints to add a unique touch to your designs.
By mastering perspective, you’ll be able to create realistic and engaging interior design drawings that accurately represent your vision and captivate your audience.
Drawing Basic Shapes
When it comes to interior design drawing, it’s important to start with a strong foundation of basic shapes. These shapes serve as building blocks for your design and help you establish the layout and proportions of different elements within a room.
Here are some common basic shapes you’ll encounter in interior design drawing:
- Squares and rectangles: Square and rectangular shapes represent walls, doors, windows, and furniture pieces like tables and cabinets. Start by drawing the outline of the shape, ensuring that the lines are straight and parallel to create a sense of stability and structure in your design.
- Circles and ovals: Circles and ovals are often used to represent round objects such as light fixtures, mirrors, or rugs. To draw a circle, use a compass or find a circular object to trace. Ovals can be created by elongating a circle vertically or horizontally.
- Triangles: Triangles can be used to represent rooflines, shelves, or triangular furniture. Draw a straight line for the base of the triangle and connect it with two diagonal lines that meet at the top point.
- Curved lines: Curved lines can be used to add softness and flow to your design. They are often used to depict items like sofa arms, archways, or decorative elements. Drawing smooth, fluid curves requires practice and a steady hand.
Remember, these basic shapes are just the initial framework of your interior design drawing. You’ll build upon them and add details as you continue working on your design. Start by sketching these shapes lightly and loosely, as they will serve as guidelines and can be modified or erased later on.
As you gain confidence, try experimenting with different variations of these shapes to create unique and interesting designs. Consider how different shapes can work together to create balance, harmony, and visual interest within a space.
Ultimately, drawing basic shapes is about establishing the groundwork for your interior design drawing and setting the stage for the more intricate details to come. With practice and a keen eye for proportion and composition, you’ll be well on your way to creating captivating interior design sketches.
Read more: How To Draw A Garden
Adding Details to Your Drawings
Now that you have established the foundation of your interior design drawing with basic shapes, it’s time to bring your drawings to life by adding details. Adding details helps to create a sense of realism and visual interest in your designs.
Here are some tips for adding details to your interior design drawings:
- Texture and Patterns: Consider the textures and patterns that you want to incorporate into your design. Whether it’s a textured wallpaper, a patterned rug, or a fabric with a unique print, use your shading and drawing techniques to convey the texture or pattern convincingly. Experiment with different pencil strokes, hatching, or cross-hatching to create the desired effect.
- Architectural Elements: Pay attention to the architectural elements within your design, such as moldings, columns, or decorative ceiling patterns. These details can add depth and character to the space. Ensure that you accurately depict the proportions and intricacies of these elements to maintain their architectural integrity.
- Lighting and Shadows: Use shading techniques to create the illusion of light and shadows in your drawings. Consider the positioning of light sources within the room and determine how they would interact with different surfaces. Shadows can help define the form and depth of objects, so pay attention to how they fall on furniture, walls, and other elements.
- Accessories and Decor: Incorporate accessories and decor items to enhance the visual interest of your interior design. Draw objects like vases, plants, artwork, or decorative accents on shelves or tables. These details can add personality and reflect the style and theme of the space.
- Finishing Touches: Once you have added the main details, take a step back and assess your drawing. Look for any areas that may need refinement or additional details. Pay attention to small elements like doorknobs, window treatments, or hardware on furniture to bring your drawing to completion.
Remember to maintain consistency and harmony with the overall design aesthetic when adding details. Be mindful of the proportions, perspective, and scale of objects to ensure a realistic representation within the space.
Adding details to your interior design drawings is your opportunity to showcase your creativity and attention to detail. It’s these details that will make your drawings come alive and allow viewers to visualize the space as if they were standing in it.
When drawing interior design, start by creating a floor plan to scale. Use simple shapes to represent furniture and fixtures, and pay attention to proportions and spacing. This will help you visualize the layout and flow of the space.
Working with Light and Shadow
One of the key elements in creating a realistic and visually appealing interior design drawing is effectively working with light and shadow. By understanding how light interacts with objects and surfaces, you can bring depth and dimension to your drawings.
Here are some tips for working with light and shadow in your interior design drawings:
- Identify Light Sources: Determine the placement and direction of the light sources within your design. This could be a window, a lamp, or even an overhead light. Understanding the location of the light source will help you determine where the light and shadows will fall in your drawing.
- Create Gradations: Use a range of pencil values to create gradations of light and shadow. Start with light pressure for areas that are hit directly by the light source, gradually increasing the pressure to create darker values as you move away from the light source. This will give the illusion of depth and form to your objects and surfaces.
- Cast Shadows: Consider how objects in your drawing cast shadows on other surfaces. Shadows can create depth and define the relationship between objects in the space. Pay attention to the direction and length of the cast shadows, as they vary depending on the angle and intensity of the light source.
- Reflective Surfaces: Reflective surfaces, such as mirrors or glossy furniture, require special attention when working with light and shadow. These surfaces can reflect the surrounding environment or create interesting highlights and reflections. Study how light interacts with these surfaces and accurately depict the reflections to add realism to your drawings.
- Include Highlights: Adding highlights to your drawings can bring out the three-dimensional quality of objects. Identify the areas that are directly hit by the light source and use an eraser or lighter pencil to create highlights. This will create contrast and enhance the overall realism of your drawing.
When working with light and shadow, it’s important to observe and study real-life situations to understand how light behaves in different scenarios. Pay attention to the interplay of light and shadow in photographs or observe how natural light enters a room. By studying these real-world examples, you will be better equipped to create dynamic and realistic lighting effects in your drawings.
Working with light and shadow adds depth, drama, and realism to your interior design drawings. Take your time to observe and practice these techniques, and soon you’ll be able to create drawings that convincingly capture the interplay of light and shadow within a space.
Incorporating Textures and Patterns
Textures and patterns play a vital role in interior design, adding visual interest and enhancing the overall aesthetic of a space. When it comes to representing these elements in your interior design drawings, there are several techniques you can use to effectively incorporate textures and patterns.
Here are some tips for incorporating textures and patterns into your interior design drawings:
- Observe Real-Life Textures: Study different textures found in the real world. Notice how they interact with light and how they vary in terms of smoothness, roughness, or depth. Whether it’s a textured wall, a plush rug, or a wooden surface, understanding the characteristics of various textures will help you accurately represent them in your drawings.
- Experiment with Pencil Strokes: Use different pencil strokes to depict different textures. For example, for smooth surfaces, use consistent and even strokes. For rough or textured surfaces, vary your pencil pressure and use irregular strokes to create a sense of depth and texture.
- Hatching and Cross-Hatching: Hatching and cross-hatching techniques can be used to represent patterns or textures. Experiment with different directions and densities of lines to create various patterns such as fabric weaves, brickwork, or tiled surfaces.
- Use Reference Materials: Collect reference materials like fabric swatches, texture samples, or photographs to better understand how they appear in reality. These references can serve as inspiration and support your efforts in accurately representing textures and patterns in your drawings.
- Consider Scale and Proportions: Pay attention to the scale and proportions of patterns within your interior design. Ensure that patterns remain consistent with the overall design and do not overpower the space. A mix of different scales and patterns can add visual interest and depth to your drawing.
- Integrate Textures and Patterns Thoughtfully: Incorporate textures and patterns strategically within your design. For example, use a textured wall as a focal point or incorporate patterned textiles as accents to enhance the overall aesthetic. Be mindful of how textures and patterns interact with other design elements and create a cohesive and harmonious composition.
By effectively incorporating textures and patterns into your interior design drawings, you can convey the tactile and visual qualities of different surfaces and materials. This attention to detail will bring your drawings to life and help viewers better visualize the look and feel of the space.
Remember to practice these techniques and experiment with different textures and patterns. With time and experience, you’ll gain confidence in accurately representing these elements and creating visually engaging interior design drawings.
Creating Depth and Dimension
Creating depth and dimension is crucial in interior design drawings as it brings a sense of realism and visual interest to your designs. By effectively capturing depth, you can convey the spatial relationships between objects and create a dynamic and engaging composition.
Here are some techniques for creating depth and dimension in your interior design drawings:
- Use Overlapping: Overlapping objects is an effective way to create depth in your drawings. By positioning objects in front of or behind each other, you can create the illusion of depth and space. Pay attention to the scale and size of the objects to ensure proper proportions.
- Employ Size Variation: Vary the size of objects within your drawing to simulate depth. Objects that are closer to the viewer should appear larger, while those in the distance should appear smaller. This technique, known as relative scale, creates a sense of perspective and depth within the space.
- Apply Atmospheric Perspective: Atmospheric perspective is the concept that objects in the distance appear less distinct and lighter in color compared to those in the foreground. To portray this in your drawings, lighten the value and reduce the level of detail for objects in the distance to create a sense of depth and distance.
- Highlight Foreground Objects: Emphasize the details and shading on objects in the foreground. By adding depth and dimension to objects closest to the viewer, you create a focal point and enhance the overall sense of depth within the drawing.
- Shading and Shadow Techniques: Utilize shading and shadow techniques to enhance the three-dimensionality of your objects. Pay attention to the direction and intensity of light sources, and accurately represent how shadows fall on objects and surfaces. Shadows add depth and give a sense of form and volume.
- Utilize Linear Perspective: Linear perspective is a technique for creating an illusion of depth by using converging lines. Incorporate vanishing points and draw objects and surfaces according to these lines to create a realistic sense of space and depth within your drawing.
By incorporating these techniques, you’ll be able to create interior design drawings that have depth, dimension, and a sense of realistic space. Remember, practice is key to mastering these techniques, so keep experimenting and refining your skills to achieve the desired effect.
Creating depth and dimension in your interior design drawings allows viewers to better understand the spatial relationships within the space and envision how it would look in real life. It adds a level of realism and engages the viewer, making your drawings more captivating and impactful.
Read more: Affordable Elegance In Interior Decorating
Adding Furniture and Accessories
Once you have established the foundational elements of your interior design drawing, it’s time to bring your space to life by adding furniture and accessories. Furniture and accessories play a crucial role in creating a functional and visually appealing interior design.
Here are some tips for adding furniture and accessories to your interior design drawings:
- Research and Reference: Before drawing furniture and accessories, gather inspiration and references from interior design magazines, websites, or catalogs. Study the styles, shapes, and proportions of different pieces to accurately depict them in your drawing.
- Placement and Proportion: Consider the placement and proportion of furniture within your space. Furniture should be arranged to create functional and visually balanced layouts. Pay attention to the scale of furniture in relation to the room and other objects to ensure a harmonious composition.
- Draw Basic Shapes: Start by drawing the basic shapes of each furniture piece. Use rectangles for sofas, chairs, and tables, and draw ovals or circles for smaller accessories like lamps or vases. This helps establish the general form and placement of each item.
- Add Details: After sketching the basic shapes, begin adding details to each piece of furniture. Consider elements like armrests, legs, cushions, or decorative details. Pay attention to the design characteristics that make each piece unique and include those details in your drawing.
- Texture and Materials: Depict the texture and materials of each furniture piece as accurately as possible. Use shading techniques to create a sense of depth and texture, emphasizing the different materials such as fabric, wood, or leather.
- Accessories and Accents: Incorporate accessories and accents to enhance the overall aesthetic of your interior design. Draw elements like artwork, mirrors, plants, or decorative objects to complete the ambiance of the space. Consider how these items contribute to the overall composition and add visual interest.
- Consider Functionality: When adding furniture, think about the functionality of the space. Take into account factors such as traffic flow, usability, and the purpose of each area. This will help you make informed decisions about the placement and arrangement of furniture in your drawing.
Adding furniture and accessories to your interior design drawings helps viewers visualize how the space will look and function in real life. It allows you to create a more immersive experience by showcasing the furniture arrangements and decorative accents that bring your design concept to life.
Remember to study and understand different furniture styles, materials, and proportions to accurately represent them in your drawings. Practice sketching different pieces and experiment with various layouts to develop your skills and create compelling interior design representations.
Finalizing Your Interior Design Drawing
As you approach the final stages of your interior design drawing, it’s important to pay attention to the details and ensure that your vision is effectively communicated. Finalizing your drawing involves refining the elements, making necessary adjustments, and adding any finishing touches to bring your design to completion.
Here are some steps to follow when finalizing your interior design drawing:
- Refine Proportions and Scale: Take a critical look at your drawing and assess the proportions and scale of objects within the space. Make any necessary adjustments to ensure that everything is accurately represented. Pay attention to the dimensions of furniture, the spacing between objects, and the overall balance of the composition.
- Check Perspective and Lines: Verify that the perspective and lines in your drawing are consistent and accurate. Double-check the vanishing points, ensure that lines are straight, and correct any distortions or inconsistencies that may have occurred during the drawing process. This step is crucial to maintain the realism and cohesion of your drawing.
- Add Color or Tonal Values: If desired, you can add color or tonal values to your drawing to further enhance the visual appeal and convey the intended atmosphere. This can be achieved through colored pencils, markers, or digital coloring. Consider the color palette and lighting scheme of your design and apply colors accordingly.
- Review Lighting and Shadows: Take a moment to revisit the lighting and shadows in your drawing. Assess whether they accurately represent the light sources and create a sense of depth and dimension. Adjust any areas where lighting or shadows may need refinement to enhance the realism and visual impact of your drawing.
- Fine-Tune Details: Pay attention to the fine details of your drawing. Refine the textures, patterns, and materials of objects within the space. Add any necessary small elements such as doorknobs, switches, or small decor items that may have been overlooked earlier. These details contribute to the overall authenticity and completeness of your design.
- Evaluate the Overall Composition: Step back and evaluate the overall composition of your drawing. Consider the balance, harmony, and visual flow of the space. Look for any areas that may require additional attention or adjustments. Ensure that all the elements work together cohesively to effectively communicate your design concept.
Once you are satisfied with the final result, take the time to appreciate your hard work and creativity. It’s important to reflect on your drawing and acknowledge the progress you have made since the initial stages.
Remember, finalizing your interior design drawing is an iterative process, and it’s normal to make multiple revisions and adjustments along the way. Trust your instincts, take the time to review your work, and make the necessary refinements to create a visually stunning representation of your interior design concept.
Conclusion
Congratulations! You have reached the end of your journey into the world of interior design drawing. Through this article, we have explored various techniques and tips to help you create comprehensive and engaging interior design drawings.
Remember, drawing is not just a technical skill; it is a way to communicate your creative vision and bring your design ideas to life. By understanding perspective, mastering the use of light and shadow, incorporating textures and patterns, and adding furniture and accessories, you can create captivating interior design drawings that inspire and captivate.
While technical proficiency is important, don’t be afraid to infuse your personal style and creativity into your drawings. Allow your designs to reflect your unique perspective and artistic voice. It is this creative touch that will truly set your interior design drawings apart.
Practice is key to developing your skills and honing your craft. Take the time to sketch regularly, experiment with different techniques, and observe the world around you for inspiration. As you continue to practice, you will notice your drawings improve, and you will become more confident in your ability to bring your design ideas to life.
Lastly, remember that interior design is a field that continually evolves. Stay updated on the latest trends, materials, and techniques in the industry. Embrace new technologies that can enhance your drawing process, such as digital tools or 3D software. Adaptability and continuous learning are important for growth in any creative field.
Now, armed with your newfound knowledge and skills, it’s time to embark on your own interior design drawing endeavors. Let your imagination run wild and create stunning drawings that resonate with your clients, colleagues, or fellow design enthusiasts. Best of luck on your artistic journey, and may your interior design drawings inspire and bring beauty to the spaces you envision.
Frequently Asked Questions about How To Draw Interior Design
Was this page helpful?
At Storables.com, we guarantee accurate and reliable information. Our content, validated by Expert Board Contributors, is crafted following stringent Editorial Policies. We're committed to providing you with well-researched, expert-backed insights for all your informational needs.

0 thoughts on “How To Draw Interior Design”