Articles
How To Draw A Garden
Modified: August 24, 2024
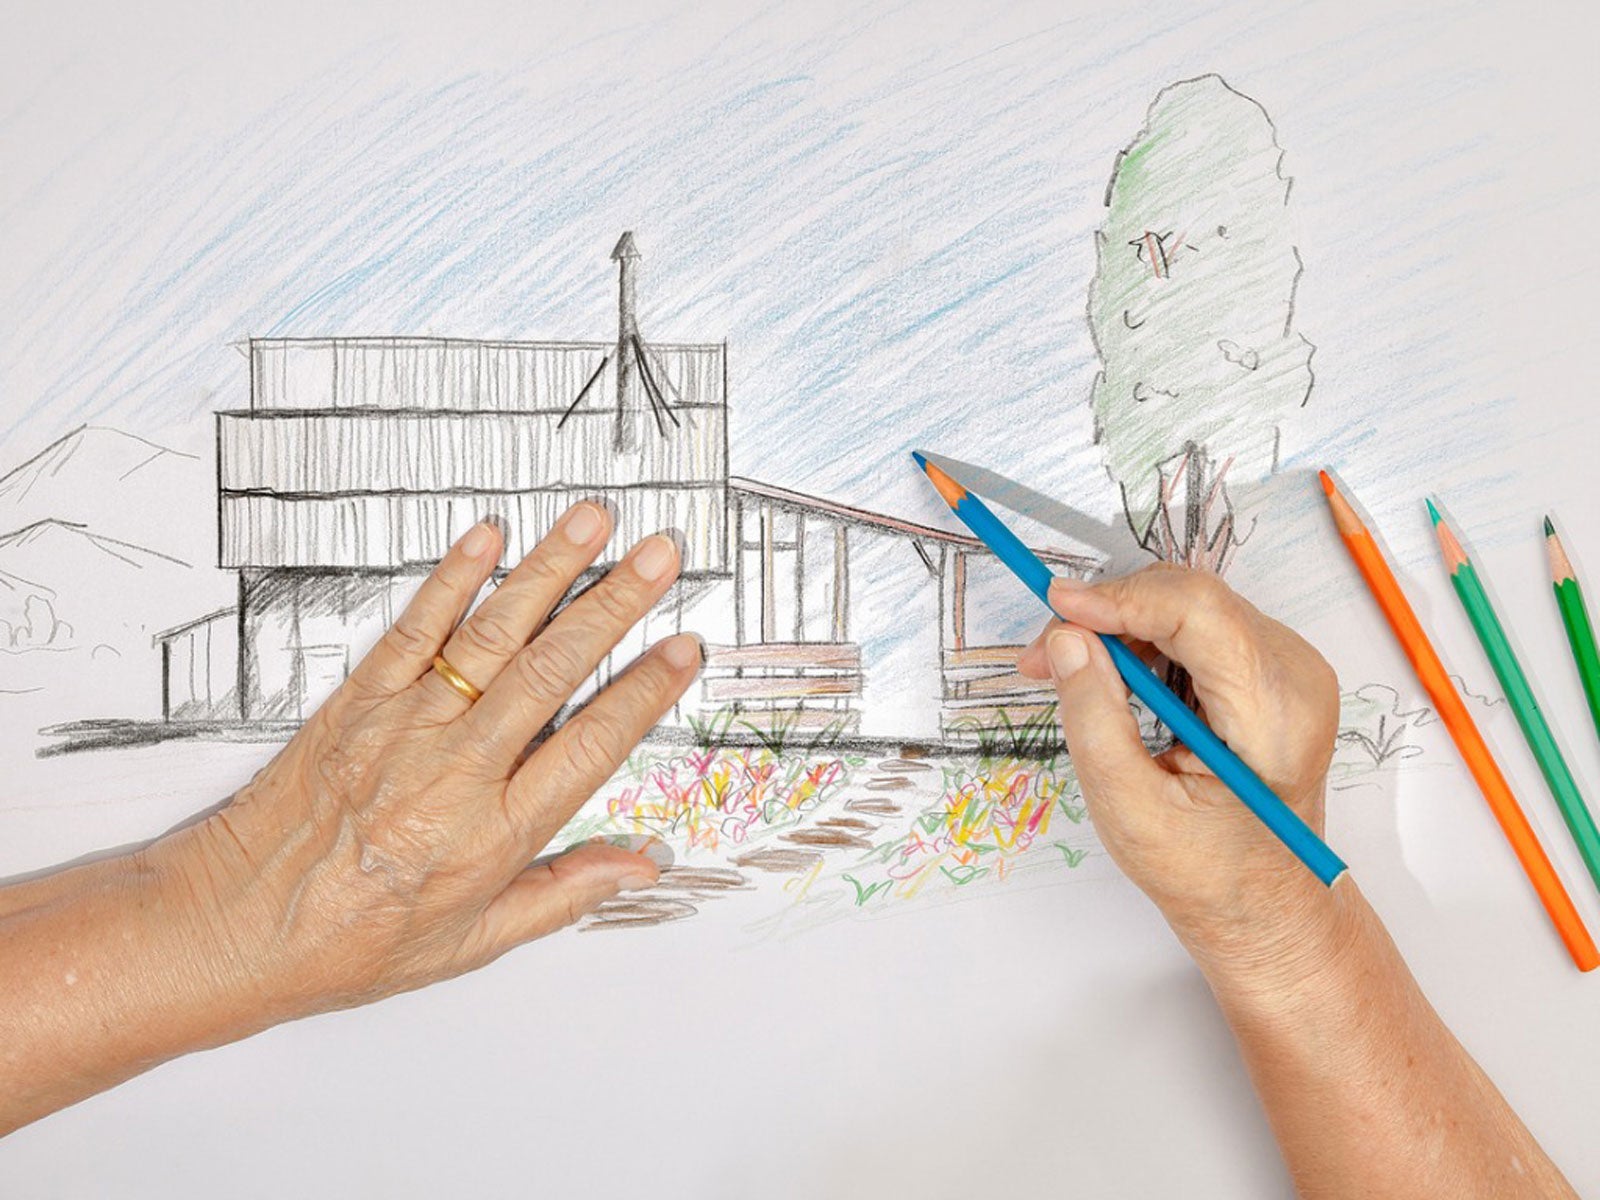
Learn the art of gardening with this step-by-step guide on how to draw a garden. Explore techniques, tips, and inspiration to create your dream garden.
(Many of the links in this article redirect to a specific reviewed product. Your purchase of these products through affiliate links helps to generate commission for Storables.com, at no extra cost. Learn more)
Introduction
Welcome to the enchanting world of gardening! Whether you have acres of land or a small balcony, cultivating a garden is a fulfilling and rewarding endeavor. Not only does gardening allow you to connect with nature, but it also provides a therapeutic escape from the hustle and bustle of daily life. And what better way to enhance your gardening experience than by learning how to draw a garden?
Drawing a garden not only allows you to capture its beauty on paper but also helps you visualize your ideas before bringing them to life in your own outdoor space. In this step-by-step guide, we will explore the art of drawing a garden, from selecting the composition to adding intricate details and final touches.
So let’s gather our pencils, sketchbooks, and creative inspiration as we embark on this artistic journey to create a stunning garden drawing!
Key Takeaways:
- Embrace the therapeutic and fulfilling experience of drawing a garden, from selecting the composition to adding intricate details, and let your creativity blossom in every stroke.
- Transform a blank canvas into a vibrant representation of nature’s splendor by honing your observation skills, understanding light and shadow, and expressing your love for gardening.
Read more: How To Draw A Balcony
Step 1: Choosing the Composition
The first step in drawing a garden is to determine the composition or layout of your artwork. The composition plays a crucial role in creating a visually appealing and balanced drawing. Here are a few tips to help you choose the composition for your garden drawing:
- Consider the viewpoint: Decide whether you want to draw the garden from a bird’s eye view, as if you’re looking down on it, or from a ground-level perspective, as if you’re standing in the garden.
- Plan the focal point: Identify the main focal point of your garden drawing. It could be a beautifully blooming flower bed, a serene water feature, or a charming garden bench. The focal point will draw the viewer’s attention and provide a visual anchor for the composition.
- Create balance: Ensure that your composition has a sense of balance by distributing the elements evenly. Avoid placing all the focal points in one corner of the drawing. Instead, consider spreading them out across the composition.
- Think about scale: Decide how much of the garden you want to include in your drawing. You may choose to capture the entire garden or focus on a specific area. Pay attention to the scale of different elements, such as trees, flowers, and structures, to maintain realistic proportions.
- Plan the foreground and background: Determine the elements you want to include in the foreground, middle ground, and background of your drawing. This will add depth and dimension to your artwork.
Take some time to experiment with different compositions by sketching quick thumbnail drawings. This will allow you to visualize various arrangements and choose the one that best represents your ideal garden.
Once you have finalized the composition, you are ready to move on to the next step of sketching the basic shapes of your garden drawing.
Step 2: Sketching the Basic Shapes
Now that you have chosen the composition for your garden drawing, it’s time to start sketching the basic shapes that will form the foundation of your artwork. This step will help you establish the overall structure and layout of your garden. Here’s how you can approach sketching the basic shapes:
- Start with light pencil strokes: Begin by lightly sketching the outline of the main elements in your garden, such as trees, shrubs, and flower beds. Use simple geometric shapes like circles, rectangles, and ovals to represent these elements. Don’t worry about adding too much detail at this stage; focus on capturing the basic shapes and proportions.
- Pay attention to spacing and placement: Ensure that the elements are spaced out properly and are positioned according to your chosen composition. This will help maintain a balanced and visually pleasing arrangement in your garden drawing.
- Use reference images: If you are unsure about the shape or structure of certain plants or flowers, refer to gardening books, magazines, or online resources. These references will provide you with a better understanding of how different elements should be represented in your drawing.
- Consider overlapping: To create depth and dimension in your garden drawing, allow some elements to overlap others. This technique adds a sense of realism and creates visual interest in your artwork.
- Refine and adjust: Once you have sketched the basic shapes, take a step back and assess your drawing. Make any necessary adjustments to the proportions, placement, or shape of the elements. Use an eraser to remove any unwanted lines or mistakes.
Remember, the goal of this step is to establish the underlying structure of your garden drawing. Take your time to get the shapes right before moving on to the next step of adding details to plants and flowers.
Step 3: Adding Details to Plants and Flowers
Now that you have sketched the basic shapes of your garden, it’s time to bring your artwork to life by adding intricate details to the plants and flowers. This step will add depth, texture, and realism to your garden drawing. Follow these tips to add stunning details to your botanical elements:
- Observe and study plants: Take a close look at the plants and flowers you want to include in your drawing. Pay attention to the shapes, patterns, and textures of their leaves, petals, and stems. Use your observations to accurately depict these details in your artwork.
- Use shading and hatching: To create depth and volume, use shading techniques to add highlights and shadows to your plants and flowers. Use light and dark pencil strokes to imitate the texture and shading of different elements. Hatching and cross-hatching techniques can also be employed for more complex shading effects.
- Experiment with different line weights: Vary the thickness and intensity of your lines to create a sense of depth and realism. Use thicker lines for the foreground elements and thinner lines for background elements to simulate distance.
- Highlight focal points: The focal points of your garden, such as a blooming flower or a flourishing tree, should be the center of attention. Use extra attention to detail and added shading to make these elements stand out from the rest of the drawing.
- Include small details: Pay attention to the small details that make each plant unique, such as the veins on leaves, the delicate texture of petals, or the patterns on tree bark. These details add realism and character to your garden drawing.
Remember to take your time and enjoy the process of adding details. Drawing plants and flowers can be a meditative and enjoyable experience, allowing you to appreciate the beauty of nature as you recreate it on paper.
Once you are satisfied with the level of detail in your garden drawing, you can proceed to the next step of drawing the pathways within the garden.
Step 4: Drawing the Pathways
The pathways within a garden not only provide a functional purpose but also add structure and visual interest to the overall composition. In this step, we will focus on drawing the pathways, which will create a sense of movement and guide the viewer’s eye through the garden. Follow these steps to draw realistic and inviting pathways:
- Choose the pathway material: Consider the type of material you want the pathways to be made of, such as gravel, stone, bricks, or wood. Each material will have a different texture and pattern, so do some research or look at reference images to get a clear idea of how to depict it.
- Start with the edges: Begin by drawing the edges of the pathway using thin, light pencil strokes. These lines will serve as a guide for the width and shape of the pathways.
- Consider perspective: If you are drawing the garden from a bird’s eye view, the pathways will appear wider in the foreground and converge toward a vanishing point in the distance. Use perspective guidelines to ensure accurate proportions.
- Add texture and details: To depict different pathway materials, use shading and texture techniques. For instance, if you are drawing a gravel pathway, create small, random dots or dashes to represent the gravel. If it’s a stone or brick pathway, add lines or small shapes to mimic the texture of the stones or bricks.
- Include details along the pathway: Draw elements such as stepping stones, flowers or plants bordering the pathway, or decorative features like lanterns or benches. These details will add visual interest and enhance the overall charm of the garden.
Take your time to carefully draw the pathways, paying attention to the specific features and materials you have chosen. Once you have finished drawing the pathways, you can move on to the next step of adding garden furniture and accessories to your artwork.
When drawing a garden, start by sketching the basic shapes of the plants and flowers. Then add details like leaves, petals, and stems to bring the garden to life. Pay attention to the different textures and sizes of the plants to create a realistic and dynamic drawing.
Read more: How To Print A CAD Drawing
Step 5: Adding Garden Furniture and Accessories
No garden is complete without some comfortable furniture and charming accessories. In this step, we will learn how to incorporate garden furniture and accessories into our drawing to create a welcoming and inviting outdoor space. Here’s how you can add these finishing touches:
- Select the right furniture: Choose the type of furniture that suits the style and theme of your garden. It could be a wooden bench, a rustic table and chairs, or even a cozy hammock. Research different styles to get inspiration and ensure that the furniture you draw complements the overall composition.
- Consider scale and placement: Determine where you want to place the furniture in your garden drawing. Pay attention to scale and make sure the size of the furniture is proportional to the surroundings. You don’t want a tiny bench overpowering the rest of the scene or vice versa.
- Add textures and patterns: Use shading techniques to add texture and depth to the furniture. Depict the wood grain, fabric patterns, or any other intricate details that make the furniture unique. This will make your drawing look more realistic and captivating.
- Include accessories: Enhance the ambiance of your garden by adding accessories like potted plants, decorative lanterns, bird baths, or even a small fountain. These elements not only add visual interest but also add a touch of personality to your garden drawing.
- Experiment with placement: Try out different locations for the furniture and accessories in your garden drawing. Move them around until you find the arrangement that enhances the composition and creates a harmonious balance.
Adding garden furniture and accessories will bring your artwork to life. It will create a sense of coziness and make the viewer envision themselves enjoying the garden space. Once you are satisfied with the placement and details, you can proceed to the next step of enhancing your drawing with shadows and highlights.
Step 6: Enhancing with Shadows and Highlights
Shadows and highlights play a vital role in making a drawing look realistic and three-dimensional. In this step, we will learn how to enhance our garden drawing by adding shadows and highlights to different elements. Follow these tips to bring depth and dimension to your artwork:
- Observe the light source: Identify the direction of the light source in your drawing, whether it is natural sunlight or artificial lighting. This will determine where the shadows and highlights will fall on the objects in your garden.
- Add shadows: Use light pencil strokes to gradually build up shadows on the objects. Pay attention to the angles and shapes of the objects to create accurate and convincing shadow placements. Vary the intensity of the shadows depending on the distance from the light source.
- Create highlights: Use an eraser or white pencil to carefully remove or lighten areas that would be hit by direct light. This will create highlights and make the objects appear more three-dimensional. Be subtle with highlighting to avoid an overly exaggerated effect.
- Blend and smudge: To create a smooth transition between shadows and highlights, use techniques like blending and smudging. These techniques help in achieving a realistic and cohesive look.
- Consider interaction of objects: Keep in mind that objects in the garden may cast shadows on other elements. For example, a tree might cast a shadow on the pathway, or a flower might cast a shadow on a nearby bench. Take these interactions into account to add depth and further realism to your drawing.
Adding shadows and highlights will bring your garden drawing to life, making it more visually dynamic and captivating. Take your time and experiment with different shading techniques to achieve the desired effect. Once you are satisfied with the result, you can move on to the final step of putting the finishing touches on your drawing.
Step 7: Final Touches and Finishing the Drawing
Congratulations, you have reached the final step in creating your garden drawing! This step is all about adding the final touches that will bring your artwork to completion. Here are some tips to help you add those finishing details:
- Refine the lines: Use a fine-tipped pencil to go over the main lines of your drawing, making them more defined and polished. Pay attention to the contours of the plants, furniture, and pathways, ensuring that they are smooth and accurate.
- Refine the details: Take a closer look at the individual elements in your drawing and add any missing details or touches that will enhance their appearance. This could include adding intricate patterns to flower petals, refining the texture of tree bark, or adding delicate features to garden furniture.
- Clean up the drawing: Use an eraser to remove any stray pencil marks, smudges, or errors that may be distracting in your garden drawing. Take your time to ensure that the final result is clean and polished.
- Add color (optional): If you wish to add color to your garden drawing, now is the time to do so. You can use colored pencils, watercolors, or any other medium of your choice. Bring your garden to life with vibrant hues, but be mindful of maintaining the balance and harmony of the composition.
- Sign your artwork: Don’t forget to add your signature to your garden drawing! This small detail adds a personal touch and establishes your ownership of the artwork.
Stand back and admire your finished garden drawing. Take pride in your artistic achievement and the beautiful representation of a garden that you have created. Whether you choose to display it or keep it as a treasured memory, your garden drawing is a testament to your creativity and passion.
Congratulations again on completing the steps to draw a garden. Now, it’s time to celebrate your artistic accomplishment!
Conclusion
Drawing a garden is not just about capturing its beauty on paper, but also about immersing yourself in the tranquility and joy that nature brings. Through the seven steps we have explored, you have learned how to create a stunning garden drawing, from choosing the composition to adding intricate details and final touches.
By carefully selecting your composition, sketching the basic shapes, adding details to plants and flowers, drawing the pathways, incorporating garden furniture and accessories, enhancing with shadows and highlights, and putting the finishing touches, you have transformed a blank canvas into a captivating garden scene.
Throughout this artistic journey, you have witnessed the transformation of your garden drawing from a collection of lines and shapes to a vibrant representation of nature’s splendor. You have honed your observation skills, improved your understanding of light and shadow, and developed your ability to bring life and depth to your artwork.
Remember, drawing a garden is not only a creative outlet, but also a way to express your love for nature and gardening. Let your imagination run wild as you recreate flowers in full bloom, lush greenery, and serene paths that beckon exploration.
Whether you choose to keep your garden drawing as a cherished memory or share it with others, it serves as a testament to your artistic talent and appreciation for the wonders of nature. So, grab your pencils, sketchbook, and let your creativity blossom as you embark on the delightful journey of drawing a garden.
Enjoy the process, embrace the tranquility, and let your artistic expression flourish in every stroke. Happy drawing!
Just wrapped up your garden drawing? Now, let's bring that sketch to life with real boundaries and flair! Whether you're a novice or seasoned gardener, our guide on unique garden fence ideas offers loads of inspiration and practical tips. Delve into creative ways to define your outdoor space while maintaining aesthetic appeal and functionality.
Frequently Asked Questions about How To Draw A Garden
Was this page helpful?
At Storables.com, we guarantee accurate and reliable information. Our content, validated by Expert Board Contributors, is crafted following stringent Editorial Policies. We're committed to providing you with well-researched, expert-backed insights for all your informational needs.


0 thoughts on “How To Draw A Garden”