Home>Home Appliances>Cleaning Appliances>How To Draw A Vacuum Cleaner
Cleaning Appliances
How To Draw A Vacuum Cleaner
Modified: January 4, 2024
Learn how to draw a vacuum cleaner step by step. Perfect for artists and enthusiasts. Master the art of drawing cleaning appliances today!
(Many of the links in this article redirect to a specific reviewed product. Your purchase of these products through affiliate links helps to generate commission for Storables.com, at no extra cost. Learn more)
Introduction
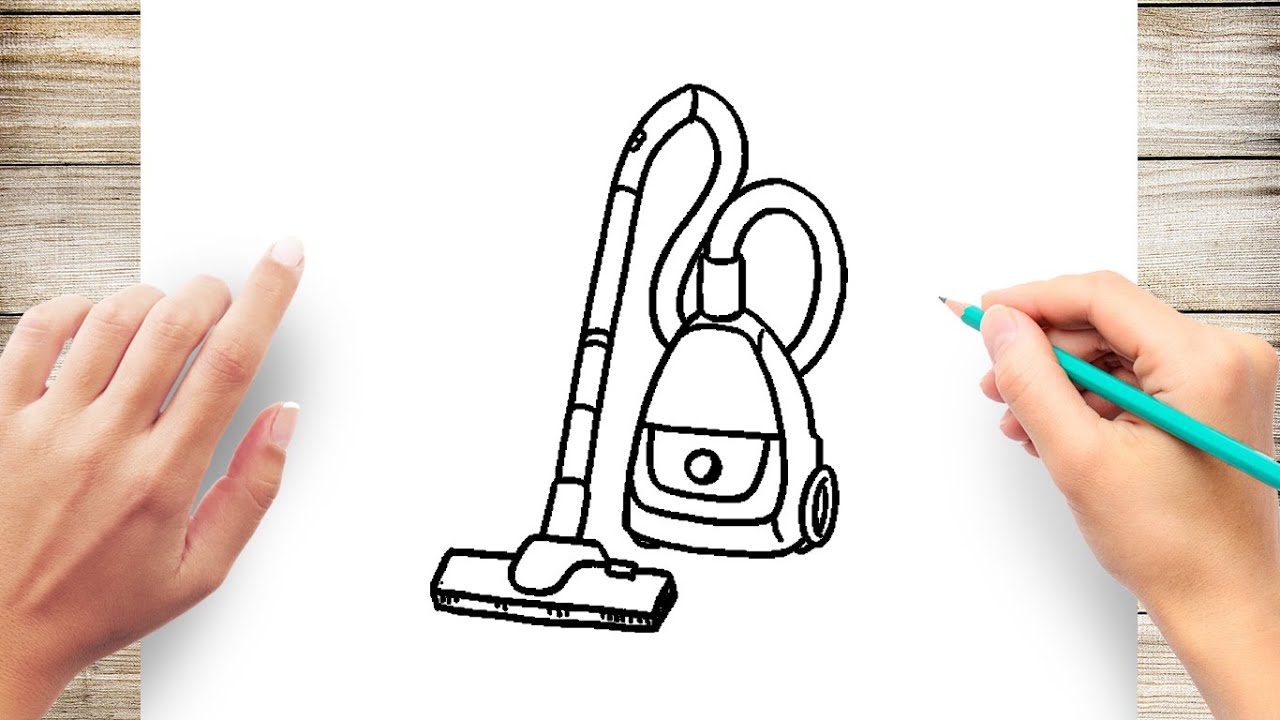
Welcome to the exciting world of drawing! In this tutorial, we will explore the step-by-step process of drawing a realistic vacuum cleaner. Whether you are an aspiring artist or just looking for a fun and creative activity, this guide will help you bring a common household appliance to life on paper.
Drawing is a wonderful way to express creativity and improve artistic skills. Through this tutorial, you will learn the techniques to create depth, texture, and shading, which are essential for bringing any object to life in a drawing.
So, grab your drawing materials, find a comfortable spot, and let's dive into the wonderful journey of drawing a vacuum cleaner. Whether you're a beginner or an experienced artist, this tutorial is designed to be enjoyable and accessible to all skill levels. Let's unleash our creativity and bring this vacuum cleaner drawing to life!
Key Takeaways:
- Drawing a vacuum cleaner involves sketching the basic shape, adding intricate details, and creating shadows and highlights to bring the appliance to life on paper.
- Through the process of drawing a vacuum cleaner, artists can hone their observation, sketching, shading, and detailing skills, which are transferable to a wide range of subjects.
Read more: How To Use A Vacuum Cleaner
Materials Needed
Before we embark on the artistic journey of drawing a vacuum cleaner, it’s important to gather the necessary materials. Here’s what you’ll need:
- Pencil: A set of drawing pencils, including HB, 2B, 4B, and 6B, for sketching and shading.
- Drawing Paper: A smooth, heavyweight paper suitable for pencil drawings.
- Eraser: A good quality eraser for correcting mistakes and adjusting highlights.
- Ruler: A straight edge for creating precise lines and angles.
- Blending Stump: Used for blending and smoothing out pencil strokes.
- Reference Image: A picture of a vacuum cleaner to use as a visual reference for details and proportions.
- Optional: Colored Pencils or Markers for adding a pop of color to your drawing.
With these materials at your disposal, you’ll be well-equipped to bring your vacuum cleaner drawing to life. Now, let’s move on to the first step of the drawing process!
Step 1: Sketching the Basic Shape
Now that you have your materials ready, it’s time to start drawing the basic outline of the vacuum cleaner. Begin by lightly sketching the overall shape of the appliance using an HB pencil. Pay close attention to the proportions and angles of the vacuum cleaner, and use a reference image to guide your initial sketch.
Start by drawing the main body of the vacuum cleaner, paying attention to any curves or straight edges. Next, add the handle and nozzle, ensuring that they are positioned correctly in relation to the body of the appliance. Use light, loose strokes at this stage, as you’ll be refining the details in the subsequent steps.
As you sketch, take the time to observe the negative spaces around the vacuum cleaner. Negative spaces refer to the areas around and between the main elements of the object. By paying attention to these spaces, you can ensure that the proportions and positioning of the vacuum cleaner are accurate.
Remember, the initial sketch doesn’t need to be perfect. It serves as a foundation for the more detailed work that will follow. Take your time to get the basic shape just right before moving on to the next step. Once you’re satisfied with the overall outline, you can proceed to the next stage of adding details to your drawing.
Step 2: Adding Details
With the basic shape of the vacuum cleaner sketched out, it’s time to add the intricate details that will bring your drawing to life. Switch to a softer pencil, such as a 2B or 4B, to begin adding the smaller features and defining the various components of the appliance.
Start by focusing on the nozzle and the attachments on the vacuum cleaner. Pay attention to any buttons, switches, or vents that are part of the design. Use light, controlled strokes to outline these details, ensuring that they are proportionate to the overall shape of the appliance.
Next, move on to the handle and any additional features, such as a power cord or wheels. Take your time to capture the subtle curves and contours of these elements, using your reference image as a guide. Remember to observe how light interacts with the surfaces of the vacuum cleaner, as this will inform the shading and highlighting in the next steps.
As you add details, don’t be afraid to make adjustments to your initial sketch. Drawing is a process of refinement, and it’s natural to make changes as you progress. Use your eraser to correct any mistakes or to fine-tune the proportions of the various components.
By the end of this step, your drawing should begin to resemble a realistic representation of a vacuum cleaner, complete with all the intricate details that make it recognizable. Once you’re satisfied with the level of detail, you can move on to the next stage of adding shadows and highlights to create depth and dimension in your drawing.
When drawing a vacuum cleaner, start by sketching the basic shape of the body and handle. Then, add details like the power switch, hose, and attachments to make it look realistic.
Step 3: Adding Shadows and Highlights
Adding shadows and highlights is a crucial step in creating a three-dimensional and realistic representation of the vacuum cleaner. This stage will bring depth and dimension to your drawing, making it appear more lifelike and dynamic.
Begin by identifying a consistent light source in your drawing. This will determine where the shadows and highlights fall on the vacuum cleaner. Use a reference image or imagine a light source, such as a lamp or window, casting light onto the appliance from a specific direction.
With the light source in mind, use a softer pencil, such as a 4B or 6B, to carefully shade the areas of the vacuum cleaner that would be in shadow. Pay attention to the contours and shapes of the appliance, and gradually build up the darkness of the shadows using hatching or cross-hatching techniques.
Conversely, use an eraser to gently lighten areas that would catch the most light, such as the top surfaces and edges of the appliance. This creates the effect of highlights and adds a sense of realism to your drawing. Take your time to observe how light interacts with the different surfaces of the vacuum cleaner, and adjust the shading and highlights accordingly.
As you work on adding shadows and highlights, consider the texture of the surfaces. For example, if the vacuum cleaner has a glossy or metallic finish, the highlights will be sharper and more pronounced. On the other hand, if the surface is matte or textured, the highlights will be softer and more diffused.
By the end of this step, your vacuum cleaner drawing should have a sense of volume and form, with shadows and highlights enhancing its three-dimensional appearance. Once you’re satisfied with the shading and highlights, you can move on to the final touches and details that will complete your drawing.
Read more: How To Choose A Vacuum Cleaner
Step 4: Final Touches and Details
As you approach the final stage of your vacuum cleaner drawing, it’s time to add the finishing touches that will elevate your artwork to a polished and professional level. This step involves refining the details, adjusting any remaining elements, and ensuring that your drawing is cohesive and visually striking.
Start by reviewing the overall composition of your drawing. Pay attention to the proportions, angles, and relationships between the various components of the vacuum cleaner. Make any necessary adjustments to ensure that the drawing accurately reflects the appearance of the appliance in your reference image.
Next, take a moment to assess the level of detail in your drawing. Are there any additional features or textures that could be added to enhance the realism of the vacuum cleaner? Consider small details such as screws, logos, or subtle variations in surface texture that can contribute to the overall authenticity of your artwork.
Once you’re satisfied with the details, consider the overall tonal balance of your drawing. Are there areas that require additional shading or highlights to create a sense of depth and contrast? Use your pencil and eraser to refine the shadows and highlights, ensuring that they contribute to the overall visual impact of your drawing.
Finally, take a step back and observe your drawing as a whole. Consider the overall impression it conveys and the level of realism you’ve achieved. If there are any remaining adjustments or refinements to be made, now is the time to address them before considering your drawing complete.
By the end of this step, your vacuum cleaner drawing should be a well-executed and detailed representation of the appliance, complete with shadows, highlights, and intricate details. With the final touches in place, you can step back and admire your finished artwork, knowing that you’ve successfully brought a common household object to life through the power of drawing.
Conclusion
Congratulations on completing the journey of drawing a realistic vacuum cleaner! Through the step-by-step process outlined in this tutorial, you’ve gained valuable insights into the techniques and skills required to bring everyday objects to life on paper.
As you reflect on your drawing experience, remember that artistic expression is a continual learning process. Each stroke of the pencil, each shadow, and each detail contributes to your growth as an artist. Embrace the journey of creativity and allow yourself the freedom to experiment and refine your skills with each drawing you undertake.
By mastering the art of drawing a vacuum cleaner, you’ve honed your ability to observe, sketch, shade, and add intricate details to your artwork. These skills are transferable to a wide range of subjects, allowing you to tackle new drawing challenges with confidence and creativity.
Whether you’re a beginner exploring the world of drawing or an experienced artist seeking new inspiration, the process of drawing a vacuum cleaner serves as a reminder of the power of creativity and observation. Everyday objects can become sources of artistic inspiration, and through drawing, you have the opportunity to capture their essence and beauty on paper.
As you continue your artistic journey, remember to explore new subjects, experiment with different techniques, and most importantly, enjoy the process of creating. Drawing is a form of self-expression and a means of connecting with the world around you. Let your creativity flow freely, and let each drawing be a testament to your unique perspective and artistic vision.
So, pick up your pencils, find new subjects to draw, and continue to explore the limitless possibilities of artistic expression. The world is your canvas, and with each drawing, you have the opportunity to create something truly extraordinary.
Frequently Asked Questions about How To Draw A Vacuum Cleaner
Was this page helpful?
At Storables.com, we guarantee accurate and reliable information. Our content, validated by Expert Board Contributors, is crafted following stringent Editorial Policies. We're committed to providing you with well-researched, expert-backed insights for all your informational needs.


0 thoughts on “How To Draw A Vacuum Cleaner”