Articles
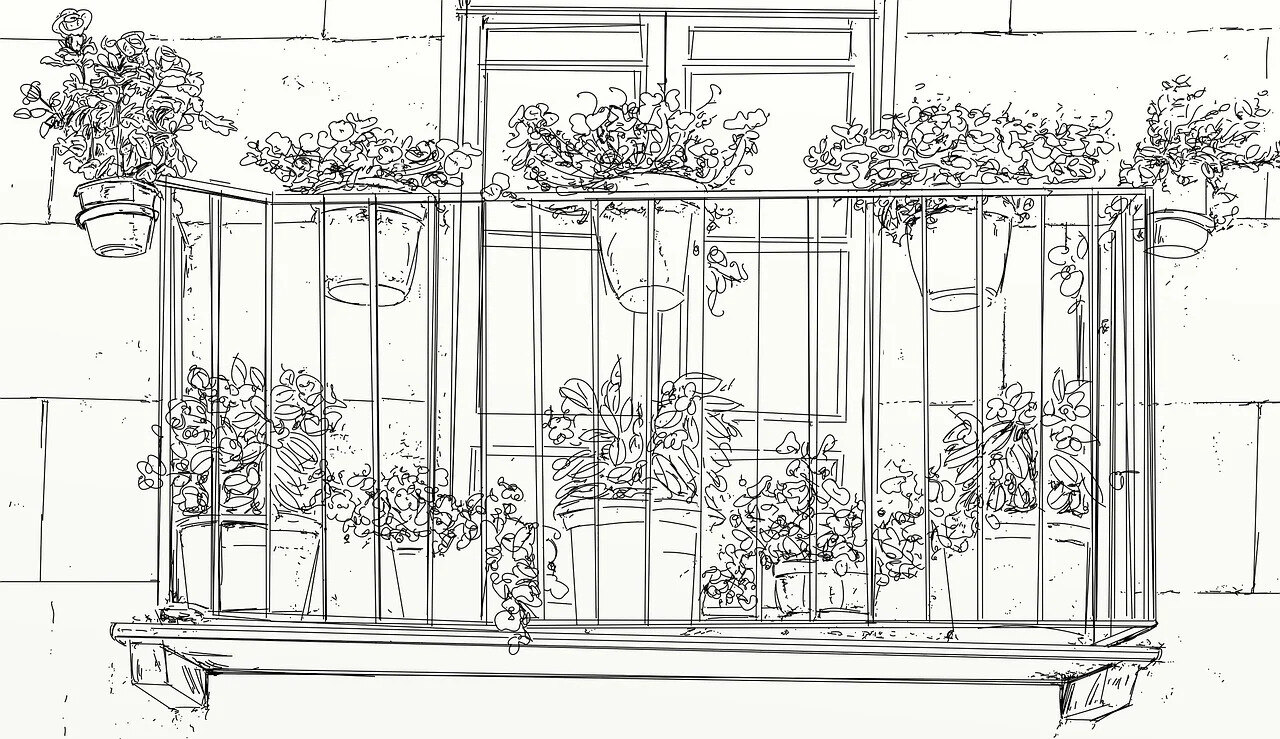
How To Draw A Balcony
Modified: May 6, 2024
Learn how to draw a stunning balcony with this step-by-step guide. Explore articles on balcony design, tips, and techniques to create your dream outdoor space.
(Many of the links in this article redirect to a specific reviewed product. Your purchase of these products through affiliate links helps to generate commission for Storables.com, at no extra cost. Learn more)
Introduction
Welcome to the world of drawing! In this tutorial, we will explore how to draw a balcony, a beautiful architectural feature that adds charm to any building. Whether you’re an artist looking to expand your skills or a beginner seeking a creative outlet, this step-by-step guide will help you create a stunning balcony drawing.
Creating a realistic and detailed balcony drawing may seem challenging at first, but with the right techniques and a little practice, you’ll be able to bring this architectural element to life on paper. So, let’s gather our materials and get started!
Key Takeaways:
- Elevate your drawing skills by learning to create stunning balcony drawings with detailed railings, intricate decorations, and realistic shading techniques. Embrace the joy of artistic expression and continuous growth in your creative journey.
- Master the art of balcony drawing through step-by-step guidance, valuable tips, and the freedom to experiment with different styles and mediums. Unleash your creativity and capture the architectural beauty of balconies with confidence and joy.
Read more: How To Draw A Garden
Materials Needed
Before we begin, make sure you have the following materials ready:
- Pencil: You’ll need a variety of pencils, including a hard pencil (like an H or 2H) for lighter lines and shading, and a softer pencil (like a 2B or 4B) for darker lines and finer details.
- Eraser: A good quality eraser is essential for making corrections and removing any unwanted lines.
- Sketch paper: Choose a smooth and sturdy sketch paper that can handle multiple erasures and shading.
- Ruler: A ruler will help you create straight lines and accurate proportions.
- Reference image: Find a photo or reference image of a balcony to guide you in drawing the details accurately.
Once you have these materials ready, you’re all set to start your balcony drawing!
Step 1: Drawing the Basic Shape
Now that you have your materials ready, let’s begin by sketching the basic shape of the balcony. Start by lightly holding your pencil and using light, smooth strokes.
Begin by drawing a horizontal line for the base of the balcony. This will be the line on which the balcony will rest. Make sure the line is straight and level.
Next, draw two vertical lines extending upwards from the ends of the base line. These lines will serve as the sides of the balcony. Ensure that the height of the two lines is proportional and equal.
Now, connect the top ends of the vertical lines with a straight horizontal line. This line will form the top of the balcony.
Once you have drawn this basic shape, you can adjust the dimensions and proportions as needed. Use your ruler if necessary to ensure accuracy and straight lines.
Remember to keep your lines light and easily erasable at this stage, as they will serve as guide lines for adding details later on.
With the basic shape of the balcony in place, you are ready to move on to the next step – adding the railings!
Step 2: Adding the Railings
Now that you have the basic shape of the balcony drawn, it’s time to add the railings that will surround it.
Start by drawing vertical lines at regular intervals along the top edge of the balcony. These lines will serve as the posts or pillars of the railing.
Next, connect the top ends of the vertical lines with a horizontal line. This will form the top rail of the balcony railing.
Now, draw another horizontal line slightly below the top rail, parallel to it. This will form the bottom rail of the balcony railing.
To create the vertical bars of the railing, draw evenly spaced vertical lines connecting the top and bottom rails. Make sure these lines are straight and parallel to each other. The spacing between the bars can vary depending on the style and design of the balcony.
Once you have drawn the railing bars, you can add more details to enhance the design. For example, you can draw decorative patterns or motifs on the posts or along the top rail of the balcony.
Remember to use light and gentle strokes for the railings, as they should appear delicate and elegant. Use your reference image as a guide to ensure accuracy and authenticity.
With the railings added, your balcony is starting to take shape! In the next step, we will add more details and decorations to make it even more visually appealing.
Step 3: Adding Details and Decorations
Now that you have the basic structure of the balcony and the railings in place, it’s time to add details and decorations to make it visually appealing and unique.
Start by adding intricate designs to the pillars or posts of the balcony. You can draw patterns, carvings, or any decorative elements that you want to incorporate. Take your time and pay attention to the details, as these will enhance the overall look of the balcony.
Next, add more decorative elements to the top rail of the balcony. You can draw floral motifs, scrollwork, or any other design that matches the style you envision. Feel free to get creative and add your own personal touch.
Consider adding architectural details such as arches, columns, or brackets to the balcony. These elements can add depth and visual interest to your drawing.
Furthermore, you can include additional features like potted plants, hanging baskets, or even a small table and chairs on the balcony. These details will bring the balcony to life and make it feel more realistic.
Remember to refer to your reference image for inspiration and guidance when adding the smaller details and decorations. It’s important to maintain a balance between simplicity and complexity to create a visually appealing composition.
With the details and decorations added, your balcony drawing is truly starting to come alive! In the next step, we will explore shading and texturing techniques to add depth and dimension to the drawing.
When drawing a balcony, start by sketching the basic shape and then add details such as railings, plants, and furniture to bring it to life. Pay attention to perspective to create a realistic look.
Read more: How To Soundproof A Balcony
Step 4: Shading and Texturing
Shading and texturing are essential in adding depth and dimension to your balcony drawing. They help create the illusion of light and shadow, making your drawing appear more realistic and three-dimensional.
To begin, identify the direction of the light source in your reference image. This will determine where the shadows and highlights should fall on the balcony and its surroundings.
Start by shading the areas of the balcony that are in shadow. Use a softer pencil (like a 2B or 4B) to create darker tones. Apply more pressure on the pencil to achieve a deeper shade, and use light, hatching or cross-hatching strokes to fill in the areas.
Next, use a blending tool or your finger to smudge and blend the shaded areas. This will help create a smoother transition between the light and shadow, giving a more realistic appearance.
Now, focus on the areas that receive direct light. Use a lighter pencil (like an H or HB) to add lighter tones and highlights. Apply less pressure on the pencil to achieve a lighter shade, and use gentle, feathery strokes to create a smooth texture.
Continue to build up the shading and texturing by layering different tones and using varying degrees of pressure on the pencil. This will add depth and dimension to your drawing.
Don’t forget to shade the railings, posts, and any other decorative elements on the balcony. Pay attention to the way light and shadow would interact with these elements to make them appear more realistic.
Finally, use a kneaded eraser to add highlights and to lighten areas that need to appear brighter. This will further enhance the contrast and make your drawing pop.
With shading and texturing complete, your balcony drawing now has depth and dimension. It’s time to move on to the final touches and finishing details!
Step 5: Final Touches and Finishing
In this final step, we will add the finishing touches to your balcony drawing, refining the details and making any necessary adjustments.
Start by evaluating your drawing as a whole. Look for any areas where the lines may need to be cleaned up or smudges that need to be erased. Make any necessary adjustments to ensure a clean and polished appearance.
Next, take a step back and assess the overall composition. Are there any areas that feel unbalanced or lacking in detail? Use your reference image as a guide to ensure accuracy and completeness.
Consider adding additional elements to further enhance the scene. This could include adding surrounding buildings, a landscape or cityscape in the background, or even people enjoying the balcony. These elements will add context and make your drawing more immersive.
Now, pay attention to the finer details. Refine the patterns, textures, and decorations on the balcony, ensuring they are crisp and well-defined. Add any additional lines or shading to enhance the overall realism and impact.
At this stage, take the time to add any personal touches or artistic flourishes that you feel will elevate your drawing. Let your creativity shine through and make the drawing uniquely yours.
Lastly, give your drawing a final once-over to ensure it is clean and free of any smudges or unintended marks. Use your eraser as needed to make any necessary corrections.
With the final touches complete, step back and admire your beautiful balcony drawing! You have successfully captured the charm and elegance of this architectural feature.
Remember, drawing is a journey of learning and practice. Don’t be afraid to experiment and explore different techniques and styles to further develop your skills.
Congratulations on completing this tutorial! Now, showcase your artwork proudly and continue to hone your drawing abilities. Who knows, you may even be inspired to tackle more complex and challenging architectural drawings in the future!
Tips and Tricks
Here are some helpful tips and tricks to keep in mind as you embark on your balcony drawing:
- Study and observe real-life balconies: Take the time to observe different types of balconies in real life or through photographs. This will give you a better understanding of the various design elements and architectural details that you can incorporate into your drawing.
- Start with light and loose sketches: Begin with light and loose sketches to establish the basic shapes and proportions. This will allow you to make adjustments easily before committing to the final lines.
- Use reference images: Having a reference image is invaluable for capturing the details and nuances of a balcony accurately. It also helps to inspire and guide you throughout the drawing process.
- Practice shading techniques: Shading is crucial in creating depth and realism. Experiment with different shading techniques, such as hatching, cross-hatching, and stippling, to achieve the desired effects.
- Pay attention to perspective: Understand the concept of perspective and how it applies to your balcony drawing. This will help you create a realistic sense of depth and dimension.
- Take breaks and step back: It’s important to take breaks during your drawing process and step back to evaluate your work. This will give you a fresh perspective and help you identify areas that may need adjustments.
- Embrace mistakes as learning opportunities: Don’t be discouraged by mistakes or imperfections. Embrace them as opportunities to learn and grow as an artist. Use your eraser as a tool for refining your drawing and making necessary corrections.
- Experiment with different mediums: While this tutorial focuses on pencil drawing, don’t hesitate to explore other mediums, such as colored pencils or markers, to add more vibrancy and texture to your balcony drawing.
- Share and seek feedback: Don’t be afraid to share your drawing with others and seek constructive feedback. This will help you gain valuable insights and improve your skills.
- Enjoy the process: Drawing should be an enjoyable and creative journey. Allow yourself to have fun and appreciate the progress you make along the way.
Remember, practice makes perfect. With time and dedication, you’ll continue to refine your drawing skills and produce beautiful balcony drawings. So, keep exploring, experimenting, and creating!
Conclusion
Congratulations on completing this comprehensive guide on how to draw a balcony! Through the steps outlined in this tutorial, you’ve learned how to create the basic shape, add railings, incorporate details and decorations, apply shading and texturing techniques, and add final touches to bring your balcony drawing to life.
Drawing a balcony requires attention to detail, observation, and a keen eye for aesthetics. By practicing these skills, you’ll not only improve your artistic abilities but also develop a deeper appreciation for the architectural beauty that surrounds us.
Remember that this tutorial serves as a foundation for your exploration of balcony drawing. As you gain more experience, feel free to experiment with different styles, techniques, and mediums to further enhance your work.
Drawing is a journey of continuous growth and learning. Embrace challenges, learn from mistakes, and let your creativity shine through. With dedication and practice, you’ll be amazed at the progress you can make.
Lastly, don’t forget to have fun! Drawing is not only a means of self-expression but also a source of joy and relaxation. Use your balcony drawing as a way to explore your creativity and take pride in your accomplishments.
Now, grab your pencils, sketch paper, and reference images, and embark on your balcony drawing adventure. Let your imagination soar and create beautiful artworks that celebrate the elegance and charm of balconies in all their architectural splendor.
Now that you've mastered the art of balcony drawing, why not extend your creativity to your backyard? If transforming outdoor spaces sparks your interest, delve into our detailed guide on backyard landscaping ideas. This resource is brimming with innovative designs that ensure your garden area is not only visually appealing but also a haven of tranquility. Whether you're looking to add a water feature, a cozy fire pit, or lush plantings, our strategies will help you make the most out of every square inch. Ready to transform your outdoor area into a personal paradise? Let's get started!
Frequently Asked Questions about How To Draw A Balcony
Was this page helpful?
At Storables.com, we guarantee accurate and reliable information. Our content, validated by Expert Board Contributors, is crafted following stringent Editorial Policies. We're committed to providing you with well-researched, expert-backed insights for all your informational needs.


0 thoughts on “How To Draw A Balcony”