Home>Gardening & Outdoor>Outdoor Structures>How To Draw A Shed Plan

Outdoor Structures
How To Draw A Shed Plan
Modified: August 16, 2024
Learn how to draw a detailed shed plan for your outdoor structure with our step-by-step guide. Create the perfect blueprint for your shed project.
(Many of the links in this article redirect to a specific reviewed product. Your purchase of these products through affiliate links helps to generate commission for Storables.com, at no extra cost. Learn more)
Introduction
So, you've decided to build a shed, but you're not sure where to start. Well, the first step in this exciting journey is to create a comprehensive shed plan. A shed plan is like a roadmap that guides you through the entire construction process, ensuring that you have a clear vision of the project before you pick up a single tool. This crucial document not only helps you visualize the end result but also serves as a blueprint for the entire construction process.
Creating a shed plan may seem daunting at first, but with the right guidance and a bit of creativity, you can bring your vision to life. In this article, we'll walk you through the step-by-step process of drawing a shed plan, from understanding its purpose to finalizing the intricate details. By the end, you'll be equipped with the knowledge and confidence to embark on your shed-building endeavor with precision and clarity.
So, grab your pencil and paper, and let's dive into the art of drawing a shed plan!
Key Takeaways:
- Drawing a shed plan involves precise measurements, creative sketching, and detailed annotations. It serves as a roadmap for building a shed, combining imagination with practicality to bring your vision to life.
- Incorporating doors and windows strategically enhances the shed’s functionality and aesthetics. Finalizing the plan with meticulous review and feedback ensures a clear and comprehensive blueprint for construction.
Read more: How To Draw Plans For Woodworking
Understanding the Purpose of a Shed Plan
Before delving into the technical aspects of creating a shed plan, it’s essential to grasp the fundamental purpose it serves. Think of a shed plan as the architectural blueprint for your project. It provides a visual representation of the intended structure, incorporating vital details that are crucial for the construction process.
One of the primary functions of a shed plan is to serve as a guide for builders and contractors. By meticulously outlining the dimensions, layout, and structural elements of the shed, the plan ensures that everyone involved in the project is on the same page. This not only streamlines the construction process but also minimizes errors and misinterpretations.
Furthermore, a well-crafted shed plan acts as a communication tool. Whether you’re consulting with building authorities, seeking advice from experts, or collaborating with suppliers, the plan conveys vital information about the project. It enables stakeholders to visualize the end product and provides a clear understanding of the materials and resources required for the construction.
Besides its practical applications, a shed plan also serves as a creative outlet. It allows you to conceptualize and refine your ideas, exploring different design possibilities and configurations. By sketching out the layout, adding aesthetic details, and visualizing the finished shed, the plan becomes a canvas for your imagination, empowering you to bring your vision to life.
Ultimately, the purpose of a shed plan is to provide clarity, precision, and a tangible representation of your construction project. It encapsulates your vision, communicates essential details, and serves as a foundational tool for transforming your dream shed into a reality.
Gathering Necessary Tools and Materials
Before you embark on the journey of drawing a shed plan, it’s crucial to gather the essential tools and materials that will aid you in this creative endeavor. While the process primarily involves your imagination and a pencil, having the right tools at your disposal can significantly enhance the precision and detail of your plan.
First and foremost, you’ll need a reliable measuring tape. Accurate measurements form the backbone of a well-crafted shed plan, so investing in a high-quality measuring tape is imperative. Additionally, a sturdy ruler and a set square can assist in ensuring straight lines and precise angles, contributing to the professional finish of your plan.
Next, consider acquiring a sketching pad or graph paper. These provide a structured canvas for your plan, allowing you to maintain scale and proportion as you sketch the shed layout. Graph paper, in particular, can be instrumental in accurately representing the dimensions of the structure and its components.
A selection of pencils in varying lead grades, along with an eraser and sharpener, will enable you to create detailed and refined sketches. Different lead grades offer versatility, allowing you to emphasize different elements of the plan, while the eraser and sharpener ensure that your drawings remain precise and clean.
For those inclined towards digital tools, there are numerous software options available for creating detailed shed plans. From specialized CAD (Computer-Aided Design) software to user-friendly online planning tools, these digital resources offer a modern and efficient approach to visualizing your shed project.
Lastly, don’t forget to gather visual references and inspiration. Whether it’s architectural magazines, online galleries, or photographs of existing sheds, having visual stimuli can ignite your creativity and provide valuable insights for your own plan.
By assembling these tools and materials, you’ll be well-prepared to embark on the process of drawing a shed plan with confidence and precision.
Taking Accurate Measurements
With the necessary tools and materials at your disposal, it’s time to embark on the foundational step of drawing a shed plan: taking accurate measurements. Precision in measurement is paramount, as it forms the basis for the entire plan and directly influences the structural integrity and functionality of the shed.
Begin by surveying the location where the shed will be constructed. Take note of any existing structures, natural features, or potential obstructions that may impact the shed’s placement and design. Understanding the spatial context will inform your measurements and ensure that the plan aligns harmoniously with its surroundings.
Using a reliable measuring tape, carefully measure the dimensions of the area designated for the shed. Take into account the length, width, and any relevant height restrictions, such as overhead clearance. It’s essential to record these measurements accurately, as they will dictate the overall footprint and scale of the shed in your plan.
As you gather measurements, consider the terrain and topography of the site. If the ground is uneven or sloped, take precise elevation measurements to accurately represent the topographical features in your plan. This attention to detail will contribute to a comprehensive and realistic depiction of the shed’s intended location.
When measuring existing structures or features that will interact with the shed, such as adjacent buildings or trees, ensure that you capture their dimensions with precision. These details are vital for designing a shed that seamlessly integrates into its environment and complies with any spatial constraints.
Throughout the measurement process, maintain a meticulous record of all dimensions and observations. Organizing this data systematically will facilitate the subsequent stages of sketching and detailing the shed plan, ensuring that your vision is translated into a cohesive and accurate representation.
By prioritizing accuracy and thoroughness in your measurements, you’ll lay a solid foundation for the creation of a comprehensive and precise shed plan.
Sketching the Shed Layout
With precise measurements in hand, it’s time to unleash your creativity and translate the spatial vision of your shed into a tangible layout. Sketching the shed layout is an exhilarating stage where you can experiment with different configurations, explore design possibilities, and infuse your personal touch into the plan.
Begin by outlining the basic shape and footprint of the shed on your sketching pad or graph paper. Utilize the measurements you meticulously gathered to ensure that the proportions and dimensions accurately reflect the intended size of the structure. This foundational sketch forms the canvas upon which you’ll build the intricate details of the shed plan.
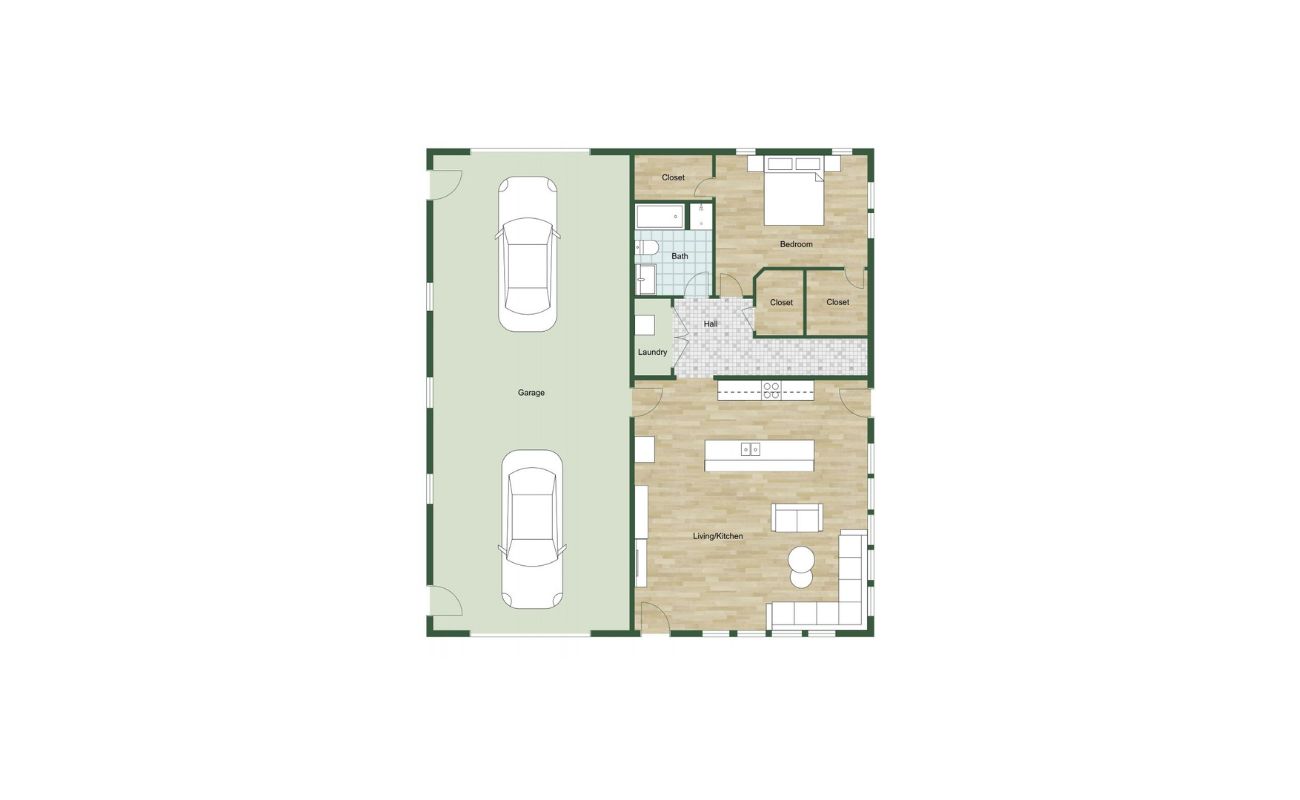
Consider the internal layout of the shed and how it aligns with your envisioned functionality. Sketch the placement of interior walls, storage areas, workspaces, or any specific features tailored to your needs. Visualizing the internal arrangement at this stage allows you to optimize the spatial design and ensure that the plan caters to your intended usage.
As you sketch, pay attention to the orientation of the shed in relation to sunlight and prevailing winds. Strategic placement of windows, doors, and ventilation openings can enhance natural light, airflow, and overall comfort within the shed. Visualizing these elements at the sketching stage lays the groundwork for a well-optimized and functional structure.
Embrace the freedom to experiment with aesthetic details and embellishments. Whether it’s decorative trim, roofing styles, or unique architectural features, sketching allows you to inject personality and character into the shed plan. This creative expression infuses the plan with individuality and sets the stage for a visually captivating end result.
Throughout the sketching process, don’t be afraid to iterate and refine your designs. Experiment with different layouts, explore alternative placements of doors and windows, and fine-tune the overall composition. Embracing this iterative approach can lead to breakthroughs and innovative solutions that elevate the quality of your shed plan.
By immersing yourself in the art of sketching the shed layout, you’ll breathe life into your vision, infuse it with creativity, and lay the groundwork for the detailed development of your plan.
When drawing a shed plan, start by measuring the area where the shed will be built. Then, sketch the layout including the walls, doors, and windows to scale. Don’t forget to include the roof design and any additional features like shelves or workbenches.
Read more: How To Draw An Evacuation Floor Plan
Adding Details and Dimensions
With the foundational layout sketched, it’s time to enrich your shed plan with intricate details and precise dimensions. This stage is pivotal in transforming the basic outline into a comprehensive and informative representation of the intended structure.
Start by adding detailed dimensions to your sketch. Ensure that all structural elements, such as walls, roof overhangs, and interior spaces, are accurately measured and represented. Clear and precise dimensions provide crucial guidance for the construction phase, ensuring that the actual build aligns with your envisioned plan.
As you add dimensions, consider incorporating annotations and labels to identify specific components of the shed. Labeling features such as doors, windows, and structural supports provides clarity and aids in conveying your design intent effectively. These annotations serve as a roadmap for builders and collaborators, elucidating the finer points of the shed plan.
Detail the exterior and interior features of the shed with precision. Include elements such as window sizes, door placements, and any external fixtures or embellishments. By capturing these details in your plan, you create a comprehensive visual guide that encapsulates the aesthetic and functional aspects of the shed.
Consider integrating sectional views or cross-section diagrams into your plan to illustrate the internal structure of the shed. These visual representations offer insights into the spatial organization and construction details, enhancing the plan’s comprehensiveness and communicative value.
Incorporate material specifications and construction notes where applicable. If you have specific material preferences for the shed’s cladding, roofing, or foundation, include these details in your plan. Additionally, jot down construction notes or considerations that may impact the building process, ensuring that these critical aspects are accounted for in the plan.
Throughout this phase, meticulous attention to detail is paramount. By enriching your shed plan with comprehensive dimensions, annotations, and detailed representations, you create a robust blueprint that conveys the intricacies of your design with clarity and precision.
Incorporating Doors and Windows
As you refine your shed plan, the strategic incorporation of doors and windows plays a pivotal role in enhancing both the functionality and aesthetics of the structure. Thoughtfully integrating these elements into your plan ensures that the shed is well-ventilated, well-lit, and seamlessly blends practicality with visual appeal.
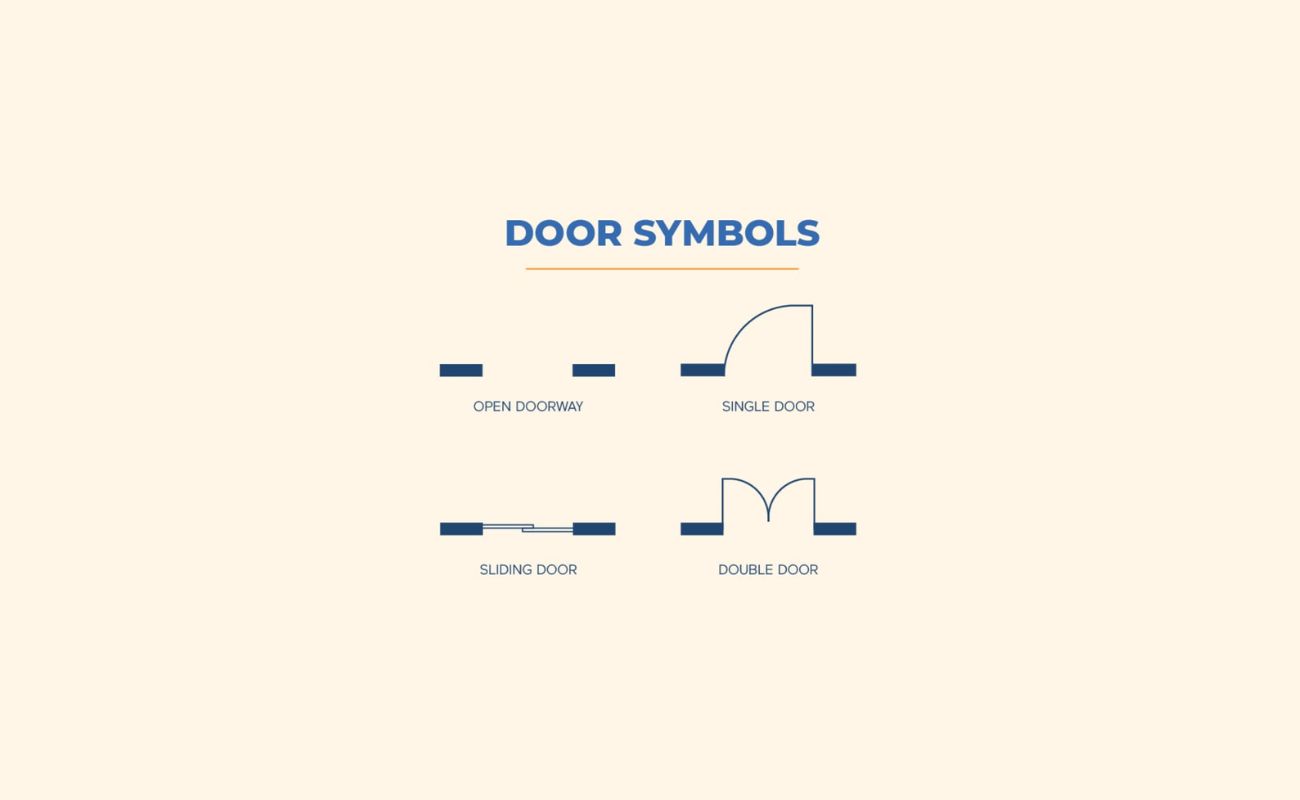
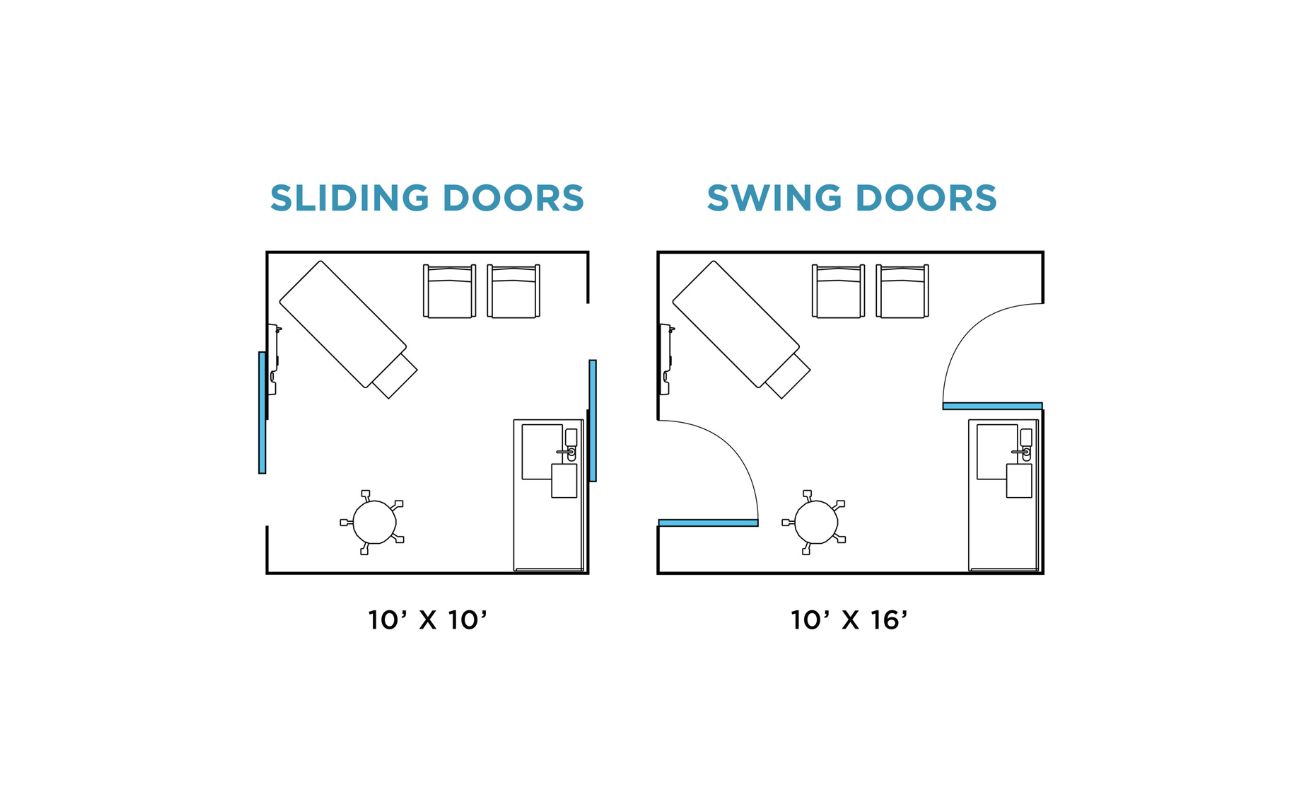
Begin by carefully considering the placement of doors within the shed layout. Evaluate the traffic flow and accessibility requirements to determine the optimal positioning of entry points. Whether it’s a single door or double doors, visualize how the door(s) will facilitate the movement of equipment, tools, and materials in and out of the shed.
When sketching the doors, pay attention to their swing direction and clearance. Incorporate these details into your plan to ensure that the doors open and close without obstruction, maximizing their functionality and usability within the shed’s layout.
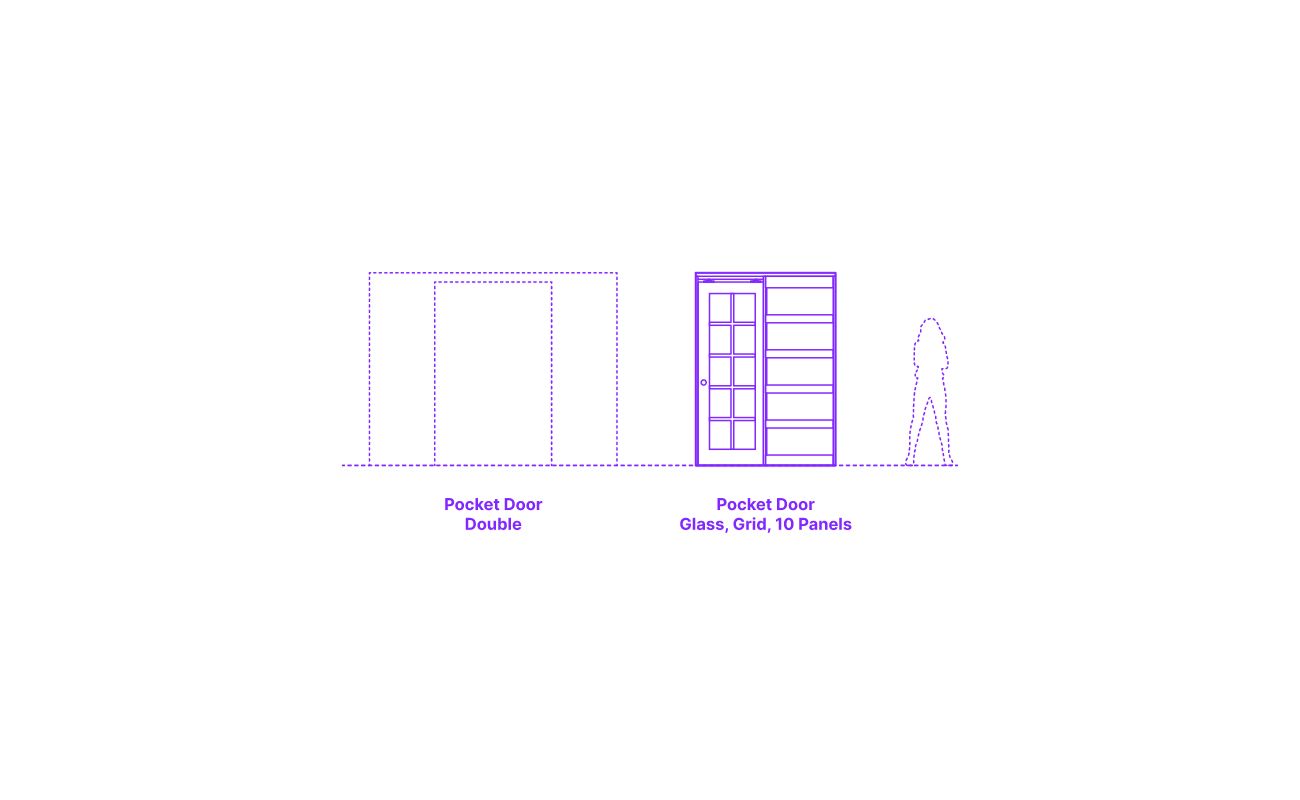
Similarly, the placement and sizing of windows are crucial considerations in your shed plan. Windows not only introduce natural light but also contribute to ventilation and the overall ambiance of the interior space. Sketch the windows in locations that optimize natural illumination and consider their alignment with prevailing views and aesthetics.
As you incorporate windows into the plan, consider their dimensions and the style of operation, whether they are fixed, sliding, or hinged. These details influence the shed’s energy efficiency, airflow, and visual character, making them integral components of the overall design.
Visualize how doors and windows interact with the shed’s exterior and interior. Consider their alignment with architectural features, such as rooflines and wall sections, to create a harmonious and balanced composition. Additionally, contemplate the potential for adding shutters, awnings, or decorative trims to enhance the visual appeal of these openings.
By thoughtfully integrating doors and windows into your shed plan, you elevate the functionality and aesthetics of the structure, ensuring that it harmoniously integrates with its surroundings and fulfills its intended purpose with finesse.
Finalizing the Shed Plan
As you approach the culmination of the shed planning process, it’s time to consolidate and refine the various elements into a cohesive and comprehensive blueprint. Finalizing the shed plan involves meticulous review, adjustments, and ensuring that the document encapsulates your vision with clarity and precision.
Begin by conducting a thorough review of the entire plan. Verify the accuracy of measurements, dimensions, and annotations, ensuring that every detail aligns with your intended design. This meticulous review serves as a quality assurance step, minimizing the potential for errors or oversights.
Consider seeking feedback from peers, professionals, or individuals with construction expertise. External perspectives can offer valuable insights and identify potential areas for improvement or refinement in your shed plan. Embracing constructive feedback enriches the plan and enhances its practicality and effectiveness.
Evaluate the plan’s communicative effectiveness. Assess whether the visual representations, annotations, and labels effectively convey the design intent and essential details to various stakeholders, including builders, suppliers, and regulatory authorities. Clarity and comprehensiveness are paramount in ensuring that the plan serves as a reliable guide throughout the construction process.
Incorporate any additional notes, considerations, or revisions that have emerged during the planning process. Whether it’s addressing structural requirements, material specifications, or regulatory compliance, ensure that these critical aspects are integrated into the final plan. This attention to detail fosters a holistic and well-informed document.
Consider the potential for creating multiple iterations or versions of the plan. Tailoring the shed plan to accommodate alternative design options or construction methods can provide flexibility and adaptability, catering to evolving project requirements or preferences.
Upon finalizing the shed plan, ensure that it is stored securely and accessible for reference throughout the construction journey. Whether in digital or physical format, safeguarding the plan preserves the culmination of your creative and technical efforts, serving as a guiding beacon as you bring your vision of the shed to fruition.
By meticulously finalizing the shed plan, you consolidate your creative vision, technical expertise, and practical considerations into a robust blueprint that sets the stage for a successful and fulfilling construction endeavor.
Conclusion
Congratulations! You’ve embarked on an enriching journey of creating a comprehensive shed plan, a vital precursor to the realization of your dream shed. Throughout this process, you’ve delved into the realms of imagination, precision, and practicality, weaving together a blueprint that encapsulates your vision with clarity and depth.
By understanding the purpose of a shed plan, you’ve recognized its role as a guiding beacon, a communication tool, and a canvas for creative expression. You’ve gathered the necessary tools and materials, equipping yourself to embark on the intricate and fulfilling task of drawing a shed plan with confidence and precision.
Embracing the art of taking accurate measurements, you’ve laid the foundation for a plan that harmoniously integrates with its surroundings and embodies meticulous attention to detail. As you ventured into sketching the shed layout, you’ve breathed life into your vision, infusing it with creativity, functionality, and personal flair.
Enriching your plan with intricate details and dimensions, you’ve meticulously sculpted a comprehensive blueprint that communicates the nuances of your design with precision and clarity. By thoughtfully incorporating doors and windows, you’ve elevated the functionality and aesthetics of the shed, ensuring that it seamlessly integrates with its environment and fulfills its intended purpose with finesse.
As you’ve approached the finalization of the shed plan, you’ve undergone a process of meticulous review, refinement, and consolidation, ensuring that the document stands as a testament to your creative vision and technical expertise. With the plan in hand, you stand poised to embark on the exciting journey of bringing your dream shed to life, armed with a clear roadmap and a tangible representation of your aspirations.
Remember, the shed plan is not merely a technical document; it’s a testament to your creativity, ingenuity, and dedication. It symbolizes the fusion of imagination and practicality, laying the groundwork for a structure that will not only serve a functional purpose but also stand as a testament to your vision and craftsmanship.
As you set forth on your shed-building endeavor, may the plan you’ve meticulously crafted serve as a steadfast guide, inspiring confidence, creativity, and a deep sense of accomplishment. Embrace the journey, cherish the process, and revel in the fulfillment of bringing your dream shed from the realm of imagination into the tangible world.
Frequently Asked Questions about How To Draw A Shed Plan
Was this page helpful?
At Storables.com, we guarantee accurate and reliable information. Our content, validated by Expert Board Contributors, is crafted following stringent Editorial Policies. We're committed to providing you with well-researched, expert-backed insights for all your informational needs.


0 thoughts on “How To Draw A Shed Plan”