Home>Interior Design>I Started Decanting My Food Goods And You Should Too
Interior Design
I Started Decanting My Food Goods And You Should Too
Modified: January 19, 2024
Discover the benefits of interior design with decanting food goods. Start organizing your kitchen and elevate your culinary experience.
(Many of the links in this article redirect to a specific reviewed product. Your purchase of these products through affiliate links helps to generate commission for Storables.com, at no extra cost. Learn more)
Introduction
Welcome to the world of decanting! In recent years, I have discovered the joy and practicality of decanting my food goods, and I must say, it has revolutionized the way I organize and enjoy my kitchen. Decanting is the process of transferring food items from their original packaging into airtight containers, creating a more visually appealing and organized pantry or countertop.
Why did I start decanting? Well, it all began with my love for interior design and my desire to create a beautiful and functional space in my kitchen. I realized that food packaging, with its different shapes, sizes, and colors, can often make a pantry look chaotic and cluttered. As an advocate for minimalism and simplicity, I wanted to find a way to maintain a clean aesthetic while still having easy access to my favorite pantry staples.
But decanting is not just about aesthetics. It also has numerous practical benefits. By transferring food goods into airtight containers, you can extend their shelf life and protect them from pests and moisture. It also allows for better portion control and easier identification of ingredients, which can streamline your meal preparation process.
Are you ready to join the decanting trend? In this article, we will explore the benefits of decanting, provide a step-by-step tutorial on how to decant your food goods, and offer tips for organizing and labeling your decanted items. By the end, you will understand why decanting is a game-changer in the world of interior design and kitchen organization.
Key Takeaways:
- Decanting your food goods not only brings beauty to your kitchen but also extends shelf life, simplifies meal prep, and promotes sustainability. It’s a game-changer for both organization and cooking experience.
- Choosing the right containers, organizing, and labeling your decanted items are crucial for a successful decanting process. With clear, consistent, and up-to-date labeling, you can maintain a visually pleasing and efficient pantry.
Why I started decanting my food goods
One day, as I was rummaging through my pantry in search of a particular ingredient, I realized how frustrating it was to find what I needed amidst the sea of mismatched food packages. Boxes, bags, and plastic containers were crammed together, making it difficult to see what I had and causing unnecessary clutter. That’s when I decided to take matters into my own hands and try decanting.
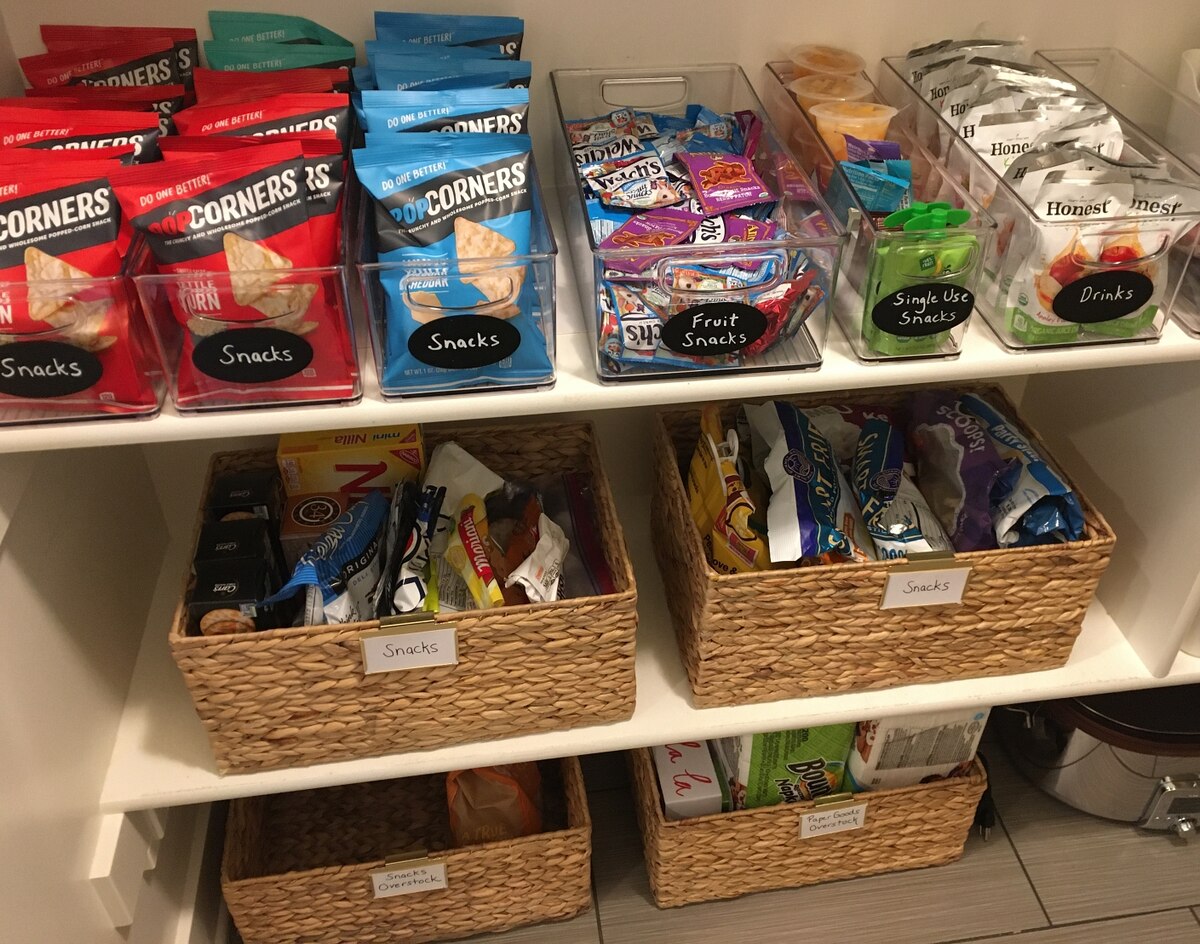
The first benefit of decanting that caught my attention was the visual appeal it brings to the kitchen. By transferring my food goods into clear, uniform containers, I instantly transformed my pantry into a beautifully organized space. The sleek and streamlined appearance not only made me feel more at ease but also gave me a sense of pride in my kitchen.
Moreover, decanting allows me to see exactly how much of each ingredient I have at a glance. No more half-empty bags of flour or forgotten cans at the back of the shelf. With everything neatly displayed in transparent containers, I can easily take inventory and plan my meals accordingly, minimizing waste and saving money.
Another advantage of decanting is the increased shelf life of my food goods. By sealing them in airtight containers, I can protect them from moisture, pests, and air exposure, which can accelerate spoilage. This means my ingredients stay fresh for longer, reducing the need for frequent restocking and saving me from throwing away food that has gone bad.
Not only does decanting improve the aesthetics and practicality of my kitchen, but it also enhances my overall cooking and baking experience. The process of decanting itself is therapeutic, allowing me to connect with my ingredients and appreciate their quality. I take pleasure in pouring rice, pasta, and spices into their designated containers, treating the process as a mindful ritual of gratitude for the nourishment these ingredients provide.
Once everything is decanted, the ease and efficiency of meal preparation become evident. No more struggling to open crumpled bags or searching for elusive spices buried in the pantry. With clear containers and labeled lids, I can quickly find what I need, measure ingredients accurately, and create delicious dishes without any unnecessary stress or wasted time.
Overall, I started decanting my food goods to bring order, beauty, and functionality to my kitchen. The benefits I discovered, such as visual appeal, extended shelf life, and improved cooking experience, have exceeded my expectations. So, if you’re looking to transform your kitchen and simplify your cooking routine, join me on this journey of decanting your food goods.
The Benefits of Decanting
Decanting your food goods goes beyond just creating a visually appealing pantry. It offers a range of benefits that can improve your cooking experience and help you maintain a more organized and efficient kitchen. Let’s explore some of the key advantages of decanting:
1. Visual Appeal and Organization
One of the most obvious benefits of decanting is the transformation it brings to your pantry or countertop. Clear, uniform containers create a clean and organized look, making it easy to locate ingredients at a glance. With everything neatly displayed, you’ll feel more motivated and inspired to cook and experiment with different recipes.
2. Extended Shelf Life
When you transfer your food goods into airtight containers, you create a barrier against moisture, pests, and air exposure. This helps to protect the ingredients and extend their shelf life. Your pantry staples, such as flour, sugar, and spices, will remain fresh for a longer period, reducing waste and saving you money in the long run.
3. Better Portion Control
Decanting allows you to have better control over portion sizes. Instead of struggling with resealing half-empty bags or boxes, you can measure out the exact amount you need for a recipe. This not only helps you avoid overuse or waste but also ensures consistent results in your dishes.
4. Easy Identification and Inventory Management
Transparent containers make it effortless to identify the contents and quantity of your ingredients. With a quick glance, you can see what you have and what needs restocking. This makes meal planning and grocery shopping more efficient, as you can easily create a shopping list based on what’s running low in your decanted containers.
5. Streamlined Meal Preparation
Decanting simplifies your cooking and baking process. No more fumbling with different-sized packages or searching for specific items hidden in the pantry. With labeled containers, everything is easily accessible and organized, saving you time and reducing stress in the kitchen.
6. Environmental Friendliness
By decanting your food goods, you can reduce your reliance on single-use packaging. Instead of buying new boxes, bags, or jars for every ingredient, you can invest in a few high-quality containers that can be reused over and over again. This small change can contribute to reducing plastic waste and promoting a more sustainable lifestyle.
In summary, decanting offers a range of benefits that go beyond just aesthetics. It enhances the organization of your kitchen, extends the shelf life of your ingredients, improves portion control, simplifies meal preparation, and even contributes to a more sustainable lifestyle. So, why not give it a try and experience these benefits for yourself?
Read more: When Should I Start Seeds Indoors
How to Choose the Right Containers for Decanting
When it comes to decanting your food goods, selecting the right containers is crucial. The ideal containers should be functional, durable, and aesthetically pleasing. Here are some factors to consider when choosing containers for decanting:
1. Airtightness
One of the main purposes of decanting is to protect your ingredients from moisture, pests, and air exposure. Therefore, it’s important to choose containers that have airtight seals. Look for containers with secure lids that create a tight seal when closed. This will help maintain the freshness and quality of your food goods.
2. Material
The material of the containers is another important consideration. Opt for food-safe materials such as glass, BPA-free plastic, or stainless steel. Glass containers are a popular choice as they are durable, non-reactive, and allow you to see the contents clearly. Plastic containers can be lightweight and shatterproof, but make sure they are labeled as BPA-free to avoid any potential health risks.
3. Size and Shape
Consider the size and shape of the containers based on the quantity and type of ingredients you plan to decant. Choose containers that can accommodate the volume of the food goods while leaving some extra space for easy scooping or pouring. Rectangular or square containers are great for maximizing storage space, while round or cylindrical containers can be more visually appealing.
Read more: What To Do If I Cut My Grass Too Short
4. Ease of Use
Look for containers that are easy to open and close, especially if you’ll be frequently accessing them during cooking or baking. Containers with hinged or snap-on lids are convenient and allow for effortless access. Additionally, consider containers that are stackable to optimize storage space and maintain a neat and organized pantry.
5. Labeling and Visibility
Clear containers are ideal for decanting, as they allow you to see the contents at a glance. This makes for easy identification and inventory management. However, if you choose containers that are not transparent, make sure they have a labeling option. Labels can be added directly to the containers or use removable labels that allow for easy changes and updates.
6. Style and Aesthetics
While functionality is key, don’t forget about the visual appeal of your containers. Choose containers that align with your personal style and the overall aesthetic of your kitchen. Consider cohesive colors, sleek designs, and matching sets to create a visually pleasing and harmonious pantry.
By considering these factors, you will be able to choose the right containers that meet your needs for decanting your food goods. Remember, the goal is to find containers that are practical, durable, and visually appealing, creating a functional and beautiful space in your kitchen.
Step-by-Step Tutorial for Decanting Your Food Goods
Decanting your food goods is a simple and satisfying process that can transform your pantry. Follow this step-by-step tutorial to learn how to decant your ingredients with ease:
Read more: Where Should I Place My Thermostat
Step 1: Gather Your Supplies
Before you begin, gather all the necessary supplies. This includes the food items you want to decant, airtight containers of your choice, labels or markers for labeling, a funnel (optional), and a clean workspace.
Step 2: Prepare the Containers
Ensure your containers are clean and dry before use. This will help maintain the freshness and cleanliness of your decanted food goods. If using new containers, wash them with warm soapy water and rinse thoroughly.
Step 3: Clear and Organize Your Workspace
Clear a clean space on your countertop or table where you can work comfortably. This will make the decanting process more efficient and enjoyable. Arrange your empty containers nearby for easy access.
Step 4: Transfer the Food Goods
Start by opening the original packaging of your food goods. Pour or transfer the contents into the appropriate containers. If the food has a pour spout, you can simply pour directly into the container. Otherwise, you can use a funnel for easy and mess-free transfer. Fill the containers to your desired level, leaving some space at the top for easy scooping or pouring.
Step 5: Label the Containers
Once you have filled the containers, it’s important to label them for easy identification. Use labels or markers to write the name of the ingredient or a specific date. You can also include any additional information such as cooking instructions or expiration dates. This will help you stay organized and ensure that you use the right ingredients at the right time.
Step 6: Arrange in Your Pantry
Now that your food goods are decanted and labeled, it’s time to arrange them in your pantry or on your countertop. Group similar items together to create a cohesive organization system. Consider organizing by categories such as grains, snacks, spices, or baking ingredients. This will make it easier to find what you need when you’re cooking or baking.
Step 7: Maintain and Update
Regularly check and update your decanted food goods. This includes keeping an eye on expiration dates and replenishing ingredients as needed. As you use ingredients, remember to clean and sanitize the containers before refilling to maintain freshness and cleanliness in your pantry.
By following these simple steps, you can successfully decant your food goods and create a beautifully organized pantry. Enjoy the benefits of easier access, extended shelf life, and a visually appealing kitchen space!
Tips for Organizing and Labeling Your Decanted Food Items
Once you have decanted your food goods, organizing and labeling them properly is key to maintaining an efficient and visually appealing pantry. Here are some tips to help you organize and label your decanted food items:
Read more: When Should I Plant My Garden
1. Categorize and Group Similar Items
Organize your decanted food items by grouping similar ingredients together. This makes it easier to locate items and maintain a systematic pantry layout. Consider categorizing by food types such as grains, cereals, snacks, baking ingredients, spices, or condiments. You could also group items based on frequency of use or cooking needs.
2. Utilize Shelf or Drawer Organizers
Make use of shelf organizers or drawer dividers to maximize space and create a tidy pantry. These organizers allow you to separate and categorize different food items, preventing them from getting mixed up. Use them to create designated sections for each food category, making it easier to find and access what you need.
3. Optimize Visibility with Clear Containers
Choose clear containers for decanting whenever possible. Clear containers allow you to see the contents at a glance, making it easier to identify ingredients and keep track of your pantry inventory. If you have non-transparent containers, consider affixing labels with a clear section so you can still get a glimpse of what’s inside.
4. Use Consistent Labeling System
Implement a consistent labeling system for all your decanted food items. Use legible and waterproof labels or markers to identify each container. Include the name of the ingredient and, if necessary, additional information such as expiration dates or cooking instructions. Ensure that labels are easily visible and won’t fade over time.
5. Invest in Labeling Tools
If you want a more polished look for your labels, consider investing in a label maker or printable labels. Label makers allow you to create clear and professional-looking labels with ease. Printable labels offer customization options and a wide range of templates to choose from. Whichever method you choose, ensure that the labels adhere securely to the containers.
6. Keep Labels Consistent and Up to Date
Maintain consistency with your labeling system by using the same font, size, and color for all your labels. Whenever you introduce a new ingredient or update information, make sure to update the labels. Regularly check for expired or stale items and dispose of them accordingly, updating the labels as necessary.
7. Rotate Items for Freshness
To ensure the freshness of your decanted food items, practice first-in, first-out rotation. Place newer items towards the back of your pantry or at the bottom of the stack, and consume older items first. This helps prevent forgotten or expired food items and ensures you use ingredients while they’re at their best quality.
With these tips, you can create a well-organized and neatly labeled pantry. Enjoy the ease of finding ingredients, maintaining freshness, and creating a visually pleasing kitchen space that enhances your cooking experience.
Potential Challenges and How to Overcome Them
While decanting your food goods can be a rewarding experience, it is important to be aware of potential challenges that may arise along the way. By understanding these challenges and implementing appropriate solutions, you can ensure a smooth and successful decanting process. Here are some common challenges and tips for overcoming them:
1. Limited Storage Space
One challenge you may face is limited storage space in your pantry or kitchen. When decanting, it’s important to consider the dimensions and capacities of your containers to optimize your available space. Consider using stackable containers or utilizing vertical storage solutions such as shelf dividers or hanging storage. Additionally, reassess your pantry items and declutter unnecessary or expired goods to free up space.
2. Remaining Product in Original Packaging
Sometimes, you may find it difficult to completely empty a product from its original packaging. To overcome this challenge, consider using small or oversized containers specifically for those partially used items. You can label these containers accordingly and place them in a designated section of your pantry. Alternatively, consider using clear resealable bags for items such as pastas or cereals that may not fit in your designated containers.
3. Maintaining Freshness and Shelf Life
Decanting can help extend the shelf life of your ingredients, but proper storage is essential for maintaining freshness. Ensure that your containers have airtight seals to protect against air, moisture, and pests. Store your decanted food goods in a cool, dry place away from direct sunlight. Additionally, consider using moisture-absorbing packets or oxygen absorbers to further preserve the freshness of your ingredients.
4. Keeping Track of Expiration Dates
With decanted items, it can be challenging to keep track of expiration dates, especially when the original packaging with the date is discarded. To overcome this challenge, make it a habit to label your containers with the date of decanting or the expiration date of the ingredient. Keep a list or note in your pantry to monitor dates and ensure that you use the oldest items first.
5. Maintenance and Cleaning
Maintaining a clean and organized pantry requires regular maintenance. As you use ingredients and empty containers, ensure that you clean them before refilling. Regularly wipe down your pantry shelves to remove any spills or debris. By incorporating these tasks into your routine, you can maintain the freshness and cleanliness of your pantry while preventing any potential buildup or contamination.
6. Resisting the Urge to Overbuy
Decanting can give you a sense of satisfaction and control over your pantry, but it’s important to resist the urge to overbuy ingredients. Avoid purchasing excessive quantities of items simply because they can be decanted. Shop intentionally and consider your actual needs to prevent food waste and clutter in your pantry. Regularly take inventory of your decanted goods to help you make informed grocery shopping decisions.
By proactively addressing these challenges, you can overcome any obstacles and enjoy the benefits of a well-organized and visually appealing pantry. Decanting your food goods will not only simplify your cooking routine but also enhance the overall aesthetic and functionality of your kitchen space.
Conclusion: Why You Should Start Decanting Your Food Goods
Decanting your food goods is more than just a trendy interior design concept; it is a practical and effective way to transform your kitchen and enhance your cooking experience. By transferring ingredients from their original packaging into airtight containers, you can reap a multitude of benefits that will elevate your pantry organization and simplify your meal preparation process.
First and foremost, decanting brings a sense of beauty and order to your kitchen. Clear and uniform containers create a visually appealing and clutter-free pantry. No more mismatched packaging or chaotic shelves – instead, you’ll have a well-organized space that is both functional and pleasing to the eye.
In addition to aesthetics, decanting also offers practical advantages. By protecting ingredients from moisture, pests, and air exposure, you can extend their shelf life and reduce waste. With airtight containers, you can store your food goods for longer periods without compromising their quality or flavor. This not only saves you money but also allows you to plan your meals more effectively, knowing that your ingredients are fresh and readily available.
The organization and visibility that decanting provides contribute to a streamlined cooking experience. Clear containers make it easy to identify ingredients at a glance, eliminating the time-consuming search for specific items. With labeled containers, you can quickly retrieve what you need and accurately measure portions, leading to more efficient and enjoyable cooking sessions.
Furthermore, decanting promotes mindful and sustainable living. By reducing reliance on single-use packaging, you can contribute to a more eco-friendly lifestyle. Investing in a few high-quality containers that can be reused not only reduces plastic waste but also adds a touch of elegance to your kitchen.
While some challenges may arise when decanting, such as limited storage space or the need to maintain freshness, these can be overcome with proper planning and organization. By incorporating simple strategies like using shelf organizers, regularly checking expiration dates, and resisting the urge to overbuy, you can maximize the benefits of decanting while minimizing any potential drawbacks.
In conclusion, decanting your food goods is a practical and visually appealing solution for organizing your kitchen and streamlining your cooking routine. With improved aesthetics, extended shelf life, easy ingredient identification, and a reduced environmental footprint, decanting offers an array of advantages that will enhance your overall culinary experience. So, why wait? Give decanting a try and unlock the potential of your pantry!
Frequently Asked Questions about I Started Decanting My Food Goods And You Should Too
Was this page helpful?
At Storables.com, we guarantee accurate and reliable information. Our content, validated by Expert Board Contributors, is crafted following stringent Editorial Policies. We're committed to providing you with well-researched, expert-backed insights for all your informational needs.


0 thoughts on “I Started Decanting My Food Goods And You Should Too”