Home>Interior Design>How To Fix A Running Toilet In 6 Simple Steps

Interior Design
How To Fix A Running Toilet In 6 Simple Steps
Modified: February 27, 2024
Learn how to fix a running toilet in 6 simple steps with our easy-to-follow guide. Get your interior design back on track with this DIY solution.
(Many of the links in this article redirect to a specific reviewed product. Your purchase of these products through affiliate links helps to generate commission for Storables.com, at no extra cost. Learn more)
Introduction
Having a running toilet can be a frustrating and costly problem. Not only does it waste water, but it can also lead to a high water bill if left unresolved. Thankfully, fixing a running toilet is not as complicated as it may seem and can be done with just a few simple steps.
In this article, we will guide you through the process of fixing a running toilet in six easy-to-follow steps. By following these steps, you will be able to diagnose the issue, make the necessary adjustments, and have your toilet working properly again in no time.
Before we begin, it’s important to note that while these steps will cover most common toilet issues, there may be more complex problems that require the expertise of a professional plumber. If at any point during the process you feel unsure or uncomfortable, it is always best to seek professional assistance.
Now, let’s get started on fixing that running toilet!
Key Takeaways:
- Easily fix a running toilet in 6 simple steps by following DIY troubleshooting techniques. Save water, prevent high bills, and restore proper functionality with basic adjustments and maintenance.
- Regularly inspect and maintain your toilet to prevent running toilet issues. Follow simple steps to diagnose and resolve problems, or seek professional assistance for more complex issues.
Read more: How To Fix A Running Toilet
Step 1: Turn off the water supply
The first step in fixing a running toilet is to turn off the water supply. This is an important precautionary measure to prevent any water damage or flooding while you work on the toilet.
To turn off the water supply, locate the shut-off valve, which is usually located on the wall behind or beside the toilet. It is typically a small lever or knob. Turn the lever or knob in a clockwise direction to shut off the water flow.
If you’re having trouble locating the shut-off valve for your specific toilet, you can also turn off the main water supply to your house. This will temporarily shut off the water to all the fixtures in your home, including the toilet.
Once the water supply is turned off, flush the toilet to drain any remaining water in the tank and bowl. This will make it easier to access the internal components of the toilet without the risk of water spillage.
Now that the water supply is turned off and the toilet is empty, we can move on to the next step in fixing the running toilet.
Step 2: Remove the tank lid
With the water supply turned off and the toilet flushed, it’s time to remove the tank lid. The tank lid is typically made of ceramic or plastic and sits on top of the toilet tank.
To remove the tank lid, gently lift it straight up and set it aside on a soft surface to avoid any potential damage. Be cautious as tank lids can be heavy and fragile.
Once the tank lid is removed, you will have a clear view of the inside of the toilet tank and its components. Take a moment to familiarize yourself with the different parts, as it will help you identify any potential issues later on.
It’s worth mentioning that some toilet models may have a two-piece tank and bowl configuration, where the tank is separate from the bowl. In such cases, you may need to remove the tank bolts or other attachments to fully separate the tank from the bowl.
Now that the tank lid is out of the way, we can proceed to the next step in diagnosing and fixing the running toilet.
Step 3: Check the flapper valve
The flapper valve is a crucial component of the toilet that controls the water flow from the tank into the bowl. A faulty or improperly functioning flapper valve is a common cause of a running toilet.
To check the flapper valve, start by inspecting its condition. Look for any signs of wear, damage, or debris that may be preventing it from creating a proper seal. If the flapper is damaged or deteriorated, it will need to be replaced.
If the flapper appears to be in good condition, the next step is to test its sealing ability. With clean hands, press down gently on the flapper to ensure it is properly seated over the flush valve opening at the bottom of the tank. Release it and observe if it returns to its original position, creating a tight seal.
If the flapper does not seal properly or if water continues to leak into the bowl, it may be necessary to adjust the chain connected to the flapper. The chain should have a slight amount of slack, allowing the flapper to fully close without being too taut or loose.
Furthermore, mineral deposits or sediment buildup around the flapper may also affect its sealing ability. In such cases, gently clean the flapper and the surrounding area to remove any obstructions. It is important to ensure that the flapper can move freely and create a proper seal.
Once you have checked and tested the flapper valve, you can move on to the next step in resolving the running toilet issue.
Check the flapper for damage or misalignment. If it’s not sealing properly, it can cause the toilet to run. Adjust or replace as needed.
Step 4: Adjust the water level
The water level in the toilet tank plays a vital role in the proper functioning of the toilet. If the water level is too high, it can cause constant running or overflowing. If it is too low, it may not provide enough water for a proper flush.
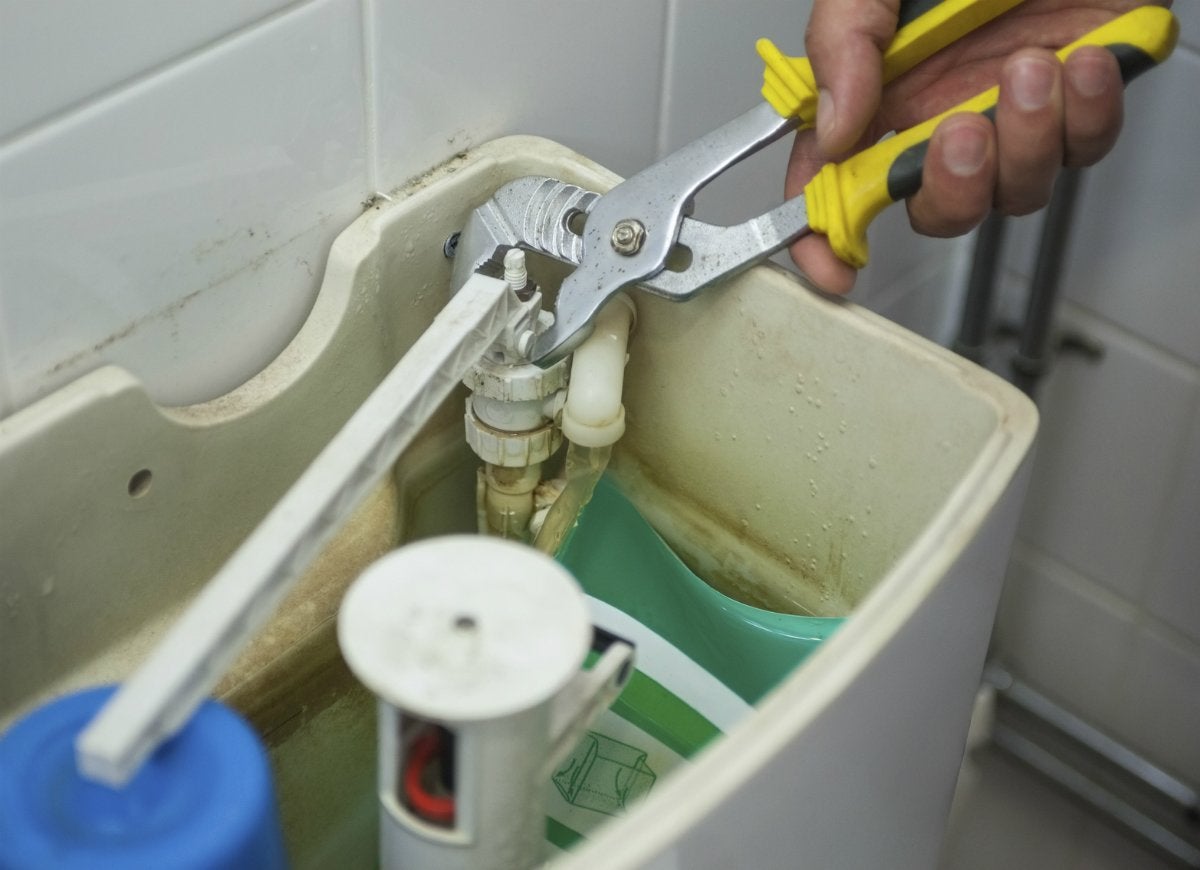
To adjust the water level, locate the fill valve inside the toilet tank. The fill valve is usually a tall mechanism with a float attached to it. This float determines the water level in the tank.
Start by locating the adjustment screw or rod on the fill valve. Turning this screw clockwise will lower the water level, while turning it counterclockwise will raise the water level. Adjust the screw slowly and carefully, making small changes at a time until the desired water level is reached.
It’s important to note that the ideal water level should be about half an inch below the top of the overflow tube. This allows for proper flushing without the risk of overflowing.
After making the adjustment, flush the toilet to check if the water level has been successfully modified. If necessary, continue to make minor adjustments until the water level is at the desired level.
Now that you have adjusted the water level, we can move on to the next step in troubleshooting the running toilet issue.
Step 5: Inspect the fill valve
The fill valve is responsible for regulating the water flow into the toilet tank after a flush. A faulty fill valve can cause a continuous flow of water, resulting in a running toilet. Inspecting and troubleshooting the fill valve can help resolve this issue.
Start by examining the fill valve for any visible signs of damage or wear. Look for cracks, leaks, or corrosion that may indicate a faulty valve. If you notice any such issues, it is recommended to replace the fill valve.
Next, check the float mechanism attached to the fill valve. The float should move freely up and down with the water level in the tank. If the float is stuck or damaged, it can disrupt the fill valve’s operation.
If the float is adjustable, ensure it is set to the correct position. The ideal position allows the float to rise and shut off the water flow just below the top of the overflow tube. Adjust the float if necessary, following the manufacturer’s instructions.
In some cases, debris or mineral deposits might clog the fill valve and impede proper water flow. To address this, turn off the water supply and remove the fill valve cap. Rinse the valve under running water to remove any obstructions. Reassemble the valve and turn the water supply back on.
After inspecting and troubleshooting the fill valve, the next step is to test for leaks and reassemble the toilet.
Step 6: Test for leaks and reassemble
After you have gone through the previous steps and made any necessary adjustments or replacements, it’s time to test the toilet for leaks and reassemble the components.
Start by turning the water supply back on and allowing the tank to fill. Make sure the fill valve is functioning properly and stops the water flow when the tank is full. Adjust the float if needed to ensure it shuts off the water at the appropriate level.
Once the tank is full, inspect the tank, bowl, and surrounding areas for any signs of leaks. Check around the base of the toilet, the connections, and the water supply line. If you notice any leaks, tighten the connections or replace any faulty parts.
Flush the toilet several times to ensure it is flushing properly and that the water stops running after each flush. Watch for any signs of water leaking into the bowl or any unusual noises or vibrations.
If everything seems to be functioning correctly and there are no leaks, it’s time to reassemble the tank lid. Carefully place the lid back onto the tank and ensure it is aligned properly. Gently press it down until it sits securely in place.
Finally, give the toilet one last flush to ensure everything is working as it should. Listen for any unusual sounds or running water and observe if the tank refills properly after each flush.
Congratulations! You have successfully fixed your running toilet. By following these steps and troubleshooting the different components, you have taken the necessary actions to resolve the issue.
It’s important to periodically check your toilet for any potential problems and address them promptly. Regular maintenance and quick repairs can help prevent further damage and save water and money in the long run.
If despite your best efforts the running toilet issue persists or if you encounter more complex problems, it is recommended to seek professional assistance from a licensed plumber.
Remember, with a little bit of knowledge and some simple steps, you can easily fix a running toilet and restore its proper functionality.
Conclusion
Fixing a running toilet may seem like a daunting task, but with a bit of knowledge and the right steps, it is a problem that can be easily solved. By following the six simple steps outlined in this article, you can diagnose and resolve the issue, saving water and preventing costly water bills.
Throughout the process, it is important to remember to turn off the water supply, remove the tank lid, check and adjust the flapper valve, adjust the water level, inspect the fill valve, and finally, test for leaks and reassemble the toilet.
Regularly checking and maintaining your toilet can prevent running toilet issues from occurring in the first place. It’s a good idea to perform routine inspections, clean the components, and address any potential problems as soon as they arise.
If you encounter more complex issues or feel uncomfortable with the tasks involved, it is always best to seek the help of a professional plumber. They have the expertise and tools to diagnose and fix the problem efficiently.
Remember, a properly functioning toilet not only saves water but also ensures a comfortable and hygienic bathroom experience. By taking the time to fix a running toilet, you are contributing to both environmental conservation and cost-saving measures.
We hope this article has provided you with valuable insights and guidance on how to fix a running toilet. By following the steps outlined, you can tackle this common household issue with confidence and success.
So go ahead, grab your tools, and let’s fix that running toilet together!
Frequently Asked Questions about How To Fix A Running Toilet In 6 Simple Steps
Was this page helpful?
At Storables.com, we guarantee accurate and reliable information. Our content, validated by Expert Board Contributors, is crafted following stringent Editorial Policies. We're committed to providing you with well-researched, expert-backed insights for all your informational needs.






0 thoughts on “How To Fix A Running Toilet In 6 Simple Steps”