Home>Maintenance & Safety>Child & Elderly Safety at Home>How To Make A Dog Booster Seat For The Car
Child & Elderly Safety at Home
How To Make A Dog Booster Seat For The Car
Modified: August 17, 2024
Learn how to create a safe and secure dog booster seat for your car, ensuring child and elderly safety at home. Follow our step-by-step guide for peace of mind on the road.
(Many of the links in this article redirect to a specific reviewed product. Your purchase of these products through affiliate links helps to generate commission for Storables.com, at no extra cost. Learn more)
Introduction
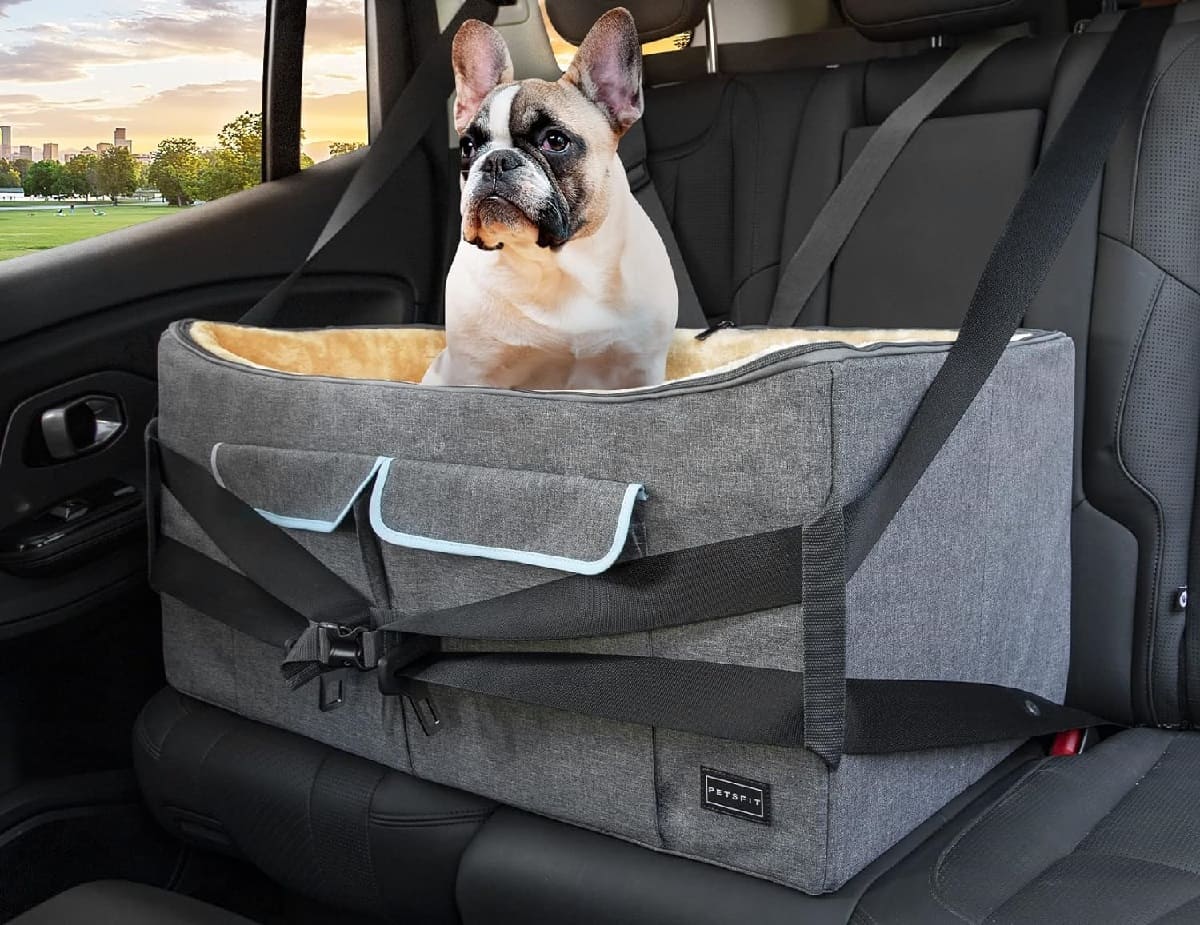
Ensuring the safety of our furry friends during car rides is a top priority for pet owners. Just like securing a child in a car seat, it's essential to provide a safe and comfortable space for our canine companions. While there are various commercial dog booster seats available, crafting a DIY dog booster seat for the car can be a rewarding and cost-effective alternative. By customizing a booster seat, you can tailor it to your dog's specific needs and ensure a snug fit in your vehicle.
Creating a homemade dog booster seat allows you to exercise creativity and resourcefulness while addressing the safety concerns associated with traveling with pets. Whether you have a small dog who enjoys a better view out the window or a larger breed who needs extra support during the journey, a DIY booster seat can be tailored to accommodate your pet's size and preferences.
In this guide, we'll walk through the step-by-step process of crafting a dog booster seat for the car using readily available materials. By following these instructions, you can provide your furry friend with a secure and comfortable spot to enjoy car rides while giving yourself peace of mind knowing that your pet is safe and content. Let's gather the necessary materials and embark on this creative and practical DIY project to ensure the safety and happiness of our beloved canine companions.
Key Takeaways:
- Create a custom dog booster seat for car safety and comfort. Tailor the seat to your dog’s needs with foam padding, durable fabric, and secure straps. Enjoy safe and happy travels with your furry friend!
- DIY dog booster seat enhances pet safety and happiness. Craft a personalized seat with foam, fabric, and straps for secure car rides. Show love and care by providing a safe and comfy travel space for your loyal companion!
Read more: How To Turn A Car Seat Into A Booster Seat
Materials Needed
To embark on this DIY project and create a safe and cozy booster seat for your dog, you'll need a few essential materials. These items are readily available and can be easily sourced from craft stores, fabric shops, or online retailers. Here's a comprehensive list of the materials required to craft a homemade dog booster seat for the car:
-
Foam Padding: Select a high-density foam padding that provides ample support and comfort for your dog. The foam should be thick enough to elevate your pet, allowing them to have a clear view out of the car window while ensuring a stable and secure seating area.
-
Durable Fabric: Choose a durable and easy-to-clean fabric for the cover of the booster seat. Consider materials such as canvas, nylon, or polyester that can withstand wear and tear while being resistant to stains and odors.
-
Sewing Supplies: Gather essential sewing supplies, including a sewing machine, thread, needles, and scissors. These tools will be instrumental in crafting a tailored fabric cover for the foam padding.
-
Heavy-Duty Straps: Acquire heavy-duty straps or webbing to secure the booster seat to the car seat. These straps should be strong and adjustable, ensuring a snug and stable fit within the vehicle.
-
Buckles or Clips: Obtain buckles or clips that will allow for easy attachment and removal of the booster seat from the car seat. Opt for secure and reliable fastening mechanisms to ensure the booster seat remains in place during travel.
-
Measuring Tape and Marker: Have a measuring tape and marker on hand to accurately measure and cut the foam padding to the desired dimensions.
-
Safety Harness (Optional): If desired, consider incorporating a safety harness attachment within the booster seat to secure your dog during car rides. This additional feature can provide extra peace of mind, especially for smaller or more energetic dogs.
By gathering these materials, you'll be well-equipped to commence the construction of a custom dog booster seat for your car. With these supplies in hand, you can proceed to the next steps and bring this DIY project to life, ensuring a safe and enjoyable traveling experience for your beloved canine companion.
Step 1: Measure and Cut the Foam
The first crucial step in creating a homemade dog booster seat for the car is to measure and cut the foam padding to the desired dimensions. This process ensures that the booster seat provides adequate elevation and support for your canine companion while fitting seamlessly within your vehicle.
Begin by measuring the dimensions of your car's back seat to determine the appropriate size for the booster seat. Use a measuring tape to accurately assess the width and depth of the seating area, taking into account any contours or irregularities in the seat's surface. Once you have obtained these measurements, transfer them to the foam padding using a marker or chalk, outlining the shape of the booster seat.
Next, carefully cut the foam padding along the marked lines, ensuring precision and accuracy to achieve the desired shape. A sharp utility knife or electric carving knife can be used to cleanly cut through the foam, resulting in smooth and even edges. Take care to maintain the integrity of the foam while cutting, as a well-defined shape will contribute to the stability and comfort of the booster seat.
When cutting the foam, consider the height at which you want your dog to sit within the car. For smaller breeds, a lower elevation may be sufficient, while larger dogs may benefit from a higher vantage point. Additionally, factor in the thickness of the foam to provide ample cushioning for your pet without compromising stability.
As you complete the cutting process, inspect the foam padding to ensure that it aligns with the intended dimensions and contours of the car seat. Make any necessary adjustments to achieve a precise fit, as the accuracy of the foam's shape will directly impact the functionality and safety of the booster seat.
By meticulously measuring and cutting the foam padding to fit your car's back seat, you lay the foundation for a tailored and secure booster seat that caters to your dog's comfort and safety needs. With this pivotal step accomplished, you are ready to proceed to the next phase of crafting the fabric cover for the booster seat, bringing you one step closer to providing your canine companion with a personalized and secure travel space.
Step 2: Sew the Fabric Cover
With the foam padding cut to the appropriate dimensions, the next step in creating a DIY dog booster seat for the car involves crafting a fabric cover to encase the foam and provide a durable and visually appealing surface for your pet to sit on. Sewing the fabric cover requires attention to detail and precision to ensure a snug fit and a professional finish.
Begin by laying out the chosen fabric on a flat surface, ensuring that it is free from wrinkles or creases. Place the foam padding on top of the fabric, allowing for sufficient excess material around the edges to accommodate the sewing process. Carefully wrap the fabric around the foam, securing it in place with pins to maintain a tight and uniform fit.
Using a sewing machine equipped with a heavy-duty needle, stitch along the edges of the fabric to create a secure seam. It is essential to reinforce the stitching to withstand the weight and movement of your dog while ensuring that the fabric cover remains intact over time. As you sew, pay attention to the tension of the fabric to prevent any puckering or unevenness in the cover.
Once the main seams are sewn, trim any excess fabric to achieve a clean and tailored appearance. Consider adding additional reinforcement stitching at stress points to enhance the durability of the cover, especially along the edges and corners. This extra reinforcement will contribute to the longevity of the fabric cover, ensuring that it withstands the wear and tear of regular use.
After sewing the fabric cover, turn it inside out to reveal the smooth and finished surface that will encase the foam padding. Inspect the cover for any loose threads or imperfections, addressing them promptly to achieve a polished and professional result. The fabric cover should fit snugly around the foam, providing a sleek and secure exterior for the booster seat.
By sewing a custom fabric cover for the foam padding, you have taken a significant stride in creating a personalized and functional dog booster seat for the car. The tailored cover not only enhances the aesthetics of the booster seat but also contributes to its durability and comfort. With the fabric cover in place, you are now prepared to proceed to the next steps of attaching the straps and securing the booster seat within the car, bringing you closer to providing your canine companion with a safe and enjoyable travel experience.
When making a dog booster seat for the car, make sure to use sturdy and durable materials that can support your dog’s weight and keep them secure during the ride.
Step 3: Attach the Straps
Attaching durable and adjustable straps to the dog booster seat is a crucial step in ensuring its stability and security within the car. These straps will not only hold the booster seat in place but also provide a reliable connection to the vehicle's seat, preventing any movement or displacement during travel.
Begin by positioning the booster seat in the desired location on the car seat, ensuring that it is centered and aligned with the seat's contours. Identify the optimal anchor points for the straps, typically located at the back and bottom of the car seat. These anchor points should be sturdy and capable of supporting the weight and movement of the booster seat.
Next, measure and cut the heavy-duty straps to the appropriate lengths, allowing for ample adjustability to accommodate different car seat sizes and configurations. It is essential to use high-quality straps that can withstand tension and movement without compromising their integrity.
Once the straps are cut to size, securely attach them to the underside of the booster seat, ensuring that they are evenly spaced and firmly anchored. Depending on the design of the booster seat, you may opt to sew the straps directly onto the fabric cover or use heavy-duty adhesive to affix them to the foam padding.
After attaching the straps to the booster seat, fasten the buckles or clips to the ends of the straps, creating a secure closure mechanism that will facilitate easy installation and removal of the booster seat. Test the buckles or clips to ensure that they fasten and release smoothly, allowing for convenient adjustment and repositioning of the booster seat as needed.
With the straps securely attached and equipped with reliable fastening mechanisms, proceed to position the booster seat on the car seat, aligning the straps with the identified anchor points. Adjust the straps to achieve a snug and stable fit, ensuring that the booster seat remains firmly in place without any excessive movement or shifting.
Once the straps are properly secured, test the stability of the booster seat by gently applying pressure and simulating the movements that may occur during car rides. Verify that the booster seat remains steady and anchored, providing a safe and comfortable space for your dog to enjoy the journey.
By attaching durable and adjustable straps to the dog booster seat, you have fortified its stability and safety within the car, creating a reliable and secure seating area for your canine companion. With the straps in place, you are now prepared to proceed to the final step of securing the booster seat within the car, bringing you closer to providing your beloved pet with a personalized and safe travel environment.
Read more: How To Anchor A Booster Seat
Step 4: Secure the Booster Seat in the Car
Securing the booster seat in the car is the final and pivotal step in ensuring the safety and stability of your canine companion during car rides. By properly anchoring the booster seat, you provide a secure and designated space for your dog, minimizing the risk of movement or displacement while enhancing their comfort and overall travel experience.
To begin, position the booster seat on the car seat, aligning it with the previously identified anchor points for the straps. Ensure that the booster seat is centered and securely placed within the confines of the car seat, allowing for ample space for your dog to sit and move comfortably.
Once the booster seat is in position, fasten the straps to the anchor points, adjusting them to achieve a snug and stable fit. Test the tension and security of the straps, verifying that they can support the weight of the booster seat and your dog without any excessive movement or slack.
As you secure the booster seat, consider the visibility and accessibility for your dog. If your pet enjoys looking out of the window during car rides, ensure that the booster seat provides an unobstructed view while maintaining a safe and contained space. Additionally, assess the ease of entry and exit for your dog, allowing them to comfortably settle into the booster seat without any obstacles or challenges.
Once the straps are securely fastened and adjusted, perform a thorough inspection of the booster seat to confirm its stability and safety. Gently apply pressure and simulate the movements that may occur during car rides, ensuring that the booster seat remains firmly anchored and immobile.
As a final precaution, enlist the assistance of a friend or family member to observe the booster seat from outside the car while you simulate driving conditions. This external perspective can provide valuable insights into the stability and security of the booster seat, allowing for any necessary adjustments or refinements.
By meticulously securing the booster seat in the car, you create a dedicated and safe space for your dog to accompany you on travels. This personalized seating area not only prioritizes your pet's safety and comfort but also enhances the overall experience of car rides, fostering a sense of security and well-being for your beloved canine companion.
With the booster seat securely in place, you have successfully completed the process of crafting a DIY dog booster seat for the car, tailored to meet the specific needs of your pet. As you embark on future journeys with your furry friend, take pride in knowing that you have provided a safe, comfortable, and personalized travel space, strengthening the bond between you and your canine companion.
Conclusion
Crafting a homemade dog booster seat for the car is a fulfilling endeavor that prioritizes the safety, comfort, and happiness of your canine companion during travels. By embarking on this DIY project, you have taken a proactive step in addressing the unique needs of your pet while fostering a sense of security and well-being. As you conclude this creative and practical undertaking, reflect on the significance of the personalized booster seat and the positive impact it will have on your pet's travel experiences.
The process of measuring and cutting the foam padding, sewing a tailored fabric cover, attaching durable straps, and securing the booster seat within the car has culminated in the creation of a customized and secure travel space for your dog. This personalized booster seat not only provides a designated area for your pet to accompany you on car rides but also enhances their overall comfort and safety.
As you envision future journeys with your furry friend, the DIY dog booster seat stands as a testament to your commitment to their well-being. The elevated vantage point and secure enclosure offered by the booster seat enable your dog to enjoy unobstructed views while remaining safely contained within the car. This tailored seating area not only enhances their travel experience but also strengthens the bond between you and your beloved pet, fostering a sense of companionship and security.
Furthermore, the resourcefulness and creativity demonstrated in crafting a homemade dog booster seat exemplify your dedication to providing the best for your pet. The attention to detail, precision in construction, and consideration for your dog's specific needs underscore the significance of this DIY project in enhancing their quality of life.
As you witness your dog settle into the booster seat, observe their contentment and ease, and experience the joy of sharing travels with your loyal companion, take pride in the personalized and secure space you have created. The DIY dog booster seat serves as a tangible expression of your love and care for your pet, ensuring that they can accompany you on adventures with comfort, safety, and joy.
In conclusion, the completion of this DIY project marks a significant milestone in prioritizing the safety and well-being of your canine companion. As you embark on future car rides with your furry friend, cherish the moments of shared experiences and the peace of mind that comes with knowing that you have provided a safe, comfortable, and personalized travel space, strengthening the bond between you and your beloved pet.
Frequently Asked Questions about How To Make A Dog Booster Seat For The Car
Was this page helpful?
At Storables.com, we guarantee accurate and reliable information. Our content, validated by Expert Board Contributors, is crafted following stringent Editorial Policies. We're committed to providing you with well-researched, expert-backed insights for all your informational needs.
0 thoughts on “How To Make A Dog Booster Seat For The Car”