Home>Maintenance & Safety>Child & Elderly Safety at Home>How To Remove The Back From A Graco Booster Seat
Child & Elderly Safety at Home
How To Remove The Back From A Graco Booster Seat
Modified: August 17, 2024
Learn how to safely remove the back from your Graco booster seat to ensure child and elderly safety at home. Follow these easy steps for a secure and comfortable seating solution.
(Many of the links in this article redirect to a specific reviewed product. Your purchase of these products through affiliate links helps to generate commission for Storables.com, at no extra cost. Learn more)
Introduction
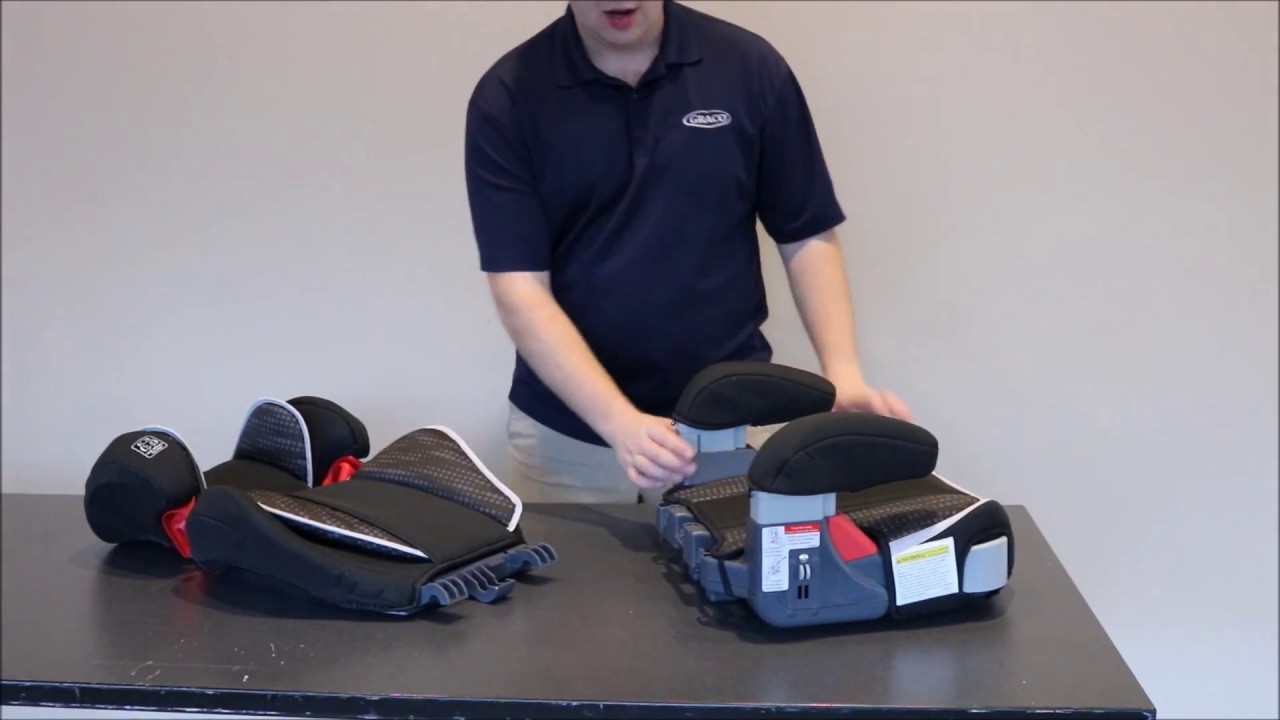
Removing the back from a Graco booster seat can be a straightforward process, providing you with the flexibility to adapt the seat to your child's changing needs. Whether you're transitioning from a high-back booster to a backless booster or simply seeking to streamline the seat for travel or storage, this guide will walk you through the steps to safely and effectively remove the back from your Graco booster seat.
By following the steps outlined in this article, you can ensure that the process is carried out smoothly and without causing any damage to the booster seat. It's important to note that while the process may vary slightly depending on the specific model of the Graco booster seat, the general steps for removing the back remain consistent across most models.
Before embarking on this task, it's essential to gather the necessary tools and familiarize yourself with the components of the booster seat. By doing so, you can approach the process with confidence and ensure that the seat remains in optimal condition for future use.
So, let's dive into the step-by-step process of removing the back from your Graco booster seat, empowering you to make the necessary adjustments to accommodate your child's growth and changing needs.
Key Takeaways:
- Removing the back from a Graco booster seat is like solving a puzzle – gather tools, find screws or clips, and carefully detach the back. It’s a skill that helps parents customize the seat for their child’s needs.
- Storing the removed back properly ensures it stays in good condition for future use. Clean, label, and store it in a safe place with its hardware. This way, parents can easily reattach it when needed.
Read more: How To Remove A Booster Seat
Step 1: Gather the necessary tools
Before beginning the process of removing the back from your Graco booster seat, it's essential to gather the necessary tools to ensure a smooth and efficient procedure. Having the right tools at hand will not only streamline the process but also minimize the risk of causing any damage to the booster seat. Here's a comprehensive list of tools you'll need:
-
Screwdriver: Depending on the specific model of your Graco booster seat, you may require a Phillips or flathead screwdriver to remove any screws securing the back in place. It's important to have the appropriate screwdriver on hand to avoid damaging the screws during the removal process.
-
Pliers (if applicable): In some Graco booster seat models, the back may be secured in place using clips instead of screws. If this is the case, a pair of pliers will be necessary to carefully release the clips and detach the back from the seat.
-
Storage bag or container: As you remove the back from the booster seat, it's important to have a designated storage bag or container to keep the back and any associated hardware in a safe and easily accessible place. This will prevent any small components from getting misplaced and ensure that everything is readily available if you decide to reattach the back in the future.
-
Safety scissors or utility knife (if applicable): Some booster seat models may feature fabric covers or padding that need to be detached to access the screws or clips holding the back in place. In such cases, having safety scissors or a utility knife can be helpful for carefully removing the fabric without causing any damage.
By ensuring that you have these tools readily available before starting the process, you can approach the task with confidence and efficiency. Additionally, having the necessary tools at hand will enable you to maintain the integrity of the booster seat and ensure that the removal process is carried out smoothly and without any complications. With the tools gathered, you're now ready to proceed to the next step of locating the clips or screws holding the back in place.
Step 2: Locate the clips or screws holding the back in place
When it comes to removing the back from a Graco booster seat, the next crucial step is to locate the clips or screws that secure the back in place. This step is essential as it sets the stage for the subsequent process of detaching the back from the seat. The method of attachment may vary depending on the specific model of the booster seat, so it's important to approach this step with attentiveness and a keen eye for detail.
Identifying Screws:
If your Graco booster seat is designed with screws holding the back in place, carefully inspect the backrest and the base of the seat to locate these screws. In most cases, the screws are positioned at the base of the backrest, often concealed beneath a fabric cover or padding. Use a screwdriver that matches the screw head type, typically Phillips or flathead, to begin the removal process. It's important to exercise caution and ensure that the screwdriver fits snugly into the screw head to prevent slippage and potential damage to the screw.
Locating Clips:
In some Graco booster seat models, the back may be secured using clips instead of screws. These clips are typically positioned at the junction where the backrest meets the base of the seat. To locate the clips, carefully examine the underside of the booster seat, paying close attention to any visible mechanisms or fasteners holding the back in place. Once the clips are identified, you can prepare to release them in the subsequent step.
Read more: How To Anchor A Booster Seat
Additional Considerations:
It's important to note that certain booster seat models may feature a combination of screws and clips for securing the back. In such cases, a thorough inspection of the seat's construction is necessary to identify all attachment points accurately. Additionally, if the booster seat has fabric covers or padding, these may need to be gently detached to gain access to the screws or clips. Exercise care when removing any fabric components to avoid causing damage to the seat's upholstery.
By meticulously locating the clips or screws holding the back in place, you set the foundation for the seamless removal of the back from your Graco booster seat. This careful and methodical approach ensures that the subsequent steps of the removal process can be carried out effectively and without any complications. With the clips or screws identified, you're now ready to proceed to the next step of removing them to detach the back from the booster seat.
Step 3: Remove the clips or screws
With the clips or screws holding the back of the Graco booster seat identified, the next step is to carefully remove them to detach the back from the seat. Depending on the specific attachment mechanism, the removal process may vary slightly, but the fundamental goal remains consistent: to release the back securely and without causing any damage to the booster seat.
Removing Screws:
If your Graco booster seat is secured with screws, use the appropriate screwdriver to begin the removal process. Ensure that the screwdriver fits snugly into the screw head to prevent slippage and potential damage to the screw. With a firm and steady grip, carefully rotate the screwdriver counterclockwise to loosen and remove each screw. It's important to maintain a consistent and controlled motion to prevent any accidental slipping that could lead to scratches or damage to the seat's components.
As each screw is removed, set it aside in a secure location, such as a small container or storage bag, to prevent misplacement. Keep track of the number of screws removed, as this will be essential when reattaching the back to the booster seat in the future. Once all screws have been successfully removed, gently lift the back to detach it from the seat, taking care to ensure a smooth and controlled separation.
Releasing Clips:
For Graco booster seat models secured with clips, the removal process involves carefully releasing the clips to free the back from the seat. Using a pair of pliers, if necessary, gently disengage the clips by applying even pressure to release them from their secured position. It's crucial to exercise caution and precision to avoid any sudden movements that could potentially damage the clips or the seat's structure.
As the clips are released, keep them in a designated storage container to prevent misplacement and ensure that they are readily available if you choose to reattach the back at a later time. Once all clips have been successfully disengaged, lift the back from the booster seat, ensuring a smooth and controlled separation without applying excessive force that could compromise the seat's integrity.
By carefully removing the clips or screws, you can successfully detach the back from your Graco booster seat, allowing you to adapt the seat to your child's evolving needs. With the back removed, you now have the flexibility to transition to a backless booster configuration or store the back for future use. This marks a significant step in customizing the booster seat to accommodate your child's growth and changing requirements.
Read more: How To Use A Booster Seat
Step 4: Lift the back off the booster seat
With the clips or screws successfully removed, the next pivotal step in the process of removing the back from your Graco booster seat is to lift the back off the seat. This step requires a steady and controlled approach to ensure that the separation is carried out smoothly and without causing any damage to the booster seat.
Before lifting the back, take a moment to assess the positioning and any potential obstructions that may impede a seamless removal. Ensure that the booster seat is placed on a stable surface, providing ample space to maneuver the back as it is lifted from the seat. It's important to maintain a firm grip on the back while exercising caution to prevent any sudden movements that could lead to accidental damage.
With a steady and deliberate motion, lift the back from the booster seat, ensuring that the separation is smooth and controlled. Depending on the design of the booster seat, the back may detach easily once the clips or screws have been removed. However, in some cases, a slight wiggle or gentle rocking motion may be necessary to free the back from any residual connections.
As the back is lifted from the booster seat, take note of any additional components or attachments that may be interconnected. Ensure that the separation is carried out evenly, avoiding any tilting or uneven pressure that could potentially strain the seat's structure. By maintaining a careful and methodical approach, you can lift the back off the booster seat with confidence, knowing that the process has been executed smoothly and without causing any harm to the seat.
Once the back has been successfully lifted from the booster seat, set it aside in a safe and designated area, ensuring that it remains in a secure position. If the booster seat features any fabric covers or padding, take care to keep these components organized and intact, ready for potential reassembly in the future.
By lifting the back off the booster seat, you have completed a crucial phase in the process of customizing the seat to suit your child's evolving needs. Whether you are transitioning to a backless booster configuration or storing the back for future use, this step marks a significant milestone in adapting the booster seat to accommodate your child's growth and changing requirements.
Step 5: Store the back for future use
After successfully removing the back from your Graco booster seat, it's essential to store it properly for potential future use. Whether you anticipate reattaching the back as your child grows or keeping it as a spare for specific occasions, proper storage ensures that the back remains in optimal condition and readily accessible when needed.
Here are the key steps to store the back of your Graco booster seat effectively:
-
Clean and Inspect: Before storing the back, take a moment to clean and inspect it thoroughly. Wipe down the surface to remove any dust or debris, paying particular attention to any crevices or attachment points. Inspect the back for any signs of wear, damage, or loose components. Addressing any issues at this stage ensures that the back is in good condition for future use.
-
Secure Storage Container: Choose a suitable storage container or bag to keep the back of the booster seat protected. Ideally, the container should provide adequate space to accommodate the back without causing any compression or deformation. If the back features any detachable components, such as armrests or padding, store them alongside the back to ensure comprehensive preservation.
-
Labeling and Organization: To facilitate easy retrieval in the future, consider labeling the storage container with the model name or any relevant details pertaining to the booster seat. This simple step can prevent confusion and streamline the process of locating the back when the need arises. Additionally, if the booster seat has multiple detachable components, organize them within the container to maintain a cohesive storage system.
-
Safe and Accessible Location: Store the container in a safe and accessible location, ensuring that it is shielded from potential damage or environmental factors. Avoid placing heavy objects on top of the container to prevent any undue pressure on the stored back. Select a designated storage area that is easily accessible when the time comes to reattach the back to the booster seat.
-
Preservation of Hardware: If the removal process involved screws or clips, ensure that these components are stored securely alongside the back. Keeping the associated hardware in the same container prevents misplacement and guarantees that all essential parts are readily available for reassembly.
By following these steps, you can store the back of your Graco booster seat effectively, preserving its condition and ensuring that it remains accessible for potential future use. Whether it's for accommodating your child's changing needs or as a precautionary measure, proper storage sets the stage for seamless reattachment and sustained functionality of the booster seat.
To remove the back from a Graco booster seat, locate the release button or lever on the back of the seat and press or pull it to release the back from the base. Lift the back off the base and store it in a safe place.
Conclusion
In conclusion, the process of removing the back from a Graco booster seat is a valuable skill that empowers parents and caregivers to adapt the seat to their child's evolving needs. By following the step-by-step guide outlined in this article, individuals can confidently undertake this task, knowing that they have the necessary knowledge to carry out the process effectively and without causing any damage to the booster seat.
The journey begins with gathering the essential tools, including a screwdriver, pliers (if applicable), a storage bag or container, and safety scissors or a utility knife (if needed). These tools form the foundation for a smooth and efficient removal process, ensuring that the seat's integrity is maintained throughout.
The subsequent steps involve meticulously locating the clips or screws holding the back in place and then proceeding to remove them with precision and care. Whether it's unscrewing the fasteners or releasing the clips, each action is carried out methodically to guarantee a seamless separation of the back from the booster seat.
Lifting the back off the booster seat marks a pivotal moment in the process, requiring a steady and controlled approach to ensure that the separation is carried out smoothly and without causing any harm to the seat. This step sets the stage for the final phase of storing the back for potential future use, emphasizing the importance of proper cleaning, inspection, and organization to maintain the back's condition and accessibility.
Ultimately, the ability to remove the back from a Graco booster seat provides a sense of flexibility and adaptability, allowing caregivers to tailor the seat to their child's specific requirements. Whether it's transitioning to a backless booster configuration or storing the back for future use, this process empowers individuals to make informed decisions regarding the functionality of the booster seat.
By understanding and implementing these steps, caregivers can navigate the process of removing the back from a Graco booster seat with confidence, knowing that they have the necessary skills to customize the seat according to their child's growth and changing needs. This knowledge not only enhances the practicality of the booster seat but also contributes to a sense of empowerment and preparedness in ensuring the safety and comfort of children during travel and everyday use.
Frequently Asked Questions about How To Remove The Back From A Graco Booster Seat
Was this page helpful?
At Storables.com, we guarantee accurate and reliable information. Our content, validated by Expert Board Contributors, is crafted following stringent Editorial Policies. We're committed to providing you with well-researched, expert-backed insights for all your informational needs.


0 thoughts on “How To Remove The Back From A Graco Booster Seat”