Home>Renovation & DIY>Tools & Equipment>How To Make A Sonic Screwdriver
Tools & Equipment
How To Make A Sonic Screwdriver
Published: December 19, 2023
Learn how to make your own Sonic Screwdriver with tools and equipment you already have. Step-by-step guide for all the Whovians out there!
(Many of the links in this article redirect to a specific reviewed product. Your purchase of these products through affiliate links helps to generate commission for Storables.com, at no extra cost. Learn more)
Introduction
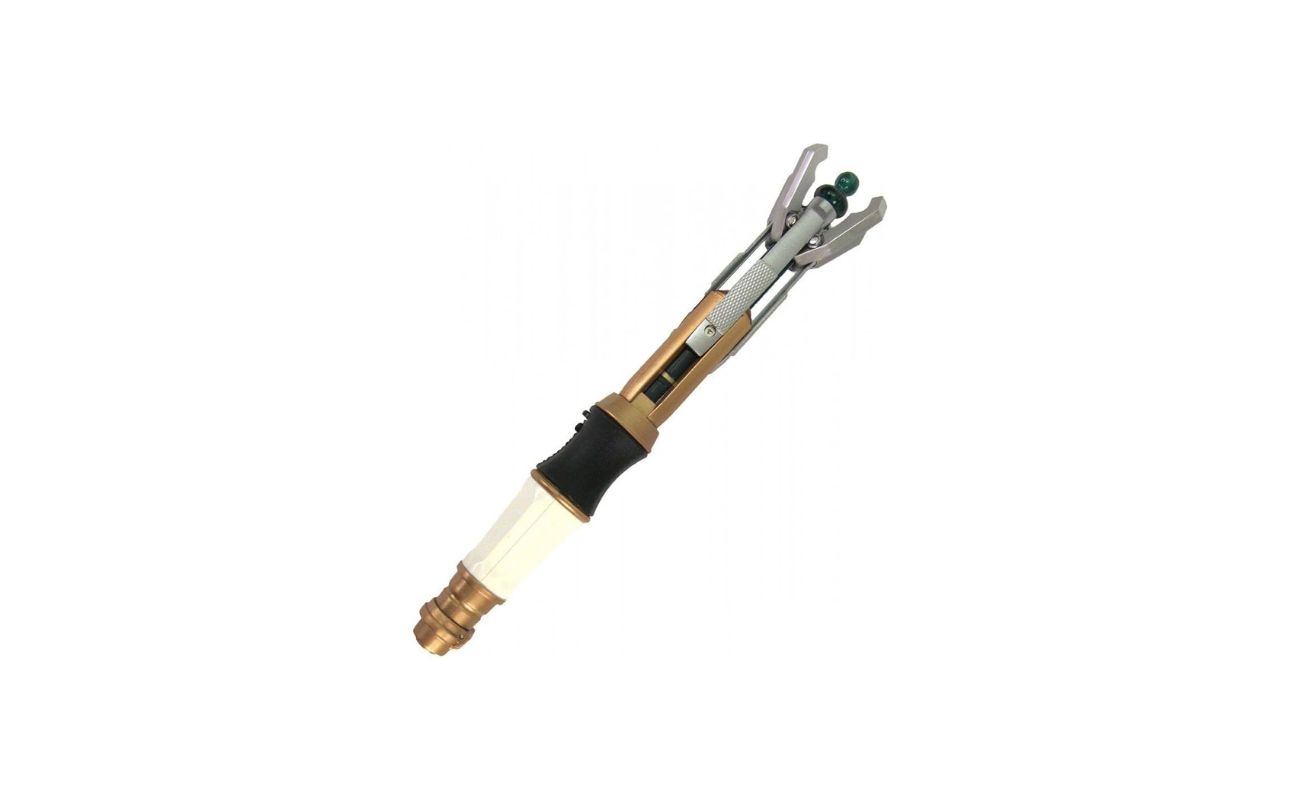
Welcome to the exciting world of DIY projects! In this article, we will be delving into the process of creating a real-life Sonic Screwdriver. If you’re a fan of the iconic science fiction television series, Doctor Who, then you’ll understand just how essential this multi-functional gadget is in the Doctor’s arsenal. While we may not possess the technology to build a fully functional Time Lord device, we can certainly replicate its appearance and incorporate some cool features.
Materials Needed
Key Takeaways:
- Create your own Sonic Screwdriver by gathering materials, assembling components, and adding LED lights and sound effects. Customize the design to reflect your unique style and enjoy the satisfaction of a DIY Doctor Who-inspired gadget.
- Embrace the DIY adventure of making a Sonic Screwdriver, incorporating electronic skills, painting techniques, and intricate details. Add personal touches, display proudly, and let your creativity shine in the Doctor Who universe.
Read more: How To Make A Screwdriver Tool
Materials Needed
- 1 LED
- 1 sound module
- 1 activation button
- 1 main body casing
- Paint (various colors)
- Paint brushes
- Glue
- Tape
- Small electronic components (wires, resistors, etc.)
Key Takeaways:
- Create your own Sonic Screwdriver by gathering materials, assembling components, and adding LED lights and sound effects. Customize the design to reflect your unique style and enjoy the satisfaction of a DIY Doctor Who-inspired gadget.
- Embrace the DIY adventure of making a Sonic Screwdriver, incorporating electronic skills, painting techniques, and intricate details. Add personal touches, display proudly, and let your creativity shine in the Doctor Who universe.
Read more: How To Make A Screwdriver Tool
Materials Needed
Before we begin, let’s gather all the materials necessary to create our Sonic Screwdriver:
- 1 LED: This will be used to create the iconic glowing tip of the Sonic Screwdriver. Choose a color that matches your personal preference.
- 1 sound module: This module will allow us to add realistic sound effects to our Sonic Screwdriver. Look for a module that can produce a variety of sci-fi sounds.
- 1 activation button: This button will serve as the primary control for activating the various functions of our Sonic Screwdriver.
- 1 main body casing: This can be made from a variety of materials such as plastic, metal, or even wood. Choose a material that is sturdy and can be easily shaped.
- Paint (various colors): Select paint colors that match the aesthetics of the Sonic Screwdriver from the show. This will allow you to add the signature designs and details to your creation.
- Paint brushes: These will be used to apply the paint onto the main body casing and add intricate details.
- Glue: Choose a strong adhesive that can securely hold the different components together.
- Tape: Electrical tape and double-sided tape may be needed for securing wires and components.
- Small electronic components (wires, resistors, etc.): These will be used to connect the LED, sound module, and activation button. Make sure to have various lengths of wires and the appropriate resistors for your LED.
Once you have gathered all these materials, we can move on to the exciting process of assembling our own Sonic Screwdriver!
Step 1: Gathering the Components
The first step in creating your own Sonic Screwdriver is to gather all the necessary components. This includes the LED, sound module, activation button, and main body casing. Let’s break down the process:
1. LED: Begin by selecting an LED that matches your desired color. The LED will be the source of the iconic glowing tip of the Sonic Screwdriver. Make sure to choose an LED that is compatible with the voltage of your power source.
2. Sound module: Look for a sound module that can produce a wide range of sci-fi sound effects. This will add an extra level of authenticity to your Sonic Screwdriver. Ensure that the sound module is small enough to fit inside the main body casing.
3. Activation button: Find a suitable activation button that is comfortable to press and has a satisfying tactile response. This button will serve as the control for activating the various functions of your Sonic Screwdriver.
4. Main body casing: Choose a material for the main body casing of your Sonic Screwdriver. Some common choices are plastic, metal, or wood. Consider the weight, durability, and ease of shaping when selecting the material. You can also experiment with 3D printing if you have access to the necessary tools.
Once you have gathered all the components, make sure to double-check that everything fits together properly and that the dimensions are to your liking. This is a crucial step in ensuring a successful assembly process and a final product that is both functional and visually appealing.
With the components in hand, we can now move on to the next step: assembling the main body of the Sonic Screwdriver.
Step 2: Assembling the Main Body
With all the components gathered, it’s time to start assembling the main body of your Sonic Screwdriver. Follow these steps to create a sturdy and functional base:
1. Prepare the main body casing: If necessary, sand any rough edges on the main body casing to ensure a smooth surface. This will make it easier to apply paint and other decorative elements later on. Additionally, create any holes or openings necessary for inserting the LED, sound module, and activation button.
2. Position the LED: Carefully insert the LED into the designated hole in the main body casing. Secure it in place with a small amount of glue or tape. Make sure the LED is positioned correctly so that it will emit light from the tip of the Sonic Screwdriver.
3. Connect the wires: Attach the appropriate wires to the LED and ensure they are connected to the correct terminals. Pay attention to the polarity of the LED to prevent any issues with functionality later on. Use soldering or crimp connectors to create secure connections.
4. Install the sound module: Find a suitable spot inside the main body casing to house the sound module. Make sure it is easily accessible, as you may need to replace batteries or adjust settings in the future. Use glue or double-sided tape to hold the sound module securely in place.
5. Connect the activation button: Position the activation button on the main body casing in a comfortable and easily accessible location. Take into account ergonomics and ease of use. Connect the wires from the activation button to the appropriate terminals on the sound module, ensuring a secure connection.
6. Test the functionality: Before proceeding further, test the functionality of your Sonic Screwdriver. Press the activation button to check if the LED lights up and if the sound module produces the desired sound effects. Troubleshoot any issues and make any necessary adjustments before proceeding.
Once you have completed these steps, you will have a fully assembled main body for your Sonic Screwdriver. In the next step, we will add the exciting feature of LED lights to make it even more visually appealing and reminiscent of the Doctor’s iconic device.
Read more: How Does A Sonic Toothbrush Work
Step 3: Adding the Activation Button
The activation button is a crucial component of the Sonic Screwdriver, as it allows you to control its various functions. In this step, we will focus on adding the activation button to your custom creation. Follow these steps to incorporate the button:
1. Select a suitable location: Determine the ideal placement for the activation button on the main body casing. Consider ergonomics and accessibility when choosing the spot. Ensure that the button is easily reached and comfortable to press.
2. Create a hole: Use a drill or a similar tool to create a hole in the location you have chosen for the activation button. The size of the hole should match the dimensions of the button you have selected. Be careful not to damage the main body casing while drilling.
3. Insert the activation button: Place the activation button into the hole you created and check if it fits properly. If the button is too loose, consider using a small amount of glue or adhesive to secure it in place. Test its functionality by pressing it to ensure a smooth and responsive action.
4. Connect the wires: Use small electronic wires to connect the terminals of the activation button to the corresponding terminals or pins on the sound module. Ensure that the wires are securely attached and that there are no loose connections. Double-check the polarity and make any necessary adjustments.
5. Test the functionality: Before moving forward, test the functionality of the activation button. Press it and observe if the desired actions are triggered through the sound module. Ensure that the button gives a satisfying tactile response and functions seamlessly.
With the activation button successfully integrated into the main body of your Sonic Screwdriver, you are one step closer to a fully functional and authentic-looking device. In the following step, we will explore how to incorporate LED lights for that extra touch of visual appeal.
When making a Sonic Screwdriver, ensure you have a clear understanding of the components needed, such as a flashlight, electronic components, and a suitable casing. Research and plan the assembly process carefully to ensure a functional and accurate replica.
Step 4: Incorporating the LED Lights
Adding LED lights to your Sonic Screwdriver will not only make it visually appealing but also give it that iconic glow. In this step, we will explore how to incorporate LED lights into your creation. Follow these steps to bring your Sonic Screwdriver to life:
1. Prepare the LED: Ensure that the LED is wired correctly and securely attached to the main body casing. Make sure that the polarity of the LED is aligned properly, with the positive and negative terminals connected to the appropriate wires.
2. Install the LED lights: Determine the desired locations for the LED lights on your Sonic Screwdriver. This could be around the tip, along the body, or in specific design elements. Carefully drill small holes or create openings in the main body casing to insert and secure the LED lights.
3. Connect the LED lights: Use small electronic wires to connect the LED lights to the wires already connected to the LED. Ensure a secure connection and make sure that the polarity is correct to prevent any issues with functionality.
4. Test the LED lights: Before proceeding further, test the LED lights to make sure they are functioning correctly. Activate your Sonic Screwdriver and observe if the LED lights up in the desired locations. Adjust any loose connections or wiring issues if necessary.
5. Add diffusers (optional): If you want a more diffused and uniform light, you can add small diffusers over the LED lights. This can be done using translucent materials such as acrylic or thin plastic. Cut the diffuser material into small pieces and secure them over the LED lights.
Once you have successfully incorporated the LED lights into your Sonic Screwdriver, you will notice a significant enhancement in its appearance. The glowing tip or illuminated design elements will add an extra level of authenticity to your creation. In the next step, we will explore how to give your Sonic Screwdriver its distinct sound effects with the sound module.
Step 5: Installing the Sound Module
The sound module is a crucial component of the Sonic Screwdriver, as it provides the iconic sound effects that make it truly come to life. In this step, we will focus on installing and integrating the sound module into your custom creation. Follow these steps to give your Sonic Screwdriver its distinct sound effects:
1. Choose a suitable location: Determine the ideal placement for the sound module inside the main body casing. Consider factors such as accessibility, space availability, and ease of replacing batteries or adjusting settings.
2. Secure the sound module: Use glue or double-sided tape to securely attach the sound module to the chosen location inside the main body casing. Make sure it is positioned correctly and does not interfere with other components or the overall functionality of the Sonic Screwdriver.
3. Connect the sound module: Use small electronic wires to connect the sound module to the activation button and other relevant components. Ensure that the wires are securely attached and that there are no loose connections. Pay attention to the polarity and follow any instructions provided by the sound module manufacturer.
4. Test the sound module: Before moving forward, test the functionality of the sound module. Press the activation button and listen for the desired sound effects. Adjust the volume and settings as necessary to achieve the desired sound quality. Troubleshoot any issues and make any necessary adjustments before proceeding.
5. Fine-tune the sound effects: Once the basic functionality is confirmed, you can further enhance the sound effects by adjusting settings on the sound module. Experiment with different sound options and customize the sound profiles to your preference. Take your time to create the perfect sonic experience for your Sonic Screwdriver.
With the sound module successfully installed, your Sonic Screwdriver will now come alive with its distinct sound effects. In the next step, we will explore how to paint and detail your creation to bring it even closer to the appearance of the Doctor’s Sonic Screwdriver.
Step 6: Painting and Detailing
Painting and detailing your Sonic Screwdriver is a crucial step in replicating the iconic appearance of the Doctor’s device. In this step, we will explore how to paint and add intricate details to elevate the visual appeal of your creation. Follow these steps to bring your Sonic Screwdriver to life:
1. Prepare the surface: Before painting, ensure that the main body casing is clean and free from any dust, debris, or residue. Sand any rough surfaces or imperfections to create a smooth canvas for the paint.
2. Prime the surface: Apply a coat of primer to the main body casing. This will create a suitable base for the paint to adhere to and ensure a more even and durable finish. Allow the primer to fully dry before proceeding.
3. Choose the colors: Select the colors that match the design of the Sonic Screwdriver from the show. The Doctor’s Sonic Screwdriver typically features a combination of silver, black, and blue. Use reference images or screenshots for accuracy.
4. Apply the base coat: Start by applying the primary base coat to the main body casing. Use a brush or spray paint to achieve an even and smooth finish. Apply multiple coats if necessary, allowing each coat to dry before adding the next.
5. Add the secondary colors: Use smaller brushes to add the secondary colors or design elements to your Sonic Screwdriver. Pay attention to the intricate details and carefully replicate the patterns seen on the Doctor’s device.
6. Apply weathering or distressing: To give your Sonic Screwdriver a more realistic and aged look, consider adding weathering or distressing effects. Use dry brushing techniques, sponging, or other methods to create worn, scratched, or faded areas on the surface.
7. Seal the paint: Once you are satisfied with the paint job, apply a clear sealant or varnish to protect the paint and give it a finished look. This will also help preserve the colors and prevent them from chipping or fading over time.
With the painting and detailing process complete, your Sonic Screwdriver will closely resemble the iconic device from Doctor Who. In the final step, we will add the finishing touches to complete the transformation.
Read more: How To Use ViewSonic Projector
Step 7: Adding the Finishing Touches
In this final step, we will add the finishing touches to your Sonic Screwdriver, bringing it to its full potential. Follow these steps to complete the transformation and add those extra details that make all the difference:
1. Finalize the paint job: Take a close look at your painted Sonic Screwdriver and make any necessary touch-ups or adjustments. Ensure that the colors are vibrant, the lines are clean, and the details are accurately represented.
2. Add additional embellishments: Consider adding extra details to replicate the Doctor’s Sonic Screwdriver more accurately. This could include small buttons, switches, or other decorative elements sculpted from additional materials or found objects.
3. Apply a clear coat: To protect the paint and add a final layer of shine, apply a clear coat over the entire surface of your Sonic Screwdriver. This will give it a polished and professional appearance.
4. Finetune the functionality: Test all the features of your Sonic Screwdriver, including the LED lights and sound effects, to ensure they are working properly. Make any necessary adjustments or repairs to ensure a seamless and functional experience.
5. Customize the sound effects (optional): If you have advanced knowledge or access to software, consider customizing the sound effects on your Sonic Screwdriver. You can add specific phrases or sound snippets from the Doctor Who series to create a truly personalized experience.
6. Display or carry your Sonic Screwdriver: Find a suitable display stand or case to showcase your completed Sonic Screwdriver. Alternatively, create a holster or harness to carry it around like the Doctor does. This will add to the authenticity and allow you to proudly show off your creation.
Congratulations! You have successfully navigated through the process of creating your very own Sonic Screwdriver. Now, whether you’re dressing up as the Doctor for a convention or simply displaying it as a piece of art, you can enjoy the satisfaction of having a unique and functional piece inspired by the beloved series Doctor Who.
Remember, this DIY project is all about creativity and individual expression, so don’t be afraid to add your own personal touches and make it truly yours. Happy sonic-ing!
Conclusion
Creating your own Sonic Screwdriver has been an exciting and rewarding journey. From gathering the components to adding the finishing touches, you have embarked on a DIY adventure that replicates the iconic device from the Doctor Who series. Throughout the process, you have learned valuable skills in assembling electronic components, painting, and incorporating intricate details.
By following the steps outlined in this article, you have not only built a visually appealing replica but also achieved a fully functional Sonic Screwdriver. The incorporation of LED lights, the activation button, and sound effects has given your creation an authentic and immersive experience. As you press the button and hear the sound effects while the LED lights up, you may feel a connection to the fictional universe you admire.
Remember, this project allows for customization and personalization. Feel free to add your own unique touches, whether it’s modifying the design, adding additional features, or customizing the sound effects. Let your imagination run wild and make your Sonic Screwdriver a reflection of your own creativity and fandom.
As you display or carry your Sonic Screwdriver, be proud of the effort and craftsmanship you have put into this DIY project. Share it with fellow Doctor Who fans, showcase it at conventions, or simply enjoy the satisfaction of having a one-of-a-kind gadget that embodies the spirit of the Doctor.
Now that you have completed this exciting project, don’t hesitate to explore other DIY endeavors that combine your passion for popular culture with your creative skills. Happy crafting and may your Sonic Screwdriver guide you through many more adventures!
Frequently Asked Questions about How To Make A Sonic Screwdriver
Was this page helpful?
At Storables.com, we guarantee accurate and reliable information. Our content, validated by Expert Board Contributors, is crafted following stringent Editorial Policies. We're committed to providing you with well-researched, expert-backed insights for all your informational needs.


0 thoughts on “How To Make A Sonic Screwdriver”