Home>Technology>Home Entertainment Systems>How To Repair LCD Television
Home Entertainment Systems
How To Repair LCD Television
Modified: February 18, 2024
Learn how to repair your LCD television and enhance your home entertainment system with our expert tips and guidance. Discover the best techniques for troubleshooting and fixing common issues. Unlock the potential of your home entertainment setup today!
(Many of the links in this article redirect to a specific reviewed product. Your purchase of these products through affiliate links helps to generate commission for Storables.com, at no extra cost. Learn more)
Introduction
Welcome to the world of LCD televisions, where stunning visuals and immersive entertainment come to life. LCD (Liquid Crystal Display) televisions have revolutionized home entertainment, offering crisp images, vibrant colors, and sleek designs. However, like any electronic device, LCD televisions may encounter issues over time, such as display problems, audio malfunctions, or power issues. In this comprehensive guide, we will delve into the art of repairing LCD televisions, empowering you to troubleshoot and address common issues with confidence.
Repairing an LCD television can be a rewarding experience, allowing you to gain a deeper understanding of the technology behind these sophisticated devices. By learning to diagnose and fix common problems, you can save money on professional repairs and extend the lifespan of your television. Whether you're a DIY enthusiast or simply eager to learn more about your LCD television, this guide will equip you with the knowledge and skills needed to tackle repairs effectively.
Throughout this article, we will explore the tools and materials required for LCD television repair, unravel the intricate components of these devices, and provide step-by-step instructions for identifying, disassembling, repairing, and reassembling your television. By the end of this journey, you will feel empowered to troubleshoot and resolve issues that may arise with your LCD television, ensuring that your home entertainment system continues to deliver captivating visuals and immersive audio experiences.
So, grab your toolkit, put on your problem-solving hat, and let's embark on this enlightening exploration of LCD television repair. Whether you're dealing with a flickering screen, distorted audio, or other common issues, this guide will serve as your trusted companion in mastering the art of LCD television repair. Let's dive in and unravel the secrets of these mesmerizing devices.
Key Takeaways:
- Repairing your LCD television empowers you to save money, understand technology, and extend its lifespan, ensuring captivating visuals and immersive audio experiences for your home entertainment.
- By mastering the art of LCD television repair, you gain precision skills, a deeper appreciation for home entertainment, and the curiosity to continue learning and adapting to future advancements in home electronics.
Read more: What LCD Television?
Tools and Materials Needed
Before embarking on the journey of repairing your LCD television, it’s essential to gather the necessary tools and materials to ensure a smooth and efficient repair process. Here’s a comprehensive list of the items you’ll need:
Tools:
- Screwdriver set (including Phillips and flathead screwdrivers)
- Needle-nose pliers
- Adjustable wrench
- Anti-static wrist strap (to prevent electrostatic discharge)
- Multimeter (for testing electrical components)
- Flashlight (for better visibility during disassembly)
- Small brush or compressed air canister (for dusting components)
- Work gloves (to protect your hands)
- Small containers or plastic bags (for organizing and storing screws and small parts)
Materials:
- Replacement parts (if needed, such as capacitors, fuses, or cables)
- Cleaning solution for electronics (isopropyl alcohol is recommended)
- Cotton swabs or soft cloth for cleaning components
- Electrical tape
- Replacement thermal paste (for reseating heat sinks)
- Documentation and schematics for your specific television model (if available)
Having these tools and materials at your disposal will streamline the repair process and ensure that you’re well-prepared to tackle any issues that may arise. Additionally, it’s important to work in a well-lit and organized space to prevent misplacing small components and to facilitate a systematic disassembly and reassembly of your television.
Now that you’re equipped with the necessary tools and materials, let’s delve into the intricate components of an LCD television and gain a deeper understanding of how these devices function.
Understanding LCD Television Components
Before delving into the repair process, it’s essential to familiarize yourself with the key components that make up an LCD television. Understanding the function of each part will empower you to diagnose and address issues effectively. Here’s an overview of the primary components found in most LCD televisions:
Read more: How To Clean Lcd Television Screens
1. LCD Panel:
The LCD panel, also known as the display screen, is the heart of the television. It consists of an array of pixels that illuminate and produce the images you see. Each pixel is composed of sub-pixels that emit red, green, and blue light, collectively creating a spectrum of colors and intricate visuals.
2. Backlighting System:
Most LCD televisions utilize a backlighting system to illuminate the LCD panel. There are two primary types of backlighting: CCFL (Cold Cathode Fluorescent Lamp) and LED (Light Emitting Diode). CCFL backlights are older and less common, while LED backlights offer improved energy efficiency and dynamic lighting control.
3. Power Supply Unit (PSU):
The power supply unit is responsible for converting the incoming AC (alternating current) power into the DC (direct current) power required to operate the television. It distributes power to various components within the television, ensuring that each part receives the appropriate voltage and current.
4. Inverter:
In LCD televisions with CCFL backlighting, an inverter is used to convert the DC power from the PSU into AC power, which is necessary to drive the CCFL lamps. LED-backlit televisions do not require an inverter, as the LED backlighting operates on DC power.
Read more: Which Is Better: Plasma Or LCD Television?
5. T-Con Board (Timing Control Board):
The T-Con board, also known as the timing control board, is responsible for processing the video signal and driving the individual pixels on the LCD panel. It ensures that the correct image data is displayed at the appropriate time, contributing to smooth motion and visual clarity.
6. Mainboard (or Motherboard):
The mainboard serves as the central hub of the television, housing the processor, memory, and various input/output connectors. It processes user inputs, controls the display functions, and interfaces with external devices such as gaming consoles, Blu-ray players, and streaming devices.
By understanding the roles of these components, you’ll be better equipped to diagnose potential issues and determine the appropriate course of action. In the next section, we’ll explore the process of identifying common problems that may affect your LCD television.
Identifying the Problem
When your LCD television encounters issues, identifying the root cause of the problem is the crucial first step in the repair process. Common symptoms of malfunctioning LCD televisions include distorted images, flickering screens, no display, audio disturbances, and power-related issues. Here’s a guide to help you pinpoint and diagnose potential problems:
1. Visual Distortions:
If your television displays distorted or garbled images, it may indicate issues with the LCD panel, T-Con board, or the signal input. Look for abnormalities such as color banding, pixelation, or persistent lines on the screen, as these can provide clues about the underlying issue.
Read more: What Is Better LCD Or LED Television?
2. Flickering or No Display:
A flickering screen or no display at all can stem from a faulty backlighting system, a malfunctioning T-Con board, or a defective LCD panel. Observing the behavior of the screen when powered on can help determine whether the issue lies in the backlighting or the display panel itself.
3. Audio Malfunctions:
If your television produces distorted sound, no audio output, or intermittent audio interruptions, the problem may be related to the audio processing circuitry, speakers, or audio input connections. Pay attention to the nature of the audio issues, such as crackling sounds or complete silence, to narrow down the potential causes.
4. Power-Related Problems:
Issues related to power can manifest as the television failing to turn on, sudden shutdowns, or irregular power behavior. Check the power supply unit, inverter (if applicable), and the mainboard for signs of damage or malfunction, and ensure that the power input and connections are secure.
Once you’ve observed and documented the symptoms exhibited by your television, you can proceed to the next phase of the repair process: disassembling the television to access its internal components. By methodically identifying the problem, you’ll be better prepared to address the specific issues affecting your LCD television and restore it to optimal functionality.
Now, let’s move on to the disassembly process, where we’ll uncover the inner workings of your television and begin the journey of repairing or replacing faulty components.
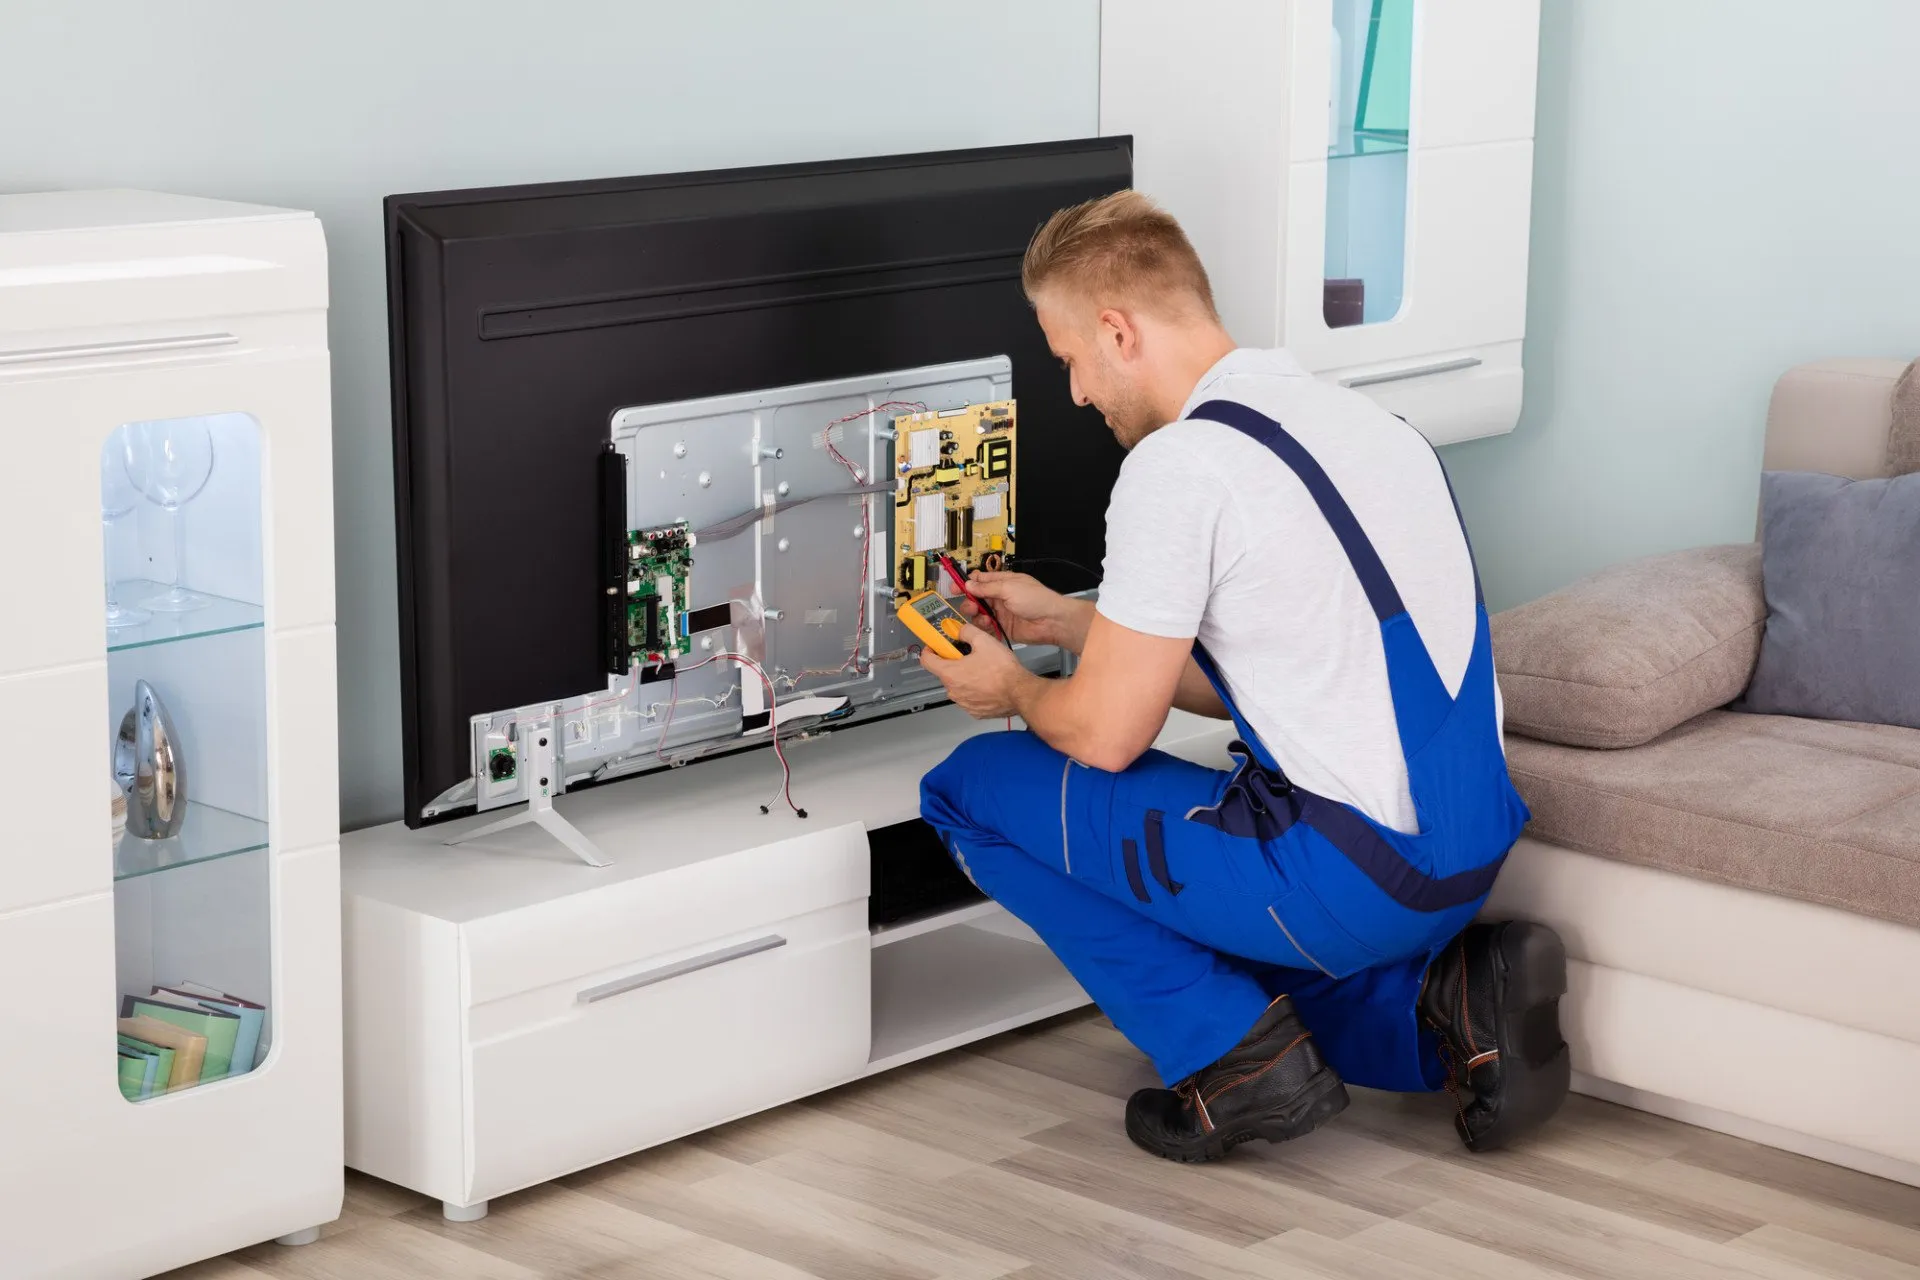
Disassembling the Television
Disassembling an LCD television requires careful attention to detail and a methodical approach to ensure that the internal components are accessed safely and efficiently. Before beginning the disassembly process, it’s crucial to unplug the television from the power source and allow it to discharge any residual electricity. Here’s a step-by-step guide to disassembling your television:
Read more: What Is A LCD Projector
1. Remove the Base or Stand:
If your television is placed on a stand or base, detach it by locating and unscrewing the fasteners that secure it to the television. Carefully lift the television and set the stand aside for reassembly later.
2. Locate and Remove the Outer Casing:
Using the appropriate screwdriver, carefully remove the screws that secure the outer casing of the television. Place the screws in a labeled container to ensure they are not misplaced during reassembly. Gently lift and remove the outer casing, exposing the internal components of the television.
3. Access the Internal Components:
Once the outer casing is removed, you’ll have access to the internal components of the television, including the mainboard, power supply unit, T-Con board, and the LCD panel itself. Take note of the arrangement of components and the connections between them, as this will be helpful during the reassembly process.
4. Secure Small Components and Screws:
As you proceed with disassembly, use small containers or plastic bags to store screws and small components, labeling them accordingly to indicate their original placement. This organization will simplify the reassembly process and reduce the risk of misplacing essential parts.
Read more: What Surge Protector For LCD TV
5. Exercise Caution with Internal Wiring:
Be mindful of any internal wiring or ribbon cables as you disassemble the television. Carefully detach any connectors or cables, taking note of their orientation and the manner in which they are secured. Avoid applying excessive force when disconnecting components to prevent damage.
By following these steps, you can safely disassemble your LCD television and gain access to the internal components that may require inspection, repair, or replacement. In the subsequent sections, we’ll delve into the process of repairing or replacing specific parts to address the issues identified during the diagnostic phase. With the television disassembled and the internal components exposed, you’re one step closer to resolving the problems affecting your LCD television.
Now that we’ve successfully disassembled the television, it’s time to explore the repair and replacement of components to restore your television to optimal functionality. Let’s proceed to the next phase of the repair process.
Repairing or Replacing Parts
With your LCD television disassembled, you’re now poised to address the specific issues identified during the diagnostic phase. Depending on the nature of the problem, you may need to repair or replace certain components to restore your television to optimal functionality. Here’s a guide to repairing or replacing common parts in an LCD television:
1. Inspecting and Repairing the Power Supply Unit (PSU):
If your television exhibits power-related issues, such as failure to turn on or sudden shutdowns, carefully inspect the power supply unit for bulging or leaking capacitors, burnt components, or damaged circuitry. In some cases, faulty capacitors can be replaced to restore the functionality of the PSU, while severe damage may necessitate the replacement of the entire unit.
2. Addressing Backlighting Problems:
If your television experiences backlighting issues, such as flickering or uneven illumination, inspect the backlighting system for faulty LED strips (in LED-backlit televisions) or malfunctioning CCFL tubes (in CCFL-backlit televisions). Replacing defective backlighting components can resolve issues related to screen illumination and visual quality.
Read more: LED Or LCD Projector: Which Is Better
3. Troubleshooting the T-Con Board:
A malfunctioning T-Con board can manifest as visual distortions, flickering screens, or no display. Inspect the T-Con board for damaged components, burnt traces, or loose connections. In some cases, minor repairs such as reflowing solder joints or replacing damaged components can rectify T-Con board issues.
4. Addressing Audio Disturbances:
If your television experiences audio malfunctions, inspect the audio processing circuitry, speakers, and audio input connections for loose connections, damaged components, or faulty wiring. Repairing or replacing the affected audio components can restore clear and consistent sound output.
5. Replacing the LCD Panel:
In rare cases of severe screen damage or persistent display issues, replacing the LCD panel may be necessary. However, this is a complex and expensive repair, often requiring professional expertise and specialized equipment.
By carefully inspecting and addressing the specific issues affecting your LCD television, you can significantly extend its lifespan and ensure optimal performance. As you repair or replace components, exercise caution, refer to technical documentation when available, and prioritize safety throughout the process.
With the necessary repairs or replacements completed, it’s time to reassemble your television and test its functionality. In the following section, we’ll guide you through the reassembly process and provide insights on testing your television to ensure that the repairs have been successful.
Now that we’ve addressed the repair and replacement of components, let’s proceed to the reassembly phase and testing of the television to verify the effectiveness of the repairs.
Reassembling the Television
As you embark on the reassembly of your LCD television, meticulous attention to detail and a systematic approach will ensure that the internal components are restored to their original configuration. The reassembly process is crucial in ensuring that the television functions optimally and safely after the necessary repairs or replacements have been completed. Here’s a step-by-step guide to reassembling your television:
Read also: 11 Best LCD Projector For 2024
1. Organize and Retrieve Components:
Retrieve the screws, small components, and containers or bags used to store them during the disassembly phase. Ensure that each component is accounted for and organized according to its original placement within the television.
2. Secure Internal Wiring and Cables:
Carefully reconnect any detached wiring, ribbon cables, and connectors, ensuring that they are secured in their respective ports and oriented correctly. Exercise caution to avoid damaging delicate cables or connectors during reattachment.
3. Align and Secure Internal Components:
Position the internal components, such as the mainboard, power supply unit, T-Con board, and other essential parts, in their designated locations within the television chassis. Align the components according to their original arrangement and secure them using the appropriate fasteners and mounting points.
4. Reattach the Outer Casing:
Gently position the outer casing of the television and secure it in place using the screws that were removed during disassembly. Ensure that the casing is aligned properly and that all fasteners are tightened securely to maintain the structural integrity of the television.
5. Reinstall the Base or Stand:
If your television was placed on a stand or base, reattach it by securing it to the television using the appropriate fasteners. Ensure that the stand is stable and properly aligned with the television for safe placement.
6. Perform a Visual Inspection:
Before proceeding to power on the television, conduct a visual inspection of the reassembled unit to ensure that all components are properly secured, wiring is correctly routed, and no tools or foreign objects are inadvertently left inside the television.
By following these steps, you can effectively reassemble your LCD television, setting the stage for the crucial testing phase to verify the success of the repairs and ensure that the television operates as intended. With the television reassembled, it’s time to proceed to the final phase: testing the functionality of the repaired television.
Now that the television has been reassembled, let’s move on to the testing phase to confirm that the repairs and reassembly have been executed successfully.
Testing the Television
As you approach the final phase of the LCD television repair process, testing the functionality of the reassembled unit is essential to ensure that the repairs have been successful and that the television operates as intended. Here’s a comprehensive guide to testing your repaired television:
1. Power On and Visual Inspection:
After reassembling the television, power it on and conduct a visual inspection of the display. Ensure that the screen illumination is uniform, and there are no flickering, distorted images, or abnormal visual artifacts. Verify that the television responds to power commands and displays the appropriate indicators when powered on.
Read more: How To Record Television
2. Audio Output Test:
Play audio content through the television’s speakers or audio output connections to assess the quality and consistency of the sound output. Listen for any distortions, crackling sounds, or irregularities in audio playback to ensure that the audio components have been restored to optimal functionality.
3. Input and Output Connectivity:
Test the input and output connectivity of the television by connecting external devices such as gaming consoles, media players, or antennas. Verify that the television recognizes and displays input signals correctly, and that the audio and video output functions as expected.
4. Functional Testing of Smart Features (if applicable):
If your television includes smart features such as built-in streaming apps, voice assistants, or internet connectivity, test these features to ensure that they operate seamlessly. Verify that the smart functionalities are responsive and that network connectivity is stable.
5. Performance Stress Testing:
Subject the television to performance stress tests by playing high-definition content, fast-paced video sequences, and audio-intensive media to gauge the television’s performance under demanding conditions. Monitor the screen for any anomalies or performance issues during stress testing.
Read more: How To Pack A Television
6. Long-Term Operation Test:
Allow the television to operate continuously for an extended period to assess its long-term stability and performance. Monitor the television for any signs of overheating, abnormal behavior, or recurrent issues that may arise during prolonged operation.
By conducting these comprehensive tests, you can ensure that the repaired LCD television operates reliably and delivers the visual and audio performance expected from a fully functional home entertainment system. If the tests reveal any lingering issues, consider revisiting the repair process to address the specific concerns identified during testing.
With the successful completion of the testing phase, you have effectively restored your LCD television to optimal functionality, ensuring that it continues to deliver captivating visuals and immersive audio experiences for your entertainment needs.
Now that the television has been thoroughly tested and verified to be in optimal working condition, you can confidently enjoy the immersive entertainment experience it provides, knowing that you’ve mastered the art of LCD television repair.
Conclusion
Congratulations on successfully navigating the intricate process of repairing your LCD television. By embarking on this enlightening journey, you’ve gained valuable insights into the inner workings of these sophisticated devices and acquired the skills to diagnose, repair, and maintain your home entertainment system with confidence. As you conclude this repair endeavor, it’s essential to reflect on the knowledge and experiences gained throughout the process.
Empowerment Through Knowledge:
By understanding the components and functionality of your LCD television, you’ve empowered yourself to troubleshoot and address common issues that may arise. This newfound knowledge not only enables you to save on repair costs but also fosters a deeper connection with your home entertainment system.
The Art of Precision and Care:
The meticulous disassembly, repair, and reassembly of your television have honed your ability to approach complex tasks with precision and care. This attention to detail is not only crucial in the realm of electronics repair but also a valuable skill that transcends into various aspects of life.
Read more: How Was Television Invented
Appreciation for Home Entertainment:
Through the repair process, you’ve gained a renewed appreciation for the captivating visuals and immersive audio experiences that your LCD television delivers. The effort invested in restoring your television amplifies the enjoyment derived from your home entertainment system.
Continued Curiosity and Learning:
As you embark on future endeavors, may the curiosity and passion ignited by this repair journey continue to drive your pursuit of knowledge and skill development. The world of home electronics is ever-evolving, and your newfound expertise positions you to adapt to future advancements with confidence.
As you bask in the satisfaction of successfully repairing your LCD television, remember that this experience serves as a testament to your resourcefulness and determination. Whether you embark on future repair projects or share your newfound expertise with others, the skills and insights gained from this endeavor will continue to resonate in your journey through the world of home entertainment.
With your LCD television restored to optimal functionality, may it continue to be a source of joy, entertainment, and shared experiences for you and your loved ones. Embrace the immersive visuals and captivating audio that your repaired television offers, knowing that you’ve mastered the art of LCD television repair.
Cheers to your triumphant journey in the realm of home entertainment systems, where the fusion of technology and human ingenuity continues to captivate and inspire.
Frequently Asked Questions about How To Repair LCD Television
Was this page helpful?
At Storables.com, we guarantee accurate and reliable information. Our content, validated by Expert Board Contributors, is crafted following stringent Editorial Policies. We're committed to providing you with well-researched, expert-backed insights for all your informational needs.


0 thoughts on “How To Repair LCD Television”