Articles
How To Dye A Duvet Cover
Modified: October 18, 2024
Looking for articles on how to dye a duvet cover? Discover the best tips and techniques to successfully dye your duvet cover with our helpful guides.
(Many of the links in this article redirect to a specific reviewed product. Your purchase of these products through affiliate links helps to generate commission for Storables.com, at no extra cost. Learn more)
Introduction
Are you tired of the plain, boring look of your duvet cover? Do you want to add a pop of color or a unique design to your bedroom decor? Look no further! In this article, we will guide you through the process of dyeing a duvet cover to give it a fresh, new look.
Dyeing a duvet cover allows you to unleash your creativity and personalize your bedding. Whether you want to achieve a vibrant, bold color or a subtle, soft hue, this DIY project will give you the freedom to transform your duvet cover into a one-of-a-kind masterpiece.
Before you begin, it’s important to gather all the necessary materials and prepare your dyeing area. This will ensure a smooth and successful dyeing process. Once you have everything ready, you can dive into the exciting world of dyeing and unleash your creativity.
In the following sections, we will walk you through each step of the duvet cover dyeing process, from selecting the right duvet cover to the finishing touches. So, grab your apron and let’s get started on this colorful journey!
Key Takeaways:
- Unleash your creativity and personalize your bedding by dyeing a duvet cover with vibrant colors or subtle hues, transforming it into a one-of-a-kind masterpiece.
- Follow the step-by-step guide to dyeing a duvet cover, from selecting the right materials to adding finishing touches, and enjoy a cozy and stylish bedroom with your personalized masterpiece.
Read more: What Is A Duvet Cover
Materials Needed
Before you embark on your duvet cover dyeing adventure, make sure you have gathered all the necessary materials. Having everything prepared in advance will ensure a smooth and hassle-free process. Here are the materials you will need:
- Duvet Cover: Choose a duvet cover made of natural fibers like cotton or linen. Synthetic materials may not hold the dye as well.
- Fabric Dye: Select a fabric dye that is suitable for the type of fabric your duvet cover is made of. There are various options available, including fiber reactive dyes, all-purpose dyes, and natural dyes.
- Bucket or Large Container: You will need a container large enough to hold the duvet cover and allow for easy stirring.
- Stirring Utensil: A long spoon or stick to stir the dye and duvet cover in the container.
- Gloves: Protect your hands and prevent dye from staining your skin by wearing gloves throughout the process.
- Protective Clothing: Dyeing can be messy, so wear old clothing or an apron to protect your clothes.
- Water: Sufficient water to soak and rinse the duvet cover.
- Detergent: Mild detergent to wash the duvet cover after dyeing.
- Plastic Wrap or Garbage Bags: Cover your work area and protect it from any accidental spills or drips.
- Towels or Old Sheets: Place towels or old sheets under the dyed duvet cover to protect any surfaces it may come into contact with during the drying process.
- Optional: Rubber Bands or String: If you want to create tie-dye patterns or sections on your duvet cover, these will come in handy for creating the desired designs.
Once you have gathered all these materials, you are ready to move on to the next step: selecting the duvet cover. So, let’s dive in and discover how to choose the perfect duvet cover for dyeing!
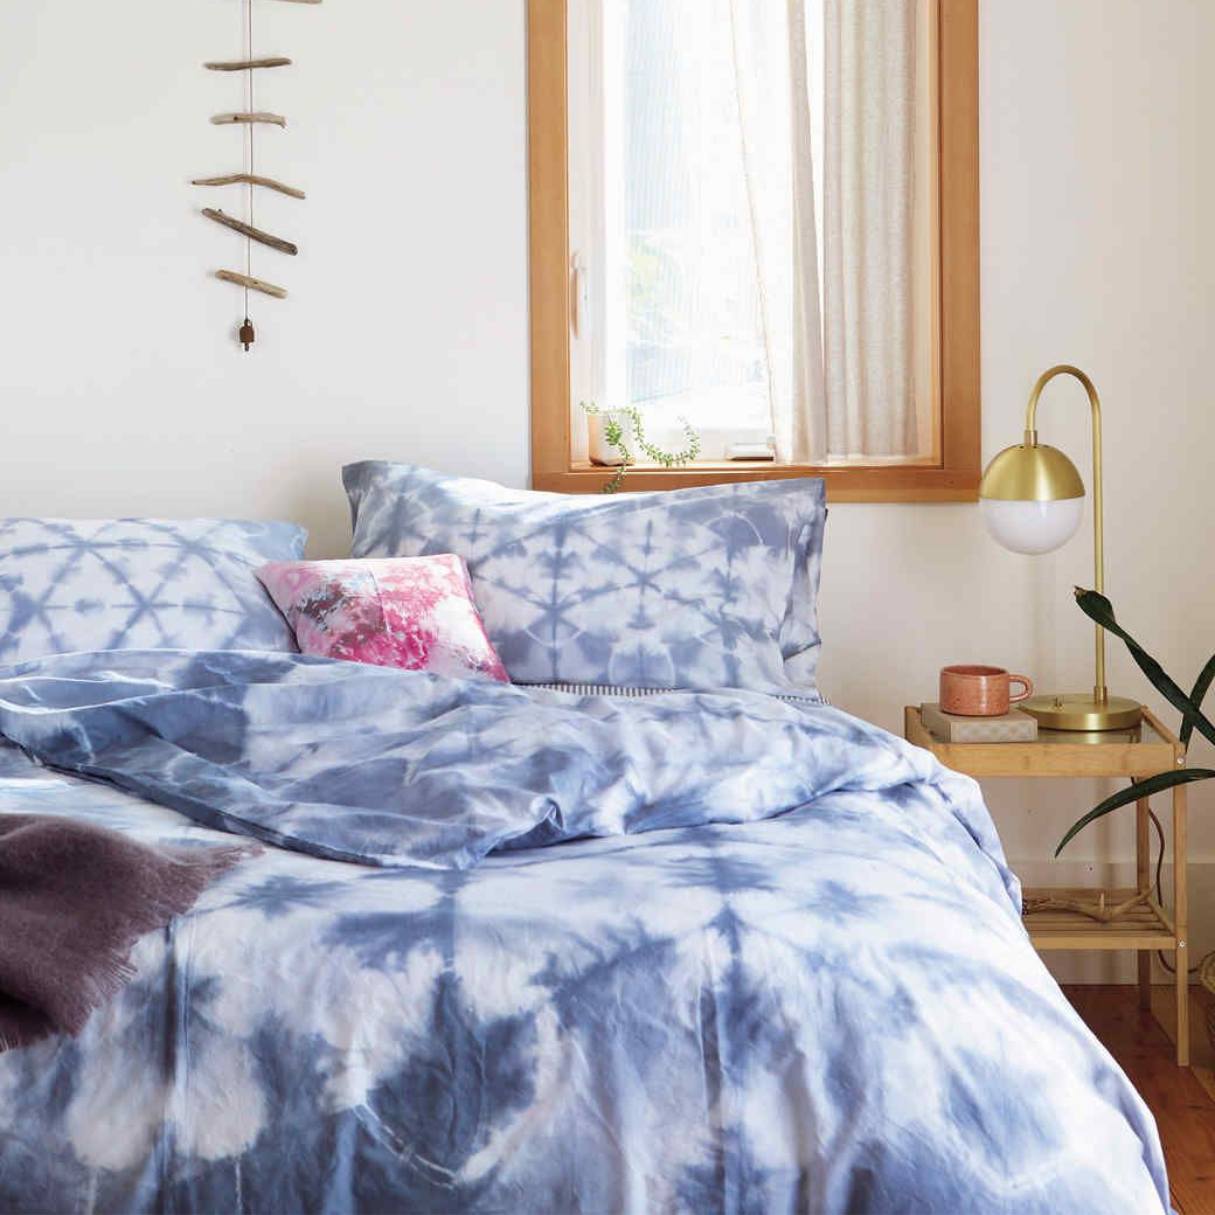
Step 1: Selecting the Duvet Cover
The first step in dyeing a duvet cover is selecting the right one for your project. When choosing a duvet cover, keep in mind the fabric type, color, and design possibilities. Here are some tips to help you make the best choice:
Consider the Fabric Type
Ideally, you want to select a duvet cover made of natural fibers, such as cotton or linen. These fabrics tend to absorb dyes better and result in more vibrant and long-lasting colors. Synthetic materials like polyester may not hold the dye as effectively and can produce less desirable results.
Choose a Light Color or White Duvet Cover
Light-colored or white duvet covers provide a blank canvas for dyeing. They allow the colors of the dye to shine through and give you more control over the final outcome. Dark or heavily patterned duvet covers may affect the color and design you are trying to achieve.
Read more: How To Iron A Duvet Cover
Consider the Design Possibilities
Think about the design you want to create on your duvet cover. If you prefer a solid color, any duvet cover will work. However, if you want to experiment with tie-dye or other patterns, consider choosing a duvet cover with a simple, unobtrusive pattern or one without any pattern at all. This will give you more freedom to create the desired design.
Check the Care Instructions
Before starting the dyeing process, make sure to read and follow the care instructions on the duvet cover. Some duvet covers may have specific requirements when it comes to washing and drying. Ensure that the duvet cover is pre-washed if necessary, to remove any sizing or finish that may interfere with the dye absorption.
Properly Measure the Duvet Cover
Take accurate measurements of the duvet cover to determine the amount of dye needed. This will help you calculate the dye-to-water ratio and ensure even color distribution throughout the fabric.
Once you have considered these factors and selected the perfect duvet cover, you are ready to move on to the next step: preparing the dye. Let’s dive in and discover how to create the perfect dye mixture for your duvet cover dyeing project!
Step 2: Preparing the Dye
Preparing the dye is a crucial step in the duvet cover dyeing process. The type of fabric dye you choose will determine the specific instructions for preparation. Here are some general guidelines to help you get started:
Read more: How To Secure A Duvet Cover
Read the Instructions
Before you begin, carefully read the instructions provided with the fabric dye. Different dyes may have different preparation methods, so it’s important to follow the specific guidelines for the brand and type of dye you are using.
Mixing the Dye
In most cases, fabric dyes require mixing with water and potentially other additives, such as salt or vinegar, to achieve the desired color and dyeing properties. Follow the instructions provided to mix the dye according to the recommended ratios or measurements.
Choosing the Color Intensity
The amount of dye you use will determine the intensity of the color on your duvet cover. If you want a lighter shade, use less dye, and if you prefer a more intense color, add more dye to the mixture. It’s advisable to start with a small amount and gradually increase until you achieve the desired hue.
Test the Dye
Before dyeing the entire duvet cover, it’s a good idea to perform a dye test on a small, inconspicuous area. This will allow you to see the color result and make any adjustments if needed. Remember that the color may appear differently on different fabric types, so the test will give you a better understanding of how the dye will look on your duvet cover.
Read more: How To Shrink A Duvet Cover
Wear Protective Gear
When preparing the dye, make sure to wear gloves and protective clothing to avoid any contact between the dye and your skin or clothing. This will prevent staining and ensure your safety throughout the process.
Once you have prepared the dye mixture and tested it, you are ready to move on to the next step: pre-washing the duvet cover. Let’s continue our journey to transform your duvet cover into a colorful masterpiece!
Step 3: Pre-Washing the Duvet Cover
Before dyeing your duvet cover, it’s essential to pre-wash it. Pre-washing helps to remove any chemicals, dirt, or impurities that may hinder the dye absorption process. Follow these steps to pre-wash your duvet cover effectively:
Check the Care Instructions
Refer to the care instructions provided with your duvet cover to determine the appropriate washing method. Some duvet covers may require a specific water temperature or gentle cycle setting. It’s important to follow these instructions to avoid damaging the fabric.
Separate Colors
If you are dyeing multiple duvet covers or other items simultaneously, make sure to wash each color separately. This prevents any color bleeding or mixing during the pre-wash process.
Read more: How To Wash Buffy Duvet Cover
Use a Gentle Detergent
Select a mild detergent suitable for the fabric type of your duvet cover. Avoid using harsh detergents that contain bleach or other brightening agents, as they may interfere with the dye absorption process.
Pre-Treat Stains
If there are any stains or spots on your duvet cover, pre-treat them before washing. Follow the instructions provided by the stain remover product and allow it to soak in for the recommended time. Gently rub the stained area to help loosen the stain before putting it in the washing machine.
Set the Washing Machine
Place the duvet cover in the washing machine and set the machine according to the care instructions. Use the appropriate water temperature and the recommended cycle for your fabric.
Hang or Tumble Dry
After the pre-wash cycle is complete, you can either hang the duvet cover to air dry or tumble dry it on a low heat setting. Avoid using a high heat setting, as it may shrink or damage the fabric. If in doubt, refer to the care instructions for the recommended drying method.
Once your duvet cover is pre-washed and dry, you are ready to move on to the next step: setting up the dyeing area. Let’s continue our journey to add a burst of color to your duvet cover!
Read more: What Is A Duvet Cover Makeover
Step 4: Setting Up the Dyeing Area
Creating a suitable dyeing area is essential to ensure a smooth and mess-free dyeing process. By setting up a dedicated space, you can concentrate on dyeing your duvet cover without worrying about accidental spills or stains on other surfaces. Follow these steps to set up your dyeing area effectively:
Choose a Well-Ventilated Area
Select a well-ventilated area, such as a patio or garage, where you can comfortably work with the dye. Adequate ventilation will help to dissipate any fumes that may be emitted during the dyeing process.
Cover and Protect Your Work Surface
Cover your work surface with plastic wrap or garbage bags to protect it from any accidental spills or drips. This will make cleanup easier and prevent any dye from staining or damaging the surface.
Read more: How To Shrink A Duvet Cover
Wear Protective Gear
Put on gloves, an apron, or old clothing to protect yourself from potential dye stains. This will ensure that your skin and clothes remain unaffected by the dyeing process.
Read more: How To Bleach A White Duvet Cover
Set Up Containers for Dye
Place a large container, such as a bucket or basin, on your work surface. This container should be big enough to accommodate the duvet cover and allow for easy stirring and movement of the fabric during the dyeing process.
Prepare Dyeing Tools
Have your stirring utensil—such as a long spoon or stick—ready to mix the dye and immerse the duvet cover. Additionally, keep a clean container filled with water nearby for rinsing your stirring utensil during color changes or adjustments.
Arrange Towels or Sheets
Spread out towels or old sheets under the dyeing area. These will cushion the fabric and protect any surfaces it may come into contact with during the dyeing process.
Once you have set up your dyeing area, you are ready to move on to the exciting part: applying the dye to your duvet cover. Let’s dive into the next step and bring some vibrant colors to your bedding!
Step 5: Applying the Dye
Now that your dyeing area is set up and ready, it’s time to apply the dye to your duvet cover. This step is where you can unleash your creativity and add the desired colors and patterns to your bedding. Follow these steps to effectively apply the dye to your duvet cover:
Read more: How Often To Clean Duvet Cover
Submerge the Duvet Cover
Begin by immersing the duvet cover into the dye mixture in the container. Ensure that the entire fabric is completely submerged and that there are no areas left untouched by the dye. Gently move the duvet cover around in the dye bath to ensure even color distribution.
Stir and Agitate
Using your stirring utensil, stir and agitate the duvet cover in the dye bath. This helps the dye penetrate the fabric and achieve an even color result. Continue stirring periodically throughout the dyeing process to prevent any settling or uneven color saturation.
Create Patterns or Designs
If you want to create patterns or designs on your duvet cover, this is the stage to do so. You can use various techniques such as folding, twisting, or tying sections of the fabric with rubber bands or string to create unique patterns. Experiment with different methods to achieve the desired effect.
Check Color Intensity
Periodically check the color intensity of the duvet cover by lifting it partially out of the dye bath. The color will appear darker when wet, so keep this in mind when determining if you need to continue dyeing or if the desired shade has been achieved. If you want a deeper color, leave the duvet cover in the dye bath for a longer period.
Read more: What Is A Duvet Cover And Sham
Adjust and Mix Colors
If you are working with multiple dyes or want to create a gradient effect, you can adjust the colors by adding more dye or water to the container. Mix the colors well to ensure a smooth transition and blend between the different dye shades.
Follow Dyeing Time Recommendations
Refer to the instructions provided with your fabric dye for the recommended dyeing time. This may vary depending on the brand and type of dye you are using. It’s crucial to follow these guidelines to achieve the best color result and ensure the durability of the dye.
Once you have finished applying the dye and are satisfied with the color and design, it’s time to move on to the next step: dyeing the duvet cover. Let’s dive into the dyeing process and bring your duvet cover to life with vibrant hues!
Step 6: Dyeing the Duvet Cover
In this step, you will actually dye the duvet cover, transforming it into a vibrant and colorful piece of art. Follow these steps to effectively dye your duvet cover and achieve the desired result:
Wring Out Excess Dye
Before removing the duvet cover from the dye bath, gently wring out any excess dye by squeezing the fabric. This will help prevent excessive dripping and minimize dye transfer during the rinsing process.
Read more: What Is The Purpose Of A Duvet Cover?
Rinse the Duvet Cover
Take the dyed duvet cover to a nearby sink or tub and rinse it thoroughly with cool water. Rinse until the water runs clear, indicating that most of the excess dye has been removed. This step helps to reduce any bleeding of colors and prepares the fabric for further washing.
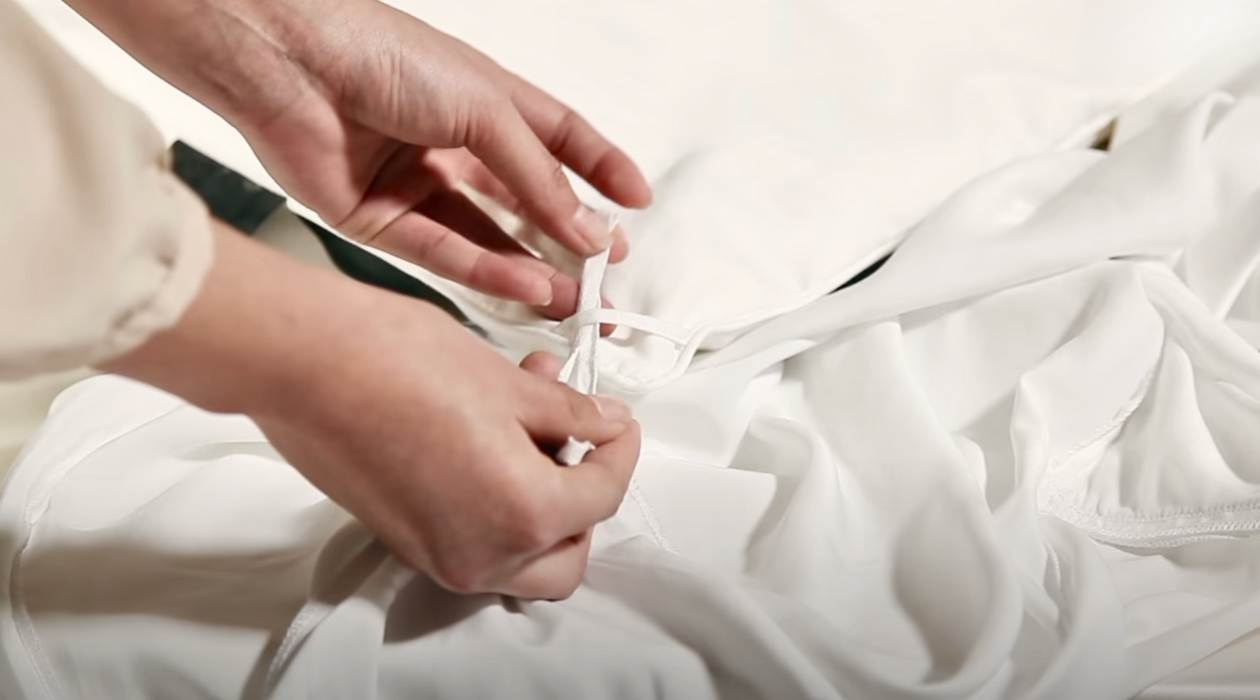
Remove Tie-Dye Materials (If Applicable)
If you used rubber bands or string to create tie-dye patterns on your duvet cover, carefully remove them now. Be gentle to avoid smudging or smearing the design.
Wash the Duvet Cover
Place the dyed duvet cover in the washing machine and wash it on a gentle cycle with a mild detergent. This will help to further remove any residual dye and ensure that the duvet cover is clean and ready for use. Follow the care instructions provided with your duvet cover for the appropriate water temperature and cycle settings.
Inspect the Color Result
After washing, inspect the color result of the dyed duvet cover. It may appear slightly lighter when dry, so carefully assess whether the color achieved meets your expectations. If you desire a deeper or richer color, you can repeat the dyeing process with the same or different dye.
Hang or Tumble Dry
After washing, either hang the duvet cover to air dry or tumble dry it on a low heat setting. Make sure to follow the care instructions provided with your duvet cover to determine the appropriate drying method. Avoid using high heat, as it may damage the fabric or cause the colors to fade.
Congratulations! You have successfully dyed your duvet cover and transformed it into a personalized piece of artwork. Now, let’s move on to the next step: rinsing and washing your duvet cover for the final touch-ups before enjoying your newly transformed bedding!
Step 7: Rinsing and Washing the Duvet Cover
After dyeing your duvet cover, it’s important to give it a thorough rinse and wash to remove any remaining dye and ensure the best color retention. Follow these steps to effectively rinse and wash your duvet cover:
Rinse under Cold Water
Take the dyed duvet cover to a sink or tub and rinse it thoroughly under cold water. This will help to remove any residual dye that may still be present after the initial rinse. Continue rinsing until the water runs clear and there is no more color bleeding.
Perform a Color Fixing Rinse (Optional)
If you want to further enhance the colorfastness of your dyed duvet cover, you can perform a color fixing rinse. Dissolve a cup of white vinegar in a large container filled with cold water. Submerge the duvet cover in the mixture and let it soak for about 15 minutes. This step can help to set the color and prevent it from fading or bleeding.
Read more: How To Put On An IKEA Duvet Cover
Wash with a Mild Detergent
Place the rinsed duvet cover in the washing machine and wash it on a gentle cycle with a mild detergent. Use the recommended amount of detergent according to the instructions provided by the manufacturer. This will help to remove any remaining dye particles and ensure that the duvet cover is thoroughly clean and ready for use.
Avoid Harsh Chemicals and Bleach
When washing your duvet cover, avoid using harsh chemicals or bleach. These can affect the color integrity and durability of the dye. Stick to gentle detergents specifically formulated for colored fabrics to maintain the vibrancy of your dyed duvet cover.
Inspect and Dry
After washing, carefully inspect the duvet cover to ensure that all dye residue has been removed and that the colors remain vibrant. Hang the duvet cover to air dry or tumble dry it on a low heat setting as per the care instructions. Avoid exposing it to direct sunlight, as this can cause the colors to fade over time.
Once your duvet cover is rinsed, washed, and dried, it’s time to move on to the final step: drying and adding the finishing touches. Let’s complete the process and prepare your duvet cover for a cozy night’s sleep in style!
Step 8: Drying and Finishing Touches
In this final step, you will ensure that your dyed duvet cover is properly dried and ready for use. Additionally, you can add some finishing touches to enhance its appearance. Follow these steps to complete the process:
Hang or Tumble Dry
Once the duvet cover is washed, carefully remove it from the washing machine and shake it gently to remove any wrinkles. You can then hang it on a clothesline or clothing rack to air dry. Alternatively, you can tumble dry it on a low heat setting. Make sure to follow the care instructions provided with your duvet cover to determine the appropriate drying method.
Smooth and Iron (Optional)
If your duvet cover has any wrinkles after drying, you can smooth them out by hand or use a steam iron on a low heat setting. Check the fabric care instructions to ensure that ironing is suitable for the type of fabric you have used. Avoid ironing directly on any decorative designs or patterns to prevent damage.
Add Additional Embellishments (Optional)
To give your duvet cover a personalized touch, you can consider adding some additional embellishments, such as decorative trim, fabric buttons, or embroidery. These extra touches can further enhance the overall look and make your dyed duvet cover truly unique. Get creative and have fun with it!
Make the Bed
Once your duvet cover is completely dry and any finishing touches have been added, it’s time to make the bed. Insert your duvet or comforter into the cover, smooth out any wrinkles, and adjust it to your desired position. Step back and admire your beautifully transformed duvet cover, now a stunning centerpiece of your bedroom decor.
Read more: How To Wash A Silk Duvet Cover
Enjoy Your New Duvet Cover
Now that you have successfully dyed, washed, and finished your duvet cover, it’s time to enjoy its vibrant colors and unique design. Curl up under your cozy and stylish duvet cover and revel in the satisfaction of creating a personalized piece of bedding that reflects your own creativity and style.
By following these steps, you have successfully dyed your duvet cover and given it a fresh, new look. Embrace the process, have fun, and let your imagination run wild. Now, it’s time to enjoy your transformed duvet cover and bring a touch of color and personality to your bedroom.
Conclusion
Congratulations on successfully dyeing your duvet cover! You have taken a plain, ordinary piece of bedding and transformed it into a vibrant and personalized masterpiece. By following the steps outlined in this guide, you have unleashed your creativity and added a touch of color and individuality to your bedroom decor.
Dyeing a duvet cover allows you to express your unique style and make a bold statement in your bedroom. Whether you chose a bold and vibrant color or a subtle and soothing shade, your newly dyed duvet cover reflects your personality and adds a personalized touch to your sleeping sanctuary.
Throughout the process, you have learned how to select a suitable duvet cover, prepare the dye, pre-wash the fabric, set up a dyeing area, apply the dye, rinse and wash the duvet cover, and add the final finishing touches. Each step was crucial in achieving the best dye result and ensuring the longevity of your dyed duvet cover.
Remember, the key to successful dyeing is to follow the instructions provided with your specific dye product and to embrace your creativity. Don’t be afraid to experiment with different color combinations, patterns, and techniques. Each dyeing project is an opportunity to create a unique and personal work of art.
Now, it’s time to proudly showcase your dyed duvet cover and enjoy its vibrant colors and unique design. Let it become the focal point of your bedroom, breathing new life into your space. Whether you’ve created a bold, eye-catching duvet cover or a subtle, soothing work of art, your finished product will enhance the ambiance and create a cozy haven for rest and relaxation.
Thank you for taking this colorful journey with us and for embracing the art of duvet cover dyeing. We hope you’ve found this guide informative and inspiring. So, go ahead, snuggle up, and revel in the comfort and style of your newly dyed duvet cover!
Frequently Asked Questions about How To Dye A Duvet Cover
Was this page helpful?
At Storables.com, we guarantee accurate and reliable information. Our content, validated by Expert Board Contributors, is crafted following stringent Editorial Policies. We're committed to providing you with well-researched, expert-backed insights for all your informational needs.
0 thoughts on “How To Dye A Duvet Cover”