Articles
How To Make Memory Shirt Pillows
Modified: December 7, 2023
Learn how to turn your old articles of clothing into cozy memory shirt pillows with our step-by-step guide. Transform your memories into functional keepsakes today!
(Many of the links in this article redirect to a specific reviewed product. Your purchase of these products through affiliate links helps to generate commission for Storables.com, at no extra cost. Learn more)
Introduction
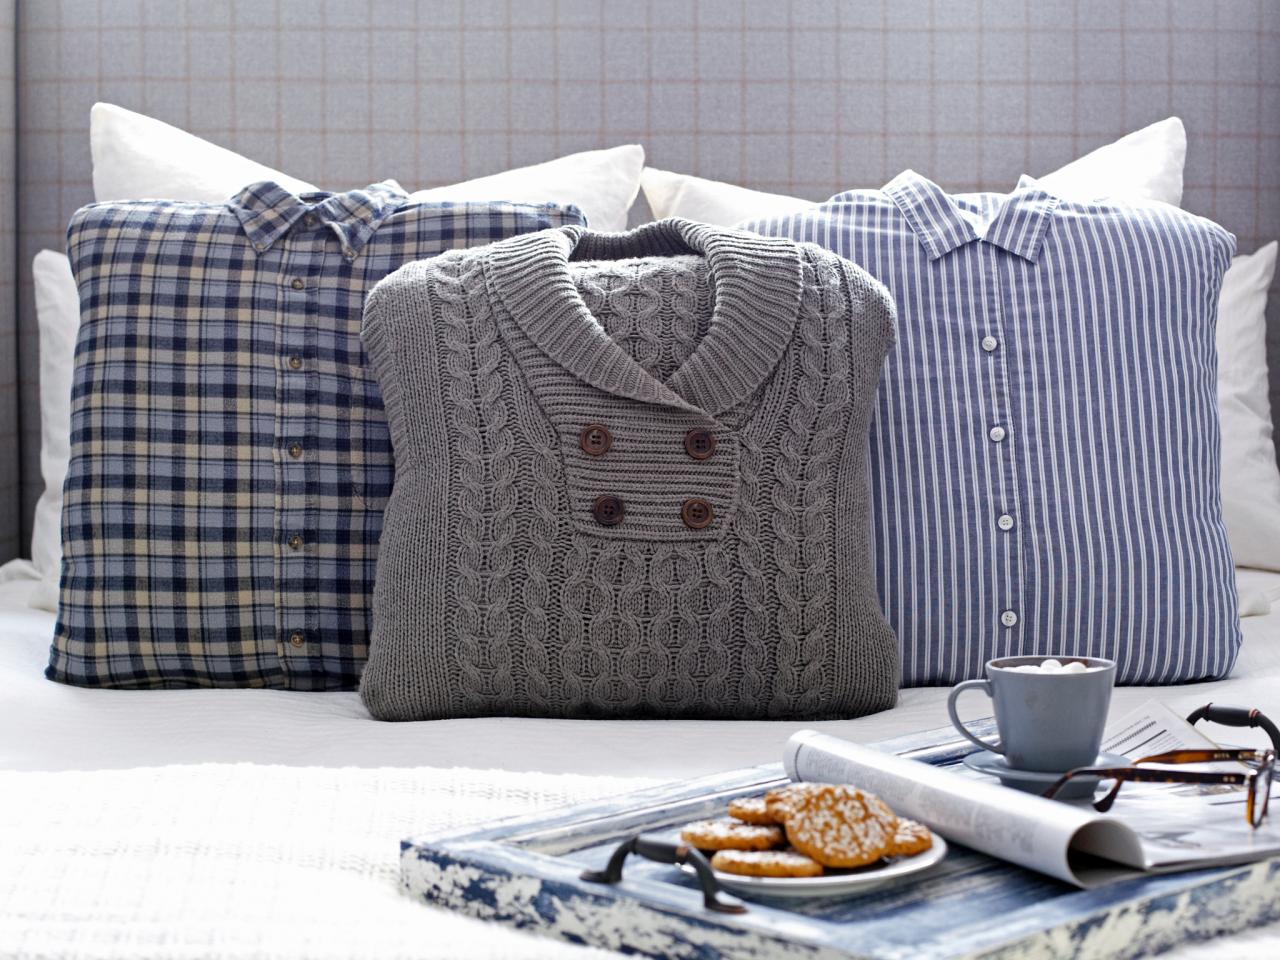
Creating memory shirt pillows is a wonderful way to preserve sentimental clothing items and turn them into cherished keepsakes. Whether it’s a beloved t-shirt from a special event or a shirt worn by a loved one who has passed away, transforming it into a cozy pillow allows you to hold onto the memories associated with it.
Not only do memory shirt pillows provide comfort and warmth, but they also serve as a tangible reminder of past experiences and the people who were a part of them. Plus, they make beautiful decorative accents for your home or thoughtful gifts for friends and family.
In this article, we will guide you through the step-by-step process of creating your own memory shirt pillows. We will cover everything from gathering the necessary materials to adding optional embellishments to make your pillows even more unique.
So grab those special shirts that hold sentimental value and let’s get started on this creative journey of transforming them into cherished memory pillow keepsakes.
Key Takeaways:
- Preserve cherished memories by transforming sentimental shirts into cozy memory pillows, creating tangible keepsakes that evoke emotions and trigger fond recollections of special moments and loved ones.
- Share the joy of memory shirt pillows as heartfelt gifts, allowing others to hold onto their cherished memories in a comforting and tangible way, while adding a unique touch with optional embellishments.
Read more: How To Use A Memory Foam Pillow
Materials Needed
Before getting started, make sure you have the following materials on hand:
- A shirt or multiple shirts with sentimental value
- Scissors
- Needle and thread or sewing machine
- Pillow stuffing or fiberfill
- Straight pins
- Measuring tape or ruler
- Optional: fabric marker or chalk
The key material for creating memory shirt pillows is, of course, the shirt(s) that hold sentimental value. Choose a shirt that carries special memories for you or your loved one. It could be a sports jersey, concert t-shirt, or a shirt worn on a memorable vacation.
Ensure that the shirt is in good condition and clean before starting the pillow-making process. If you have multiple shirts, you can combine them to create a unique patchwork design for your pillow.
Sharp scissors are essential for cutting out the shirt panels, so make sure you have a pair on hand. If you are comfortable with a sewing machine, you can use it to stitch the panels together. Otherwise, a needle and thread will work just fine.
Pillow stuffing or fiberfill is needed to fill the pillow and give it a soft, comfortable feel. You can find this at craft stores or online. Alternatively, if you have an old pillow that you no longer use, you can repurpose its stuffing for this project.
Straight pins will come in handy for holding the shirt panels together while sewing. A measuring tape or ruler will be useful for ensuring accurate cuts and measurements.
Lastly, if you want to mark the shirt panels before cutting them, you can use a fabric marker or chalk that can be easily wiped off once the cuts are made.
Now that you have all the necessary materials, let’s move on to the step-by-step process of making memory shirt pillows.
Step 1: Gather Your Materials
Before you begin creating your memory shirt pillows, ensure that you have gathered all the necessary materials. Having everything at hand will make the process smoother and more enjoyable.
Start by selecting the shirts that hold sentimental value to you or your loved ones. These could be shirts worn on special occasions, shirts that carry happy memories, or shirts that belonged to a loved one who has passed away.
Once you have chosen the shirts, make sure they are clean and in good condition. If needed, wash and iron them to ensure a neat and fresh appearance for your pillows.
Gather all your materials in one place: the shirt(s), scissors, needle and thread or sewing machine, pillow stuffing or fiberfill, straight pins, measuring tape or ruler, and any optional marking tools like fabric markers or chalk.
If you plan to combine multiple shirts to create a patchwork design, lay them out and visualize how you want the panels to fit together. This will help you determine which parts of the shirts to cut and how to arrange them.
Having all your materials organized and ready will save you time and make the pillow-making process more efficient. It will also make it easier to execute each step as you won’t need to constantly search for or gather different items throughout the process.
Once you have gathered all your materials, it’s time to move on to the next step: preparing the shirts for cutting.
Step 2: Prepare the Shirt
Now that you have gathered your materials, it’s time to prepare the shirt for cutting. This step involves removing any components of the shirt that you don’t want to include in your memory pillow, such as buttons, zippers, or pockets.
Start by examining the shirt and identifying any elements that you want to exclude. Carefully cut and remove buttons, zippers, or other embellishments that may interfere with the cutting and sewing process.
For pockets, you have two options: you can either remove them completely or sew them shut and leave them intact as a decorative feature on your pillow. Choose whichever option you prefer based on the look and feel you want to achieve.
If there are any large graphics or designs on the shirt that you want to showcase on the pillow, make sure they are centered and positioned correctly before proceeding to the next step. You can use straight pins to hold them in place temporarily.
Take your time during this step to ensure that the shirt is prepared exactly as you want it. By doing so, you will have greater control over the design and appearance of your memory pillow.
Once you are satisfied with the preparation of the shirt, it’s time to move on to the next step: cutting out the shirt panels.
Step 3: Cut Out Shirt Panels
With the shirt prepared, it’s time to cut out the panels that will form the front and back of your memory shirt pillow. This step requires precision and careful attention to detail.
Start by determining the size of the panels you want for your pillow. Measure and mark the desired dimensions on the shirt using a measuring tape or ruler. You can choose a square or rectangular shape, depending on your preference.
If you are using multiple shirts to create a patchwork design, plan out the placement of each shirt panel accordingly. Consider the designs, graphics, or sentimental elements of each shirt and arrange them in a harmonious way.
Once you have marked the dimensions and placement of the panels, it’s time to start cutting. Use sharp scissors to cut along the marked lines, ensuring clean and even cuts. Take your time and be mindful of any details or designs that you want to preserve.
Remember to cut two panels of the same size—one for the front and one for the back of the pillow. If you want to include any specific parts of the shirt, such as logos or images, make sure they are centered on the panels.
If you are creating a patchwork design, cut the panels from different shirts and arrange them in the desired pattern. Pay attention to aligning the edges and matching any specific elements or motifs.
After cutting the panels, double-check that they are the desired size and shape. Make any necessary adjustments if needed.
Now that you have successfully cut out the shirt panels, the next step is to sew them together to form the pillow. This step will bring your memory shirt pillow one step closer to completion.
When making memory shirt pillows, be sure to carefully cut and preserve any meaningful designs or logos from the shirt to incorporate into the pillow design.
Read more: What Is A Memory Foam Pillow
Step 4: Sew the Panels Together
Now that you have the shirt panels cut out, it’s time to sew them together to create the body of your memory shirt pillow. This step will bring your pillow to life and transform the cut pieces into a cohesive and functional item.
Begin by placing the front panel and back panel of the pillow together, with the right sides facing each other. Align the edges carefully to ensure a neat finished product.
If you have chosen to include any specific designs or graphics on the panels, make sure they are properly aligned and centered.
Once the panels are aligned, pin them together along the edges using straight pins. This will hold the panels securely in place and prevent them from shifting while you perform the sewing.
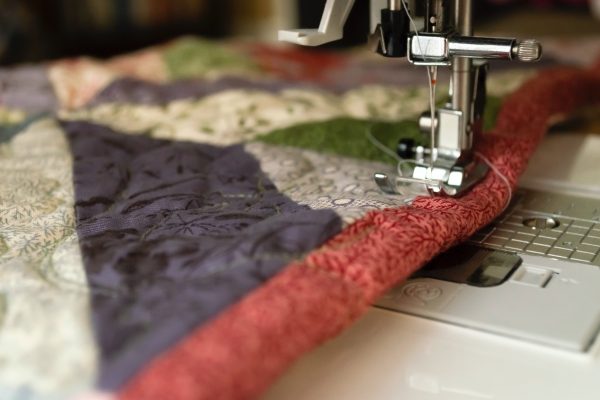
Now, it’s time to sew the panels together. You can choose to use a sewing machine or hand-stitch with a needle and thread, depending on your comfort level and access to equipment.
If using a sewing machine, use a straight stitch and carefully sew along the pinned edges, leaving a small opening for stuffing later. Remove the pins as you go to ensure smooth stitching.
If hand-stitching, use a strong and durable thread that matches the color of the shirt panels. Employ a basic stitch, such as a running stitch or backstitch, to secure the panels together.
Whichever sewing method you choose, make sure to sew with precision and attention to detail. This will ensure a secure and visually pleasing seam for your memory shirt pillow.
Once you have sewn the panels together, remove any remaining pins and turn the pillowcase right-side out through the opening. Use your fingers or a blunt object to gently push out the corners for a neat and well-defined shape.
Now that the panels are securely sewn together and the pillow is taking shape, it’s time to move on to the next step: stuffing the pillow.
Step 5: Stuff the Pillow
With the panels sewn together and the pillowcase turned right-side out, it’s time to bring your memory shirt pillow to life by adding stuffing. This step will give your pillow its soft and comfortable texture, transforming it into a cuddly keepsake.
Start by gathering your pillow stuffing or fiberfill. Ensure you have enough to achieve your desired level of firmness and plushness. You can find pillow stuffing at craft stores or online, or repurpose the stuffing from an old pillow.
Begin by carefully inserting small amounts of the stuffing through the opening in the pillowcase. Use your fingers or a small blunt object, such as a pencil or chopstick, to evenly distribute the stuffing throughout the pillow.
Continue adding stuffing, gradually filling the pillow to your desired level of fullness. Be mindful not to overstuff, as this can lead to a lumpy or misshapen pillow. Instead, aim for a balanced and comfortable feel.
As you add more stuffing, periodically push it towards the corners and edges of the pillow to ensure even distribution and a smooth shape. This will help maintain the overall symmetry and structure of the pillow.
Take breaks to fluff and adjust the stuffing as needed, making sure the pillow feels uniform and comfortable. Pay attention to any areas that may require additional stuffing to achieve a visually pleasing appearance.
Once you are satisfied with the level of stuffing and the overall shape of the pillow, it’s time to move on to the final step: sewing the pillow closed.
Remember, the stuffing process is crucial in determining the comfort and appearance of your memory shirt pillow. Take your time and adjust it according to your preferences until you achieve the desired result.
Step 6: Sew the Pillow Closed
With the pillow stuffed to your liking, it’s time to sew the opening closed to complete your memory shirt pillow. This final step will give your pillow a polished and finished look.
First, fold the raw edges of the opening inside, so they align with the sewn edges of the pillow. Use straight pins to hold the folded edges in place and ensure a clean finish.
Next, choose your preferred sewing method. You can use a needle and thread to hand-stitch the opening closed, or you can use a sewing machine if you feel more comfortable with a machine stitch.
If hand-stitching, use a thread color that matches the fabric of the pillow. Employ a small, hidden stitch, such as a slip stitch or ladder stitch, to sew the opening closed. Make sure your stitches are secure and evenly spaced.
If using a sewing machine, carefully sew along the folded edges, ensuring that the stitching blends seamlessly with the rest of the pillow. Backstitch at the beginning and end to secure the thread and prevent unraveling.
As you sew, remove the straight pins to avoid sewing over them. Take your time and maintain a steady pace to ensure a smooth and professional-looking seam.
Once you have completed sewing, double-check for any loose threads and trim them close to the seam to give your pillow a clean and tidy appearance.
With the final stitch in place, your memory shirt pillow is now fully closed and ready to be enjoyed. Take a moment to admire your handiwork and the sentimental value it carries.
Now that your memory shirt pillow is complete, it’s time for one final step: optional embellishments to add an extra personal touch.
Step 7: Optional Embellishments
While your memory shirt pillow is undoubtedly beautiful on its own, you can further personalize it by adding optional embellishments. These additional touches will make your pillow even more unique and reflective of the memories it holds.
Consider the following embellishment ideas:
- Embroidery or Appliqué: Add embroidered details, patches, or appliqués to the pillow to enhance its design. This could include names, dates, or meaningful symbols.
- Buttons or Ribbons: Sew decorative buttons or ribbons onto the pillow to give it extra flair and visual interest.
- Photo Transfers: If you have a special photo associated with the shirt or the memory it represents, consider transferring it onto fabric and incorporating it into the pillow’s design.
- Personalized Messages: Use fabric markers or embroidery to add personal messages, quotes, or memories directly onto the pillow.
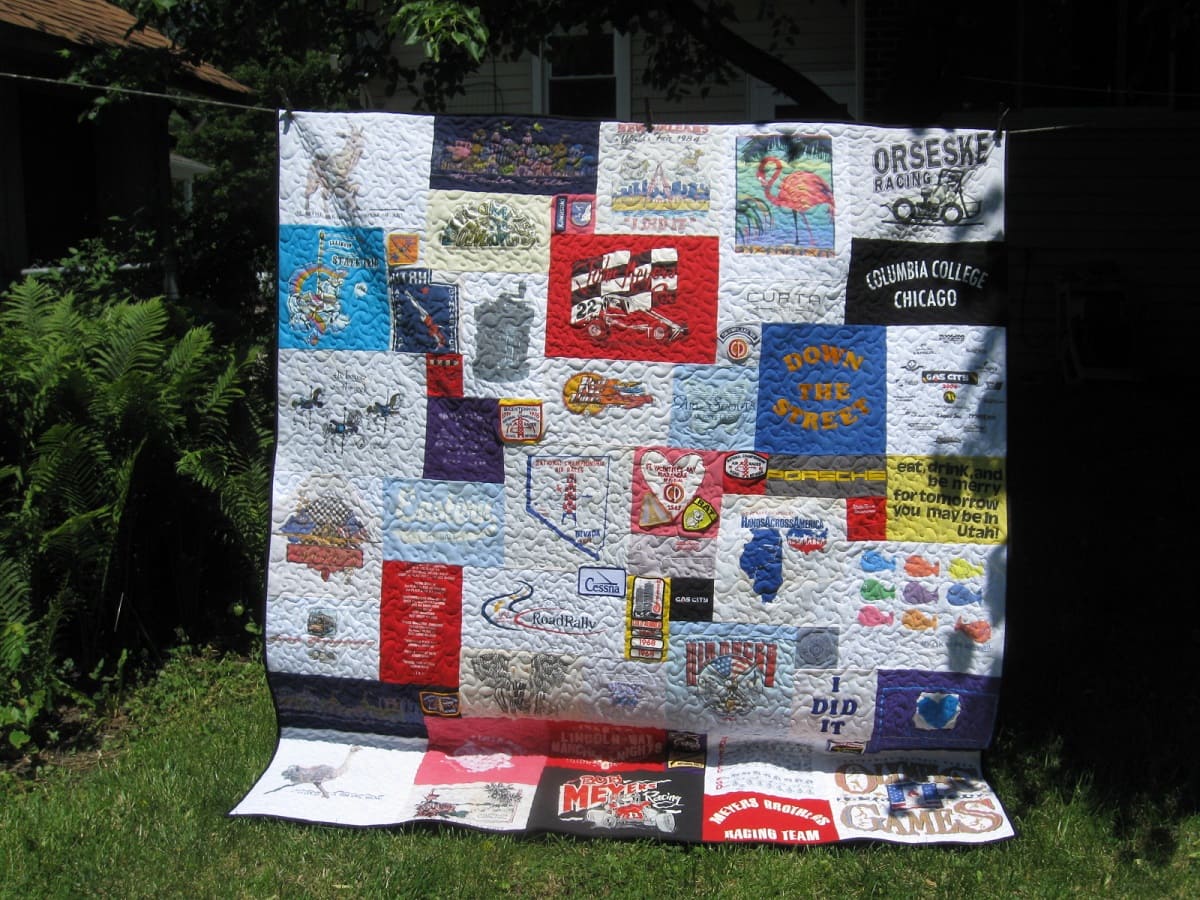
- Patchwork or Quilting: If your pillow is made from multiple shirts, consider incorporating patchwork or quilting techniques to highlight different fabrics and create a layered effect.
The choice of embellishments is entirely up to you and should align with your personal style and the memories associated with the shirt. Select options that resonate with the sentiment you want to convey.
When adding embellishments, take care not to overwhelm the main design of the pillow. The goal is to enhance and complement the existing elements, creating a harmonious and cohesive final product.
Once your embellishments are in place, step back and admire the unique character and sentimental value infused into your memory shirt pillow.
Now that you have completed all the steps, you can proudly display your one-of-a-kind memory shirt pillow or gift it to someone special, knowing that it holds cherished memories and serves as a symbol of love and remembrance.
Read more: How To Dry A Memory Foam Pillow
Conclusion
Congratulations! You have successfully completed the process of creating your very own memory shirt pillows. These pillows are not only cozy and decorative, but they also hold deep sentimental value and preserve cherished memories.
Throughout this article, we discussed the step-by-step process of making memory shirt pillows, from gathering the materials to adding optional embellishments. By following these steps, you transformed sentimental shirts into beautiful and meaningful keepsakes.
Remember, the beauty of memory shirt pillows lies in their ability to evoke emotions and trigger fond memories. Each time you rest your head or see the pillow on your sofa, it will serve as a gentle reminder of precious moments, events, or loved ones.
Don’t forget to share the joy of memory shirt pillows with others. They make heartfelt gifts for family and friends, allowing them to hold on to their own cherished memories in a tangible and comforting way.
Now that you have the knowledge and skills to create these special pillows, feel free to experiment with different shirt designs, color combinations, and embellishments. Make each pillow a unique reflection of the memories it encapsulates.
Thank you for joining us on this creative and sentimental journey. We hope you enjoy the process of making memory shirt pillows and that they bring you warmth, comfort, and a sense of nostalgia for years to come.
Frequently Asked Questions about How To Make Memory Shirt Pillows
Was this page helpful?
At Storables.com, we guarantee accurate and reliable information. Our content, validated by Expert Board Contributors, is crafted following stringent Editorial Policies. We're committed to providing you with well-researched, expert-backed insights for all your informational needs.

0 thoughts on “How To Make Memory Shirt Pillows”