Articles
How Do You Make A Memory Quilt
Modified: November 1, 2024
Discover the step-by-step process of creating heartfelt memory quilts in our informative articles. Transform cherished fabrics into beautiful keepsakes.
(Many of the links in this article redirect to a specific reviewed product. Your purchase of these products through affiliate links helps to generate commission for Storables.com, at no extra cost. Learn more)
Introduction
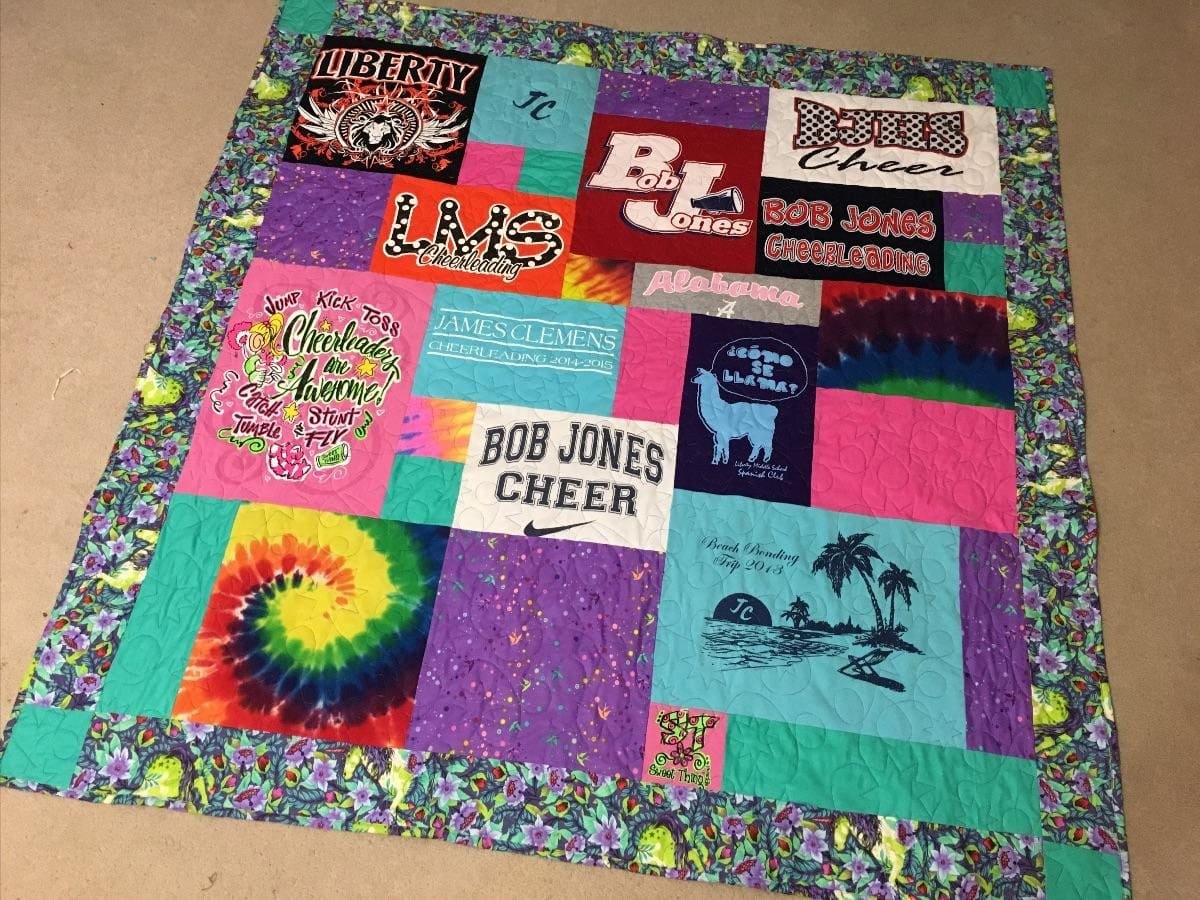
A memory quilt is a beautiful and meaningful way to preserve and celebrate the memories of loved ones, special events, or important milestones in your life. It is a creative and personalized project that allows you to showcase cherished clothing items, photographs, or other memorabilia in a functional and artistic way.
Creating a memory quilt requires careful thought and planning to ensure that the finished piece truly represents the memories and emotions you want to capture. In this article, we will guide you through the process of making a memory quilt, from selecting and preparing your materials to the final finishing touches.
Whether you are an experienced quilter or a novice looking to embark on your first quilting project, this article will provide you with the step-by-step instructions and tips you need to create a one-of-a-kind memory quilt that will be cherished for years to come.
Before we dive into the details of making a memory quilt, let’s take a moment to explore the reasons why many people choose to create these beautiful keepsakes. A memory quilt can serve as a way to honor a loved one who has passed away, preserve the memories of a special trip or event, commemorate a wedding or anniversary, or simply capture the essence of a particular time in your life.
Regardless of the purpose, a memory quilt is a tangible reminder of the moments, people, and experiences that have shaped who we are. It provides comfort, warmth, and a sense of connection to the past. It is a labor of love that allows us to express our creativity while honoring the memories that hold a special place in our hearts.
Now that we have explored the significance of a memory quilt, let’s move on to the first step in the process – choosing and gathering the materials for your quilt.
Key Takeaways:
- Crafting a memory quilt is a heartfelt journey that weaves cherished memories into a tangible work of art, preserving the essence of loved ones, special events, and life’s meaningful moments.
- Each step of creating a memory quilt, from selecting materials to adding optional embellishments, is an opportunity to infuse personal meaning and creativity, resulting in a future heirloom to be treasured for generations.
Read more: How Do You Make A Barn Quilt
Choosing and Gathering Materials
When it comes to making a memory quilt, the materials you choose will play a significant role in telling your story and preserving your memories. Here are some tips to help you select and gather the materials for your quilt:
- Memory items: Start by identifying the clothing items, photographs, or other memorabilia that hold special meaning to you. It could be your loved one’s favorite shirt, a baby blanket, a concert ticket, or any other item that evokes memories. Make a list of these items to guide you in the next steps.
- Fabric: Choose a fabric for the quilt top that complements your memory items. Consider the color palette, patterns, and textures that resonate with the memories you want to capture. You can use new fabric, repurpose old clothing, or even incorporate fabric from sentimental items like curtains or bed sheets.
- Backing fabric: Select a fabric for the back of your quilt that is durable and complements the design of the quilt top. This fabric will provide the stability and structure for your quilt.
- Batting: Batting is the layer of material that goes between the quilt top and backing to provide insulation and loft. Choose a batting that suits your desired level of warmth and thickness.
- Thread: Invest in high-quality thread that matches the colors of your fabrics. The thread should be strong enough to withstand the quilting process and hold your quilt together over time.
- Tools and equipment: Ensure that you have the necessary sewing tools and equipment, such as a sewing machine, scissors, rotary cutter, cutting mat, ruler, pins, and needles. Having these tools readily available will make the quilting process smoother and more efficient.
Once you have gathered all the necessary materials, organize them in a way that makes it easy for you to access and work with them throughout the quilt-making process. You may want to separate the memory items into individual zip-top bags, label each bag, and store them together with the fabric and other supplies.
Remember, the materials you choose should reflect the memories you want to capture and evoke the emotions associated with them. Take your time in selecting and gathering the materials, as they will be the building blocks of your memory quilt.
Now that you have your materials ready, let’s move on to the next step – selecting and preparing the memory items for your quilt.
Selecting and Preparing Memory Items
Once you have gathered the materials for your memory quilt, it’s time to select and prepare the memory items that will be incorporated into the quilt. Here are the steps to follow:
- Assess your memory items: Take a close look at each memory item you have collected. Check for any damage or stains that may affect the overall appearance of the quilt. Evaluate the sentimental value and relevance of each item to ensure that it aligns with the story you want to tell.
- Wash and prepare the items: If your memory items are clothing or fabric-based, gently wash and clean them before using them in your quilt. Follow the care instructions on the labels and use mild detergent. If possible, air dry the items to prevent any damage or shrinkage.
- Cut or disassemble: Depending on the size and shape of your memory items, you may need to cut them into smaller pieces or disassemble them to incorporate them into your quilt. For example, you can cut a favorite t-shirt into squares or other geometric shapes.
- Stabilize delicate items: If you have delicate or fragile items, such as lace or delicate embroidery, consider using an iron-on stabilizer or interfacing to reinforce the fabric. This will help prevent any stretching or tearing during the quilting process.
- Store and label: As you prepare the memory items, keep them organized and labeled. Store them in separate containers or bags to ensure that they stay safe and easily accessible throughout the quilt-making process.
Remember, the goal is to preserve and honor these memory items while incorporating them into the quilt design. Be mindful of their sentimental value and handle them with care.
Once you have selected and prepared your memory items, you are ready to move on to the next step – designing the layout of your quilt.
Designing Your Quilt Layout
Designing the layout of your memory quilt is an exciting and creative process that allows you to showcase your memory items in a visually appealing and meaningful way. Here are some steps to help you design your quilt layout:
- Lay out your memory items: Start by spreading out your memory items on a design wall, table, or floor. Experiment with different arrangements and combinations to see how the items complement each other. Consider the colors, patterns, sizes, and textures of the fabrics to create a visually pleasing composition.
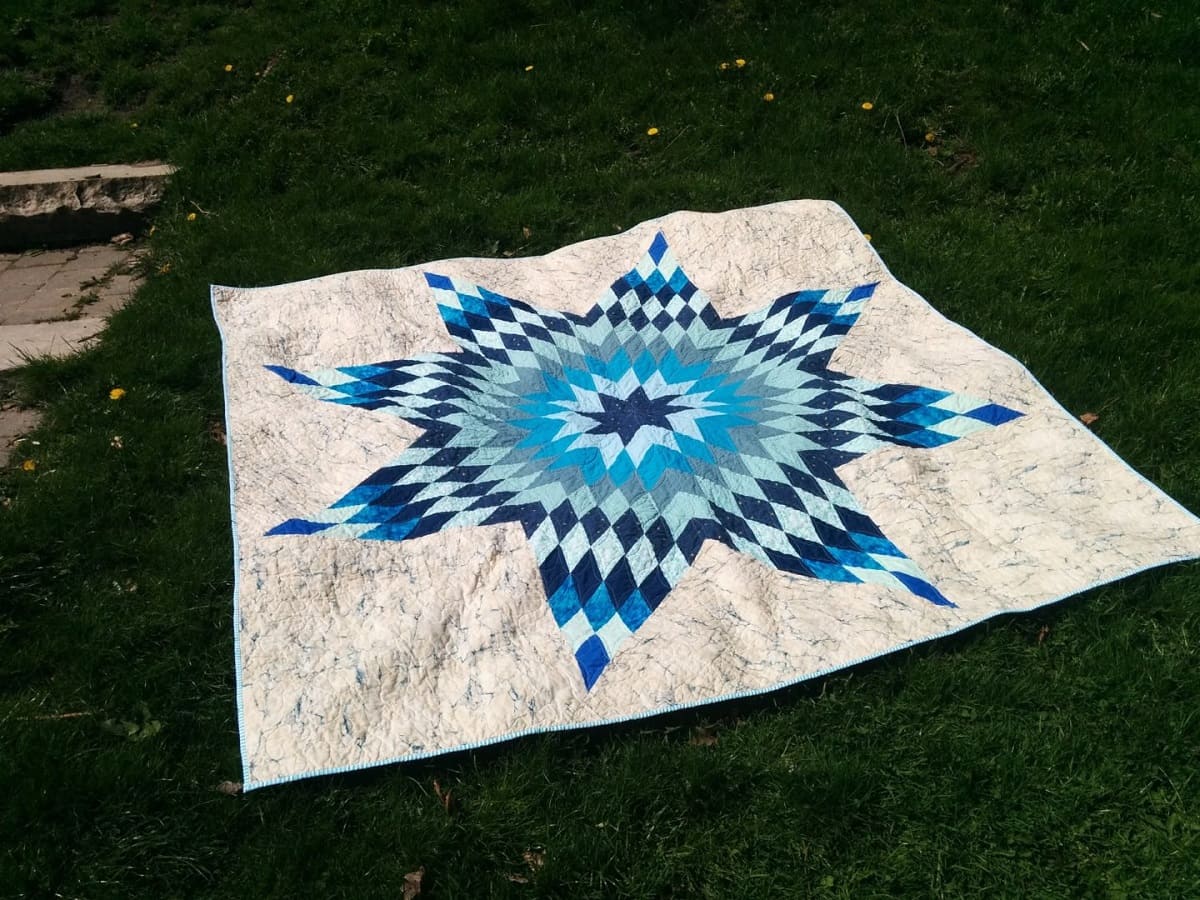
- Create a focal point: Identify a focal point for your quilt, which can be a central memory item or a combination of items. Arrange the other memory items around this focal point to create a cohesive and balanced design. Pay attention to the placement of colors and textures to ensure a visually appealing result.
- Add borders or sashing: Borders and sashing can help frame and separate different sections of your quilt. Consider adding contrasting or complementary fabrics to enhance the overall design. Experiment with different widths and patterns to find the look that best suits your vision.
- Consider symmetry and balance: Strive for symmetry and balance in your quilt layout. Distribute the memory items evenly throughout the quilt to create a sense of harmony. Pay attention to the visual weight of each item and adjust their placement accordingly.
- Take photos and step back: Once you are satisfied with your quilt layout, take photos from different angles and distances. This will give you a fresh perspective and help you identify any adjustments or improvements that may be necessary. Step back and assess the overall look and feel of the design.
Remember, the layout of your memory quilt is a personal and subjective choice. Trust your instincts and let the memories guide your creative decisions. Don’t be afraid to experiment and try different arrangements until you find the perfect layout that reflects your story and vision.
Once you have finalized your quilt layout, it’s time to move on to the next step – cutting and sewing the quilt top.
Cutting and Sewing the Quilt Top
Now that you have designed the layout of your memory quilt, it’s time to bring your vision to life by cutting and sewing the quilt top. Follow these steps to ensure a successful quilting process:
- Measure and cut your fabric: Refer to your quilt design and measurements to determine the size of each fabric piece. Use a ruler, rotary cutter, and cutting mat to achieve clean and accurate cuts. Take your time and double-check your measurements to avoid any mistakes.
- Organize your fabric: Arrange your cut fabric pieces according to your quilt layout. This will ensure that you have everything you need at your fingertips and make the sewing process more efficient.
- Sew quilt blocks or sections: Start by sewing smaller sections of your quilt top, such as blocks or rows. Follow your chosen quilt design and use a 1/4-inch seam allowance. Press the seams open or to one side, depending on your preference.
- Assemble quilt sections: Once you have sewn all the individual blocks or sections, it’s time to assemble them into larger sections or the entire quilt top. Use pins or clips to hold the pieces together, aligning the seams and corners as you stitch.
- Press and trim: After sewing each section, press the seams to set them and create a neat finish. Trim any excess fabric or uneven edges to ensure that your quilt top is square and clean.
- Continue sewing and assembling: Repeat the sewing and assembling process until you have completed the entire quilt top. Take breaks as needed to avoid fatigue and maintain accuracy in your stitching.
Throughout the cutting and sewing process, remember to handle your memory items with care, especially if they are fragile or delicate. Take your time and enjoy the journey of bringing your memory quilt to life.
Once the quilt top is complete, you are ready to move on to the next step – assembling the quilt layers.
Read more: How To Make A Memory Quilt Using Photos
Assembling the Quilt Layers
Assembling the layers of your memory quilt is an important step in the quilting process that will give your quilt structure and body. Here’s how to successfully assemble the layers:
- Prepare your backing fabric: Lay your backing fabric flat on a large, clean surface. Make sure it is free from wrinkles or creases. If necessary, press the fabric to remove any stubborn wrinkles.
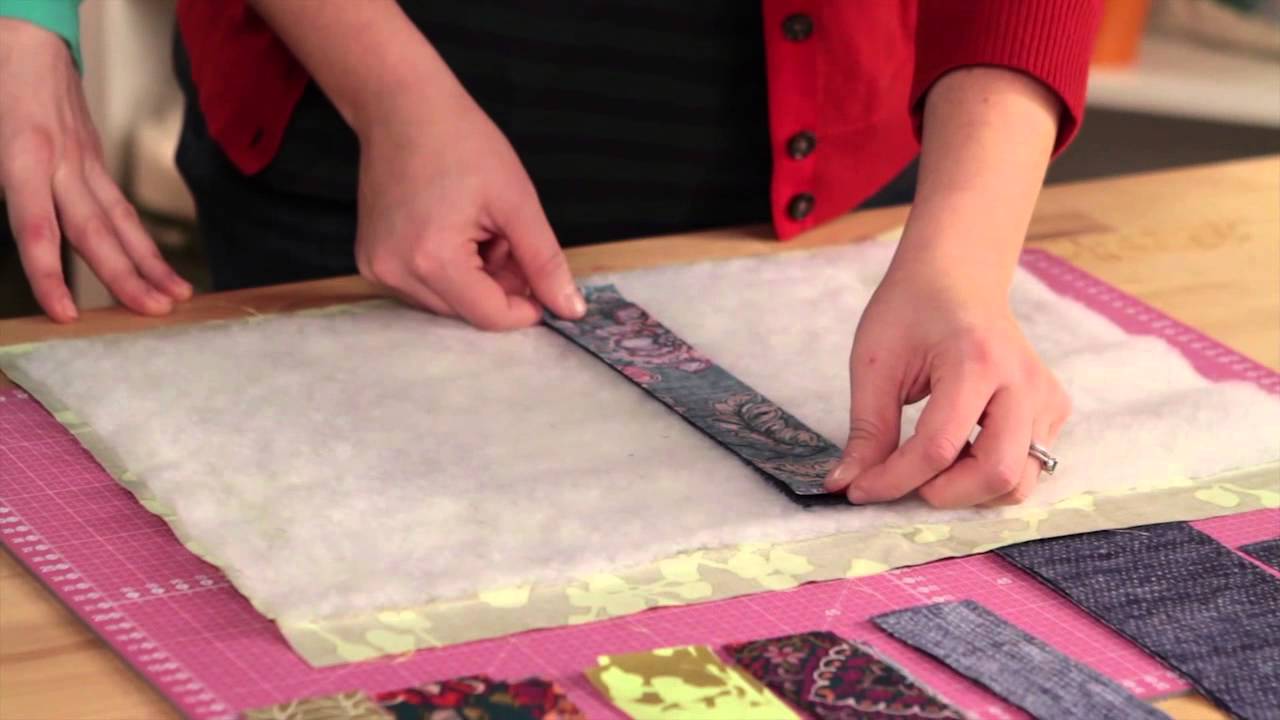
- Position the batting: Place the batting on top of the backing fabric, ensuring it is centered and covers the entire quilt area. Smooth out any wrinkles or bumps in the batting to create an even surface.
- Add the quilt top: Carefully place your quilt top on top of the batting, making sure it is centered and aligns with the edges of the backing fabric. Smooth out any wrinkles or tucks in the quilt top.
- Secure the layers: Pin or baste the layers together to hold them in place during the quilting process. Use safety pins or large hand stitches to secure the layers, working from the center outwards. Ensure that all layers are taut and smooth.
- Check for any adjustments: Take a step back and examine the quilt layers. Look for any areas that may need adjustments or smoothing out. Make any necessary tweaks before moving on to the quilting process.
It’s important to ensure that all three layers – backing fabric, batting, and quilt top – are aligned and flat. This will make the quilting process easier and result in a professional-looking finish.
Once you have successfully assembled the layers, you are ready to move on to the next step – quilting the layers together.
When making a memory quilt, be sure to use quality materials to preserve the fabric and memories. Consider using interfacing to stabilize delicate fabrics and prevent stretching.
Quilting the Layers Together
Quilting the layers together is the process of stitching through the quilt top, batting, and backing fabric to create a secure and decorative design. There are various quilting techniques you can choose from, including hand quilting, machine quilting, or a combination of both. Here’s how to quilt your memory quilt:
- Choose your quilting method: Decide whether you will be hand quilting or machine quilting your memory quilt. Consider your skill level, available time, and desired quilting design when making this decision.
- Mark your quilting design: Use fabric markers or a chalk pencil to mark your desired quilting pattern on the quilt top. You can opt for simple straight lines, intricate free-motion designs, or follow the shape of the memory items.
- Start quilting: Begin quilting by stitching along the marked lines or following your chosen quilting pattern. If hand quilting, use a quilting needle and thread to sew small, even stitches through all layers. If machine quilting, attach a quilting foot to your sewing machine and follow the marked lines with a straight stitch or desired quilting stitch.
- Take breaks and adjust tension: Quilting can be a time-consuming process, so take breaks as needed to prevent fatigue. Check your tension regularly to ensure smooth and even stitches. Make any tension adjustments if necessary.
- Continue quilting the entire quilt: Work your way across the quilt, quilting one section at a time. Take your time and enjoy the process, keeping the layers smooth and taut as you stitch.
- Secure loose threads: As you finish quilting each section, tie off and secure any loose threads. Trim them close to the fabric for a tidy finish.
Remember, quilting is a personal touch that adds both functionality and artistry to your memory quilt. Choose a quilting method and design that best complements your memory items and overall quilt aesthetic.
Once you have finished quilting, you’re ready to add optional embellishments to enhance the visual appeal of your memory quilt.
Adding Optional Embellishments
Adding optional embellishments to your memory quilt can elevate its visual appeal and further enhance the storytelling aspect of your design. While this step is entirely optional, it can add a unique and personal touch to your quilt. Here are some ideas for embellishments:
- Embroidery: Consider adding hand or machine embroidery to highlight specific details or motifs on your quilt. You can embroider names, dates, meaningful quotes, or decorative elements that hold significance.
- Appliqué: Appliqué is the process of attaching fabric shapes onto the quilt top. It allows you to add additional images or designs that may not be represented by your memory items. You can use fabric scraps or pre-cut appliqué shapes to create unique visual elements.
- Patchwork borders: If you have additional fabric scraps or memory items that didn’t make it into the main quilt design, consider creating patchwork borders. This will add an extra layer of visual interest and texture to your quilt.
- Photo transfers: If you have printed photographs that hold special meaning, consider transferring them onto fabric and incorporating them into your quilt. There are various methods for transferring photos, such as using transfer paper or fabric printing services.
- Trim and lace: Adding lace or decorative trim to the borders or around specific memory items can bring a touch of elegance and whimsy to your quilt. Consider lace appliqués, trims, or ribbons that complement your overall design.
- Buttons, beads, or charms: Adding buttons, beads, or charms can provide interesting texture and visual accents to your memory quilt. Sew them onto specific memory items or use them as standalone embellishments throughout the quilt.
- Quilting motifs: Consider incorporating specific quilting motifs that hold significance to your memories. For example, if you’re quilting a memory of a beach trip, you could add waves or seashell motifs in your quilting pattern.
Remember to carefully consider the placement and size of the embellishments to ensure that they enhance the overall design without overwhelming the memory items. Less is often more when it comes to embellishments, so select a few key elements that will truly make your quilt unique.
Once you’re satisfied with the embellishments, it’s time to move on to adding a backing and binding to complete your memory quilt.
Adding a Backing and Binding
Adding a backing and binding to your memory quilt is the final step in completing your quilt. The backing provides stability and protects the quilt’s inner layers, while the binding gives a polished and finished look to the edges. Here’s how to add a backing and binding to your quilt:
- Preparing the backing fabric: Lay your backing fabric flat, right side down, and ensure that it is larger than your quilt top on all sides. If needed, trim the backing fabric to the appropriate size.
- Layering the quilt: Place the quilt top, batting, and backing fabric together, aligning the edges. Smooth out any wrinkles or folds in the layers to ensure a flat and even surface.
- Pinning or basting the layers: Pin or baste the quilt layers together to hold them in place. Starting from the center and working your way to the edges, secure the layers with safety pins or hand basting stitches.
- Quilt the layers together: Optional Step: Before adding the binding, you can choose to quilt the layers together in a simple design or follow the existing quilting pattern. This additional quilting will provide extra stabilization and enhance the overall durability of your quilt.
- Trimming the excess fabric: Trim any excess fabric or batting from the edges of the quilt, making sure that all layers are flush and even.
- Preparing the binding fabric: Cut strips of fabric for the binding, ensuring they are long enough to go around the entire perimeter of the quilt. The width of the binding is a matter of personal preference but typically ranges from 2.5 to 3 inches.
- Attaching the binding: Fold one end of the binding strip at a 45-degree angle to create a neat mitered corner. Starting near the middle of one side of the quilt, align the raw edges of the binding strip with the raw edges of the quilt. Sew a 1/4-inch seam allowance, mitering the corners as you go.
- Finishing the binding: Continue sewing the binding around the entire quilt, mitering the corners and neatly joining the ends of the binding strip. Fold the binding to the back of the quilt and hand stitch it in place using a slip stitch or ladder stitch.
Take your time to ensure that the binding is securely attached and that the stitches on the back are nearly invisible. The binding will provide a professional and finished look to your memory quilt.
Once you have finished adding the backing and binding, your memory quilt is complete! Take a step back and admire the beautiful creation that preserves and showcases your cherished memories.
Remember to follow the care instructions provided with your memory items and the appropriate care guidelines for your quilt to ensure its longevity.
Congratulations on creating a meaningful and unique memory quilt that will be treasured for generations to come!
Wrap-up the article with a concluding paragraph.
Read more: How Do You Make A Quilt By Hand
Finishing and Caring for Your Memory Quilt
Now that your memory quilt is complete, it’s important to take proper care of it to ensure its longevity and continued beauty. Here are some tips for finishing and caring for your memory quilt:
- Inspect and secure: Before you consider the quilt officially finished, carefully inspect the seams, quilting, and binding to ensure everything is secure. Check for any loose threads or areas that may need reinforcement. Make any necessary repairs to keep your quilt in excellent condition.
- Label your quilt: Consider attaching a label to the back of your quilt that includes your name, date, and any other details you would like to share. This adds a personal touch and provides information for future generations who may inherit the quilt.
- Store your quilt properly: When not in use, store your memory quilt in a cool, dry place away from direct sunlight. Ideally, fold the quilt and place it in a clean, breathable fabric storage bag or wrap it in acid-free tissue paper to protect it from dust and damage.
- Avoid excessive handling: While it’s natural to want to share and display your memory quilt, try to limit excessive handling, especially if the quilt contains delicate or fragile memory items. Excessive handling can lead to wear and tear over time.
- Spot clean when necessary: If your memory quilt gets a stain or becomes dirty, spot clean it as soon as possible. Use a gentle detergent and blot the stain gently with a clean cloth. Avoid rubbing or scrubbing vigorously, as this can damage the fabric or memory items.
- Consider professional cleaning: If your memory quilt requires a deep clean or if you’re not comfortable spot cleaning, consider taking it to a professional quilt cleaner. They have the expertise and tools to clean and preserve your quilt without causing damage.
- Enjoy and share your quilt: Your memory quilt is a precious keepsake that deserves to be enjoyed and shared with loved ones. Display it on a quilt rack, drape it on a couch or bed, or even use it during special occasions. Share the stories and memories behind the quilt with family and friends to keep those memories alive.
By following these tips and caring for your memory quilt with love and attention, you can ensure that it remains a cherished heirloom for years to come. Each stitch, fabric, and memory item has come together to create a beautiful and meaningful masterpiece that holds the stories and memories that are close to your heart.
Congratulations again on completing your memory quilt, and may it bring you warmth, comfort, and joy for generations to come.
.Wrap up the article with a concluding paragraph.
Conclusion
Crafting a memory quilt is a labor of love that allows you to transform cherished memories and sentimental items into a tangible work of art. From selecting and gathering materials to designing the layout, cutting and sewing the quilt top, quilting the layers, and adding optional embellishments, every step of the process is an opportunity to infuse the quilt with personal meaning and creativity.
A memory quilt is not merely a functional item; it is a testament to the love, joy, and experiences that shape our lives. Whether you’re preserving the memory of a loved one, commemorating a special event, or capturing the essence of a particular time in your life, a memory quilt allows you to weave together the threads of your story.
As you embark on your memory quilt journey, take your time, trust your instincts, and embrace the creative process. Allow yourself to reminisce as you handle each memory item, reliving the moments and emotions associated with them. Remember to incorporate thoughtful design choices and meaningful embellishments that truly reflect your memories and personal style.
Once completed, your memory quilt becomes not only a beautiful and tactile representation of your memories but also a future heirloom to be treasured by generations to come. Care for your quilt with love, protect it from damage, and share its stories with those close to your heart. Allow it to be a source of comfort, warmth, and connection.
Creating a memory quilt is a journey that combines craftsmanship, creativity, and emotional depth. It is an act of self-expression, love, and homage to the people and moments that have shaped who we are. So, gather your materials, embark on this transformative process, and create a memory quilt that will forever hold the heart and soul of your memories.
Frequently Asked Questions about How Do You Make A Memory Quilt
Was this page helpful?
At Storables.com, we guarantee accurate and reliable information. Our content, validated by Expert Board Contributors, is crafted following stringent Editorial Policies. We're committed to providing you with well-researched, expert-backed insights for all your informational needs.


0 thoughts on “How Do You Make A Memory Quilt”