Articles
How To Make Seashell Mirrors
Modified: December 7, 2023
Learn how to create stunning seashell mirrors with our informative articles. Discover step-by-step guides, tips, and inspiration for your DIY projects.
(Many of the links in this article redirect to a specific reviewed product. Your purchase of these products through affiliate links helps to generate commission for Storables.com, at no extra cost. Learn more)
Introduction
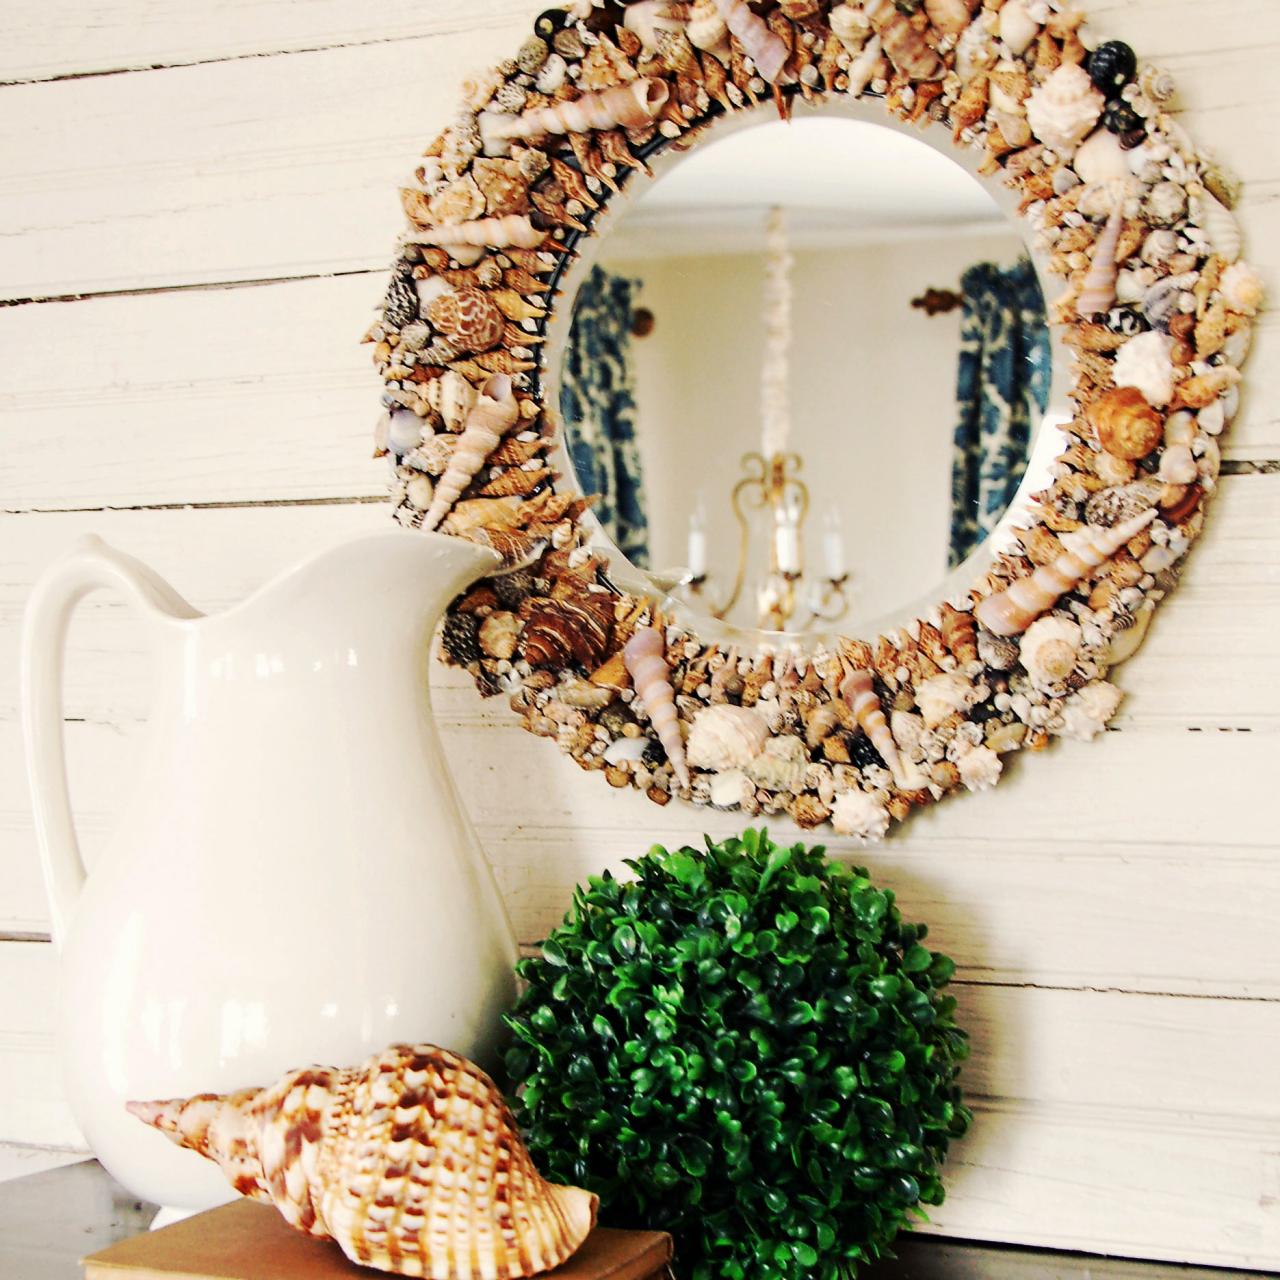
Welcome to the world of seashell mirrors! If you’re looking for a creative and unique way to add a touch of the ocean to your home décor, then making your own seashell mirror is the perfect DIY project for you. Seashell mirrors not only bring a coastal vibe to any space but also serve as a reflection of your personal style.
Gathering seashells and turning them into a beautiful mirror allows you to showcase your creativity and create a stunning piece of art that is both functional and visually appealing. Whether you live near a beach or have collected seashells from past trips, this project is a wonderful way to give those shells a new purpose and preserve the memories associated with them.
In this article, we will walk you through the step-by-step process of making your own seashell mirror. We’ll cover everything from gathering the seashells to displaying your finished masterpiece. So, let’s dive in and explore the wonders of the ocean as we embark on this DIY project together.
Key Takeaways:
- Embrace the beauty of the ocean by creating a stunning seashell mirror, showcasing your creativity and preserving cherished memories through a unique and personalized DIY project.
- Transform your home with a touch of coastal elegance by crafting a seashell mirror, bringing the tranquil beauty of the beach into your living space while reflecting your personal style and creativity.
Read more: How To Make A Seashell Chandelier
Materials Needed
Before we start crafting our seashell mirror, let’s gather all the necessary materials. Here’s a list of what you’ll need:
- A mirror – You can use a pre-made mirror or repurpose an old one.
- Seashells – Collect a variety of seashells in different shapes and sizes. You can find them at the beach or purchase them from a craft store.
- Adhesive – Use a strong adhesive suitable for attaching seashells to a mirror. Epoxy resin or hot glue gun are commonly used options.
- Masking tape or painter’s tape – This will help secure the mirror and protect its surface during the crafting process.
- Frame (optional) – If you want to add a frame to your mirror, gather a frame of your choice that complements the style of your seashells.
- Paint and brushes (optional) – If you plan to paint the mirror frame, make sure to have the desired paint color and brushes on hand.
- Sealant (optional) – A clear sealant can be applied to the seashells to enhance their natural color and protect them from wear and tear.
With these materials ready, you’re all set to begin creating your stunning seashell mirror. Remember, you can adapt and customize the materials based on your preferences and the style you want to achieve. Now, let’s move on to the fun part – making the mirror itself!
Step 1: Gather Seashells
The first step in creating your seashell mirror is to gather a variety of seashells. This is an opportunity to explore the beach, go beachcombing, or even utilize seashells you’ve collected over the years. Here’s how you can gather the perfect assortment of seashells for your mirror:
- Visit the beach: Find a local beach that is known for having beautiful seashells. This could be a sandy beach or a rocky shoreline, depending on your preference.
- Timing is important: Plan your beach visit during low tide, as this is when more seashells are exposed and available for collecting. Check the local tide charts to determine the best time for your visit.
- Search strategically: Walk along the shoreline and keep an eye out for seashells that catch your attention. Look in sandy areas, near rocks, and in tidal pools. Sometimes, you might need to dig a little bit in the sand to find hidden treasures.
- Collect a variety: Aim to collect seashells in different shapes, sizes, and colors. This will add visual interest and diversity to your seashell mirror. Look for shells such as scallops, conch shells, clam shells, and colorful spiral shells.
- Inspect shells: As you pick up seashells, examine them closely to ensure they are not damaged or broken. Look for shells that are intact and in good condition.
- Be respectful: Remember to practice responsible beachcombing and only collect seashells that are already empty. Avoid taking live shells or disturbing the natural habitats of marine life.
Once you have gathered an assortment of seashells, you are ready to move on to the next step of creating your seashell mirror. As you handle the seashells, marvel at their intricate designs and imagine how they will come together to form a stunning piece of art.
Step 2: Prepare the Mirror Frame
Now that you have your seashells ready, it’s time to prepare the mirror frame. If you’re using a pre-made mirror, you can skip this step and move on to Step 3. If you’re repurposing an old mirror or want to add a frame to your seashell mirror, follow these steps:
- Clean the mirror: Start by cleaning the mirror surface to ensure it’s free from any dust or grime. Wipe it gently with a glass cleaner or a mixture of vinegar and water.
- Protect the mirror: To avoid accidentally getting adhesive on the mirror during the crafting process, use masking tape or painter’s tape to cover the edges of the mirror. This will protect the mirror from any potential damage.
- Prepare the frame (if applicable): If you’re using a frame for your seashell mirror, remove any existing artwork or glass. Sand or paint the frame, if desired, to match your style and the theme of the seashells. Let it dry completely before proceeding.
- Position the mirror: If you’re placing the mirror inside a frame, properly position and secure it in place. Use small screws or brackets to keep it steady.
By taking these steps to prepare the mirror frame, you ensure a clean and stable surface to work with when attaching the seashells. Remember, if you’re using a pre-made mirror, you can focus solely on arranging and attaching the seashells in the next steps. Now, let’s move on to the exciting part – arranging the seashells to create a stunning design for your seashell mirror!
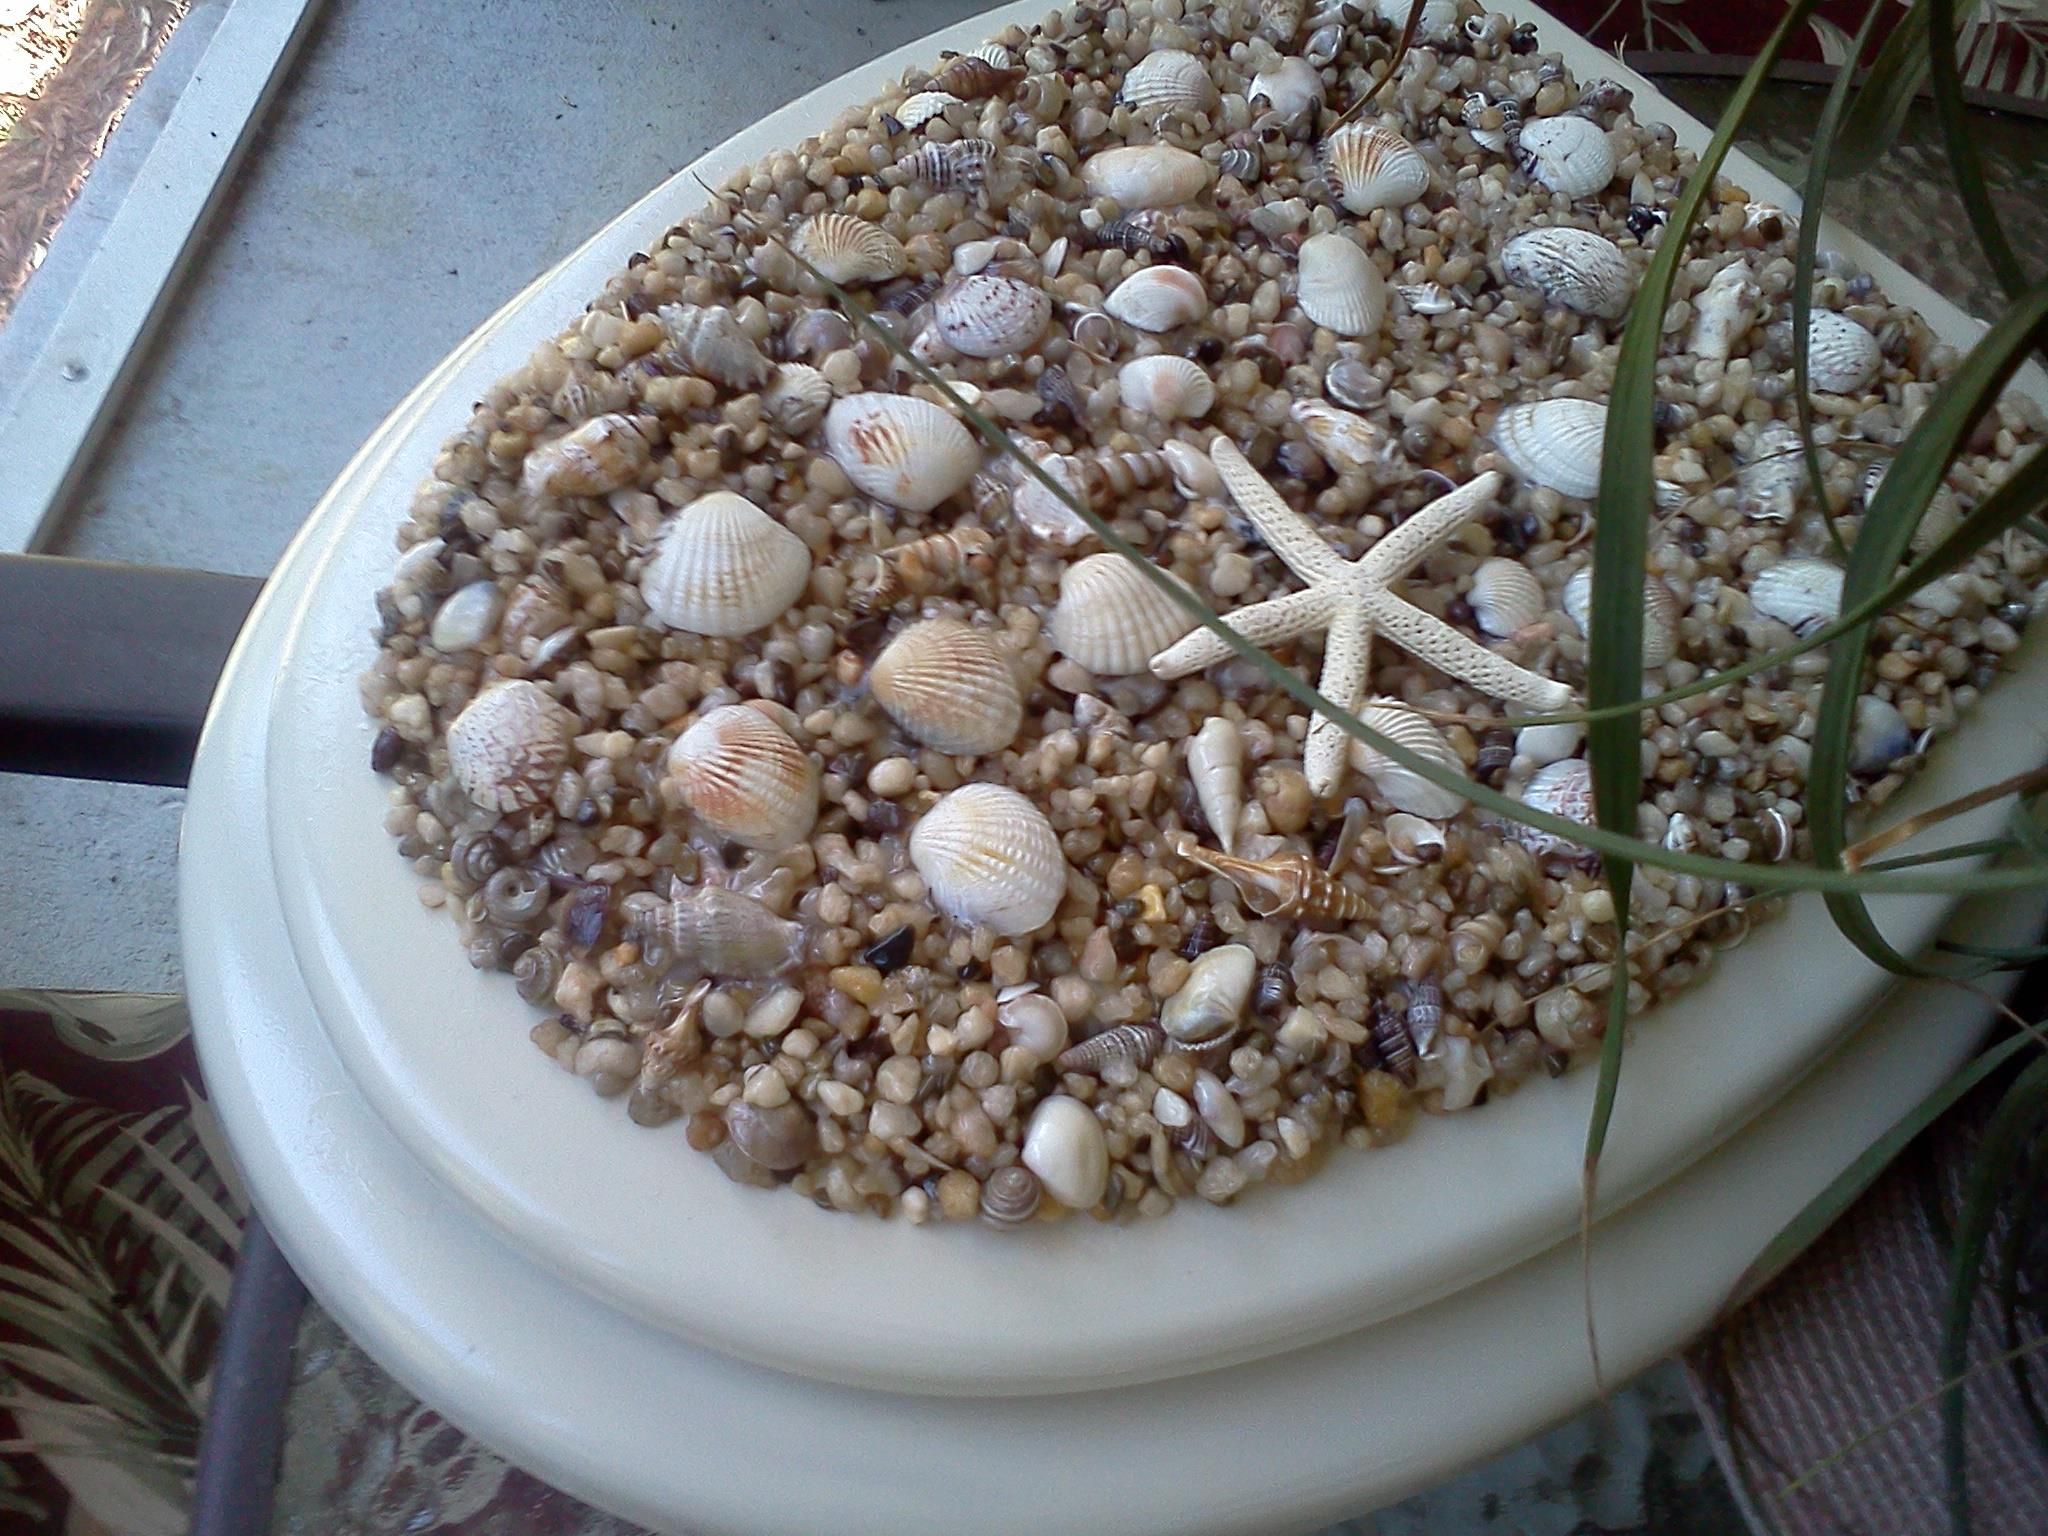
Step 3: Arrange the Seashells
Now that you have your mirror and frame ready (if applicable), it’s time to get creative and arrange the seashells to form a visually pleasing design. Here’s how you can arrange the seashells for your seashell mirror:
- Lay out the seashells: Start by laying out all the seashells you’ve collected on a clean, flat surface. This will allow you to visually assess the shells you have and plan their placement on the mirror.
- Experiment with different arrangements: Play around with the arrangement of the shells to find a design that you like. Consider the shape, size, and color of each shell and how they fit together harmoniously. You can create patterns, arrange them in a random or organic layout, or even spell out words or initials using alphabet seashells.
- Consider the focal point: Determine if you want to create a specific focal point on the mirror by placing larger or more unique shells in a central position. This can draw attention to a particular area and add visual interest to your seashell mirror.
- Take a step back: Once you’ve arranged the seashells on the mirror, step back and observe the design from a distance. This will give you a better perspective of how the shells interact with each other and how the overall composition looks.
- Make adjustments as needed: If you’re not satisfied with the initial arrangement, don’t be afraid to make adjustments. Rearrange the shells until you achieve the desired look and balance.
Remember, arranging the seashells is a creative process, and there’s no right or wrong way to do it. Trust your instincts and let your imagination guide you. Once you’re happy with the arrangement, it’s time to move on to attaching the seashells to the mirror frame in the next step.
When collecting seashells for your mirror, make sure to clean and dry them thoroughly to prevent any odor or decay. This will ensure your mirror stays beautiful for longer.
Read more: How To Store Seashells
Step 4: Attach the Seashells to the Frame
Now that you have beautifully arranged your seashells on the mirror, it’s time to securely attach them to the frame (if applicable) or directly to the mirror surface. Follow these steps to ensure that your seashells stay in place:
- Prep the adhesive: Depending on the type of adhesive you’re using, follow the instructions to prepare it for use. This may involve mixing epoxy resin or heating up a hot glue gun.
- Apply adhesive to seashells: Using a small amount of adhesive, carefully attach each seashell to the frame or mirror surface. Apply the adhesive to the backside of the seashell and press it firmly into place.
- Work in small sections: To prevent the adhesive from drying too quickly, work in small sections. Attach a cluster of seashells at a time, ensuring that they are securely fastened before moving on to the next section.
- Be mindful of placement: Pay attention to the arrangement you created in the previous step and ensure that the positioning of the seashells remains consistent. Adjust as necessary to maintain the desired design.
- Press and hold: After attaching each seashell, press it down firmly and hold it in place for a few seconds to ensure a strong bond between the shell and the frame/mirror. This step is especially important if you’re using a hot glue gun adhesive.
- Fill in gaps: As you attach the seashells, you may notice small gaps between them. To create a seamless look, consider filling in these gaps with smaller shells or pieces of shells.
Take your time during this step to ensure that each seashell is firmly attached. Be cautious not to apply too much adhesive, as it may overflow and become visible once the seashell mirror is completed. Once all the seashells are securely in place, it’s time to let them dry and prepare for the final steps of finishing and enhancing the seashells.
Step 5: Let It Dry
After attaching the seashells to the frame or mirror surface, it’s important to allow them to dry completely. This will ensure that they are securely in place and won’t shift or come loose. Here’s what you need to do:
- Find a safe and flat surface: Carefully move the mirror or frame to a safe and flat surface where it can be left undisturbed during the drying process.
- Follow adhesive instructions: Refer to the instructions provided with your adhesive to determine the recommended drying time. It may take several hours or even overnight for the adhesive to fully cure, so be patient.
- Avoid moving or touching: While the seashells are drying, avoid moving or touching the mirror to prevent any potential disruptions to the adhesive bond. This will ensure that the seashells remain intact and securely attached.
- Keep the area well-ventilated: If you’re using epoxy resin or any adhesive that emits strong fumes, make sure to work in a well-ventilated area or open a window to allow for proper air circulation.
- Take the necessary safety precautions: If you’re working with a hot glue gun or any adhesive that requires heat, be cautious and handle it with care to avoid any burns or accidents.
Allowing the seashells to dry completely will give you peace of mind that your seashell mirror is staying together and ready for the next steps. While you wait for the seashells to dry, you can use this time to clean and enhance the seashells, which we’ll cover in the next step.
Step 6: Clean and Enhance the Seashells
Now that your seashells are securely attached and the adhesive has dried, it’s time to clean and enhance them to bring out their natural beauty. This step will help remove any dirt or residue from the shells and maximize their visual appeal. Follow these steps to clean and enhance your seashells:
- Gently rinse the seashells: Fill a basin or sink with lukewarm water and add a small amount of mild soap. Place the seashells in the soapy water and use a soft brush or cloth to gently scrub away any dirt or debris. Avoid using harsh chemicals or abrasive cleaning agents as they can damage the seashells.
- Rinse and dry the shells: After cleaning, thoroughly rinse the seashells with clean water to remove any soap residue. Pat them dry with a towel or let them air dry naturally.
- Inspect and repair any damaged shells: While cleaning, you may come across seashells that are cracked or chipped. If possible, repair them using glue specifically designed for repairing seashells or ceramic materials. Be careful not to overdo the repairs and avoid altering the shells’ natural appearance.
- Apply a sealant (optional): If you want to enhance the color and shine of the seashells, you can apply a clear sealant. This will protect the shells from moisture and give them a glossy finish. Make sure to choose a sealant that is suitable for the type of seashells you are using and follow the manufacturer’s instructions for application.
- Buff and polish (optional): For seashells with a smooth surface, you can use a soft cloth or microfiber cloth to gently buff and polish them. This will bring out their luster and make them shine even more.
By cleaning and enhancing the seashells, you’ll ensure that they look their best and add an extra touch of elegance to your seashell mirror. Once the shells are clean and dry, take a moment to admire their intricate details and vibrant colors before moving on to the final step of displaying your seashell mirror.
Step 7: Display Your Seashell Mirror
Congratulations, you’ve reached the final step! Now it’s time to display your beautiful seashell mirror and enjoy the fruits of your labor. Here’s how you can showcase your seashell mirror in all its glory:
- Choose the perfect location: Select a spot in your home where your seashell mirror will be prominently displayed. It could be a focal point on a living room wall, above a fireplace mantel, or in a bathroom to create a tranquil coastal atmosphere.
- Consider the surroundings: Take into account the style and color scheme of the room where you’ll be placing the mirror. Ensure that it complements the overall décor and enhances the ambiance of the space.
- Hang the mirror securely: If your seashell mirror has a frame, use appropriate hanging hardware and follow the instructions to mount it on the wall securely. If it’s frameless, you can use adhesive hooks or picture-hanging strips specifically designed for mirrors.
- Ensure proper positioning: Step back and observe the mirror from various angles to ensure that it’s aligned correctly and positioned at the desired height. You want it to be easily visible and accessible for everyone to admire.
- Add complementary elements: To further enhance the coastal theme, consider incorporating other beach-inspired décor elements around the mirror. This could include seashells in a decorative bowl, nautical accents, or coastal artwork.
- Regularly clean and maintain: As with any mirror, it’s essential to keep your seashell mirror clean and free from dust or smudges. Gently wipe the mirror surface and the seashells with a soft cloth or glass cleaner as needed to maintain its pristine appearance.
Now it’s time to step back and admire your stunning seashell mirror. Not only have you created a unique piece of art, but you’ve also brought a touch of the ocean into your home. Whenever you catch a glimpse of the mirror, it will serve as a reminder of the natural beauty and tranquility of the beach.
Remember, your seashell mirror is not just a decorative piece but also a reflection of your creativity and personal style. Share your creation with friends and family, and inspire others to embark on their own seashell mirror journey. Enjoy the admiration and pride that comes with completing a DIY project that truly stands out!
Frequently Asked Questions about How To Make Seashell Mirrors
Was this page helpful?
At Storables.com, we guarantee accurate and reliable information. Our content, validated by Expert Board Contributors, is crafted following stringent Editorial Policies. We're committed to providing you with well-researched, expert-backed insights for all your informational needs.


0 thoughts on “How To Make Seashell Mirrors”