Home>Articles>How To Open Water Tank On Vanity Planet Steamer
Articles
How To Open Water Tank On Vanity Planet Steamer
Modified: January 6, 2024
Learn how to open the water tank on your Vanity Planet steamer with helpful articles. Get step-by-step instructions and expert tips.
(Many of the links in this article redirect to a specific reviewed product. Your purchase of these products through affiliate links helps to generate commission for Storables.com, at no extra cost. Learn more)
Introduction
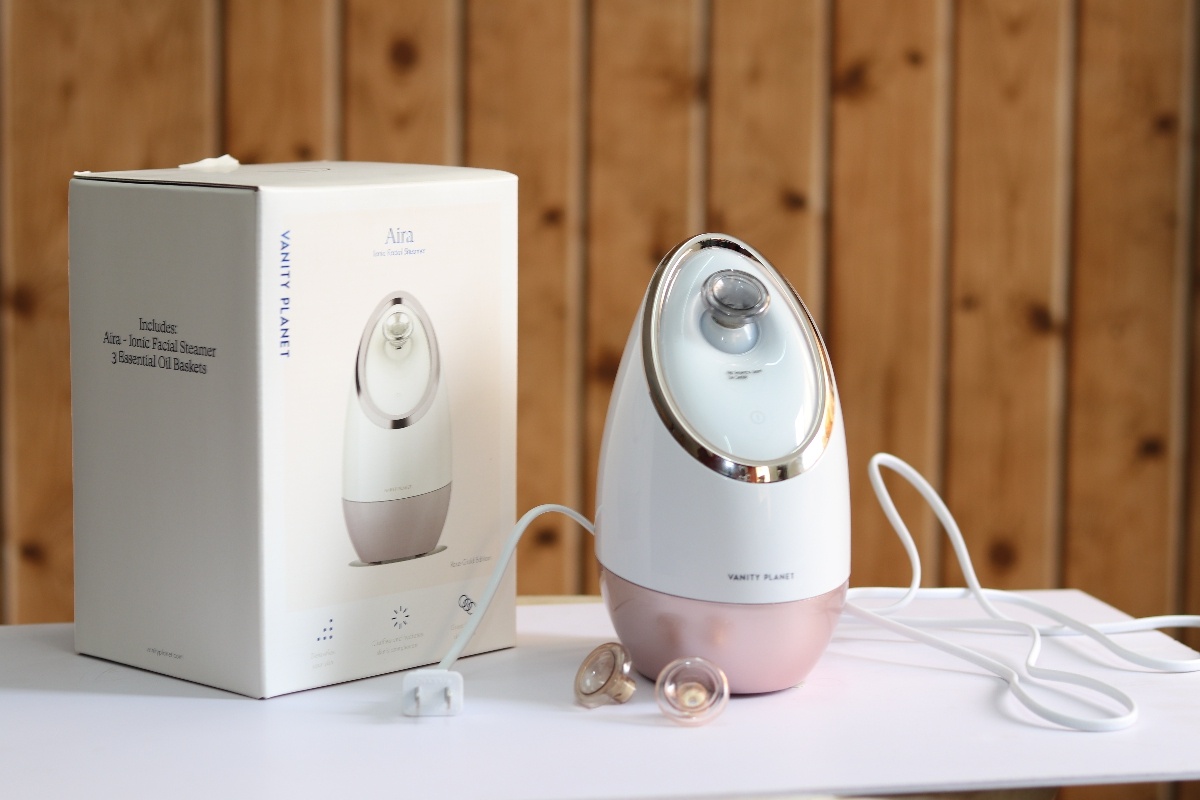
Welcome to the world of steamers! If you own a Vanity Planet Steamer, you know how important it is to keep the water tank filled for optimal performance. Opening the water tank on your Vanity Planet Steamer may seem like a simple task, but it’s essential to do it correctly to avoid any mishaps. This article will guide you through the step-by-step process of opening the water tank on your Vanity Planet Steamer, ensuring that you can enjoy the benefits of steam effortlessly.
Having a steamer at home has numerous advantages. Steam can help open up your pores, remove impurities from your skin, and even relax tense muscles. The Vanity Planet Steamer allows you to experience all these benefits without visiting a spa or salon. However, to harness the full potential of your steamer, you need to ensure that the water tank is filled properly. This means understanding how to open the water tank, ensuring a seamless steaming experience every time.
Before we dive into the process, it’s important to note that safety should always be a priority. Make sure that the steamer is turned off and unplugged before attempting to open the water tank. This will help prevent any accidents or injuries and ensure that you can confidently navigate through the steps.
Now, let’s get started!
Key Takeaways:
- Safety first! Always ensure your Vanity Planet Steamer is turned off and unplugged before opening the water tank. This prevents accidents and allows for a hassle-free process.
- Use distilled or filtered water to fill the tank and follow the step-by-step guide for a seamless steaming experience. Enjoy the benefits of steaming at home with ease!
Read more: Vanity Planet Facial Steamer How To Use
Step 1: Gathering the necessary tools and materials
Before you begin opening the water tank on your Vanity Planet Steamer, it’s important to gather all the necessary tools and materials. This will ensure that you have everything you need within reach, making the process smooth and efficient.
Here’s a list of the tools and materials you will need:
- A clean cloth or towel
- A small bowl or container
- Distilled or filtered water
The clean cloth or towel will come in handy for wiping any spills or drips that may occur during the process. It’s always a good idea to have one nearby to keep your surroundings clean and dry.
The small bowl or container will serve as a holding vessel for the water while you open the water tank. This will prevent any water from dripping onto the floor or other surfaces, keeping the area neat and tidy.
Lastly, you’ll need distilled or filtered water to fill the water tank. Using distilled or filtered water is recommended to prevent mineral build-up or impurities that could affect the performance of your steamer. It’s important to avoid using tap water or any other untreated water sources.
Once you have gathered all the necessary tools and materials, you’re ready to move on to the next step!
Step 2: Ensuring the Vanity Planet Steamer is turned off
Before you can open the water tank on your Vanity Planet Steamer, it’s crucial to ensure that the steamer is turned off. This step ensures your safety during the process and prevents any potential accidents.
To turn off your Vanity Planet Steamer, locate the power switch or button on the device. Typically, this switch is located on the base or control panel of the steamer. Make sure to slide the switch to the “off” position or press the power button to turn off the steamer completely.
Once the steamer is turned off, it’s also advisable to unplug it from the power source. This step adds an extra layer of safety by eliminating any chance of accidental activation while you’re working on opening the water tank.
Take a moment to double-check that the steamer is completely powered off and unplugged. Look for any indicator lights or displays that may suggest the steamer is still in use. Once you’re confident that the steamer is off and disconnected from the power source, you’re ready to proceed to the next step.
Ensuring the Vanity Planet Steamer is turned off is a crucial safety measure that should not be overlooked. It protects you from potential burns or injuries and allows you to work on opening the water tank with peace of mind. So take a moment to verify the steamer’s status before moving forward in the process.
Step 3: Locating the water tank on the Vanity Planet Steamer
Now that you have ensured the Vanity Planet Steamer is turned off, it’s time to locate the water tank. The water tank is where you will fill and store the water that will be used for steaming.
The exact location of the water tank may vary depending on the model of your Vanity Planet Steamer. However, in most cases, the water tank is located near the base of the steamer.
Start by examining the base of the steamer. Look for any removable parts or compartments that might house the water tank. There might be a specific area designated for the water tank or a separate compartment with a lid. Some steamers have a clear window or panel that allows you to see the water level inside the tank.
If you’re having trouble finding the water tank, refer to the user manual or guide that came with your Vanity Planet Steamer. The manual will provide detailed instructions and illustrations to help you locate the water tank easily.
Once you have located the water tank, you’re ready to move on to the next step. Having a clear understanding of where the water tank is located will make it easier for you to access it and proceed with opening it correctly.
Take a moment to familiarize yourself with the water tank’s location to ensure a smooth and efficient process. With this step complete, you’re one step closer to opening the water tank on your Vanity Planet Steamer!
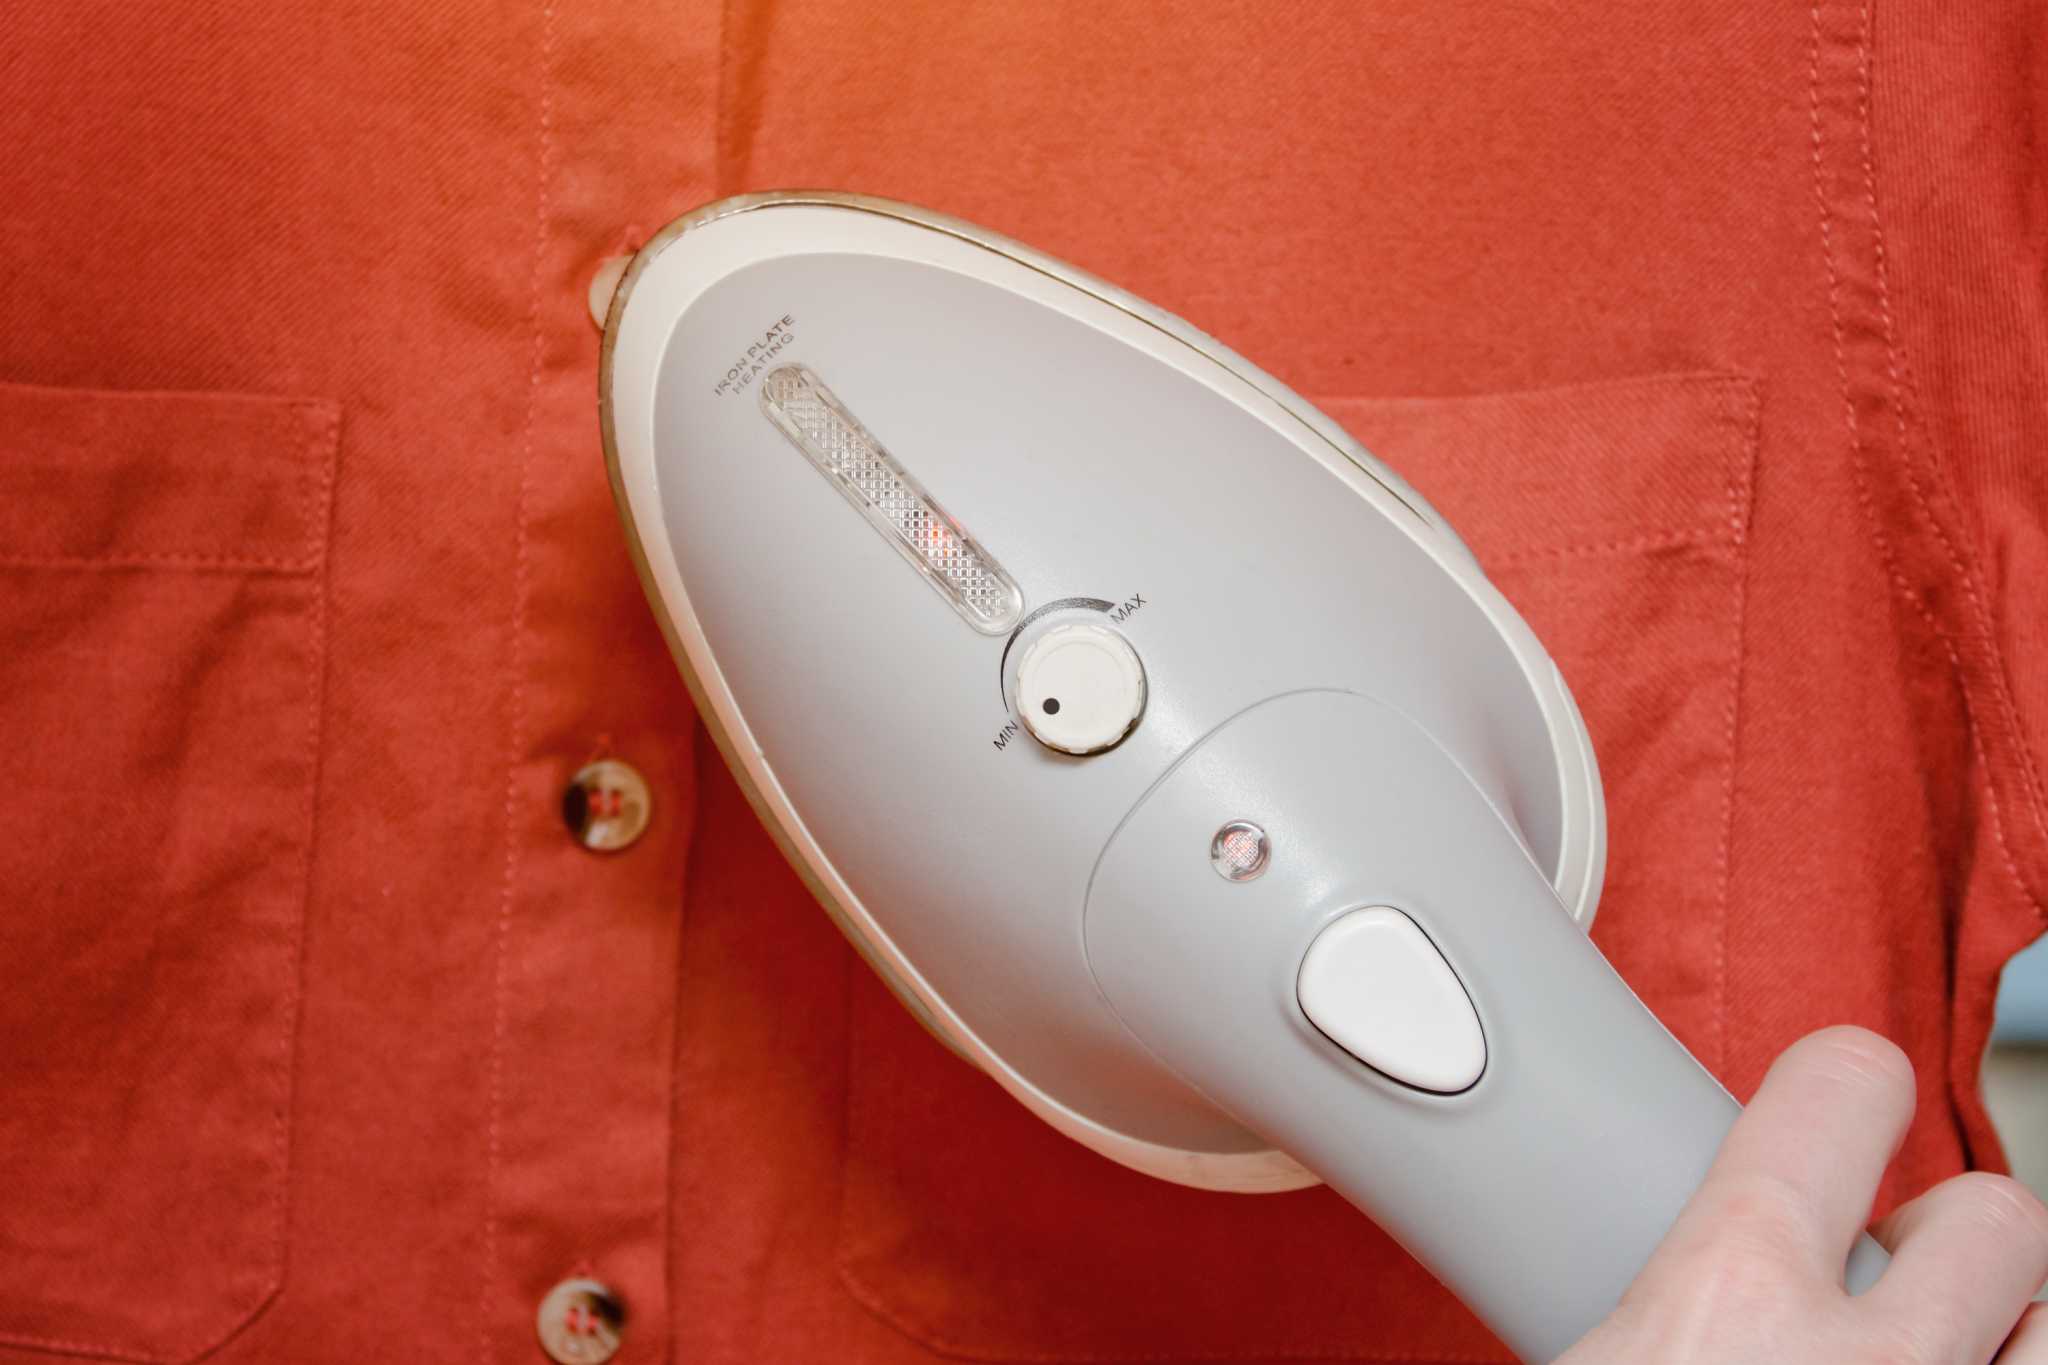
Before opening the water tank on your Vanity Planet steamer, make sure the steamer is unplugged and cooled down. Then, twist the cap of the water tank counterclockwise to open it and fill it with distilled water.
Step 4: Removing the water tank cover
With the water tank located, it’s time to remove the water tank cover. The water tank cover is responsible for keeping the water securely in place while the steamer is in use. By removing the cover, you’ll be able to access the water tank and fill it with fresh water.
Before proceeding, make sure you have a firm grip on the steamer and a sturdy surface to place the water tank cover. This will prevent any accidental drops or slips during the process.
Start by examining the water tank cover. Look for any locks, latches, or buttons that are securing the cover in place. Different models of Vanity Planet Steamers may have different mechanisms for securing the cover.
Once you have identified the locking mechanism, release it accordingly. This may involve pressing a button, sliding a latch, or twisting a lock. Follow the instructions in your user manual, if needed, to ensure you’re unlocking the cover properly.
With the cover unlocked, gently lift it off the water tank. Be cautious of any residual steam or hot surfaces that may be present. If you’ve recently used the steamer, it’s advisable to allow it to cool down for a few minutes before removing the cover.
Set the water tank cover aside on a clean and dry surface. Take a moment to inspect the cover for any dirt or debris. If necessary, wipe it down with a clean cloth or towel to keep it in optimal condition.
With the water tank cover removed, you now have direct access to the water tank. You’re ready to move on to the next step and fill the water tank with fresh water. By following these steps carefully, you’ll ensure a hassle-free process of removing the water tank cover.
Read more: How To Open A Steamer Basket
Step 5: Filling the water tank
Now that the water tank cover has been removed, you can proceed with filling the water tank of your Vanity Planet Steamer. This step is crucial as it provides the necessary water for generating steam during your steaming session.
Before you begin filling the water tank, make sure you have the distilled or filtered water and a small bowl or container ready. Using distilled or filtered water is recommended to prevent any mineral buildup or impurities that could affect the performance of your steamer.
Start by locating the fill line or indicator inside the water tank. This line indicates the maximum level to which you can fill the tank without overflowing. It’s important not to exceed this level to avoid any potential leaks or spills.
Position the small bowl or container under a water source, such as a faucet or a jug of water. Slowly pour the distilled or filtered water into the tank, aiming to fill it up to the indicated fill line. Be careful to avoid any overspills or excessive splashing.
Take your time while filling the water tank to ensure accuracy and avoid any water wastage. If you accidentally exceed the fill line, use a clean cloth or towel to absorb the excess water and bring the level back to the appropriate mark.
Once you have filled the water tank to the desired level, take a moment to inspect the tank for any water droplets or moisture. If necessary, use a clean cloth or towel to wipe away any spills or excess water. Ensuring the water tank is clean and dry will prevent any potential water damage to your steamer.
With the water tank filled, you’re now ready to proceed to the next step and reattach the water tank cover. By following these steps diligently, you’ll ensure that the water tank is filled correctly, allowing for an optimal steaming experience.
Step 6: Reattaching the water tank cover
After filling the water tank of your Vanity Planet Steamer, it’s time to reattach the water tank cover. This step ensures that the water remains securely in place and prevents any potential leaks or spills during the steaming process.
To reattach the water tank cover, start by aligning it with the opening of the water tank. Make sure that it is positioned correctly before proceeding.
Next, carefully lower the water tank cover onto the water tank, ensuring that it sits snugly. Pay attention to any locks, latches, or buttons that need to be engaged to secure the cover in place. Refer to the user manual if you encounter any difficulties or if there are specific instructions for your model.
Once you have positioned the cover correctly, lock it into place according to the mechanism provided. This may involve pressing a button, sliding a latch, or twisting a lock. Ensure that the cover is secure and does not wobble or move loosely.
When the water tank cover is properly attached, give it a gentle tug or shake to test its stability. It should hold firm and not come off easily. If there is any sign of looseness or insecurity, adjust the cover or check if all locking mechanisms are engaged correctly.
Take a moment to inspect the water tank and cover for any signs of water leakage or moisture. If necessary, use a clean cloth or towel to wipe away any water droplets or spills.
With the water tank cover securely reattached, you have successfully completed this step. Now, you’re ready to move on to the final step and test the water tank to ensure everything is functioning properly.
By following these steps diligently, you’ll ensure that the water tank cover is properly reattached, allowing for a seamless and effective steaming experience with your Vanity Planet Steamer.
Step 7: Turning on the Vanity Planet Steamer and testing the water tank
With the water tank securely in place, it’s time to turn on your Vanity Planet Steamer and test the water tank to ensure everything is functioning properly. This final step will allow you to confirm that the steamer is ready for use and that the water tank is supplying steam as intended.
Start by plugging in your Vanity Planet Steamer and locating the power switch or button. Switch it to the “on” position or press the power button to turn on the steamer. Wait for a few moments to allow the steamer to heat up and generate steam.
Once the steamer is turned on, pay attention to any indicator lights or displays that signify the steamer is operational. Different models may have different indicators, such as a light indicating the steam is ready or a display showing the temperature or timer settings. Consult your user manual to understand the specific indicators and their meanings.
After a brief period, the steamer should start releasing steam from the nozzle or designated outlet. This indicates that the water tank is supplying steam to the system effectively. If you don’t see any steam or if the steam seems weak or irregular, check the water level in the tank. It may need to be refilled or adjusted.
If you notice any leaks or unusual noises coming from the water tank or steamer, turn off the steamer immediately and consult the troubleshooting guide in your user manual. It’s important to address any issues or concerns before using the steamer to avoid any potential damage or accidents.
Take a moment to check the temperature of the steam and ensure that it’s suitable for your needs. Some models allow you to adjust the steam intensity or temperature settings. If necessary, refer to your user manual for instructions on adjusting these settings.
Congratulations! You have successfully turned on your Vanity Planet Steamer and tested the water tank. Now you can confidently proceed with your steaming session knowing that everything is functioning as it should.
Remember to follow the manufacturer’s guidelines and recommendations for the duration and frequency of each steaming session. This will ensure that you maximize the benefits of your steamer while maintaining its longevity.
Enjoy the rejuvenating and relaxing experience of steaming with your Vanity Planet Steamer!
Frequently Asked Questions about How To Open Water Tank On Vanity Planet Steamer
Was this page helpful?
At Storables.com, we guarantee accurate and reliable information. Our content, validated by Expert Board Contributors, is crafted following stringent Editorial Policies. We're committed to providing you with well-researched, expert-backed insights for all your informational needs.


0 thoughts on “How To Open Water Tank On Vanity Planet Steamer”