Articles
How To Install Water Pump With Pressure Tank
Modified: October 19, 2024
Learn how to install a water pump with a pressure tank efficiently with our informative articles. Gain valuable knowledge and troubleshoot any issues effectively.
(Many of the links in this article redirect to a specific reviewed product. Your purchase of these products through affiliate links helps to generate commission for Storables.com, at no extra cost. Learn more)
Introduction
Welcome to this comprehensive guide on how to install a water pump with a pressure tank. Whether you’re looking to install a water system for your home, garden, or commercial property, understanding the process is crucial to ensure a reliable water supply.
A water pump with a pressure tank is a versatile and efficient solution that provides consistent water pressure and flow rates. It is commonly used in well water systems, irrigation systems, and other water supply applications.
In this guide, we will take you through each step of the installation process, ensuring that you have all the information you need to get the job done right. By following these steps and using the right tools and materials, you’ll have a functioning water pump system in no time.
Before we dive into the installation process, let’s quickly go over some of the basic tools and materials you’ll need:
- Water pump
- Pressure tank
- Pipes (PVC or copper)
- Pressure switch
- Teflon tape
- Wrenches
- Hacksaw or pipe cutter
- Electrical wiring and connectors
- Drill and bits
Make sure you have all these items ready before you begin with the installation process. Now, let’s move on to the first step: choosing the right location for your water pump and pressure tank.
Key Takeaways:
- Proper installation of a water pump with a pressure tank requires careful consideration of location, secure mounting, and thorough testing. Following manufacturer instructions and safety precautions is crucial for a reliable water supply.
- Regular maintenance, including checking for leaks, monitoring water pressure, and troubleshooting, is essential for ensuring the longevity and optimal performance of a water pump system. Prioritizing safety and seeking professional help when needed are key to success.
Read more: What Does A Water Pump Do In A Fish Tank
Tools and Materials Needed
Before starting the installation process, gather all the necessary tools and materials to ensure a smooth and efficient setup. Here is a list of the essential items required for installing a water pump with a pressure tank:
Tools:
- Adjustable wrench
- Hacksaw or pipe cutter
- Measuring tape
- Drill and bits
- Screwdriver
- PVC pipe cutter (if using PVC pipes)
- Wire stripper
- Teflon tape
- Level
Materials:
- Water pump
- Pressure tank
- Pipes (PVC or copper)
- Pressure switch
- Electrical wiring and connectors
- Pipe fittings
- Thread sealant
- Pipe clamps or straps
- Pressure gauge
Ensure that you have all the necessary tools and materials readily available before you begin the installation process. Additionally, make sure to follow any manufacturer guidelines or specific requirements for the particular model of water pump and pressure tank you are installing.
Having the right tools and materials at hand will help you work efficiently and ensure the proper functioning of your water pump system. With everything ready, let’s move on to the first step: choosing the right location for your water pump and pressure tank.
Step 1: Choosing the Right Location
The location of your water pump and pressure tank is crucial for the efficient operation of your system. When choosing the right location, consider the following factors:
Read more: How To Set Water Pump Pressure Switch
Accessibility:
Ensure that the chosen location provides easy access for maintenance and repairs. You should have enough space to work around the pump and tank comfortably.
Ventilation:
Choose a well-ventilated area to prevent overheating of the motor. Adequate airflow will help the pump run more efficiently and extend its lifespan.
Noise:
Water pumps can generate noise, especially when operating at high pressures. Consider placing the pump away from living areas or using noise-dampening measures if noise is a concern.
Protection from Elements:
Avoid placing the pump and tank in areas prone to flooding or extreme weather conditions. Adequate protection from elements will prevent damage to the system.
Read also: 13 Amazing Fish Tank Water Pump for 2025
Distance from Water Source:
Position the pump as close to the water source as possible to minimize friction losses and optimize performance. This will also reduce the strain on the pump, resulting in better efficiency.
Electrical Requirements:
Ensure the location has access to the necessary electrical connections and meets the electrical requirements for your water pump. Consult a professional if you have any doubts or need assistance with electrical installations.
Once you have considered these factors, you can choose the best location for your water pump and pressure tank. Take your time and evaluate different options before making a final decision.
With the location chosen, you can now move on to the next step: preparing the installation area.
Step 2: Preparing the Installation Area
Before you begin installing the water pump and pressure tank, it’s important to properly prepare the installation area. This will help ensure a secure and stable setup for your system. Follow these steps to prepare the installation area:
Clear the Area:
Remove any debris, clutter, or obstructions from the installation area. Clearing the space will provide you with a clean working environment and reduce the risk of accidents or damage during the installation process.
Level the Surface:
Use a level to ensure that the surface where the pump and tank will be placed is level. If the surface is uneven, use shims or other appropriate materials to level it. A level surface will prevent any instability or potential damage to the system.
Secure Mounting Surface:
If you are mounting the pump and tank to a wall or other structure, ensure that the mounting surface is sturdy and can support the weight of the equipment. Use appropriate hardware and ensure a secure attachment to prevent any movement or vibration during operation.
Check for Drainage:
It’s important to have proper drainage for any potential leaks or condensation. Ensure that the installation area has a drain or a suitable method for water to flow away from the system. This will help prevent water damage or mold growth.
Provide Adequate Space:
Make sure there is ample space around the pump and tank for easy access and maintenance. Having enough room will allow you to perform any necessary repairs, replacements, or inspections without difficulty.
By preparing the installation area properly, you will create a stable and safe environment for your water pump and pressure tank. Once the area is prepared, you can proceed to the next step: mounting the pressure tank.
Read more: Why Is My Water Pump Not Building Pressure
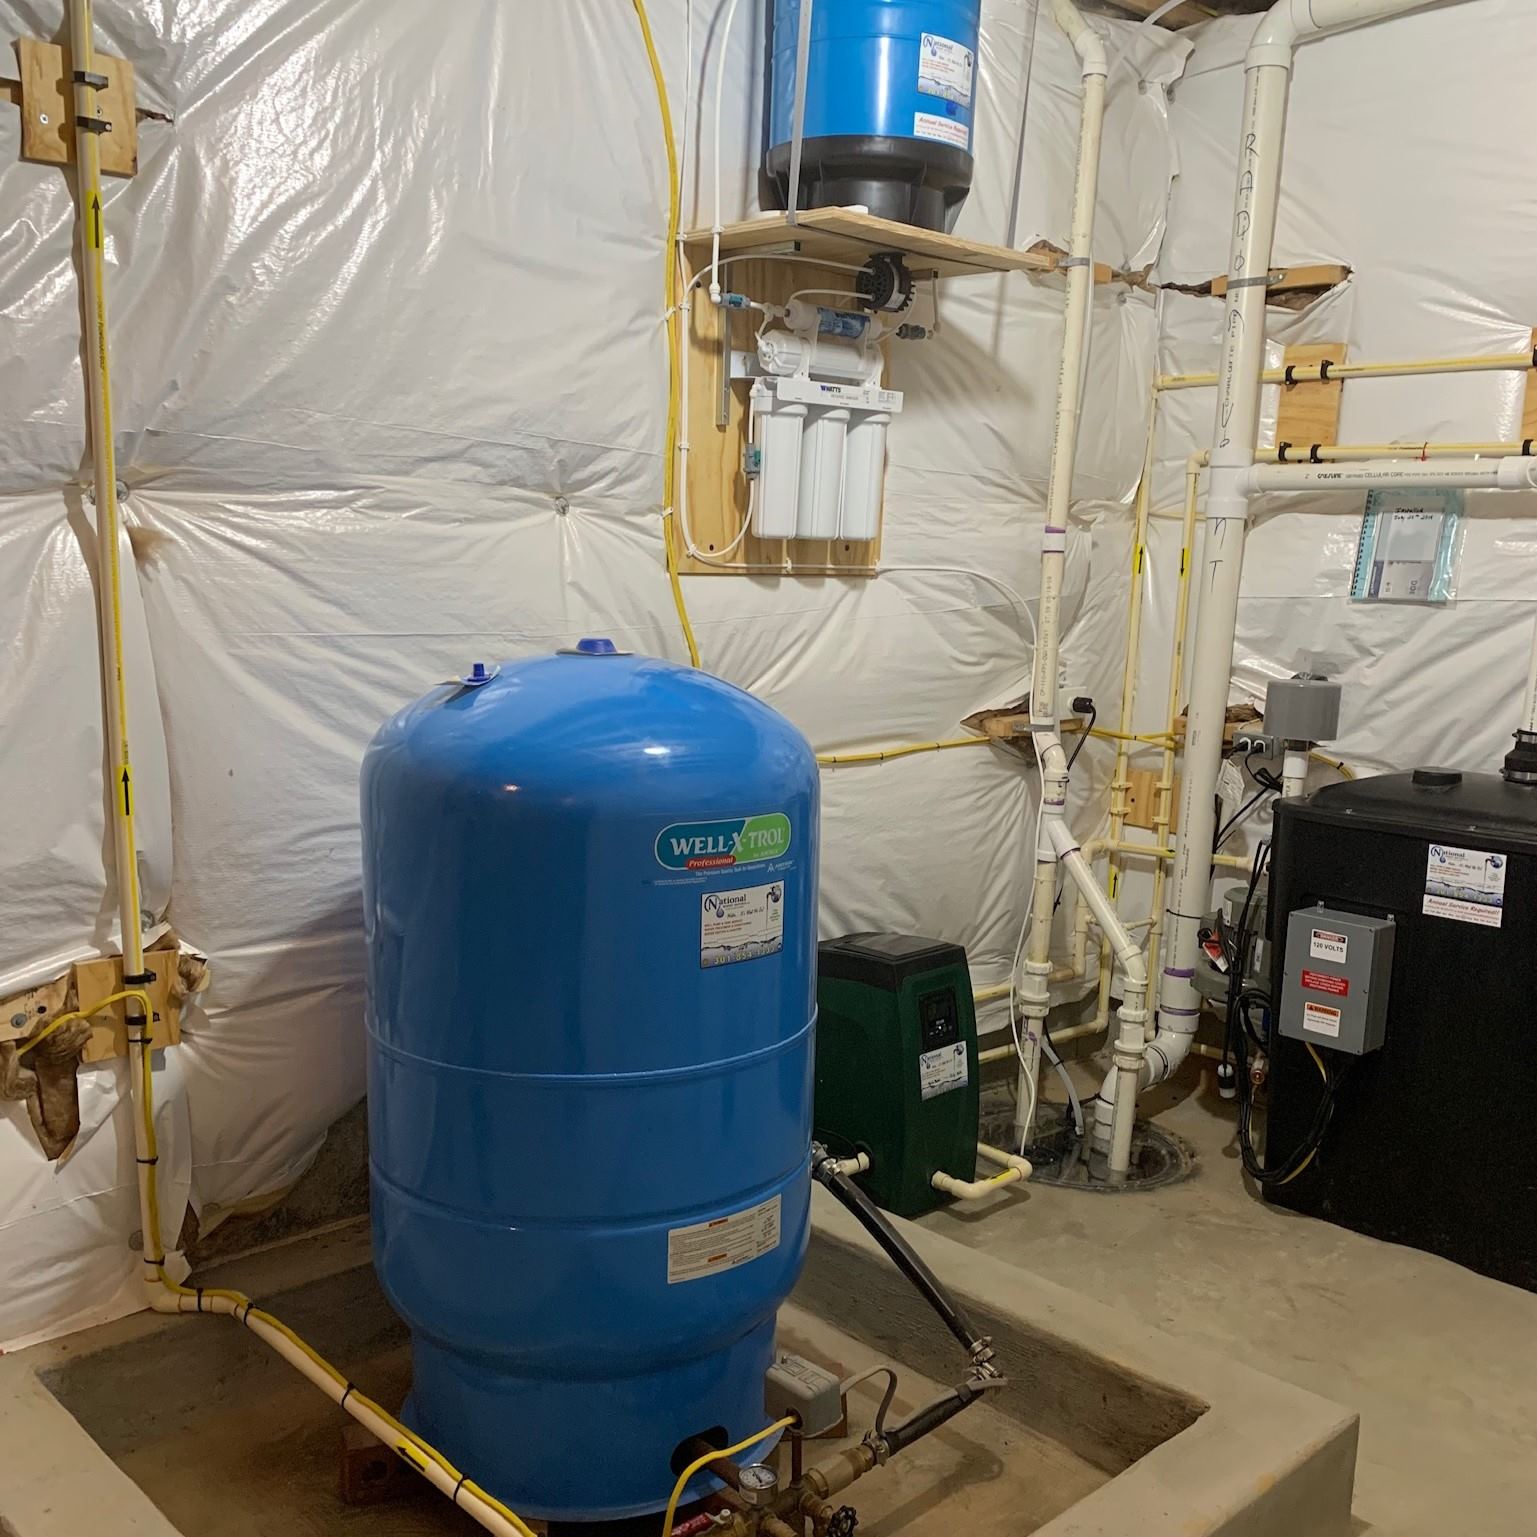
Step 3: Mounting the Pressure Tank
Mounting the pressure tank is a crucial step in the installation process. The pressure tank helps regulate the water pressure in your system and provides a buffer for the pump. Follow these steps to mount the pressure tank:
Choose the Mounting Location:
Select a suitable location to mount the pressure tank. It should be near the water pump and accessible for future maintenance. Ensure that the area has enough space to accommodate the tank and any necessary fittings or connections.
Attach Mounting Brackets:
If your pressure tank comes with mounting brackets, attach them securely to the tank. Use appropriate screws or bolts to ensure a strong and stable attachment.
Attach the Tank to the Mounting Surface:
Using the appropriate hardware, attach the pressure tank to the mounting surface. Ensure that it is securely fastened to prevent any movement or vibration during operation.
Ensure Proper Clearance:
Leave enough clearance between the pressure tank and any surrounding walls or objects. This will allow for proper ventilation and provide space for maintenance and inspection.
Check for Level:
Use a level to ensure that the pressure tank is properly aligned and level. Adjust it if necessary by adding shims or making small adjustments to the mounting brackets.
Make Necessary Connections:
Connect the pipes from the water pump to the appropriate ports on the pressure tank. Use suitable pipe fittings and secure the connections tightly to prevent leaks.
Test for Stability:
Gently wiggle the pressure tank to ensure it is securely mounted and stable. If it moves or feels loose, double-check the mounting bolts and brackets to ensure a secure attachment.
Once the pressure tank is properly mounted and secured, you can proceed to the next step: installing the water pump.
Read more: How To Install A Shallow Well Water Pump
Step 4: Installing the Water Pump
Now that the pressure tank is securely mounted, it’s time to install the water pump. The water pump is responsible for drawing water from the source and delivering it into the pressure tank. Follow these steps to install the water pump:
Select the Proper Location:
Choose a suitable location for the water pump, ideally near the water source and close to the pressure tank. Ensure there is enough clearance around the pump for maintenance and airflow.
Secure Mounting Surface:
If your water pump requires mounting, ensure that the mounting surface is sturdy and can support the weight of the pump. Use appropriate hardware to securely attach the pump. Alternatively, some pumps may come with a base or stand that can be placed on a level surface.
Position the Pump:
Place the pump in the chosen location, ensuring it is level and stable. If needed, use shims or adjustments to achieve a level position.
Read more: Where To Install Check Valve On Water Pump
Connect the Water Source:
Attach the appropriate pipes to the inlet of the water pump, connecting it to the water source. Use recommended pipe fittings and ensure tight connections to prevent leaks.
Connect the Discharge Pipe:
Attach the discharge pipe to the outlet of the water pump, which will deliver water into the pressure tank. Securely connect the pipe using suitable fittings and clamps.
Ensure Proper Alignment:
Double-check that the water pump is properly aligned with the water source and discharge pipe. Any misalignment can cause problems with water flow and reduce system efficiency.
Check Connections:
Inspect all the connections, including those at the water source and discharge pipe. Ensure that they are tight and properly sealed to prevent any leaks.
Once the water pump is installed and all connections are secure, you can proceed to the next step: connecting the pipes.
Read also: 15 Best High Pressure Water Pump for 2025
Step 5: Connecting the Pipes
With the water pump and pressure tank in place, it’s time to connect the pipes to complete the water pump system. Follow these steps to properly connect the pipes:
Measure and Cut the Pipes:
Using a pipe cutter or hacksaw, measure and cut the necessary lengths of pipe to connect the water pump, pressure tank, and other components. Remember to account for fittings and connections when measuring.
Prepare the Pipes:
Before making any connections, clean the ends of the pipes to remove any debris or burrs. Smooth the edges with sandpaper if necessary.
Apply Teflon Tape:
Wrap a few layers of Teflon tape clockwise around the threaded ends of the pipes and fittings. This will create a reliable seal and prevent leaks.
Make the Connections:
Using appropriate fittings and connectors, make the necessary connections between the pipes and the water pump, pressure tank, and other components. Ensure that the connections are tight and properly aligned.
Secure the Connections:
Use pipe clamps or straps to secure the connections and prevent any movement or vibration. This will help maintain the integrity of the system and prevent stress on the connections.
Check for Leaks:
After making all the connections, inspect the system for any leaks. Turn on the water supply and check each connection point for any signs of water leakage. If you spot any leaks, tighten the connections or wrap additional Teflon tape as needed.
Double-Check Alignment and Clearance:
Ensure that all pipes are properly aligned and have adequate clearance from walls or other obstructions. This will prevent kinks or restrictions in the flow of water.
Once all the pipes are properly connected, and there are no leaks, you can move on to the next step: installing the pressure switch.
Read more: What Is An Expansion Tank On A Water Heater
Step 6: Installing the Pressure Switch
The pressure switch plays a crucial role in monitoring and controlling the water pressure in your system. It automatically turns the water pump on and off based on preset pressure levels. Follow these steps to properly install the pressure switch:
Choose the Proper Location:
Select a suitable location for the pressure switch. It should be easily accessible for maintenance and wiring. Consider placing it near the pressure tank or close to the water pump.
Turn Off the Power:
Before installing the pressure switch, always turn off the power to the water pump system. This will ensure your safety during the installation process.
Remove the Cover:
Remove the cover of the pressure switch to expose the internal components. This will allow you to access the terminals and wiring connections.
Read more: How To Replace Hot Water Tank Thermostat
Connect the Wiring:
Refer to the manufacturer’s instructions to determine the correct wiring connections for your specific pressure switch model. Connect the power wires and the wires from the water pump to their designated terminals on the switch. Ensure that the connections are secure and tightened properly.
Grounding:
Attach the grounding wire from the pressure switch to a suitable grounding point. Grounding is essential for safety and helps protect against electrical faults.
Replace the Cover:
Once all the connections are made, carefully place the cover back onto the pressure switch. Secure it in place to protect the internal components.
Turn On the Power:
After confirming that all the wiring connections are secure, turn on the power to the water pump system. Test the pressure switch by observing the pump turning on and off at the designated pressure levels.
Read more: How To Lubricate A Water Pump
Adjust Pressure Settings:
If necessary, adjust the pressure settings on the pressure switch according to your water pressure requirements. Consult the manufacturer’s instructions for guidance on adjusting the pressure switch settings.
Once the pressure switch is installed and functioning correctly, you can proceed to the next step: electrical wiring.
Step 7: Electrical Wiring
Electrical wiring is an essential step in the installation of a water pump system. Proper electrical connections ensure the safe and efficient operation of the system. Follow these steps to correctly wire your water pump system:
Turn Off the Power:
Before starting any electrical work, make sure to turn off the power to the water pump system at the circuit breaker. This will prevent any accidents or electrical shocks during the wiring process.
Review the Manufacturer’s Instructions:
Consult the manufacturer’s instructions accompanying your water pump and pressure tank for specific electrical wiring requirements. Different systems may have varying instructions, so it’s important to follow the guidelines provided.
Read more: How To Fix Water Pump
Prepare the Wiring:
Measure and cut the appropriate length of electrical wire for connecting the power supply to the pressure switch and the water pump. Strip the insulation from the ends of the wires to expose the copper conductors.
Connect the Wires:
Connect the corresponding wires from the power supply to the designated terminals on the pressure switch. Ensure that the connections are secure and tight. Refer to the manufacturer’s instructions for the proper wiring configuration.
Connect the Pump Wires:
Attach the wires from the water pump to the designated terminals on the pressure switch. Follow the manufacturer’s instructions for wiring connections and ensure that they are secure.
Grounding:
Connect the grounding wire from the power supply to the designated grounding point on the pressure switch or as specified in the instructions. Grounding is crucial for electrical safety.
Read more: How To Use A Water Pump
Test the Wiring:
Once all the wiring connections are made, double-check the connections and ensure they are properly insulated. Turn on the power supply and test the system by observing the response of the pressure switch and the water pump.
Properly Secure and Protect the Wiring:
Use appropriate cable clamps or straps to secure the wiring and prevent any strain or damage. Additionally, make sure the wiring is well-insulated and protected from moisture or other potential hazards.
Remember, if you are unsure about any aspect of electrical wiring or if you have any doubts, it is best to consult a qualified electrician to ensure the job is done safely and correctly.
With the electrical wiring completed, you are ready to move on to the final step: testing and troubleshooting.
Step 8: Testing and Troubleshooting
After completing the installation and wiring of your water pump system, it’s important to conduct thorough testing to ensure everything is working properly. Follow these steps to test and troubleshoot your system:
Check for Leaks:
Inspect all connections, including the pipes, fittings, and valves, for any signs of leaks. With the system pressurized, visually inspect all areas and listen for any hissing sounds that indicate a leak. Address any leaks by tightening connections or replacing faulty components.
Turn On the Power:
Switch on the power supply to the water pump system. Ensure that the pressure switch is functioning correctly and that the pump turns on and off at the specified pressure levels. Listen for any unusual sounds or vibrations that may indicate a problem.
Check Water Pressure:
Observe the water pressure in the system. Ensure that it remains steady and within the desired range. If the pressure is too low or fluctuates significantly, there may be a problem with the pump or the pressure tank. Consult the manufacturer’s instructions or seek professional assistance to troubleshoot and resolve the issue.
Monitor Performance:
Observe the performance of the water pump system over a period of time. Ensure that the pressure tank is operating correctly, providing consistent water pressure and flow rates. Monitor any changes in performance or signs of irregularities.
Test Shut-off Functionality:
Manually simulate a situation where the pressure switch should turn off the water pump. This can typically be done by closing a valve or tap to create a situation where the pressure in the system reaches the cut-off pressure. Ensure that the pump stops running when the pressure limit is reached and restarts when necessary.
Read more: How To Test Water Pump
Troubleshooting:
If you encounter any issues or inconsistencies during testing, consult the manufacturer’s instructions for troubleshooting guidance. Common issues may include low water pressure, pump cycling too frequently, or system malfunctions. Follow the recommended troubleshooting steps or consider seeking help from a professional if necessary.
Maintain Regular Maintenance:
Once your water pump system is operating smoothly, establish a regular maintenance schedule. This may include tasks such as inspecting and cleaning the filter, checking pressure tank air pressure, and ensuring proper lubrication of the pump. Follow the manufacturer’s recommendations for maintenance intervals and procedures.
By conducting thorough testing and troubleshooting, you can ensure the proper functioning and reliability of your water pump system. This will provide you with consistent water supply and peace of mind.
With this final step complete, you have successfully installed and tested your water pump system. Congratulations! Enjoy the benefits of a reliable water supply for your needs.
Remember to always refer to the manufacturer’s instructions specific to your water pump and pressure tank for accurate guidance throughout the installation process.
Conclusion
Installing a water pump with a pressure tank may seem like a daunting task, but with the right tools, materials, and guidance, it can be a manageable and rewarding project. A properly installed and functioning water pump system ensures a reliable water supply for your home, garden, or commercial property.
In this comprehensive guide, we have covered each step of the installation process, from choosing the right location to testing and troubleshooting the system. By following these steps and referring to the manufacturer’s instructions for your specific water pump and pressure tank, you can successfully set up a water pump system that meets your needs.
Remember to prioritize safety throughout the installation process. Always turn off the power supply before working with electrical connections, and seek assistance from a qualified electrician if needed. Additionally, be cautious of sharp edges and moving parts while handling the equipment.
Regular maintenance is essential to ensure the longevity and optimal performance of your water pump system. Follow the manufacturer’s recommendations for maintenance tasks and intervals to keep your system running smoothly.
By installing a water pump with a pressure tank, you can enjoy consistent water pressure and flow rates, whether you need it for household use, irrigation, or other water supply applications. With proper installation and maintenance, your water pump system will provide you with reliable water supply for years to come.
Remember, if you ever encounter difficulties during the installation process or experience any issues with your water pump system, do not hesitate to seek professional help. They can provide expertise and guidance to resolve any problems efficiently.
Now that you have completed this guide, you are equipped with the knowledge and understanding to install and maintain your water pump system. Enjoy the convenience and reliability that a well-installed water pump with a pressure tank can bring to your daily life.
Frequently Asked Questions about How To Install Water Pump With Pressure Tank
Was this page helpful?
At Storables.com, we guarantee accurate and reliable information. Our content, validated by Expert Board Contributors, is crafted following stringent Editorial Policies. We're committed to providing you with well-researched, expert-backed insights for all your informational needs.
0 thoughts on “How To Install Water Pump With Pressure Tank”