Articles
How To Put A Wax Ring On A Toilet
Modified: March 1, 2024
Discover the step-by-step process of properly installing a wax ring on a toilet with this comprehensive guide. Read more articles on toilet maintenance and repair.
(Many of the links in this article redirect to a specific reviewed product. Your purchase of these products through affiliate links helps to generate commission for Storables.com, at no extra cost. Learn more)
Introduction
When it comes to installing or replacing a toilet, one important step is putting a wax ring on the toilet. The wax ring creates a watertight seal between the bottom of the toilet and the flange on the floor. This ensures that there are no leaks or unpleasant odors coming from the base of the toilet.
While it may seem like a simple task, properly installing a wax ring is essential for the long-term functionality of your toilet. In this guide, we will walk you through a step-by-step process on how to put a wax ring on a toilet, ensuring a secure and leak-free connection.
Before you begin, make sure you have all the necessary supplies. This includes a wax ring, wax ring sleeve (if needed), adjustable wrench, putty knife, sponge or rag, and gloves. Additionally, it is always a good idea to turn off the water supply to the toilet before removing it to avoid any accidental leaks.
So, let’s dive into the details of how to put a wax ring on a toilet and get your bathroom back in working order.
Key Takeaways:
- Properly installing a wax ring on a toilet is crucial for preventing leaks and odors. Follow the step-by-step guide to ensure a secure and stable connection, and enjoy a leak-free bathroom experience.
- Gathering the necessary supplies, prepping the toilet, cleaning the flange, and testing for leaks are essential steps in putting a wax ring on a toilet. Take pride in your DIY skills and enjoy a well-fitted toilet.
Read more: How To Change A Wax Ring On A Toilet Bowl
Supplies Needed
Before you begin the process of putting a wax ring on a toilet, gather all the necessary supplies. Having everything on hand will make the installation process much smoother. Here are the supplies you will need:
- Wax ring: This is the main component of the seal and ensures a watertight connection between the toilet and the flange.
- Wax ring sleeve (if needed): In some cases, when the flange is below the floor level, a wax ring sleeve helps bridge the gap and provide a secure seal.
- Adjustable wrench: You will need this tool to loosen and tighten the bolts that hold the toilet in place.
- Putty knife: Use a putty knife to scrape away the old wax ring and clean the flange.
- Sponge or rag: Have a sponge or rag handy to clean up any water or debris during the installation process.
- Gloves: It is always a good idea to wear gloves when handling the wax ring and any other parts to protect your hands.
By having all these supplies ready, you can ensure a quick and efficient installation of the wax ring. Now, let’s move on to the step-by-step process of putting a wax ring on a toilet.
Step 1: Prep the Toilet
Before you can put the wax ring on the toilet, you need to prepare the toilet itself. This involves removing any water from the tank and bowl, as well as disconnecting the water supply line. Follow these steps to properly prep the toilet:
- Start by turning off the water supply to the toilet. Locate the shut-off valve, typically located near the base of the toilet, and turn it clockwise to close it.
- Flush the toilet to drain as much water as possible from the tank and bowl. Hold the handle down to empty the tank completely.
- To remove any remaining water from the bowl, use a plunger to force it down the drain or carefully scoop it out with a cup or bucket.
- Next, disconnect the water supply line. Use an adjustable wrench to loosen the nut connecting the supply line to the bottom of the toilet tank. Once loose, carefully pull the supply line away from the toilet.
By prepping the toilet in this way, you create a clean and dry surface for installing the wax ring. Now, you are ready to move on to the next step: removing the old wax ring.
Step 2: Remove the Old Wax Ring
Removing the old wax ring is a crucial step in the process of putting a new one on. The old wax ring may be flattened or worn out, and it needs to be completely removed to ensure a proper seal with the new wax ring. Follow these steps to remove the old wax ring:
- Put on a pair of gloves to protect your hands from any debris or residue.
- Use a putty knife to carefully scrape away the remnants of the old wax ring from the flange. Be cautious not to scratch or damage the flange.
- Dispose of the old wax ring and any other debris that may have accumulated around the flange.
- Inspect the flange to ensure it is clean and free from any leftover wax or debris. Use the putty knife or a damp cloth to wipe away any remaining residue.
By removing the old wax ring and cleaning the flange, you create a clean surface for the new wax ring to be installed. This step is essential for ensuring a proper and secure seal. Now, let’s move on to the next step: cleaning the flange.
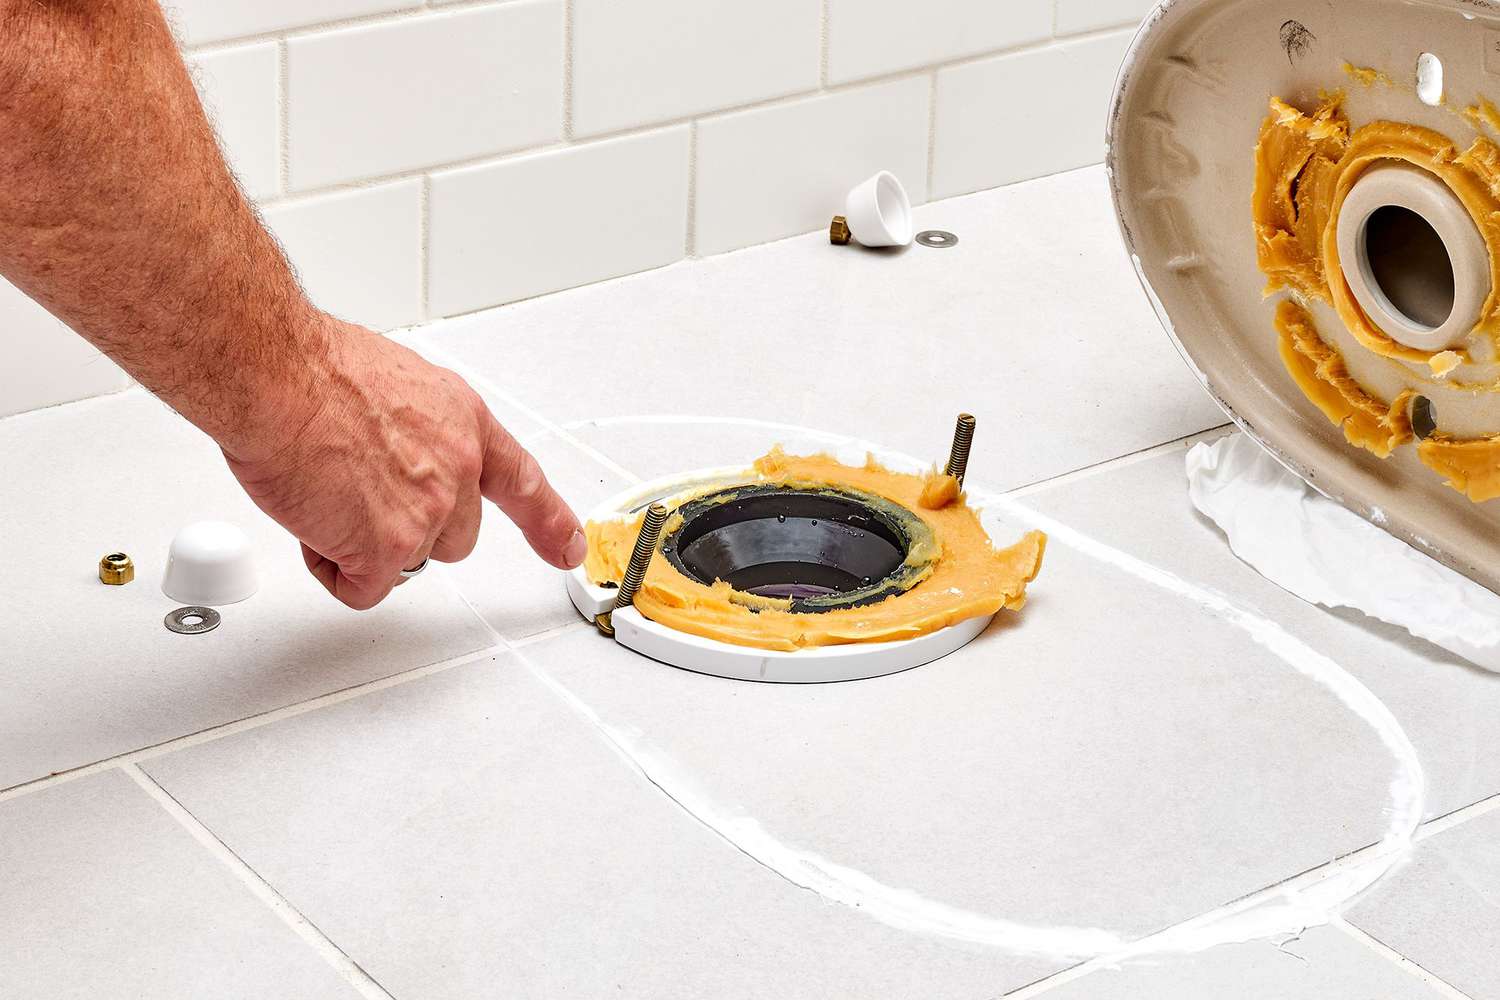
Step 3: Clean the Flange
Cleaning the flange is an important step in the process of putting a wax ring on a toilet. The flange is the metal or plastic ring that connects the toilet to the drainpipe. By cleaning the flange, you ensure a smooth and secure installation of the new wax ring. Follow these steps to clean the flange properly:
- Inspect the flange to ensure it is free from any cracks or damage. If you notice any issues with the flange, it may need to be repaired or replaced before proceeding.
- Use a putty knife or a damp cloth to wipe away any debris or residue from the flange. Make sure to clean both the inside and outside edges of the flange.
- Check the flange for any buildup of old wax or caulk. Use the putty knife to carefully scrape away any remaining residue.
- If the flange is below the floor level, you may need to use a wax ring sleeve to bridge the gap. Follow the manufacturer’s instructions for installing the wax ring sleeve onto the flange.
By cleaning the flange, you ensure a clean and smooth surface for the new wax ring to be installed. This step is crucial in creating a secure and watertight seal. With the flange clean and ready, we can now move on to placing the new wax ring in the next step of the process.
When placing a wax ring on a toilet, make sure to center it on the toilet flange and press down firmly to create a good seal. Be careful not to move the toilet once the wax ring is in place to avoid breaking the seal.
Read more: How Long Does Toilet Wax Ring Last
Step 4: Place the New Wax Ring
Placing the new wax ring is a critical step in the process of putting a wax ring on a toilet. The wax ring creates a watertight seal between the toilet and the flange, preventing leaks and odors. Follow these steps to properly place the new wax ring:
- Take the new wax ring out of its packaging. The wax ring is a soft, pliable material that will create a secure seal when compressed.
- Hold the wax ring with the rounded side facing up and the flat side facing down.
- Carefully lower the wax ring onto the flange, aligning it with the center hole of the flange. Make sure the wax ring is centered and evenly placed on the flange.
- Gently press down on the wax ring to compress it and create a tight seal. Apply even pressure around the entire circumference of the wax ring.
- Double-check that the wax ring is securely in place and centered on the flange. It is important to ensure that there are no gaps or spaces between the wax ring and the flange.
By properly placing the new wax ring, you ensure a secure and watertight connection between the toilet and the flange. This step is crucial in preventing leaks and maintaining the integrity of your bathroom plumbing. With the wax ring securely in place, we can move on to the next step: aligning and lowering the toilet onto the wax ring.
Step 5: Align and Lower the Toilet
Aligning and lowering the toilet onto the wax ring is a crucial step in the process of putting a wax ring on a toilet. Proper alignment ensures that the toilet fits securely onto the flange and creates a tight seal with the wax ring. Follow these steps to align and lower the toilet onto the wax ring:
- Position the toilet bowl above the wax ring and flange, ensuring that the mounting bolts on the flange align with the holes on the bottom of the toilet.
- Slowly lower the toilet onto the wax ring, taking care not to press down yet. Make sure the mounting bolts pass through the holes on the base of the toilet.
- Once the toilet is in position, gently rock it back and forth to ensure that the wax ring compresses evenly and forms a tight seal.
- Center the toilet bowl over the flange and check that it is level. Use a bubble level to ensure that the toilet is sitting evenly on the floor.
- If needed, make small adjustments by carefully shifting the toilet from side to side. This will help ensure that the wax ring compresses evenly and creates a secure seal.
By properly aligning and lowering the toilet, you ensure a secure and snug fit onto the wax ring and flange. This step is crucial in preventing leaks and maintaining the stability of the toilet. Now that the toilet is in place, we can move on to securing it in the next step.
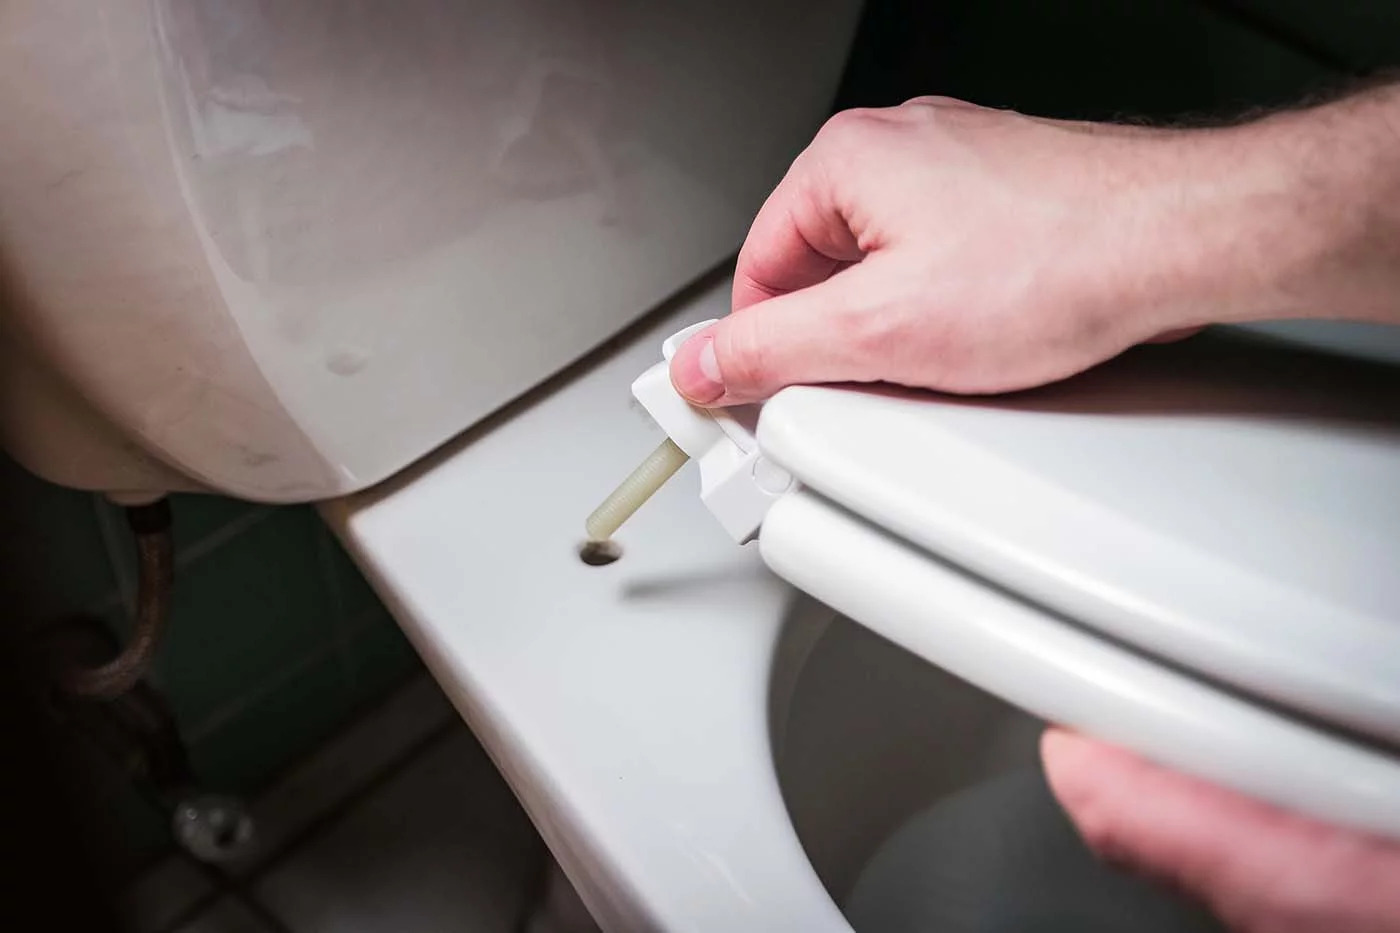
Step 6: Secure the Toilet
Securing the toilet is an important step in the process of putting a wax ring on a toilet. By properly securing the toilet, you ensure its stability and prevent any movement or rocking. Follow these steps to secure the toilet:
- Place a washer and nut onto each mounting bolt that extends through the base of the toilet.
- Tighten the nuts evenly using an adjustable wrench. Be careful not to over-tighten, as this can crack the toilet bowl.
- Alternate between tightening each nut to ensure even pressure is applied on both sides of the toilet.
- Once the nuts are tight and secure, use a hacksaw or a pipe cutter to remove any excess length from the mounting bolts. This will prevent the bolt from interfering with the toilet tank or base.
- With the toilet securely fastened, place the plastic caps over the mounting bolts to provide a finished appearance.
By properly securing the toilet, you ensure its stability and minimize the risk of any movement or leaks. This step is crucial for maintaining the longevity and functionality of your toilet. With the toilet securely in place, we can move on to the final step: testing for leaks.
Step 7: Test for Leaks
Testing for leaks is the final step in the process of putting a wax ring on a toilet. It is important to ensure that there are no leaks between the toilet and the flange, as this can cause water damage and unpleasant odors. Follow these steps to test for leaks:
- Turn on the water supply to the toilet by opening the shut-off valve fully.
- Allow the tank to fill with water and then flush the toilet. Observe the area around the base of the toilet for any signs of water leakage.
- Check for any water seeping out from under the toilet or any visible water around the edges of the toilet base.
- If you notice any leaks, it may indicate an improper seal between the toilet and the wax ring. In this case, you may need to repeat the steps above to ensure a proper installation.
- If there are no leaks, dry the area around the base of the toilet with a towel or cloth to ensure it is clean and dry.
By testing for leaks, you can ensure that the wax ring has created a proper seal between the toilet and the flange. This step is crucial for preventing any water damage and maintaining the overall functionality of the toilet. Congratulations! You have successfully put a wax ring on your toilet and can now enjoy a leak-free bathroom.
Read more: How To Change Toilet Wax Ring
Conclusion
Putting a wax ring on a toilet is a necessary step in the installation or replacement process. It ensures a watertight seal and prevents leaks and unpleasant odors in your bathroom. By following the step-by-step guide outlined above, you can successfully put a wax ring on your toilet and ensure a secure and stable connection.
Throughout the process, it is important to gather all the necessary supplies, prep the toilet, remove the old wax ring, clean the flange, place the new wax ring, align and lower the toilet, secure it properly, and test for leaks. Each step is crucial in achieving a successful installation and maintaining the integrity of your toilet.
Remember to take your time during each step, ensuring that everything is done correctly. Proper alignment, sealing, and securing of the toilet are essential for the long-term functionality of your bathroom fixtures. Testing for leaks is the final step to confirm that the wax ring has created a tight seal and that there are no water leaks around the base of the toilet.
By putting a wax ring on your toilet properly, you can enjoy a leak-free and odor-free bathroom experience. Should you encounter any challenges or notice leaks after completing the process, do not hesitate to consult a professional plumber for assistance.
With this comprehensive guide, you are now equipped with the knowledge and skills to confidently put a wax ring on a toilet. Take pride in your DIY skills and enjoy the peace of mind that comes with a secure and well-fitted toilet.
Frequently Asked Questions about How To Put A Wax Ring On A Toilet
Was this page helpful?
At Storables.com, we guarantee accurate and reliable information. Our content, validated by Expert Board Contributors, is crafted following stringent Editorial Policies. We're committed to providing you with well-researched, expert-backed insights for all your informational needs.


0 thoughts on “How To Put A Wax Ring On A Toilet”