Articles
How To Remove Ring Around Toilet
Modified: October 20, 2024
Looking for articles on how to remove the ring around your toilet? Discover effective tips and tricks to tackle this common household problem.
(Many of the links in this article redirect to a specific reviewed product. Your purchase of these products through affiliate links helps to generate commission for Storables.com, at no extra cost. Learn more)
Introduction
Having a ring around the toilet can be an unsightly and frustrating problem. Not only does it make your toilet look dirty, but it can also be difficult to remove. But fear not! With the right supplies and a little bit of elbow grease, you can easily get rid of that stubborn ring and have your toilet looking fresh and sparkling clean once again.
In this article, we will explore the causes of ring around the toilet, the supplies needed for removing it, and provide you with step-by-step instructions to effectively tackle the problem. Additionally, we’ll share some prevention tips to help you avoid future rings.
So, let’s dive in and discover how to remove that ring around the toilet!
Key Takeaways:
- Understanding the causes of ring around the toilet, gathering the right supplies, and following a step-by-step cleaning process can effectively remove stubborn stains and mineral deposits, restoring the toilet bowl’s cleanliness.
- Implementing prevention tips such as regular cleaning, proper flushing, and improving bathroom ventilation can help avoid future ring formation, ensuring a consistently clean and hygienic toilet bowl.
Read more: How To Remove Hard Water Ring In Toilet Bowl
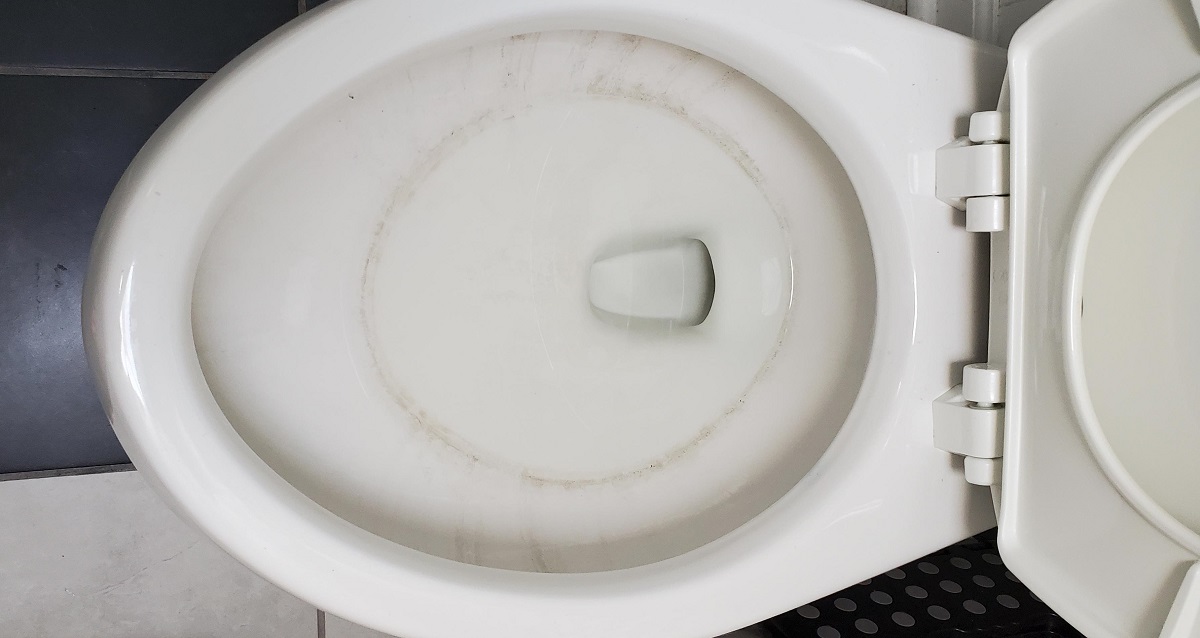
What Causes Ring Around the Toilet
The ring around the toilet is typically caused by the build-up of mineral deposits, such as calcium and limescale. These deposits can accumulate over time and form a ring that is difficult to remove. The most common factors that contribute to the formation of the ring are:
- Hard water: If your area has hard water, which is high in mineral content, the chances of developing a ring around the toilet are higher. The minerals in the water can leave behind deposits when the water evaporates.
- Infrequent cleaning: If the toilet is not regularly cleaned, these mineral deposits can build up over time and form a ring.
- Inadequate flushing: Insufficient water flow during flushing can lead to the build-up of waste and minerals, which can then contribute to the formation of the ring.
- Poor ventilation: Inadequate air circulation in the bathroom can result in higher humidity levels, promoting the growth of bacteria and mold, which can also contribute to the formation of the ring.
Understanding the causes of the ring around the toilet is crucial in effectively removing it and implementing preventative measures to avoid future build-up.
Supplies Needed for Removing Ring Around Toilet
Before you begin the process of removing the ring around the toilet, it’s important to gather the necessary supplies. Having the right tools and cleaning agents will make the task easier and more efficient. Here are the supplies you’ll need:
- Toilet brush: Choose a sturdy and durable toilet brush with stiff bristles to effectively scrub away the ring.
- Rubber gloves: Protect your hands from any harsh chemicals or bacteria by wearing rubber gloves throughout the cleaning process.
- Vinegar: White vinegar is an excellent natural cleaner that can help break down mineral deposits. It’s affordable, readily available, and safe to use.
- Baking soda: Baking soda is another versatile and effective cleaning agent that can help remove stains and odors.
- Lemon juice: Lemon juice acts as a natural disinfectant and can help tackle tough stains and eliminate unpleasant odors.
- Soft cloth or sponge: Use a soft cloth or sponge to apply the cleaning solutions and gently scrub the toilet bowl.
- Plastic scraper: In case the ring is stubborn and requires more intensive scrubbing, a plastic scraper can be handy to scrape away the hardened deposits gently.
- Bucket: Keep a bucket nearby to hold the cleaning solutions and rinse water.
- Water: You’ll need plenty of water for rinsing the toilet bowl and diluting the cleaning solutions.
With these supplies on hand, you’ll be well-equipped to tackle the ring around the toilet and restore the cleanliness of your bathroom.
Step-by-Step Instructions
Now that you have gathered all the necessary supplies, it’s time to dive into the step-by-step process of removing the ring around the toilet. Follow these instructions for the best results:
- Assess the Severity of the Stains: Before starting the cleaning process, take a moment to assess the severity of the ring. This will help you determine the appropriate cleaning methods and solutions.
- Gather the Necessary Cleaning Supplies: Make sure you have the toilet brush, rubber gloves, vinegar, baking soda, lemon juice, soft cloth or sponge, plastic scraper, bucket, and water ready to use.
- Apply the Cleaning Solution: Start by pouring a cup of vinegar or lemon juice into the toilet bowl. Let it sit for a few minutes to allow the acid to break down the mineral deposits.
- Scrub the Toilet Bowl: Take the toilet brush and begin scrubbing the ring and the rest of the toilet bowl. Apply firm pressure and make sure to scrub all areas thoroughly.
- Let the Solution Sit: After scrubbing, let the cleaning solution sit in the toilet bowl for about 10-15 minutes. This will give the acid enough time to work on loosening the stubborn stains.
- Rinse and Repeat if Necessary: Flush the toilet and rinse off the cleaning solution. Check if the ring has been completely removed. If not, repeat the process of applying the cleaning solution, scrubbing, and letting it sit for a bit longer.
- Dry the Toilet Bowl: Once the ring has been successfully removed, dry the toilet bowl using a soft cloth or sponge. This will help prevent the formation of future rings.
- Prevention Tips to Avoid Future Rings: To minimize the chances of ring formation in the future, consider using a toilet bowl cleaner regularly, ensuring proper toilet flushing, improving bathroom ventilation, and using water softeners if you have hard water.
By following these step-by-step instructions, you’ll be able to tackle the ring around the toilet effectively and maintain a clean and fresh bathroom.
Assess the Severity of the Stains
Before diving into the cleaning process, it’s essential to assess the severity of the stains around the toilet bowl. This will help you determine the appropriate cleaning methods and solutions required to remove the ring effectively.
Take a close look at the toilet bowl and identify the areas where the ring is most prominent. Is the entire bowl affected, or is it concentrated in certain spots? Are the stains light or heavily built up? Understanding the extent of the stains will guide you in deciding how thorough you need to be in cleaning.
If the stains are minor and superficial, they can typically be removed using basic household cleaning agents. However, for more stubborn and deeply ingrained stains, you may need to resort to more potent cleaning solutions or techniques.
Additionally, consider the time and effort you are willing to invest in the cleaning process. If you have limited time or prefer a quick fix, you may choose to tackle only the most visible or bothersome parts of the ring. On the other hand, if you are dedicated to achieving a spotless toilet bowl, you can opt for a more extensive and thorough cleaning approach.
Remember, every toilet and every ring around it is unique, so there is no one-size-fits-all solution. Assessing the severity of the stains will allow you to tailor your cleaning strategy to meet your specific needs.
Once you have determined the severity of the stains, you can move on to gathering the necessary cleaning supplies and preparing for the next steps in the ring removal process.
Gather the Necessary Cleaning Supplies
Before you begin the process of removing the ring around the toilet, it’s important to gather all the necessary cleaning supplies. Having everything ready and within reach will make the task more efficient and streamlined.
Here are the essential cleaning supplies you’ll need:
- Toilet brush: Choose a sturdy toilet brush with stiff bristles that can effectively scrub away the stains.
- Rubber gloves: Protect your hands from any harsh chemicals or bacteria by wearing rubber gloves throughout the cleaning process.
- Vinegar: White vinegar is a versatile and effective cleaning agent that can help break down mineral deposits and eliminate odors. Make sure you have enough vinegar for the cleaning process.
- Baking soda: Baking soda is another excellent cleaning agent that can help remove stains and neutralize odors. You’ll need a sufficient amount to cover the affected areas.
- Lemon juice: Lemon juice contains natural acidity that helps remove stains and disinfect the toilet bowl. Fresh lemons or bottled lemon juice both work well for this purpose.
- Soft cloth or sponge: Use a soft cloth or sponge to apply the cleaning solutions and gently scrub the toilet bowl.
- Plastic scraper: In case the stains are especially stubborn, a plastic scraper can be used to gently scrape away the built-up residue. Make sure the scraper is plastic to avoid scratching the porcelain.
- Bucket: Keep a bucket nearby to hold the cleaning solutions and to rinse out the cloth or sponge as needed.
- Water: You’ll need water for diluting the cleaning solutions, rinsing the toilet bowl, and cleaning your tools.
By gathering these necessary cleaning supplies before you start, you’ll have everything you need to effectively remove the ring around the toilet. This will save you time and ensure that the cleaning process goes smoothly.
Once you have all the supplies ready, you can move on to the next step: applying the cleaning solution and tackling the stubborn stains.
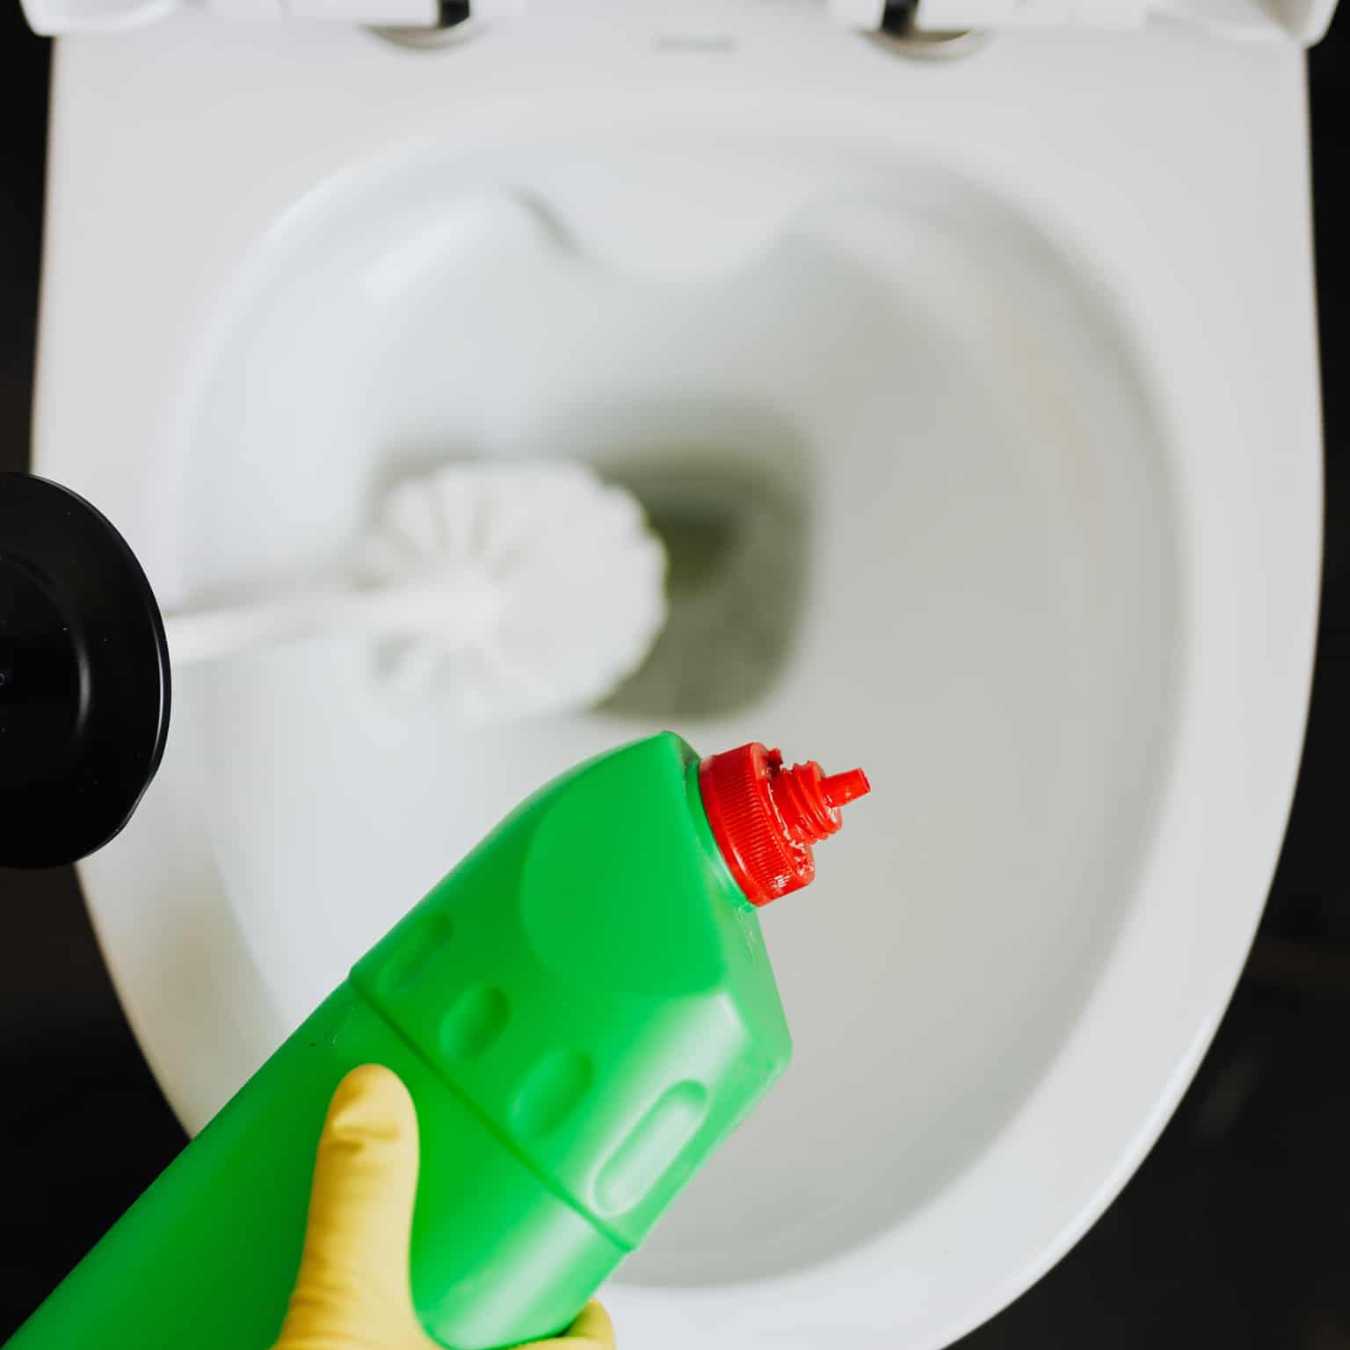
Apply the Cleaning Solution
Now that you have gathered all the necessary cleaning supplies, it’s time to prepare and apply the cleaning solution to tackle the ring around the toilet.
Here’s how to apply the cleaning solution effectively:
- Measure the amount: Start by measuring out the appropriate amount of cleaning solution for your toilet bowl. The exact measurements may vary depending on the size of the bowl and the severity of the stains. As a general rule of thumb, you can use the following ratios: for vinegar, use 1 cup; for baking soda, use 1/2 cup; for lemon juice, use the juice of 1-2 lemons.
- Mix the ingredients: In a bucket or another suitable container, mix the cleaning agents with water to create the cleaning solution. Stir the mixture well to ensure that the ingredients are evenly combined.
- Apply the solution: Pour the cleaning solution into the toilet bowl, making sure to cover all the stained areas. You can use a cup or a watering can to pour the solution for more precise application.
- Distribute the solution: Take the toilet brush and use it to distribute the solution evenly across the stained areas. Make sure to reach all corners and edges of the toilet bowl. Use gentle yet firm pressure to work the solution into the stains.
- Let it sit: After applying the cleaning solution, allow it to sit in the toilet bowl for at least 10-15 minutes. This will give the cleaning agents enough time to break down the mineral deposits and loosen the stains.
Applying the cleaning solution is a crucial step in removing the ring around the toilet. The combination of vinegar, baking soda, and lemon juice creates a powerful and natural cleaning agent that is effective against tough stains and mineral build-up.
Now that the cleaning solution is applied, it’s time to move on to the next step: scrubbing the toilet bowl to eliminate the ring and restore its cleanliness.
Use a pumice stone to gently scrub away the ring around the toilet. Make sure to wet the stone and the toilet first to prevent scratching.
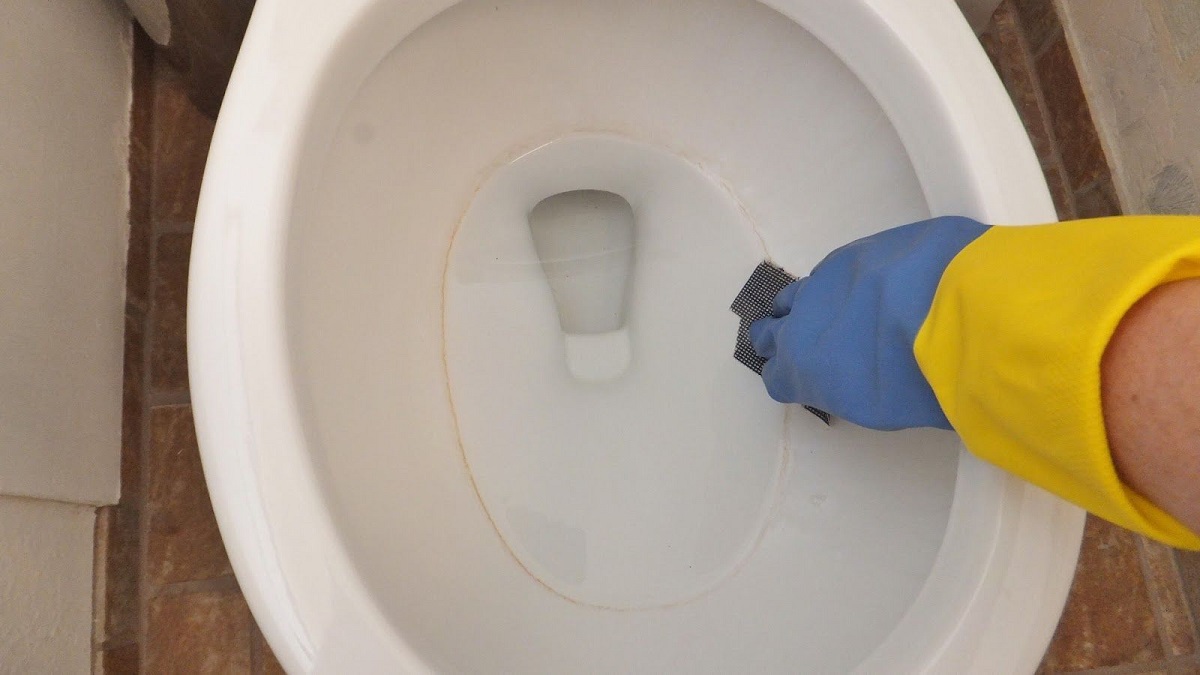
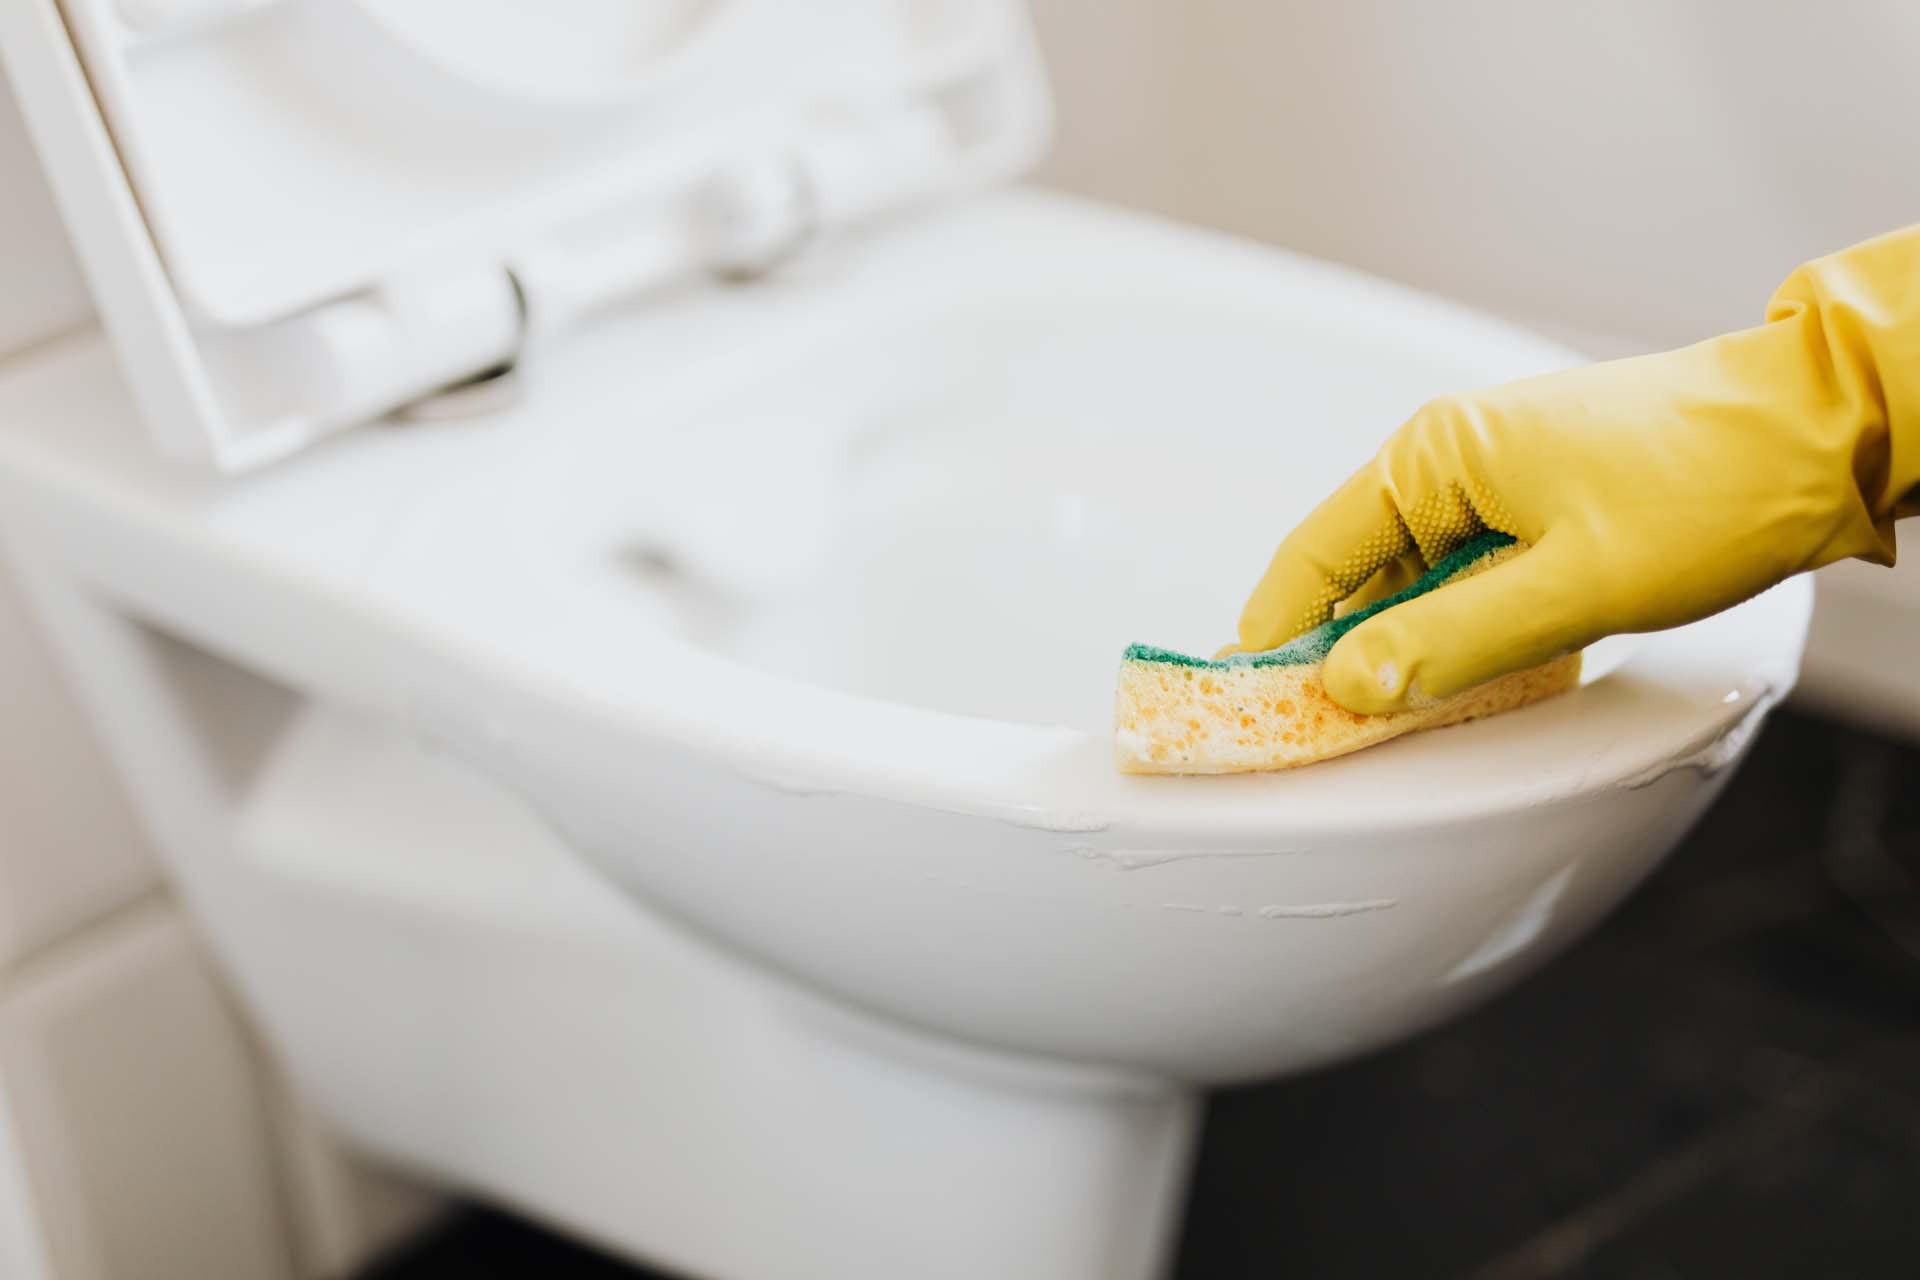
Scrub the Toilet Bowl
Now that the cleaning solution has been applied and allowed to sit for a few minutes, it’s time to grab your trusty toilet brush and start scrubbing away the ring around the toilet bowl.
Follow these steps to effectively scrub the toilet bowl:
- Starting from the top: Begin by scrubbing the upper part of the toilet bowl, including the rim and the inside edges. Apply firm pressure to remove any stains or build-up in these areas.
- Work your way down: Move the toilet brush down to scrub the middle and lower parts of the toilet bowl. Use circular motions and apply pressure as needed to target the ring and any other visible stains.
- Focus on affected areas: Pay extra attention to the areas where the ring is most prominent. Apply additional pressure and use a back-and-forth motion to tackle the tough stains and mineral deposits.
- Clean the waterline: Don’t forget to scrub the waterline as well, as it is often prone to staining. Brush vigorously to remove any discoloration or mineral build-up.
- Use the right technique: Make sure to scrub the entire inner surface of the toilet bowl from top to bottom, ensuring that you cover all areas thoroughly. Be consistent in your scrubbing technique and apply enough pressure to remove the stains without causing damage to the porcelain.
- Pay attention to corners and crevices: Take extra care when scrubbing corners, curves, and hard-to-reach areas. These spots can often hide stubborn stains, so make sure to give them special attention.
Continue scrubbing until you are satisfied with the results. Keep in mind that older or more stubborn stains may require additional efforts and repeated scrubbing.
Once you have thoroughly scrubbed the toilet bowl, it’s time to move on to the next step: letting the cleaning solution sit to work its magic.
Let the Solution Sit
After scrubbing the toilet bowl, it’s essential to allow the cleaning solution to sit for a period of time. Allowing the solution to sit helps maximize its effectiveness in breaking down the stubborn stains and mineral deposits.
Here’s what you need to do:
- Step away and let it sit: Once you have finished scrubbing, step away from the toilet bowl and resist the temptation to flush right away. Allow the cleaning solution to sit undisturbed for approximately 10-15 minutes.
- Giving it time to work: The sitting time is crucial as it allows the acidity of the cleaning agents to work on the stains and mineral deposits. The vinegar, baking soda, and lemon juice help break down the grime and make it easier to remove during the rinsing process.
- Close the toilet lid: To prevent any accidental spills or splashes, it’s a good idea to close the toilet lid while the solution is sitting. This will also help retain the heat and maintain the optimal environment for the cleaning solution to work effectively.
By letting the solution sit, you’re allowing it to penetrate and dissolve the stains, making them easier to remove. This step is especially important for stubborn or heavily built-up rings around the toilet.
Once the sitting time is up, it’s time to move on to the next step: rinsing the toilet bowl and assessing the results.
Read more: How To Prevent Toilet Bowl Rings
Rinse and Repeat if Necessary
After allowing the cleaning solution to sit for the recommended time, it’s time to rinse the toilet bowl and assess the effectiveness of the cleaning process. In some cases, you may need to repeat the cleaning steps to completely remove the ring around the toilet.
Follow these steps to rinse the toilet bowl and determine if further cleaning is needed:
- Flush the toilet: Start by flushing the toilet to remove the cleaning solution and any loosened stains from the bowl. Make sure to hold down the flush lever or button to ensure a thorough flush.
- Inspect the bowl: After flushing, take a close look at the inner surface of the toilet bowl. Pay attention to the areas where the ring was most prominent. Are the stains completely removed, or is there still some residue remaining?
- Repeat the process if necessary: If there are still visible stains or if the ring is not completely eliminated, don’t worry! You can repeat the cleaning process by applying another round of cleaning solution and scrubbing the affected areas again. This is especially important for stubborn or deeply embedded stains.
- Scrape if needed: For particularly persistent stains, you may need to use a plastic scraper to gently scrape away the remaining residue. Be careful not to scratch the porcelain while doing so.
- Rinse thoroughly: Once you are satisfied with the cleanliness of the toilet bowl, thoroughly rinse it with water. Use a cup or a bucket to pour water over the surfaces and flush as needed. This will ensure that all cleaning solution and residue are completely removed.
Remember, the effectiveness of the cleaning process may vary depending on the severity of the stains and the build-up of the ring around the toilet. If necessary, don’t hesitate to repeat the steps and give the cleaning solution more time to work its magic.
Now that you’ve rinsed the toilet bowl, you can move on to the next step: drying the toilet bowl to prevent future ring formation.
Dry the Toilet Bowl
After rinsing the toilet bowl and ensuring that all cleaning solution and residue have been thoroughly removed, it’s important to dry the toilet bowl to prevent future ring formation and maintain its cleanliness.
Follow these steps to effectively dry the toilet bowl:
- Start by removing excess water: Use a plunger or a toilet brush to push any remaining water towards the drain. This will make it easier to dry the surfaces.
- Use a soft cloth or towel: Take a clean and absorbent cloth or towel and carefully wipe down the inner surfaces of the toilet bowl. Pay special attention to areas that tend to retain moisture, such as the rim and the waterline.
- Dry hard-to-reach areas: Use a clean and dry cloth wrapped around a flat-end tool (such as a screwdriver) to dry hard-to-reach areas like the base and corners of the toilet bowl.
- Let it air dry: Allow the toilet bowl to air dry for some time to ensure that all moisture evaporates. Open windows or turn on the fan in the bathroom to facilitate air circulation and expedite the drying process.
Drying the toilet bowl helps prevent the formation of new rings by removing any lingering moisture. This step is especially important for those living in areas with high humidity or hard water, which can contribute to mineral deposits and stains.
By thoroughly drying the toilet bowl, you’re ensuring that it remains clean and free from any moisture that could lead to the formation of new rings or stains.
Now that the toilet bowl is dry and refreshed, it’s time for the final step: implementing prevention tips to avoid future rings.
Prevention Tips to Avoid Future Rings
Now that you have successfully removed the ring around the toilet, it’s essential to implement preventive measures to avoid its recurrence in the future. By following these tips, you can maintain a clean toilet bowl and prevent the formation of new rings:
- Regular cleaning: Establish a regular cleaning routine for your toilet. Regularly cleaning the toilet bowl and removing any build-up will help prevent the accumulation of mineral deposits and stains.
- Use a toilet bowl cleaner: Invest in a good-quality toilet bowl cleaner and follow the manufacturer’s instructions for effective use. These cleaners often contain ingredients that help break down stains and prevent the formation of rings.
- Proper flushing: Make sure to flush the toilet properly after each use. Adequate water flow will help rinse away waste and prevent the build-up of stains and mineral deposits.
- Improve bathroom ventilation: Ensure proper ventilation in your bathroom to reduce humidity levels. Install an exhaust fan or open a window during and after showering to allow moisture to escape. High humidity can contribute to the growth of bacteria and mold, which can lead to ring formation.
- Water softeners: If your water supply is known to be hard water, consider using a water softener. This will help reduce the mineral content in the water, minimizing the formation of mineral deposits and rings.
- Regular inspections: Check your toilet bowl regularly for any signs of ring formation. Catching early signs of staining will make it easier to remove and prevent further build-up.
- Wipe down surfaces: After cleaning the toilet bowl, wipe down the surfaces with a clean cloth to remove any excess moisture. This will help keep the bowl dry and minimize the risk of ring formation.
By implementing these prevention tips, you can significantly reduce the chances of future rings around the toilet. Consistency and regular maintenance are key to keeping your toilet bowl clean and free from unsightly stains.
Now that you’re equipped with preventive measures, you can enjoy a clean and fresh toilet bowl for a long time to come.
Conclusion
Removing the ring around the toilet can be a challenging task, but with the right approach and proper supplies, you can easily restore the cleanliness of your toilet bowl. By following the step-by-step instructions outlined in this article, you can effectively tackle the stubborn stains and mineral deposits that contribute to the formation of the ring.
We began by understanding the causes of the ring, such as hard water and infrequent cleaning. Then, we gathered the necessary cleaning supplies, including a toilet brush, vinegar, baking soda, and lemon juice. With these supplies in hand, we proceeded to apply the cleaning solution, scrub the toilet bowl, and let the solution sit to work its magic.
If necessary, we repeated the process, ensuring a thorough cleaning and rinsing of the toilet bowl. We also emphasized the importance of drying the bowl to prevent future ring formation. Finally, we provided prevention tips to help you maintain a clean and ring-free toilet bowl, including regular cleaning, proper flushing, and improving ventilation.
By following these guidelines, you can enjoy a fresh and sparkling toilet bowl, free from the unsightly ring that can detract from its appearance. Remember, consistency is key, so incorporate these tips into your regular cleaning routine to maintain a clean and hygienic bathroom environment.
With determination and the right tools, you can easily remove the ring around your toilet and keep your bathroom looking its best. So, why wait? Get started on the journey to a clean and ring-free toilet bowl today!
Frequently Asked Questions about How To Remove Ring Around Toilet
Was this page helpful?
At Storables.com, we guarantee accurate and reliable information. Our content, validated by Expert Board Contributors, is crafted following stringent Editorial Policies. We're committed to providing you with well-researched, expert-backed insights for all your informational needs.


0 thoughts on “How To Remove Ring Around Toilet”