Home>Articles>How To Remove Fan Clutch From Water Pump Chevy

Articles
How To Remove Fan Clutch From Water Pump Chevy
Modified: April 23, 2024
Learn how to remove the fan clutch from the water pump of your Chevy with our detailed step-by-step articles.
(Many of the links in this article redirect to a specific reviewed product. Your purchase of these products through affiliate links helps to generate commission for Storables.com, at no extra cost. Learn more)
Introduction
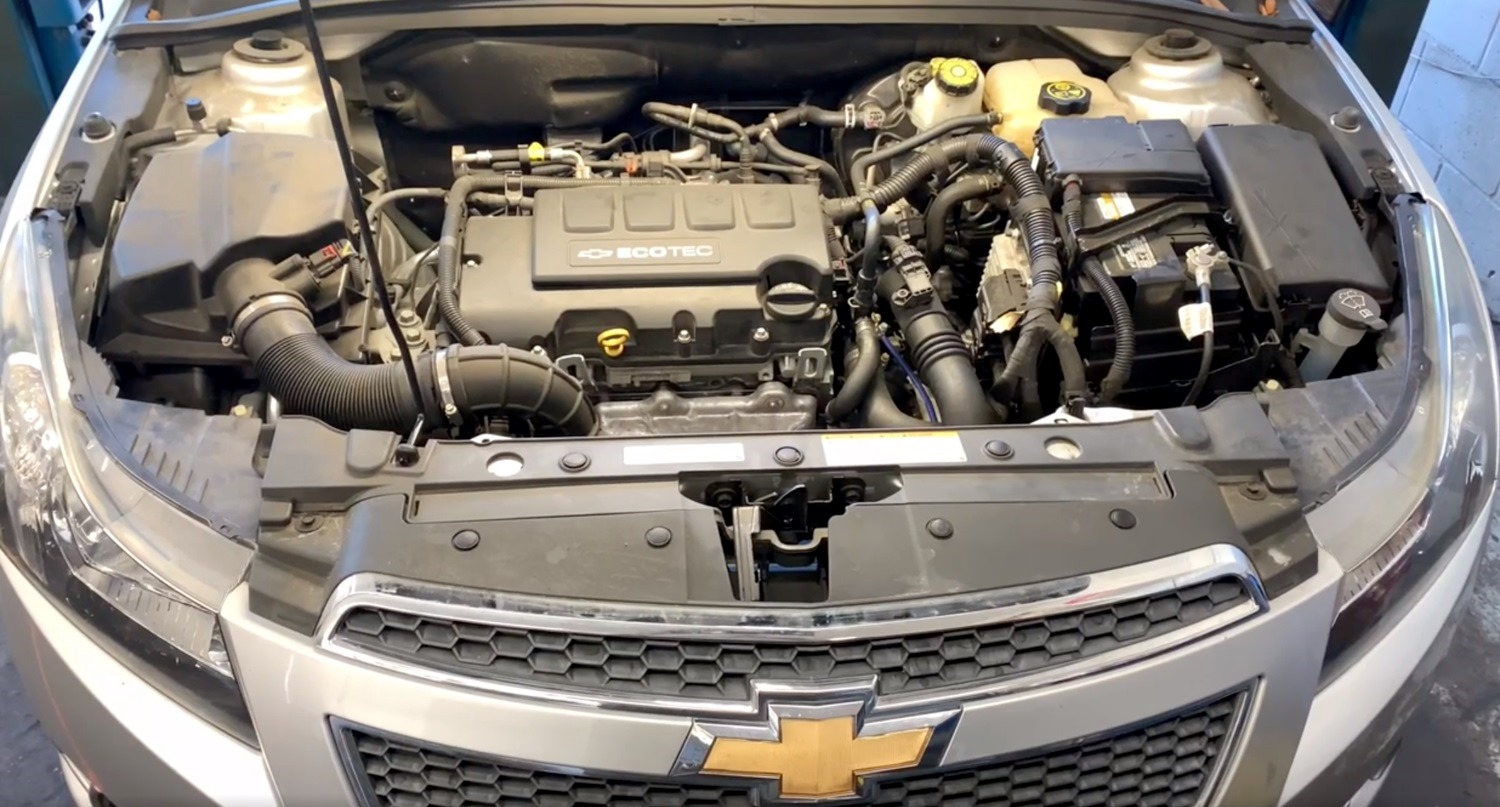
One common maintenance task that car owners may need to perform is the removal of the fan clutch from the water pump of a Chevrolet vehicle. The fan clutch is an important component of the cooling system, responsible for regulating the speed of the engine fan and controlling the temperature of the engine. Over time, the fan clutch may wear out or malfunction, necessitating its replacement.
Removing the fan clutch from the water pump can be a relatively straightforward process, especially if you have the right tools and follow the appropriate steps. In this article, we will guide you through the process of removing the fan clutch from the water pump on a Chevy vehicle, providing clear instructions and helpful tips along the way.
Before starting the removal process, it’s important to gather the necessary tools and materials. Being prepared will help ensure a smooth and efficient process. Let’s take a look at the tools and materials you will need.
Key Takeaways:
- Proper preparation, including gathering the necessary tools and materials, and vehicle readiness, is crucial for a smooth and efficient fan clutch removal process from the water pump of a Chevy vehicle.
- Careful attention to detail, from removing the serpentine belt to reassembling the fan shroud and performing final checks, is essential for successfully replacing the fan clutch and maintaining optimal cooling system performance in a Chevy vehicle.
Read more: How To Remove Clutch Fan
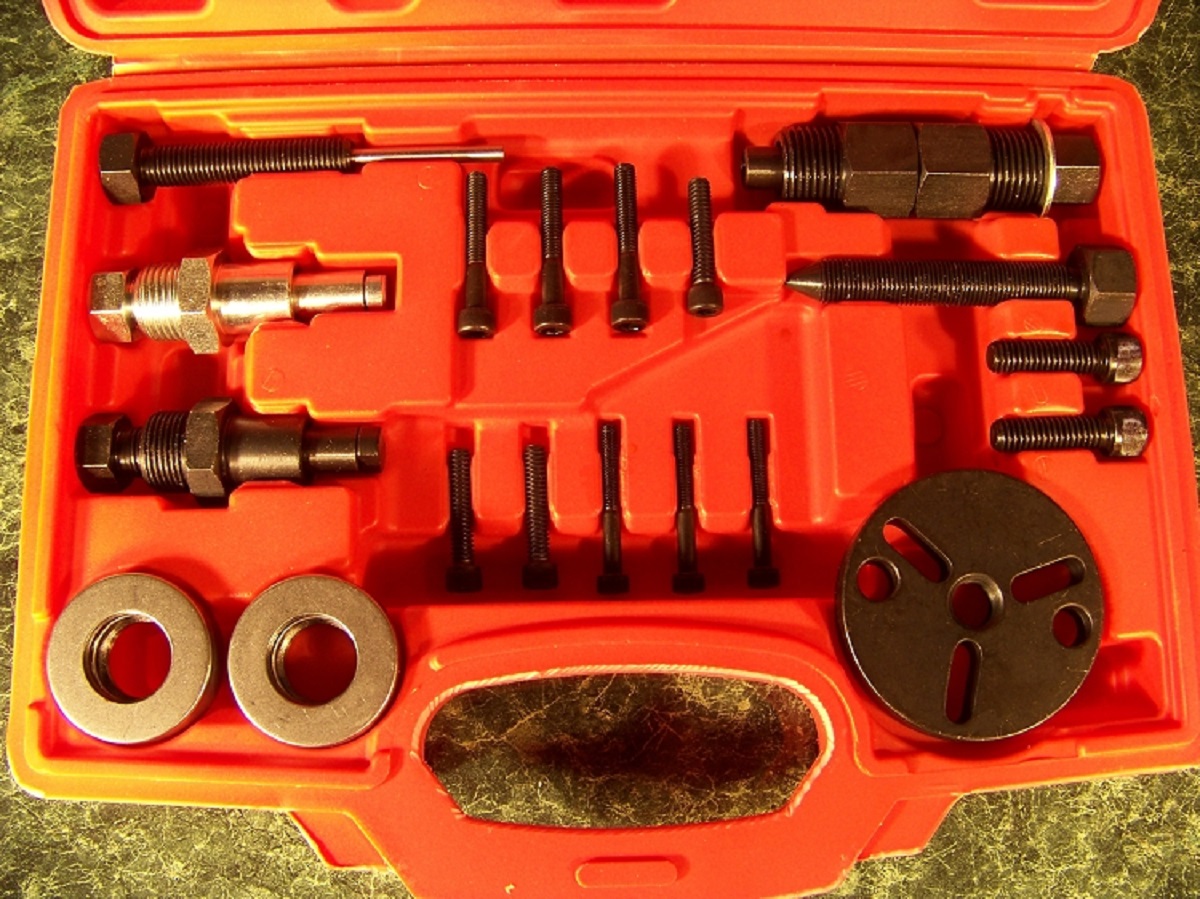
Tools and Materials Needed
Before you begin the process of removing the fan clutch from the water pump on your Chevy vehicle, it is important to gather the necessary tools and materials. Here is a list of items you will need:
- Socket set with various sizes
- Wrench set
- Fan clutch removal tool
- Large adjustable wrench
- Spray lubricant
- Clean cloth or rag
- New fan clutch (if replacement is needed)
Having these tools readily available will make the removal process much easier and efficient.
Step 1: Preparing the Vehicle
Before you can begin the process of removing the fan clutch from the water pump on your Chevy vehicle, it is important to prepare the vehicle properly. Follow these steps to ensure a smooth removal process:
- Make sure the engine is completely cooled down. It is best to work on the vehicle when the engine is cool to avoid any risk of burns or injuries.
- Park the vehicle on a flat and stable surface. This will provide a safe and stable working environment.
- Disconnect the battery cables. This step is important to prevent any accidental starting of the engine during the removal process.
- Remove any obstructions around the fan shroud. This may include air intake ducts or other components that may interfere with the removal process.
By following these preparation steps, you will ensure a safe and efficient removal process for the fan clutch from the water pump.
Step 2: Removing the Serpentine Belt
Once you have prepared the vehicle, the next step in removing the fan clutch from the water pump on your Chevy vehicle is to remove the serpentine belt. The serpentine belt is responsible for powering various components in the engine. Follow these steps to remove the serpentine belt:
- Locate the belt tensioner. The belt tensioner is a spring-loaded pulley that keeps the serpentine belt tight. Use a wrench or socket to rotate the belt tensioner in the counterclockwise direction.
- As you rotate the belt tensioner, you will notice that the tension on the belt loosens. Keep rotating the tensioner until there is enough slack in the belt to remove it from the pulleys.
- Slide the serpentine belt off the pulleys, carefully sliding it over any components that it may be routed around. Take note of the belt’s routing path for later reference.
- Once the belt is removed, inspect it for any signs of damage or wear. If necessary, replace the serpentine belt with a new one before proceeding.
Removing the serpentine belt will provide enough space and access to proceed with the removal of the fan clutch from the water pump.
Step 3: Removing the Fan Shroud
With the serpentine belt removed, the next step in removing the fan clutch from the water pump on your Chevy vehicle is to remove the fan shroud. The fan shroud is a protective cover that surrounds the fan and helps direct airflow. Follow these steps to remove the fan shroud:
- Locate the mounting bolts that secure the fan shroud to the radiator. These bolts are typically located near the top and bottom of the shroud.
- Using a wrench or socket, loosen and remove the mounting bolts. Be careful not to drop the bolts into the engine bay.
- Gently lift the fan shroud upwards to detach it from the radiator. Be cautious of any wiring or hoses that may be connected to the shroud.
- If there are any electrical connections or hoses attached to the fan shroud, disconnect them carefully. Take note of their positions for reassembly later.
- With the fan shroud removed, set it aside in a safe place. Ensure that it is kept away from any potential damage.
By removing the fan shroud, you will have better access to the fan clutch and water pump, making the removal process easier and more efficient.
Read more: How To Remove Fan From Water Pump Dodge Ram
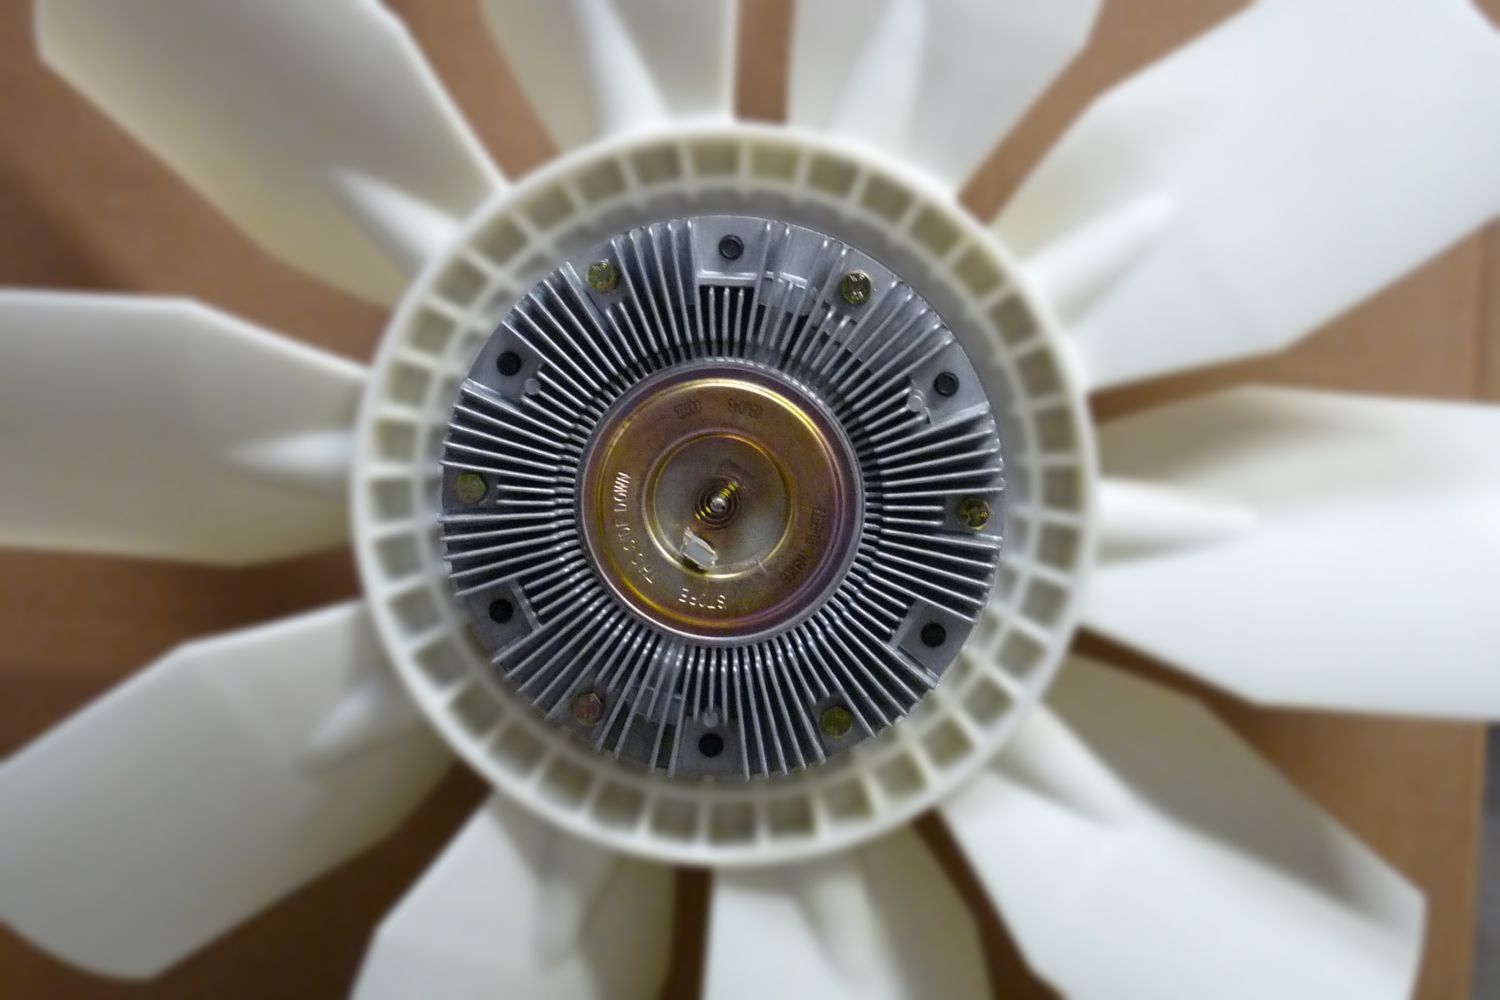
Step 4: Removing the Fan Clutch
With the fan shroud removed, you can now proceed with removing the fan clutch from the water pump on your Chevy vehicle. The fan clutch is attached to the water pump and helps regulate the speed of the engine fan. Follow these steps to remove the fan clutch:
- Locate the nut that secures the fan clutch to the water pump. This nut is typically located at the center of the fan clutch assembly.
- Using a large adjustable wrench or a suitable fan clutch removal tool, hold the pulley steady while turning the nut counterclockwise to loosen it.
- As you loosen the nut, you may need to apply some force to overcome the resistance of the fan clutch. Be careful not to damage any surrounding components.
- Once the nut is completely loosened, carefully lift the fan clutch away from the water pump, ensuring that you do not damage the radiator or other nearby components.
- Inspect the fan clutch for any signs of damage or excessive wear. If necessary, replace the fan clutch with a new one before proceeding with reassembly.
By successfully removing the fan clutch, you have completed a crucial step in the process of replacing or servicing the fan clutch on your Chevy vehicle.
When removing the fan clutch from the water pump on a Chevy, use a fan clutch removal tool to securely hold the pulley while loosening the fan clutch nut in a counterclockwise direction. This will prevent damage to the water pump and ensure a smooth removal process.
Step 5: Installing the New Fan Clutch
After successfully removing the old fan clutch from the water pump, the next step is to install the new fan clutch onto your Chevy vehicle. Installing a new fan clutch will help ensure proper cooling system performance. Follow these steps to install the new fan clutch:
- Position the new fan clutch over the water pump, aligning it with the mounting holes. Take note of the orientation of the clutch and make sure it is in the correct position.
- Insert the fan clutch onto the water pump, fitting it securely into place. Ensure that the clutch is properly aligned and seated before proceeding.
- Using a large adjustable wrench or the appropriate tool, tighten the nut on the fan clutch. Be careful not to overtighten the nut, as it may cause damage to the clutch or other components.
- Once the nut is tightened, give the fan clutch a gentle tug to ensure it is secure and properly installed. Avoid excessive force when checking the installation.
- Inspect the area around the fan clutch to ensure that there are no loose or disconnected components. Reattach any electrical connections or hoses that were disconnected during the removal process.
By successfully installing the new fan clutch, you have taken an important step in maintaining the cooling system efficiency of your Chevy vehicle.
Step 6: Reassembling the Fan Shroud
After installing the new fan clutch, the next step is to reassemble the fan shroud. The fan shroud helps guide airflow and protects the fan assembly. Follow these steps to reassemble the fan shroud:
- Position the fan shroud over the radiator, aligning it with the mounting points.
- Reattach any electrical connections or hoses that were disconnected during the fan shroud removal process.
- Insert the mounting bolts into the appropriate holes and tighten them securely using a wrench or socket.
- Ensure that the fan shroud is properly aligned and seated, allowing sufficient airflow through the radiator.
- Double-check all connections and bolts to ensure they are secure and properly tightened.
Once the fan shroud is reassembled, you have successfully completed the step of restoring the protective cover for the fan assembly on your Chevy vehicle.
Step 7: Installing the Serpentine Belt
With the fan shroud reassembled, the next step in the process is to install the serpentine belt back onto the pulleys. The serpentine belt is responsible for powering various engine components. Follow these steps to install the serpentine belt:
- Refer to your vehicle’s belt routing diagram. This diagram should be located either on the fan shroud or in the engine compartment. Take note of the correct routing path for the serpentine belt.
- Ensure that the belt tensioner is in the fully released position. This will create enough slack in the belt to properly install it onto the pulleys.
- Starting at the bottom of the belt path, carefully route the serpentine belt around the various pulleys, following the diagram you referenced earlier. Make sure the belt is properly seated on each pulley.
- With the belt routed correctly, slowly release the tension on the belt tensioner. This will tighten the belt and ensure proper tension for optimal operation.
- Double-check the belt’s alignment on each pulley and ensure there are no twists or misalignments. Proper alignment is crucial for the belt’s longevity and performance.
Once the serpentine belt is properly installed and tensioned, you have completed the step of restoring power transmission to the engine’s components.
Read more: How To Change A Water Pump On A Chevy Truck
Step 8: Final Checks and Testing
After completing the installation of the serpentine belt, it’s important to perform final checks and testing to ensure everything is in proper working order. Follow these steps for the final checks and testing:
- Carefully inspect all connections, bolts, and components that were removed and reinstalled during the fan clutch replacement process. Check for any loose or improperly secured parts.
- Make sure that the fan shroud is securely fastened, and there are no obstructions or interference with the fan blades.
- Reconnect the battery cables that were disconnected during the preparation process.
- Start the engine and allow it to run for a few minutes. Check for any unusual noises or vibrations that may indicate a problem with the fan clutch or other components.
- Monitor the engine temperature gauge to ensure that the cooling system is functioning properly. The temperature should remain within the normal operating range.
- If everything appears to be in working order, take the vehicle for a short test drive to further verify the performance of the cooling system.
By performing these final checks and testing, you can have confidence in the successful replacement of the fan clutch and ensure that your Chevy vehicle’s cooling system is functioning optimally.
Conclusion
Removing the fan clutch from the water pump on your Chevy vehicle may seem like a daunting task, but with the right tools and following the proper steps, it can be accomplished with relative ease. By replacing a worn-out or malfunctioning fan clutch, you can ensure optimal cooling system performance and prevent potential engine overheating.
In this article, we provided a comprehensive guide on how to remove the fan clutch from the water pump in your Chevy vehicle. We covered the necessary tools and materials, along with step-by-step instructions for each stage of the removal process. From preparing the vehicle to reassembling the fan shroud, we aimed to provide clear and concise guidance.
Remember to exercise caution and take your time during the removal process. Pay attention to details, such as proper routing of the serpentine belt and ensuring all connections are secure during reassembly. Additionally, perform thorough checks and testing before considering the job complete.
By successfully replacing the fan clutch, you are taking an important step in maintaining the efficient operation of your vehicle’s cooling system. A properly functioning fan clutch will help regulate engine temperature and ensure the longevity of your Chevy vehicle’s engine.
We hope that this article has provided you with valuable information and guidance on how to remove the fan clutch from the water pump in your Chevy vehicle. By following these steps and taking the necessary precautions, you can confidently tackle this maintenance task and keep your vehicle running smoothly.
Frequently Asked Questions about How To Remove Fan Clutch From Water Pump Chevy
Was this page helpful?
At Storables.com, we guarantee accurate and reliable information. Our content, validated by Expert Board Contributors, is crafted following stringent Editorial Policies. We're committed to providing you with well-researched, expert-backed insights for all your informational needs.


0 thoughts on “How To Remove Fan Clutch From Water Pump Chevy”