Articles
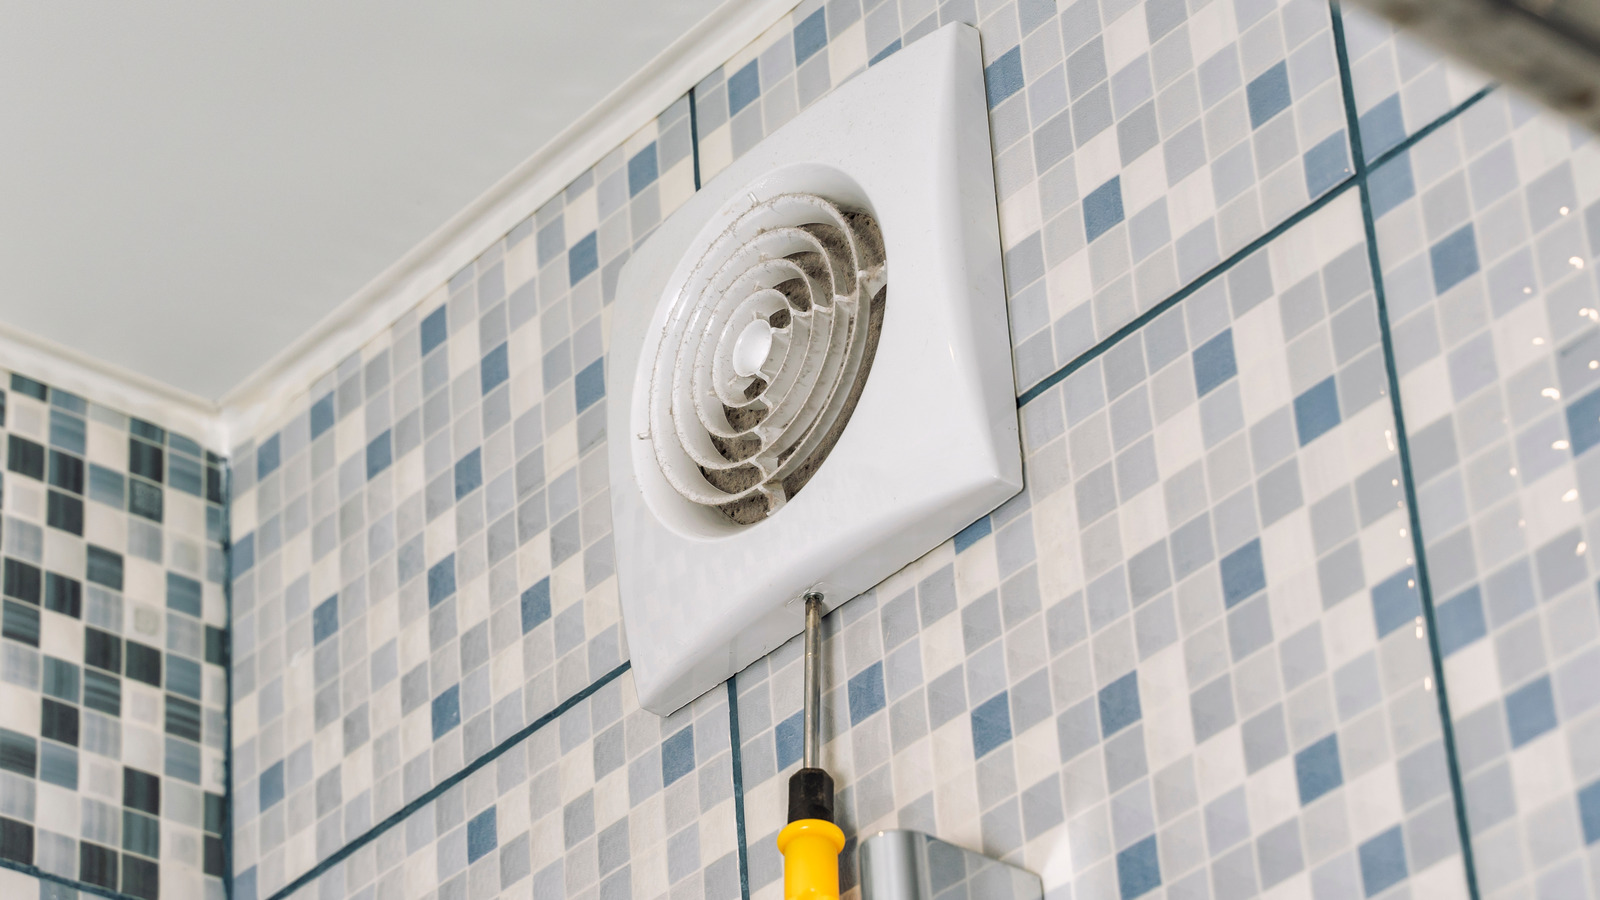
How To Fix Water Dripping From Bathroom Fan
Modified: October 20, 2024
Learn effective techniques and tips from our articles on how to fix water dripping from your bathroom fan. Take control of the situation and prevent any further damage.
(Many of the links in this article redirect to a specific reviewed product. Your purchase of these products through affiliate links helps to generate commission for Storables.com, at no extra cost. Learn more)
Introduction
Welcome to the guide on how to fix a common issue in bathrooms – water dripping from the fan. If you’ve noticed water drops falling from your bathroom fan, you’re not alone. This problem can occur due to various reasons, including high humidity levels, improper ventilation, or even a damaged fan. While it may seem like a minor inconvenience at first, water dripping from the fan can lead to mold growth, paint discoloration, and even structural damage if left unresolved.
In this article, we will walk you through the steps to identify the cause of the issue and provide you with a comprehensive guide on how to fix it. But before we dive into the solution, let’s first understand the nature of the problem and why it occurs.
Key Takeaways:
- Prevent water damage and mold growth by understanding the causes of water dripping from your bathroom fan, taking safety precautions, and following a step-by-step process to clean, inspect, and potentially replace the fan.
- Enhance your bathroom’s ventilation system by installing a ventilation cover, checking for blockages in the ventilation ducts, and ensuring the proper functioning of the fan. Regular maintenance is key to preventing future issues.
Read more: How To Stop Water From Dripping In Bathtub
Understanding the Issue
Water dripping from the bathroom fan can be frustrating and worrisome, but it’s important to understand why it happens before attempting to fix it. The primary cause of this issue is condensation. Condensation occurs when warm, moist air comes in contact with a cool surface. In the case of a bathroom fan, the cool surface is the housing or the ventilation duct.
When you take a hot shower or run hot water in the bathroom, the air becomes saturated with moisture. This moisture-laden air is then drawn into the fan through the intake vent. As the warm air travels through the ventilation duct, it encounters the cooler surfaces of the duct and fan housing. This temperature difference causes the moisture in the air to condense into water droplets, which then drip down, creating the issue of water dripping from the fan.
There are several factors that can contribute to the severity of this issue. One factor is the ventilation system itself. If the bathroom fan is not functioning properly or the ventilation ducts are blocked or restricted, the moist air will have difficulty escaping, leading to an accumulation of condensation. Additionally, certain environmental factors such as high humidity levels or inadequate insulation can exacerbate the problem.
Now that you have a better understanding of why water drips from the bathroom fan, let’s move on to the next section, where we will discuss the safety precautions you should take before attempting any repairs.
Safety Precautions
Before starting any repairs on the bathroom fan, it is essential to prioritize safety. Here are some important safety precautions to keep in mind:
- Turn off the power: Before doing any work on the fan, make sure to turn off the electricity to the bathroom. Locate the circuit breaker for the bathroom or switch off the bathroom’s power supply at the main electrical panel. This will prevent any accidental electrical shocks while working with the fan.
- Wear protective gear: It is always a good idea to wear protective gear when working with electrical components or performing maintenance tasks. Wear safety goggles to protect your eyes from any debris or dust that may be dislodged during the cleaning process. Additionally, wearing gloves can protect your hands from sharp edges or any potential electrical hazards.
- Use a sturdy ladder: If you need to access the fan for cleaning or replacement, use a sturdy and stable ladder to reach it. Avoid standing on countertops, chairs, or any unstable surfaces that could lead to accidents or falls.
- Work in a well-ventilated area: Ensure that the bathroom has proper ventilation or open a window to allow fresh air to circulate while you work. This will help minimize the exposure to any fumes or airborne dust.
- Follow manufacturer’s instructions: If you are replacing the fan or any components, be sure to read and follow the manufacturer’s instructions carefully. Each fan may have specific requirements for installation, so it’s important to adhere to them for optimal performance and safety.
By following these safety precautions, you can minimize the risk of accidents or injuries while working on your bathroom fan. Now that you are aware of the necessary safety measures, let’s move on to the tools and materials you will need for the repair.
Tools and Materials Needed
Before you begin fixing the water dripping from the bathroom fan, gather the following tools and materials:
Tools:
- Screwdriver (flathead and Phillips)
- Needle-nose pliers
- Wire brush or soft bristle brush
- Vacuum cleaner with a brush attachment
- Step ladder or sturdy stool
Read more: How To Fix Dripping Bathroom Faucet
Materials:
- Clean cloth or sponge
- Mild detergent or cleaner
- Replacement fan (if necessary)
- New ventilation cover/vent grille (if necessary)
- Duct tape or silicone caulk (for sealing ducts)
Having these tools and materials ready will ensure that you have everything you need to complete the repairs. If you already have some of these items at home, double-check their condition to ensure they are functioning properly. Now that you have your tools and materials prepared, let’s move on to the step-by-step process of fixing the issue.
Step 1: Turn off the Power
The first and most crucial step before working on the bathroom fan is to turn off the power to the bathroom. This is necessary to prevent any potential accidents or electrical shocks. Follow these steps to turn off the power:
- Locate the circuit breaker for the bathroom in your main electrical panel. It is usually labeled for easy identification.
- Flip the switch for the bathroom circuit breaker to the “Off” position. This will cut off the power supply to the bathroom.
- Alternatively, if your electrical panel does not have labeled circuit breakers, you can switch off the main power supply for the entire house. However, this may disrupt power to other areas, so proceed with caution.
After turning off the power, double-check that the bathroom lights, outlets, and any other electrical fixtures are not working. This will ensure that you have successfully disconnected the power supply.
Remember, safety should always be your top priority when working with electrical components. By turning off the power, you minimize the risk of electric shock or damage to the electrical system. Once you’ve confirmed that the power is off, you can proceed to the next step and inspect the fan for any dirt or debris.
Step 2: Inspect and Clean the Fan
Once you’ve turned off the power, it’s time to inspect and clean the bathroom fan. Dirt, dust, and debris can accumulate over time, leading to reduced efficiency and potential water leakage. Follow these steps to clean the fan:
- Using a step ladder or sturdy stool, carefully reach the fan. Depending on your bathroom setup, you may need to remove the fan cover or grille. Refer to the manufacturer’s instructions if necessary.
- Inspect the fan blades for any visible dirt or debris. Use a clean cloth or sponge to wipe away any loose particles.
- If the fan blades are caked with dirt, use a soft bristle brush or a vacuum cleaner with a brush attachment to gently remove the buildup. Be careful not to bend or damage the blades.
- Next, check the intake vent located inside the bathroom. It may be covered with a grille or vent cover. Remove the cover and carefully clean any dust or debris. Use a vacuum cleaner or a wire brush to get rid of stubborn dirt.
- Inspect the fan housing for any signs of moisture or mold. If you notice mold growth, refer to our guide on how to remove mold from bathroom surfaces.
- While inspecting the fan, take note of any visible damage, such as cracks in the housing or bent blades. If the fan is damaged beyond repair, you may need to replace it.
Once you’ve completed the cleaning process and inspected the fan for any damage, it’s time to move on to the next step: checking the ventilation ducts for any blockages or restrictions.
Check if the fan is properly sealed to the ceiling. If not, use caulk to seal any gaps. Also, ensure the vent pipe is not blocked and the fan is venting outside. If the issue persists, consider replacing the fan.
Step 3: Check the Ventilation Ducts
Checking the ventilation ducts is an important step in resolving the issue of water dripping from the bathroom fan. Blockages or restrictions in the ducts can impede the airflow and contribute to moisture buildup. Follow these steps to check the ventilation ducts:
- Locate the ventilation ducts connected to the bathroom fan. These ducts are typically made of flexible or rigid material and run through the walls or ceiling.
- Carefully inspect the ducts for any visible blockages or restrictions. Look for debris, excessive dust, or signs of mold growth.
- If you can access the vent on the exterior of your house, check for any obstructions such as leaves, bird nests, or debris that may be blocking the airflow.
- Use a flashlight to shine into the ducts and check for any potential issues, like loose connections or damaged sections.
- If you come across blockages or obstructions, use a vacuum cleaner with a brush attachment to remove the debris. If necessary, use a wire brush or long-handled brush to dislodge stubborn dirt.
- Consider sealing any gaps or leaks in the ducts using duct tape or silicone caulk. This will help prevent any air leakage and improve ventilation efficiency.
By checking and clearing any blockages in the ventilation ducts, you can ensure that the air can properly flow out of the bathroom, reducing the chances of condensation and water dripping from the fan. However, if you’ve completed this step and the issue persists, it may be necessary to replace the fan altogether. We will discuss this in the next step.
Read more: How To Fix Bathroom Exhaust Fan
Step 4: Replace the Damaged Fan
If you’ve inspected the fan and discovered visible damage that cannot be repaired, it’s time to replace the fan. Here’s how you can go about replacing a damaged bathroom fan:
- Start by determining the type and size of the fan you need as a replacement. Refer to the specifications of your current fan or consult a professional if you’re unsure.
- Turn off the power supply to the bathroom, following the same precautions mentioned earlier.
- If the fan has a removable grille or cover, carefully remove it. In some cases, you may need to remove screws or clips to detach the fan assembly from the ceiling or wall.
- Disconnect the electrical wiring connected to the fan. Take note of how the wires are connected so you can replicate the setup with the new fan.
- Remove the old fan from the mounting bracket or housing. Depending on the model, this may involve unscrewing the fan from the bracket or disconnecting it from the housing.
- Install the new fan by following the manufacturer’s instructions. Ensure the fan is securely mounted in the bracket or housing, and reconnect the electrical wiring as noted earlier.
- Replace the grille or cover, securing it in place with screws or clips if applicable.
- Lastly, turn on the power supply to the bathroom and test the new fan to ensure it is functioning properly. You should notice improved airflow and a reduction in water dripping.
If you are uncomfortable or unsure about replacing the fan yourself, it’s always best to seek professional assistance. They will have the expertise and tools required to safely and efficiently install the new fan.
Now that you have replaced the fan, let’s move on to the final step: installing a ventilation cover to further prevent water dripping and improve airflow.
Step 5: Install a Ventilation Cover
Installing a ventilation cover is the final step to address the issue of water dripping from the bathroom fan. A ventilation cover, also known as a vent grille, helps prevent water from entering the fan and keeps out debris, insects, and animals. Here’s how you can install a ventilation cover:
- Choose a ventilation cover that is suitable for your bathroom fan and matches the style of your bathroom. Consider one that has a backdraft damper to prevent backflow of air and potential water entry.
- Ensure that the power supply to the bathroom is turned off as a safety precaution.
- Remove the existing cover or grille from the fan housing, if applicable, by unscrewing or unlatching it.
- Place the new ventilation cover over the opening of the fan housing, aligning it properly.
- Secure the cover in place using the screws or clips provided with the cover. Make sure it is tightly fastened to prevent any gaps.
- If necessary, apply a small amount of silicone caulk around the edges of the cover to create a watertight seal.
- Turn on the power supply to the bathroom and test the fan to ensure it is operating correctly without any water dripping.
By installing a ventilation cover, you add an extra layer of protection to the bathroom fan, reducing the likelihood of water seepage and enhancing the overall efficiency of the ventilation system.
With the installation of the ventilation cover, you have completed all the necessary steps to fix the issue of water dripping from the bathroom fan. Regular maintenance, such as cleaning the fan and checking for any blockages, will help prevent future problems. Remember to periodically clean the fan and inspect the ventilation ducts to ensure optimal performance.
By following these steps, you can enjoy a well-functioning bathroom fan that effectively removes moisture from the air, reducing the risk of water damage and maintaining a healthy bathroom environment.
We hope this guide has been helpful in resolving the issue of water dripping from your bathroom fan. If you have any further questions or concerns, don’t hesitate to consult a professional for assistance.
Conclusion
Water dripping from the bathroom fan can be a frustrating issue, but with the right approach, it can be resolved effectively. By understanding the causes of this problem and following the steps outlined in this guide, you can fix the issue and prevent further water damage and mold growth in your bathroom.
Throughout this guide, we’ve covered various aspects, from understanding the issue and taking safety precautions to inspecting and cleaning the fan, checking the ventilation ducts, replacing a damaged fan, and installing a ventilation cover. Each step is crucial in addressing the root cause of water dripping and ensuring proper ventilation in your bathroom.
It’s important to remember that regular maintenance of your bathroom fan is key to keeping it in optimal condition. This includes periodic cleaning of the fan, checking for any obstructions in the ventilation ducts, and maintaining a well-sealed ventilation cover.
If at any point you feel unsure or uncomfortable with performing the repairs yourself, it’s always best to seek the assistance of a professional. They will have the expertise and knowledge to handle the job safely and efficiently.
By taking the necessary steps to address water dripping from the bathroom fan, you can maintain a healthy and functional bathroom environment. Reduced humidity levels will not only prevent water damage but also contribute to better air quality in your home.
We hope this guide has been helpful in guiding you through the process of fixing water dripping from the bathroom fan. Now you can enjoy a properly functioning bathroom fan that effectively removes moisture and keeps your bathroom dry and comfortable.
Frequently Asked Questions about How To Fix Water Dripping From Bathroom Fan
Was this page helpful?
At Storables.com, we guarantee accurate and reliable information. Our content, validated by Expert Board Contributors, is crafted following stringent Editorial Policies. We're committed to providing you with well-researched, expert-backed insights for all your informational needs.

0 thoughts on “How To Fix Water Dripping From Bathroom Fan”