
Articles
How To Remove Clutch Fan
Modified: October 20, 2024
Learn how to remove a clutch fan with this helpful article. Step-by-step instructions and tips to make the process easy.
(Many of the links in this article redirect to a specific reviewed product. Your purchase of these products through affiliate links helps to generate commission for Storables.com, at no extra cost. Learn more)
Introduction
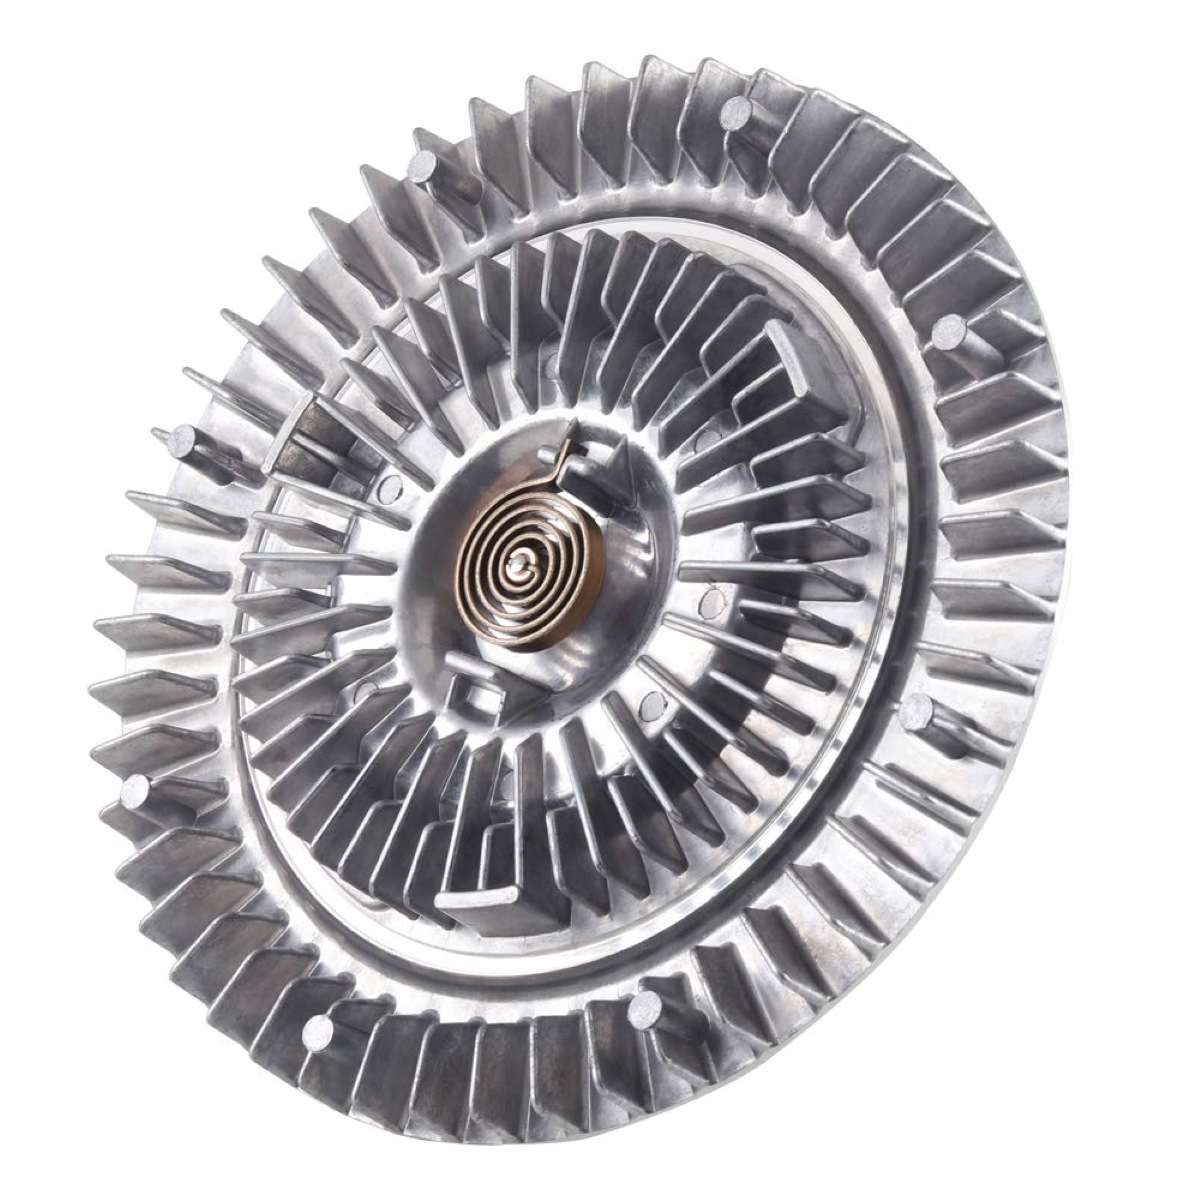
When it comes to the cooling system of your vehicle, the clutch fan plays a crucial role in maintaining optimal engine temperature. The clutch fan is responsible for drawing cool air into the radiator to dissipate the heat generated by the engine. Over time, however, the clutch fan can become worn or damaged, leading to inefficient cooling and potential engine overheating. In such cases, it becomes necessary to remove the clutch fan and either repair or replace it.
In this article, we will guide you through the step-by-step process of removing a clutch fan, ensuring that you can complete the task with ease and confidence. Before we dive into the process, it is important to gather the necessary tools and materials to ensure a smooth and successful removal.
Key Takeaways:
- Safely and effectively remove a clutch fan by following step-by-step instructions, ensuring optimal cooling system performance and preventing engine overheating. Prioritize safety, inspect components, and consider replacement if necessary.
- Gather necessary tools, take safety precautions, and utilize specialized removal tools to successfully remove and potentially replace a worn or damaged clutch fan. Regular maintenance ensures a properly functioning cooling system for your vehicle’s engine.
Read also: 15 Amazing Fan Clutch for 2025
Tools and Materials Needed
Before you embark on the task of removing a clutch fan, it is essential to gather the right tools and materials. Here is a list of items you will need:
- Socket wrench set: A set of socket wrenches in various sizes will be necessary for loosening and removing bolts and nuts.
- Adjustable wrench: An adjustable wrench will come in handy for loosening and tightening components of the clutch fan assembly.
- Fan clutch removal tool: This specialized tool is designed specifically for removing the fan clutch without damaging other components.
- Pliers: Pliers will be useful for gripping and holding onto certain parts, such as hose clamps or electrical connectors.
- Screwdriver: A screwdriver may be needed to remove screws or clips that hold the fan shroud or other components in place.
Having these tools readily available will ensure that you can perform the task efficiently and without any unnecessary complications.
Step-by-Step Guide to Removing a Clutch Fan
Now that you have gathered all the necessary tools and materials, let’s dive into the step-by-step process of removing a clutch fan. Follow these instructions carefully to ensure a successful removal:
Step 1: Safety Precautions
Before working on your vehicle’s cooling system, it is important to take some safety precautions. Make sure the engine is cool before you begin. Additionally, wearing protective gloves and eye protection is recommended to prevent any injuries.
Step 2: Locate the Clutch Fan
Open the hood of your vehicle and locate the clutch fan assembly. The clutch fan is typically attached to the water pump and positioned behind the radiator. Take a moment to familiarize yourself with its components and how it is connected to the engine.
Read also: 5 Best AC Clutch Removal Tool for 2025
Step 3: Remove the Fan Shroud
In many cases, the fan shroud needs to be removed before you can access the clutch fan. The fan shroud is a plastic cover that surrounds the fan and helps direct air towards the radiator. Use a screwdriver or socket wrench to remove any screws or clips securing the fan shroud in place. Once removed, set the fan shroud aside.
Step 4: Loosen the Fan Clutch Nut
Locate the fan clutch nut at the center of the clutch fan. Using an adjustable wrench or the appropriate socket wrench, loosen the nut by turning it counterclockwise. Be mindful not to remove the nut completely at this stage, as it will be easier to remove the fan clutch when it is still attached to the water pump.
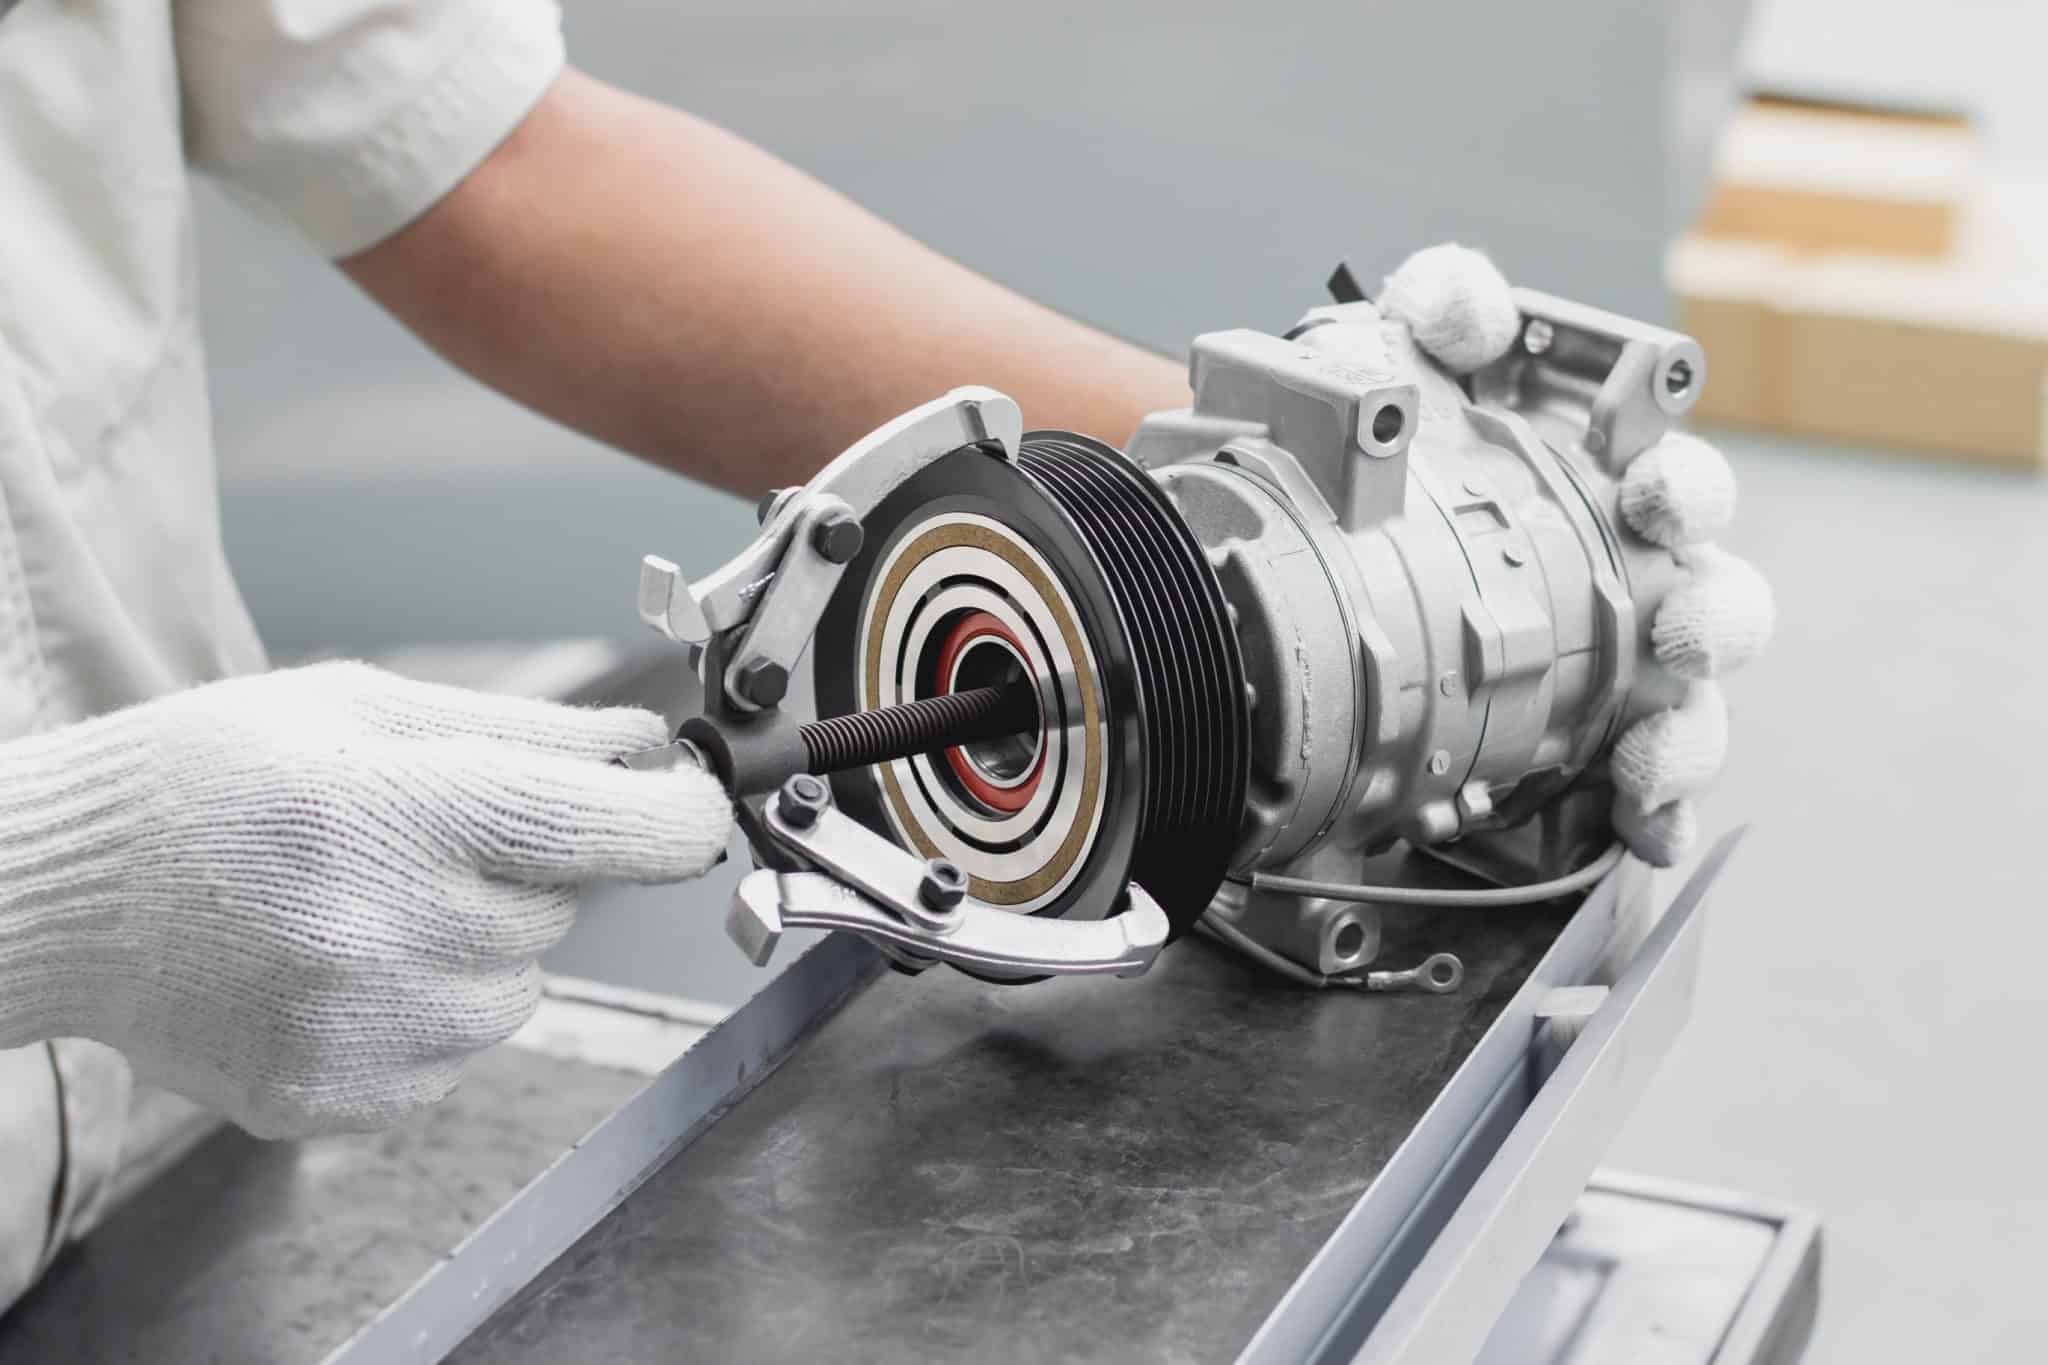
Step 5: Use the Fan Clutch Removal Tool
Now it’s time to use the fan clutch removal tool. This tool is designed to hold the water pump pulley in place while you apply torque to the fan clutch nut. Insert the fan clutch removal tool into the wrench holes or slots on the water pump pulley, and then use an adjustable wrench to apply torque to the fan clutch nut, turning it counterclockwise. This will break the fan clutch free from the water pump.
Step 6: Remove the Fan Clutch
Once the fan clutch is free from the water pump, carefully pull it away from the engine. Take note of any electrical connectors or hoses that may be attached to the clutch fan, and disconnect them as necessary. Set the fan clutch aside, ensuring it is in a safe place where it won’t get damaged.
Read more: How To Remove An Attic Fan
Step 7: Inspect and Clean Components
With the clutch fan removed, take a moment to inspect the components for any signs of damage or wear. It is also a good idea to clean the fan blades and the areas around the water pump to remove any dirt or debris.
Step 8: Reinstall or Replace the Clutch Fan
If the clutch fan is in good condition, you may choose to reinstall it by following the steps in reverse order. Make sure all connections are secure and tighten the fan clutch nut to the manufacturer’s specifications. If the clutch fan is damaged or worn, it is recommended to replace it with a new one to ensure optimal cooling efficiency.
By following these step-by-step instructions, you can safely and effectively remove a clutch fan from your vehicle’s cooling system. Always refer to your vehicle’s specific manual for any additional instructions or precautions.
Conclusion
Removing a clutch fan may seem like a daunting task, but with the right tools and proper guidance, it can be accomplished smoothly. Whether you need to repair a damaged clutch fan or replace it with a new one, this step-by-step guide has provided you with the necessary instructions to do so.
Remember to prioritize safety by taking necessary precautions and wearing protective gear. Take your time to locate the clutch fan and remove the fan shroud, ensuring easy access to the fan clutch assembly. Loosen the fan clutch nut with the appropriate tools, and utilize a fan clutch removal tool for easier removal.
Once you have successfully removed the clutch fan, take the opportunity to inspect and clean the components. This will ensure optimal functioning of the cooling system. If the clutch fan is in good condition, you can re-install it following the reverse steps. However, if it is damaged or worn, it is advisable to replace it with a new clutch fan.
By following these guidelines and referring to your vehicle’s specific manual, you can confidently remove a clutch fan and maintain a properly functioning cooling system. Regular maintenance and care of your vehicle’s cooling system will help prevent engine overheating, ensuring optimal performance and longevity.
Remember, if you’re uncomfortable performing this task yourself or lack the necessary tools, it’s always a good idea to consult a professional mechanic who can assist you in removing and replacing the clutch fan safely and efficiently.
With this knowledge and understanding, you are now equipped to tackle the task of removing a clutch fan, ensuring the proper cooling of your vehicle’s engine and keeping it running smoothly for miles to come.
Frequently Asked Questions about How To Remove Clutch Fan
Was this page helpful?
At Storables.com, we guarantee accurate and reliable information. Our content, validated by Expert Board Contributors, is crafted following stringent Editorial Policies. We're committed to providing you with well-researched, expert-backed insights for all your informational needs.


0 thoughts on “How To Remove Clutch Fan”