Articles
How To Start A Loop Yarn Blanket
Modified: November 1, 2024
Learn how to start a loop yarn blanket with these helpful articles. Step-by-step instructions and tips to get you started on your cozy project.
(Many of the links in this article redirect to a specific reviewed product. Your purchase of these products through affiliate links helps to generate commission for Storables.com, at no extra cost. Learn more)
Introduction
Welcome to the world of loop yarn blankets! A loop yarn blanket is a modern and unique way to add warmth and style to your home. With its soft and cozy texture, it’s hard to resist snuggling up under one of these beautifully crafted blankets. Whether you’re an experienced knitter or a beginner, creating a loop yarn blanket can be a rewarding and enjoyable project.
In this article, we will guide you through the process of starting your own loop yarn blanket. From choosing the right loop yarn to casting on, knitting the rows, and finishing touches, we’ve got you covered. So, grab your knitting needles and let’s get started on this exciting journey!
Before we dive into the knitting process, it’s important to understand what loop yarn is and why it’s a popular choice for blanket knitting. Loop yarn, also known as finger-knitting yarn, is unique in that it already has loops built into the yarn itself. This means you can create a blanket without the use of traditional knitting needles or crochet hooks. The loops make it easy to work with, even for beginners who may be new to knitting.
Loop yarn comes in a variety of colors, textures, and thicknesses, so you can choose the perfect yarn for your blanket project. Whether you prefer a chunky and cozy blanket or a more delicate and lightweight one, there is loop yarn out there to suit your needs.
Not only is loop yarn easy to work with, but it also allows you to create beautiful patterns and designs effortlessly. You can experiment with different stitches, textures, and techniques to make your loop yarn blanket truly unique. It’s a great way to let your creativity shine and add a personal touch to your home décor.
So, whether you want to knit a blanket for yourself, make a thoughtful gift for a loved one, or simply explore a new knitting technique, starting a loop yarn blanket project is a fantastic choice. It’s a fun and relaxing hobby that anyone can enjoy, no matter their skill level.
In the next sections, we will delve deeper into the process of creating a loop yarn blanket, from choosing the right yarn to finishing touches. So, let’s get our creative juices flowing and start knitting!
Key Takeaways:
- Loop yarn blankets offer a versatile and enjoyable knitting experience, suitable for beginners and experienced knitters alike. With a variety of yarn options and design possibilities, creating a unique and cozy blanket is both accessible and rewarding.
- The process of starting and completing a loop yarn blanket involves careful yarn selection, pattern choice, and finishing techniques. From casting on to binding off and adding decorative touches, each step contributes to the creation of a beautiful and personalized blanket.
Read more: How To Make A Loop Yarn Blanket
Choosing the Right Loop Yarn
When embarking on a loop yarn blanket project, one of the first steps is choosing the right yarn for your project. Loop yarn comes in various materials, colors, textures, and thicknesses. Here are a few factors to consider when selecting your loop yarn:
- Material: Loop yarn can be made from a variety of materials, including acrylic, cotton, wool, and blends. Consider the level of softness, durability, and ease of care that you desire for your blanket. Acrylic loop yarn is an excellent choice for its affordability, wide color range, and low maintenance.
- Color: Select a color that complements your personal style and home decor. Whether you prefer vibrant hues, pastels, or neutral tones, there is a vast array of color options available, allowing you to find the perfect match for your project.
- Texture: Different loop yarns offer different textures, from smooth and silky to fluffy and plush. Consider the overall feel and texture you want for your blanket, as it can enhance both the visual appeal and comfort.
- Thickness: Loop yarn comes in various thicknesses or weights, ranging from lightweight to chunky. Thinner yarn creates a more delicate and lightweight blanket, while thicker yarns result in a chunkier, cozier texture. Choose the thickness that best suits your desired aesthetic and the level of warmth you want the blanket to provide.
It’s essential to feel the yarn in person before making a final decision. Visit your local yarn store or craft retailer and take the time to touch and examine different loop yarn options. Pay attention to the yarn’s drape, softness, and overall quality. This ‘hands-on’ approach will help you make an informed choice and ensure that you are satisfied with your blanket’s final outcome.
Additionally, consider the yardage or length of loop yarn you will need for your project. Check the recommended yardage on the pattern you are following or estimate the amount based on the blanket’s size you want to create. It is always better to have a little extra yarn to avoid running out in the middle of your project.
Once you have chosen the perfect loop yarn for your blanket project, you are ready to move on to the next step: selecting a pattern or design. Whether you decide on a simple garter stitch pattern or a more intricate design, the right yarn will enhance the overall look and feel of your finished loop yarn blanket.
Selecting a Pattern or Design
Now that you have chosen the perfect loop yarn for your blanket project, it’s time to select a pattern or design that will showcase the yarn’s beauty and bring your vision to life. Whether you prefer a classic and simple look or a more intricate and unique design, there are endless possibilities to explore. Here are some tips to help you select the right pattern or design:
- Skill Level: Consider your knitting experience and skill level when choosing a pattern. If you are a beginner, opt for a pattern that is labeled as easy or beginner-friendly. As you gain confidence and expertise, you can challenge yourself with more complex patterns.
- Style and Aesthetic: Think about the overall style and aesthetic that you want for your blanket. Do you prefer a traditional, timeless design or a more modern, contemporary look? Consider the decor of the room where your blanket will be displayed and select a pattern that complements the existing style.
- Stitch Patterns: Look for patterns that incorporate different stitch patterns to add texture and visual interest to your blanket. Some popular stitch patterns for loop yarn blankets include garter stitch, seed stitch, rib stitch, and basketweave stitch. Experimenting with different stitch patterns can transform a simple blanket into a work of art.
- Size and Shape: Determine the size and shape of your desired blanket. Do you want a large throw blanket for your couch or a smaller baby blanket? Consider the dimensions that will suit your needs and find a pattern that provides instructions for your desired size.
- Customization: If you are feeling adventurous, consider modifying an existing pattern or creating your design. You can incorporate stripes, color blocks, or geometric shapes to add a personal touch to your blanket. Remember to keep track of any modifications you make to ensure consistency throughout your project.
There are various resources available for finding loop yarn blanket patterns. Check online knitting communities, knitting magazines, and knitting pattern books for inspiration and ideas. Websites, such as Ravelry, offer a vast collection of patterns created by fellow knitters. You can filter patterns by skill level, yarn type, and design features to find the perfect one for your project.
Once you have selected your desired pattern or design, familiarize yourself with the instructions before starting. Carefully read through the pattern and make sure you understand the stitch requirements and any special techniques involved. It is also helpful to make a gauge swatch to ensure that your tension matches the pattern’s recommendations.
Remember, you are not limited to a single pattern or design. Feel free to explore and experiment with different patterns for future projects. This is your opportunity to unleash your creativity and make a loop yarn blanket that is truly unique and reflective of your personal style.
Now that you have chosen your loop yarn and selected a pattern or design, it’s time to gather the necessary knitting tools and supplies to bring your blanket to life. From knitting needles to stitch markers, we will cover all the essentials in the next section.
Knitting Tools and Supplies Needed
Before you begin knitting your loop yarn blanket, it’s essential to gather all the necessary knitting tools and supplies. Having everything on hand will make the knitting process smooth and enjoyable. Here is a list of the items you will need:
- Loop Yarn: Of course, you will need loop yarn, which you have already chosen based on your preference and project requirements. Make sure you have enough yarn to complete the blanket, keeping in mind the recommended yardage for your chosen pattern.
- Knitting Needles: Although loop yarn eliminates the need for traditional knitting needles, a pair of knitting needles will come in handy for certain techniques, such as binding off or creating borders. Choose a size appropriate for your loop yarn and check the pattern instructions for any specific needle size recommendations.
- Tapestry Needle: A tapestry needle will be used for weaving in the loose ends of yarn once you have finished your blanket. Opt for a needle with a large eye to accommodate the bulky loop yarn.
- Stitch Markers: Stitch markers are useful for marking specific stitches or sections of your blanket. They help keep track of your progress and make it easier to follow the pattern instructions correctly.
- Scissors: A good pair of scissors is essential for cutting the yarn and trimming any excess ends.
- Measuring Tape: A measuring tape or ruler will be beneficial for checking the dimensions of your blanket and ensuring consistent sizing throughout the project.
- Pattern or Design: Keep the chosen pattern or design instructions handy while knitting. It will serve as your guide and reference throughout the project.
Optional tools and supplies that may be helpful include a row counter to keep track of your row progress, stitch holders or extra knitting needles to hold stitches when needed, and a project bag or storage container to keep all your knitting supplies organized.
Now that you have all the necessary tools and supplies, it’s time to start the knitting process. In the next sections, we will guide you through the steps of casting on with loop yarn and knitting the blanket rows.
Remember to create a comfortable and well-lit workspace to ensure a pleasant knitting experience. Enjoy the process and let your creativity flow as you bring your loop yarn blanket to life.
How to Cast On with Loop Yarn
Now that you have all your knitting tools and loop yarn ready, it’s time to start your loop yarn blanket by casting on. Casting on is the process of creating the first row of stitches on your knitting needle and is the foundation of your blanket. Here is a step-by-step guide on how to cast on with loop yarn:
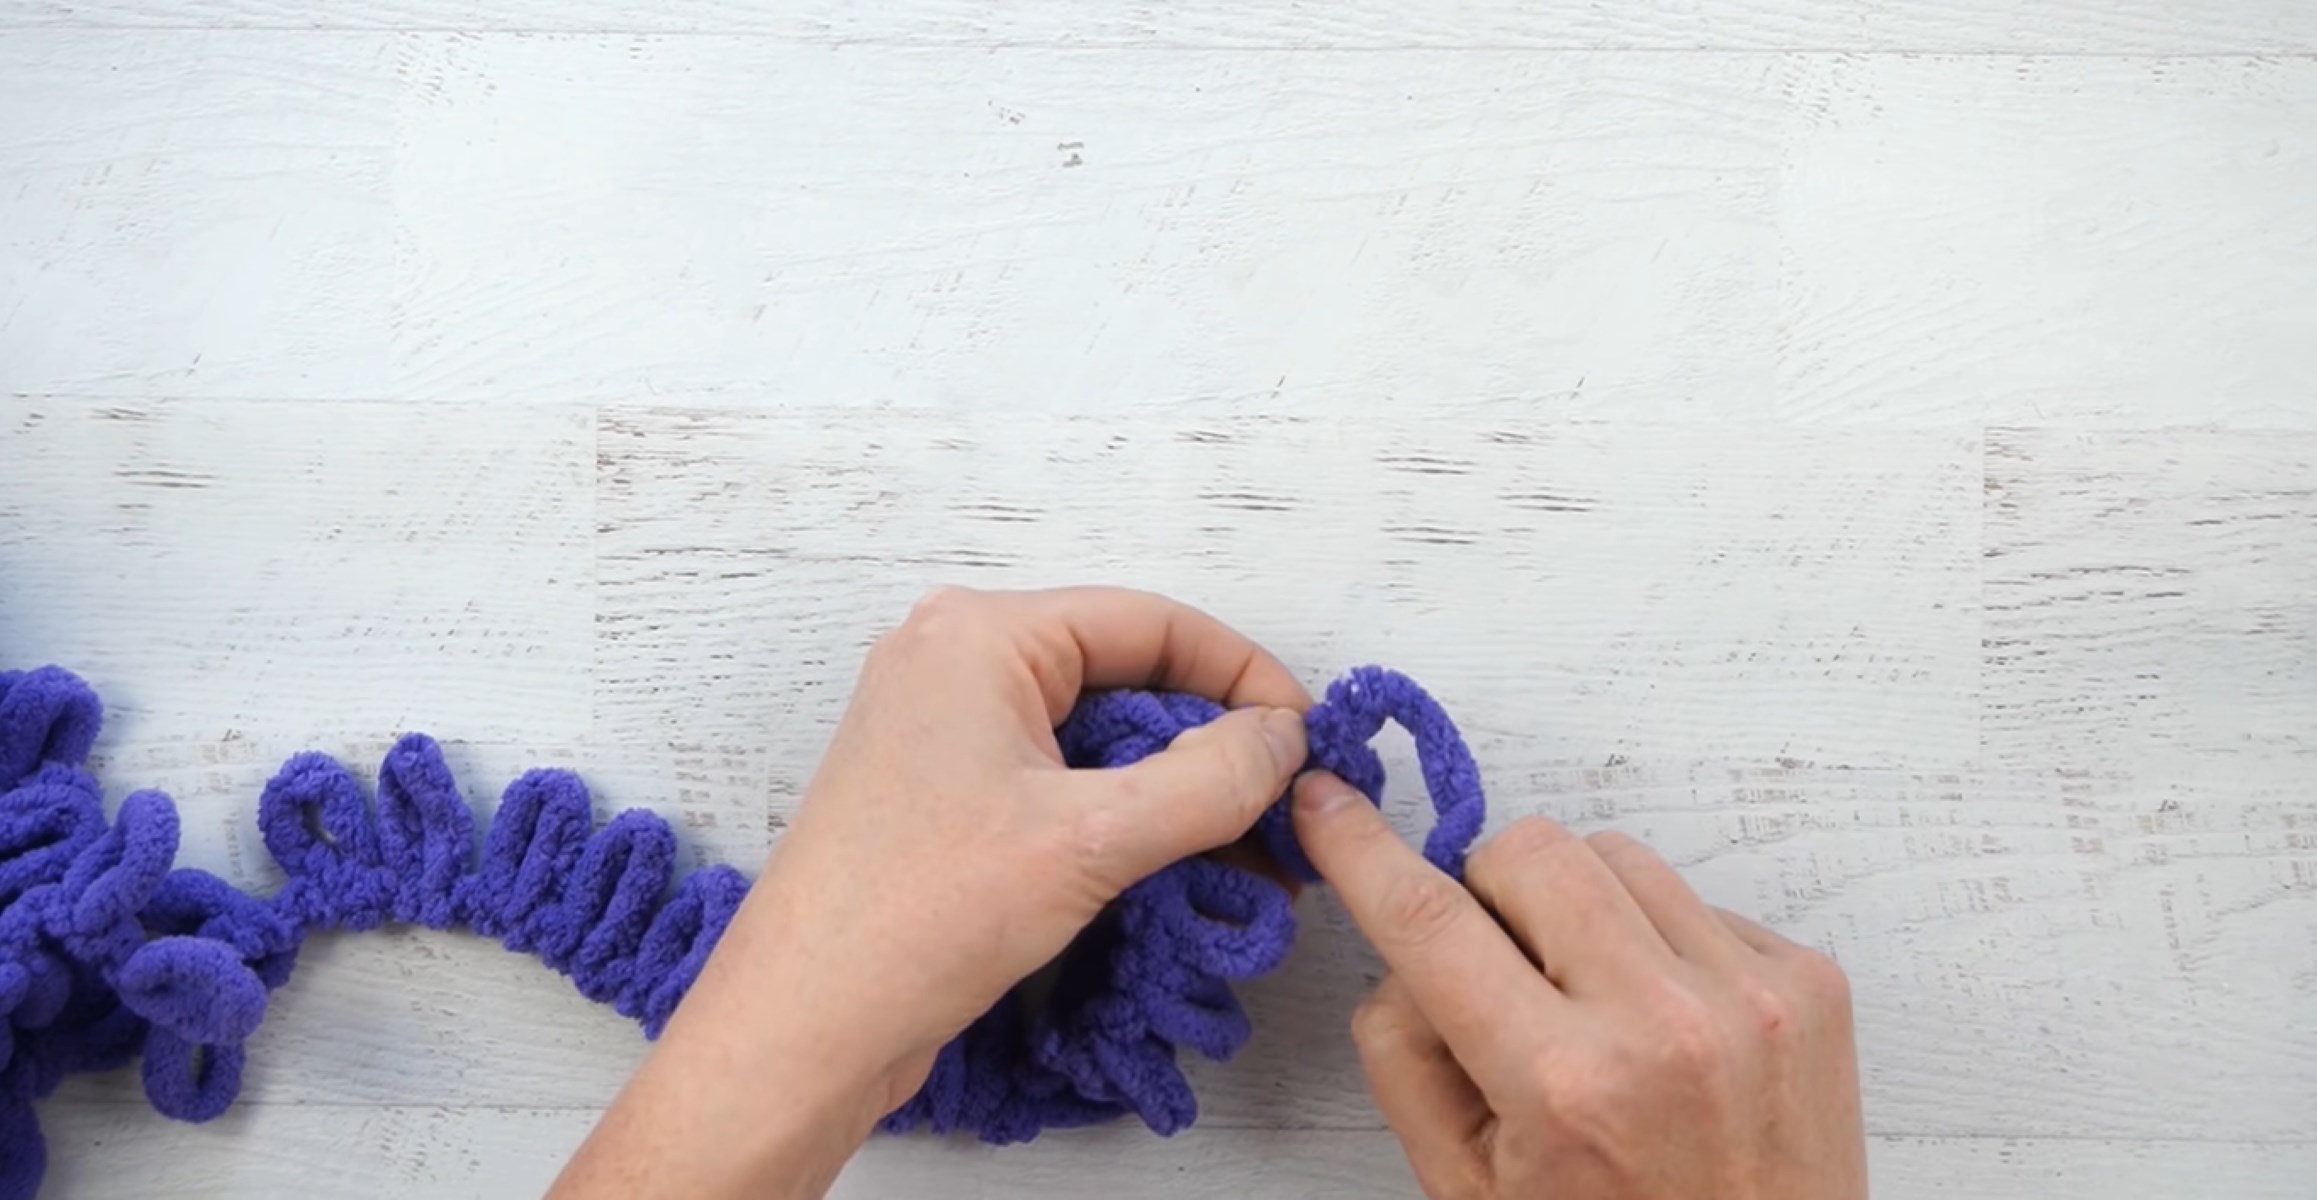
- Make a Slip Knot: Begin by making a slip knot at the end of your loop yarn. To do this, leave a tail of yarn and make a loop with the working end of the yarn over the tail. Insert the working end through the loop and pull it tight. This slip knot will serve as your first stitch.
- Insert Your Hand: Insert your hand into the first loop of the loop yarn, making sure your palm is facing up.
- Pull the Next Loop: Reach through the loop on your hand and grab the next loop of yarn from behind, pulling it through the first loop.
- Insert Your Hand Again: Insert your hand into the loop you just pulled through, making sure your palm is facing up.
- Repeat: Continue pulling loops through and inserting your hand into the newly created loops until you have the desired number of stitches. Remember to keep the loops loose but evenly spaced along your hand.
- Transfer Stitches to Needles: Once you have cast on all the stitches, carefully transfer the loops from your hand onto your knitting needles. Make sure the loops are in the correct order on the needles and not twisted.
Once all the stitches are transferred to the needles, you are ready to start knitting the rows of your loop yarn blanket. The cast-on row creates the first row of loops that you will be working with throughout the blanket. Take a moment to ensure that your loops are even and secure on the needles before proceeding.
Remember to maintain a relaxed tension as you work with the loop yarn. It’s normal for the loops to be loose and not as tight as traditional knitting stitches. This looseness adds to the unique look and feel of the loop yarn blanket.
Congratulations! You have successfully cast on your loop yarn blanket and are ready to begin knitting the rows. In the next section, we will guide you through the process of knitting the blanket rows with loop yarn.
Take your time, enjoy the knitting process, and let your creativity shine as you bring your loop yarn blanket to life.
When starting a loop yarn blanket, make sure to leave a long enough tail to weave in at the end. This will ensure that your blanket stays secure and doesn’t unravel.
Read more: Why Are There Loops On My Weighted Blanket
Knitting the Blanket Rows
Now that you have cast on your loop yarn blanket, it’s time to start knitting the rows. This is where your loop yarn blanket will really begin to take shape. Follow these steps to knit the rows of your blanket:
- Hold the Needles: Hold the knitting needles with the cast-on stitches in your hands, ensuring that the working yarn is on your right side.
- Insert Your Hand: Insert your hand into the first loop of the loop yarn, with your palm facing up.
- Bring the Loop Through: Reach through the loop on your hand and grab the next loop of yarn from behind, pulling it through the first loop. This creates a new loop on your hand.
- Slide Loops onto Needles: Slide the loop from your hand onto the appropriate knitting needle while releasing the loop from your hand. Make sure the loop is securely on the needle.
- Repeat: Continue this process of reaching through the loop, pulling a new loop through, and sliding it onto the needle until you have completed the entire row.
- Turn and Repeat: Once you have finished the row, turn your work and repeat the process, knitting another row using the same technique.
As you knit each row, the loops will build on top of one another, creating the unique texture of your loop yarn blanket. Take your time and maintain an even tension throughout the rows. Remember to keep the loops loose but evenly spaced on the needles to ensure a consistent and visually appealing result.
Pay attention to the pattern instructions, if following one, for any specific stitch patterns or stitch counts. If you’re not following a pattern and want a simple blanket, continue knitting each row using the same technique until your blanket reaches the desired length.
It’s important to note that the number of rows you knit will determine the size of your blanket. Measure your blanket periodically to ensure that it is reaching the desired dimensions.
Once you have completed all the necessary rows, you can move on to creating borders and edges, which will add a polished finishing touch to your loop yarn blanket. We will explore this process in the next section.
Take your time, enjoy each stitch, and let your creativity shine as you move closer to completing your loop yarn blanket.
Creating Borders and Edges
Now that you have finished knitting the main body of your loop yarn blanket, it’s time to add borders and edges to give your blanket a polished and finished look. Borders and edges not only enhance the overall appearance of the blanket but also provide structure and stability to the edges. Here are a few methods you can use to create borders and edges on your loop yarn blanket:
- Garter Stitch Border: The garter stitch border is a simple yet effective way to add a clean and textured edge to your blanket. To create a garter stitch border, knit every row for a few inches at the beginning and end of your blanket. This will create a border that consists of all knit stitches, giving it a neat and uniform appearance.
- Rib Stitch Edge: If you prefer a more defined and stretchy edge, you can opt for a rib stitch border. The rib stitch involves alternating knit stitches and purl stitches in a specific pattern. For example, a common rib stitch pattern is to knit 2 stitches, purl 2 stitches, and repeat this pattern across the row. This creates a ribbed texture that adds both visual interest and flexibility to the edge of your blanket.
- I-Cord Edging: An I-cord edging is a decorative finishing technique that creates a thin and rounded cord-like border around the edge of your blanket. To create an I-cord edging, you will work a few stitches in a specific pattern while carrying the yarn across the back of the stitches. This method adds a stylish and structured edge to your blanket.
- Seed Stitch Border: The seed stitch is a popular choice for creating borders and edges in knitting. It involves alternating knit and purl stitches in a specific pattern to create a textured and visually appealing finish. Seed stitch borders add depth and dimension to your blanket, giving it a more intricate and decorative look.
Choose the border or edge design that best complements your blanket and personal style. Consider the overall texture, thickness, and aesthetic of your loop yarn blanket to make an informed choice.
When adding borders and edges, it’s essential to maintain a consistent tension with your loop yarn and ensure that the edges lie flat and evenly. Take the time to measure and adjust your stitches to achieve the desired result.
Once you have completed the borders and edges, your loop yarn blanket is almost complete. The final step is to bind off the stitches and secure the last row. We will walk you through this process in the next section.
Enjoy this last stage of adding borders and edges to your loop yarn blanket, knowing that you are putting the finishing touches on your beautiful creation.
Binding Off
After you have finished adding borders and edges to your loop yarn blanket, it’s time to bind off and secure the final row of stitches. Binding off is the process of creating a neat edge by removing the stitches from the knitting needles. Here’s a step-by-step guide on how to bind off your loop yarn blanket:
- Knit the First Two Stitches: Knit the first two stitches of the row as you normally would.
- Insert Left Needle: Insert the left needle into the first stitch on the right needle.
- Lift First Stitch Over: Using the left needle, lift the first stitch over the second stitch and off the right needle. You should now have one stitch remaining on the right needle.
- Knit One Stitch: Knit one more stitch on the right needle.
- Repeat: Repeat steps 2 and 3, inserting the left needle into the second stitch on the right needle and lifting it over the first stitch and off the right needle. Continue this process until only one stitch remains on the right needle.
- Secure the Last Stitch: Cut the loop yarn, leaving a tail of yarn. Thread the tail through the final stitch and pull tight to secure it.
Make sure to keep an even tension as you bind off to ensure that the edge remains neat and uniform. Take your time to ensure the stitches are securely bound off without being too tight.
Once you have completed the binding off, admire your beautifully finished loop yarn blanket. Give it a gentle shake or tug to loosen up the stitches and let the blanket relax into its final shape.
As a final touch, use a tapestry needle to weave in any loose ends on the backside of the blanket. Thread the yarn through the eye of the needle and pass it through a few stitches, following the line of the yarn. Trim any excess yarn, leaving a clean and tidy finish.
Congratulations! You have successfully bound off your loop yarn blanket. It’s now ready to be enjoyed and displayed in your home or gifted to someone special.
Remember, the process of binding off marks the completion of your project, but it also opens up new possibilities for future knitting endeavors. Now that you have mastered the art of creating a loop yarn blanket, you can explore other knitting techniques, stitch patterns, and projects to further expand your knitting repertoire.
Enjoy your loop yarn blanket, and cherish the memories of creating something beautiful with your own hands.
Blocking and Finishing Touches
After binding off your loop yarn blanket, it’s time to give it some finishing touches to ensure it looks its best. One essential step is blocking, which helps to even out the stitches and give the blanket its final shape. Here’s a guide on how to block your loop yarn blanket:
- Prepare the Blanket: Gently remove the blanket from the knitting needles, being careful not to stretch or distort the stitches.
- Soak the Blanket: Fill a basin or sink with lukewarm water and add a few drops of mild detergent. Submerge the blanket in the water, gently pressing it down to ensure it is fully saturated. Let it soak for 10 to 15 minutes.
- Remove Excess Water: Carefully lift the blanket out of the water and gently squeeze out the excess water. Avoid twisting or wringing the blanket, as this can damage the delicate loop yarn.
- Shape the Blanket: Lay the blanket flat on a clean, absorbent towel or blocking mat. Using your hands, gently reshape the blanket to the desired dimensions, smoothing out any uneven stitches or edges.
- Pin or Weigh Down: If needed, use rustproof pins or weights designed for blocking to secure the edges of the blanket in place. This helps maintain the shape as the blanket dries.
- Let it Dry: Allow the blanket to air dry completely. This may take a day or two, depending on the thickness of the yarn and the ambient humidity.
- Remove Pins or Weights: Once the blanket is fully dry, carefully remove any pins or weights used during the blocking process.
Blocking your loop yarn blanket not only sets the shape but also evens out the stitches and enhances the overall appearance. It gives your blanket a professional and polished finish that will make your hard work stand out.
Once your blanket is dry and unblocked, it’s time to add any additional finishing touches to make it truly unique. Consider adding decorative elements such as fringe, tassels, or pompoms along the edges. You can also attach buttons, ribbons, or appliques to further personalize your blanket.
Before adding any embellishments, take a moment to experiment and place them in different spots on the blanket to see what works best for your design. Once you’re satisfied with the placement, secure them in place using a tapestry needle and matching yarn or thread.
Finally, give your loop yarn blanket a final inspection. Check for any loose ends or imperfections and tidy them up with a tapestry needle. Trim any excess yarn carefully to ensure a neat and clean finish.
By blocking your loop yarn blanket and adding those finishing touches, you’ll have a stunning and cozy creation ready to be enjoyed or gifted. Take pride in your work and share the warmth and beauty of your loop yarn blanket with those around you.
Now sit back, relax, and revel in your achievement. Admire your unique and carefully-crafted loop yarn blanket, knowing that your time and effort have resulted in a beautiful heirloom piece that will bring warmth and comfort for years to come.
Frequently Asked Questions about How To Start A Loop Yarn Blanket
Was this page helpful?
At Storables.com, we guarantee accurate and reliable information. Our content, validated by Expert Board Contributors, is crafted following stringent Editorial Policies. We're committed to providing you with well-researched, expert-backed insights for all your informational needs.
0 thoughts on “How To Start A Loop Yarn Blanket”