Articles
How To Make A Loop Yarn Blanket
Modified: November 1, 2024
Learn how to make a cozy loop yarn blanket with our step-by-step articles. Discover helpful tips and techniques for creating your own warm and stylish masterpiece.
(Many of the links in this article redirect to a specific reviewed product. Your purchase of these products through affiliate links helps to generate commission for Storables.com, at no extra cost. Learn more)
Introduction
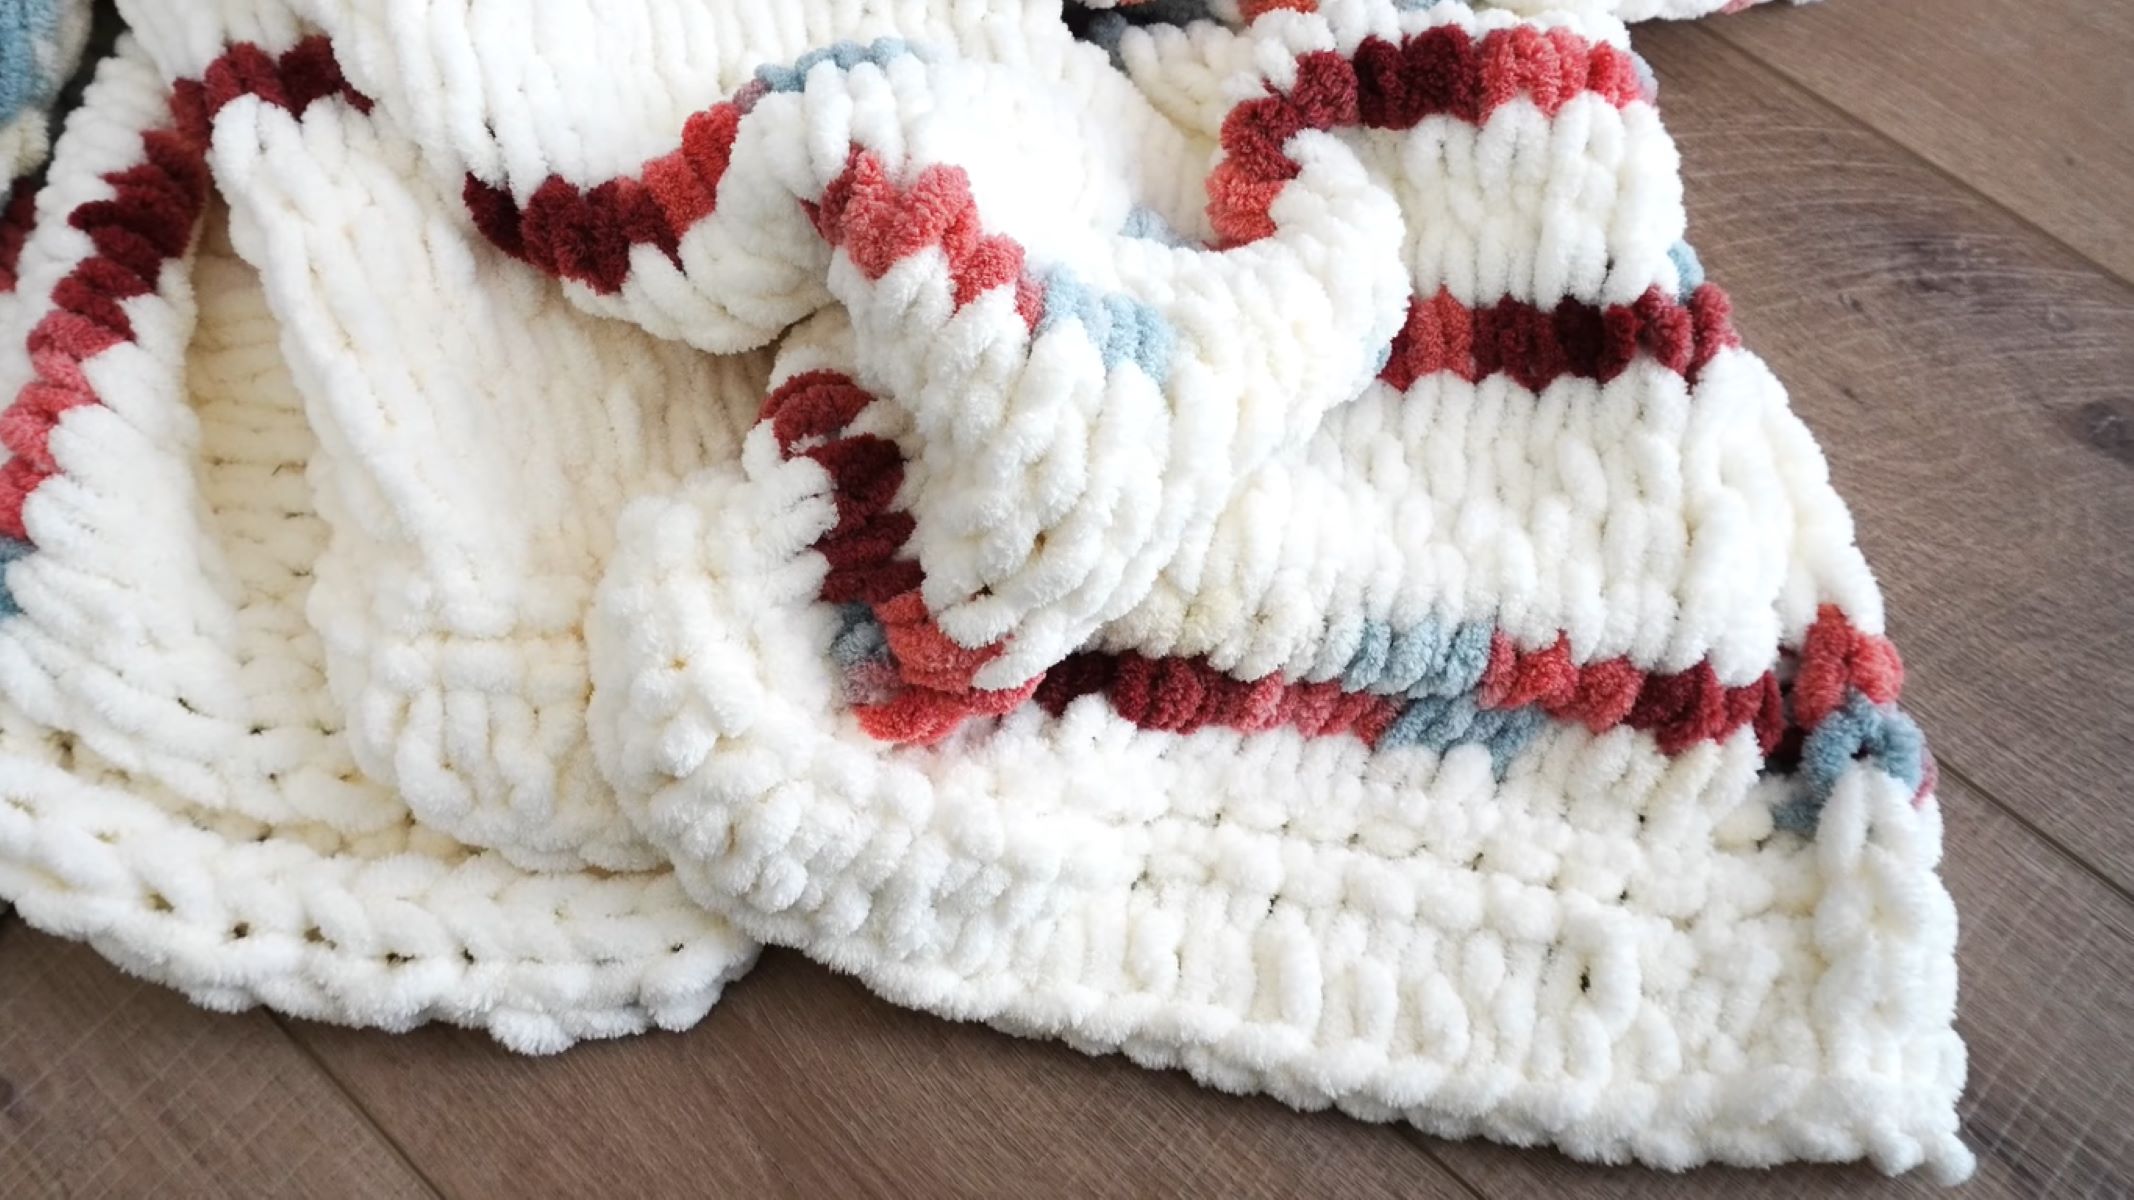
Creating your own loop yarn blanket is a rewarding and cozy project that anyone can enjoy. Whether you’re a seasoned crafter or a beginner, making a loop yarn blanket is a fun and relaxing way to create a beautiful piece for your home or as a thoughtful gift for someone special. In this article, we will guide you through the process of making a loop yarn blanket, from choosing the right materials to finishing the final stitches.
Loop yarn, also known as chenille yarn, is a unique type of yarn that features loops along its entire length. This eliminates the need for knitting needles or crochet hooks, making it perfect for those who are new to the world of yarn crafting. With loop yarn, you can easily create a blanket by simply pulling one loop through another and repeating the process until you reach your desired size.
Before you begin, gather the necessary materials. You’ll need loop yarn in your preferred color and thickness, scissors, and a large space where you can comfortably work on your project. It’s also a good idea to have a tape measure or ruler on hand to ensure that your blanket turns out the perfect size.
In the next section, we’ll discuss how to choose the right loop yarn for your project and how to decide on the size and pattern that you want to create. We’ll guide you through each step of the process, from creating a slip knot and starting the foundation chain to working the rows and adding more yarn if needed. Finally, we’ll show you how to finish your loop yarn blanket and provide some tips for care and maintenance.
So, whether you’re looking to curl up under a warm and stylish blanket during the chilly winter months or want to try your hand at a new artistic venture, making a loop yarn blanket is a fantastic way to express your creativity and create something truly unique. So let’s dive in and learn how to make a loop yarn blanket step by step!
Key Takeaways:
- Loop yarn blankets offer a simple and enjoyable crafting experience for beginners and seasoned crafters alike. With no need for knitting needles or crochet hooks, anyone can create a cozy and stylish blanket using just their hands.
- Choosing the right loop yarn, deciding on the size and pattern, and seamlessly adding more yarn are crucial steps in creating a beautiful and personalized loop yarn blanket. Infuse your creativity and enjoy the therapeutic process of crafting.
Read more: How To Start A Loop Yarn Blanket
Materials Needed
Before you start making your loop yarn blanket, it’s important to gather all the necessary materials. Here’s a list of what you’ll need:
- Loop yarn: Choose a loop yarn that matches your desired color and thickness. Loop yarn comes in a variety of colors and textures, so you can select the one that best suits your style and preferences.
- Scissors: A pair of sharp scissors will be needed to trim any excess yarn and make neat cuts.
- Tape measure or ruler: This will help you measure the size of your blanket as you progress and ensure that it turns out the way you want it to be.
- Large workspace: Find a spacious area where you can comfortably work on your blanket. This could be a table, bed, or even the floor, as long as you have enough room to lay out the blanket as it grows.
Once you have gathered all the necessary materials, you’ll be ready to start your loop yarn blanket project. Having everything prepared before you begin will make the process smoother and more enjoyable.
It’s worth mentioning that while the loop yarn itself is the primary material you’ll need, additional items such as a crochet hook or knitting needles are not required. The unique design of loop yarn allows you to create a blanket using just your hands.
Now that you have all your materials ready, it’s time to move on to the next step: choosing the perfect loop yarn and deciding on the size and pattern of your blanket.
Step 1: Choosing Your Loop Yarn
Choosing the right loop yarn for your blanket is an important starting point for your project. With a variety of colors, textures, and thicknesses available, it’s essential to consider factors such as your personal style, the intended use of the blanket, and the overall aesthetic you want to achieve.
When selecting loop yarn, take into account the color scheme of the room where the blanket will be used. If you’re making it as a gift, consider the recipient’s color preferences or the decor of their home. Loop yarn comes in a wide range of hues, from neutrals to vibrant shades, so you’re sure to find something that suits your needs.
In addition to color, consider the texture of the loop yarn. Some loop yarns have a smooth, velvety feel, while others have more texture or even a fluffy appearance. Think about the level of coziness and warmth you want your blanket to have and choose a yarn that matches your desired tactile experience.
Thickness is another important factor to consider. Loop yarn comes in various gauges, from thin to chunky. Thicker yarn will create a blanket with more weight and warmth, while thinner yarn will result in a lighter and airier blanket. Think about the climate and intended use of the blanket when deciding on the thickness of your loop yarn.
If you’re unsure about which loop yarn to choose, consider visiting a local craft store or searching online for inspiration. Look for swatches or samples of loop yarn to touch and feel the texture firsthand. You can also read reviews and look at photos of finished projects made with different loop yarns to get a better sense of their appearance and quality.
Once you have selected your loop yarn, make sure you have enough to complete your desired blanket size. Check the label for the recommended amount of yarn needed for a specific project or consult a pattern if you’re following one. It’s better to have more yarn than necessary to avoid running out in the middle of your project.
Now that you have chosen the perfect loop yarn for your blanket, you’re ready to move on to the next step: deciding on the size and pattern.
Step 2: Deciding on the Size and Pattern
Deciding on the size and pattern of your loop yarn blanket is an important step before you start creating. The size of your blanket will depend on its intended purpose, whether it’s a cozy throw for your couch or a larger blanket for your bed. The pattern you choose will add visual interest and style to your finished piece. Let’s explore these considerations further.
Size: Consider where you want to use your loop yarn blanket and measure the area to determine the desired dimensions. For a throw blanket, a common size is around 50 inches by 60 inches. For a bed blanket, larger dimensions may be needed, such as 60 inches by 80 inches or even 70 inches by 90 inches. Keep in mind that the size of your loop yarn blanket will also affect the amount of yarn you’ll need.
Pattern: Loop yarn blankets can be made in various patterns to add visual interest and texture. Some popular patterns include a simple garter stitch (knitting every row), a seed stitch (alternating knit and purl stitches), or a basketweave pattern. You can also create stripes or incorporate different colors to make your blanket unique. Explore different pattern options and choose one that appeals to you and complements your home decor.
To decide on your pattern, you can search for inspiration online, browse through knitting or crochet pattern books, or even experiment with swatches before starting your blanket. Consider the skill level required for each pattern and choose one that matches your comfort and experience level.
Once you’ve determined the size and pattern for your loop yarn blanket, it’s time to gather the necessary materials and begin the next steps of the process. In the next section, we’ll guide you through making a slip knot and creating the foundation chain to start your blanket.
Remember, the size and pattern of your loop yarn blanket are personal choices, so trust your instincts and choose what feels right for you and your desired outcome. The possibilities are endless, and you’re on your way to creating a beautiful and cozy blanket that will bring warmth and joy to your home.
Step 3: Making a Slip Knot
Before you can start creating your loop yarn blanket, you’ll need to make a slip knot to secure the yarn to begin your project. The slip knot serves as the starting point for your blanket and ensures that the yarn stays in place as you work on your stitches. Follow these steps to make a slip knot:
- Hold the yarn: Take the end of your loop yarn and hold it in your hand, leaving a tail about 6 inches long. The tail will be used to weave in later.
- Create a loop: Make a loop with the yarn, bringing the end over the rest of the yarn. The end should be on the top and the working yarn beneath it.
- Pass the end through the loop: Insert the end of the yarn through the loop from the underside, creating a second, smaller loop.
- Tighten the knot: Pull the end of the yarn gently to tighten the slip knot. Make sure it is snug but not too tight to allow for easy movement of the yarn.
Once you have successfully made a slip knot, you can place it on your hand or a knitting needle to hold it securely. This will create the foundation from which you will start working on your loop yarn blanket.
Keep in mind that it may take a bit of practice to make the slip knot perfectly, especially if you’re new to working with loop yarn. Don’t worry if your first attempts are not ideal – with a little patience and practice, you’ll become more comfortable with the process.
Now that you have a slip knot in place, you’re ready to move on to the next step: creating the foundation chain. This will set the stage for building your loop yarn blanket row by row.
Read more: Why Are There Loops On My Weighted Blanket
Step 4: Creating the Foundation Chain
With the slip knot securely in place, it’s time to create the foundation chain for your loop yarn blanket. The foundation chain acts as the starting row from which you will build upon to create your blanket. Follow these steps to create your foundation chain:
- Hold the slip knot: Hold the slip knot between your thumb and index finger, ensuring that the knot is secure and the loop is open.
- Loop the yarn: Take the working yarn (the end attached to the ball or skein of loop yarn) and thread it through the slip knot loop from front to back, bringing it up and over the back of the slip knot loop.
- Pull through the loop: With your fingers or hook, pull the working yarn through the slip knot loop, creating a new loop. This new loop will become the foundation chain.
- Continue the process: Repeat steps 2 and 3, looping the yarn through the previous loop and pulling it through, until you have reached the desired length for your foundation chain. The length of the chain will depend on the width you want for your blanket.
As you create the foundation chain, make sure to keep the loops loose but not too loose. You want them to be large enough for the yarn to easily pass through but still snug enough to keep the chain intact.
Once you have completed your foundation chain, you can check its length by stretching it out or using a tape measure. This will give you an idea of the width of your blanket and allow you to make any necessary adjustments.
Now that you have successfully created your foundation chain, you’re ready to move on to the next step: starting the first row of your loop yarn blanket. This is where the real fun begins as you begin to see your blanket take shape.
Remember, creating the foundation chain is an essential step, so take your time and ensure that it is well made. A solid foundation will set the stage for the rest of your loop yarn blanket project.
When making a loop yarn blanket, be sure to use a large crochet hook to easily work with the bulky yarn. This will help you create a cozy and beautiful blanket in no time.
Step 5: Starting the First Row
With the foundation chain complete, it’s time to start working on the first row of your loop yarn blanket. This is where you will begin to see the blanket taking shape and the loops coming together to form a cozy and beautiful piece. Follow these steps to start the first row:
- Hold the foundation chain: Hold the foundation chain in your hand, ensuring that the loops are facing upwards. The slip knot should be at the end of the chain.
- Insert your hand or fingers: Insert your hand or fingers through the second loop from the slip knot end while still holding the chain. This will form a loop on your hand.
- Loop the yarn through: Take the working yarn (the end attached to the ball or skein of loop yarn) and bring it up through the loop on your hand.
- Create a new loop: Pull the working yarn through the loop on your hand, creating a new loop. This new loop will be the first loop of the first row.
Continue the process of inserting your hand or fingers through the next loop of the foundation chain, looping the yarn through, and creating new loops. Be careful not to pull the loops too tightly or leave them too loose. Aim for a consistent tension throughout the row to ensure an even and balanced appearance.
As you work your way across the foundation chain, you will notice that the loops interlock and create a seamless row of stitches. This is the essence of loop yarn crafting – the ease and simplicity of connecting loops to form a beautiful fabric.
Once you have completed the first row, take a moment to check your work. Make sure all the loops are properly connected and that there are no skipped or missed stitches. Adjust the tension if needed, ensuring that the loops are neither too tight nor too loose.
Congratulations! You have successfully started the first row of your loop yarn blanket. The next step is to continue working the rows, building upon the foundation chain to create a cozy and stylish blanket. In the next section, we’ll guide you through the process of working the rows and adding more yarn when needed.
Remember to take your time, enjoy the process, and admire your progress. Each loop stitched is a step closer to a beautiful finished blanket.
Step 6: Working the Rows
Now that you have completed the first row of your loop yarn blanket, it’s time to continue working the rows to create the desired length and thickness. Working the rows is a repetitive and enjoyable process that allows you to see your blanket grow and take shape. Follow these steps to work the rows:
- Turn your work: Once you have finished the first row, turn your work so that the completed row is now facing downwards and the loops are facing upwards.
- Insert your hand or fingers: Insert your hand or fingers through the second loop from the edge of your work, just as you did in the first row.
- Loop the yarn through: Take the working yarn and bring it up through the loop on your hand, just as you did before.
- Create a new loop: Pull the working yarn through the loop on your hand, creating a new loop. This new loop will be the first loop of the second row.
Continue this process for each loop across the row, creating new loops as you go. Remember to maintain a consistent tension and ensure that each loop is properly connected to the previous row. This will create the desired fabric and prevent any gaps or unevenness in your blanket.
As you work on each row, you will notice the blanket growing in length and thickness. Take the time to periodically measure your blanket using a tape measure or ruler to ensure that it meets your desired dimensions. If you need to adjust the size or make any modifications, such as adding or subtracting stitches, do so at the beginning or end of each row.
Working the rows is a repetitive process that can be quite relaxing and meditative. Enjoy the rhythm of creating the loops and see your blanket gradually take shape stitch by stitch. Take breaks when needed to rest your hands and admire your progress.
Continue working the rows until your loop yarn blanket reaches the desired length. Keep in mind that the number of rows you need to complete will depend on the width of your foundation chain, the desired thickness of the blanket, and the size you want to achieve.
With each row, you’re getting closer to completing your loop yarn blanket. The next step is to learn how to add more yarn if needed to ensure that you have enough to finish your project. This will be covered in the next section.
Enjoy the process of working the rows, and revel in the anticipation of the cozy, finished blanket that’s within your reach.
Step 7: Adding More Yarn
As you work on your loop yarn blanket, you may find that you need to add more yarn to continue the project. Adding more yarn ensures that you have enough to finish your blanket and prevents any interruptions in the stitching process. Follow these steps to seamlessly add more yarn to your project:
- Prepare the new yarn: If you’ve reached the end of your current skein or ball of loop yarn, prepare the new yarn by cutting off a length of yarn, leaving a tail of about 6 inches.
- Insert the new yarn: Take the end of the new yarn and insert it through the last loop of the previous row, just as you would if you were continuing with the same strand of yarn.
- Continue working: Once the new yarn is inserted, continue working the next row as you normally would, looping the new yarn through the loops and creating new stitches. Be sure to secure the tail of the new yarn by leaving it behind the stitches as you work.
- Weave in the ends: Once you have completed your blanket, it’s important to weave in the loose ends of the yarn. Use a tapestry needle or your fingers to weave the ends into the stitches of the blanket, ensuring they are securely tucked away and not visible.
When adding more yarn, it’s essential to join the new yarn in a way that creates a smooth transition and prevents any gaps or knots in your work. By inserting the new yarn through the last loop of the previous row, you can seamlessly continue working on your blanket without any noticeable changes or interruptions.
If you prefer a more visible join, you can also tie a secure knot using the old and new yarn ends. However, be mindful of the thickness and texture of your loop yarn, as bulky knots may impact the overall appearance of your blanket.
When working with loop yarn, it’s a good idea to have extra yarn on hand to avoid running out in the middle of your project. Check the label or consult a pattern for the recommended amount of yarn needed for your specific blanket size.
Adding more yarn is a simple yet crucial step in ensuring the completion of your loop yarn blanket. With each additional skein or ball of yarn, you’re one step closer to wrapping yourself in the warmth and comfort of your finished creation.
Next, we’ll move on to the final step of finishing your loop yarn blanket and giving it that polished and professional look.
Read more: How Many Skeins Of Yarn For A Blanket
Step 8: Finishing the Blanket
Congratulations! You’re in the final step of completing your loop yarn blanket. Finishing the blanket involves a few important steps to ensure that your project looks polished and ready to be used or gifted. Follow these steps to finish your blanket with finesse:
- Weave in the ends: Take the time to weave in any loose yarn ends from joining new yarn or starting the project. Use a tapestry needle or your fingers to carefully weave the ends into the stitches of the blanket, ensuring that they are securely concealed. This creates a neater appearance and prevents the ends from unraveling over time.
- Check the edges: Assess the edges of your blanket to ensure they are even and straight. If needed, you can use a tape measure and scissors to trim any excess yarn or adjust the shape of the edges. Be cautious when trimming to maintain the integrity of your stitches.
- Block the blanket (optional): If desired, you can block your loop yarn blanket to give it a more refined and uniform look. Blocking involves lightly dampening the blanket, then laying it flat on a clean surface to dry. Use pins or weights to gently stretch and shape the blanket as it dries. This can help even out any irregularities and enhance the overall appearance of your work.
- Give it a final inspection: As a final step, carefully examine your finished blanket. Check for any missed stitches, loose loops, or uneven tension. If necessary, you can use a crochet hook or your fingers to adjust individual loops and stitches to ensure uniformity throughout the project. Take your time and make any necessary corrections to ensure a high-quality finished piece.
Once you have completed these steps, your loop yarn blanket is officially finished! Step back and take a moment to admire your work. You’ve created a cozy and beautiful blanket that showcases your creativity and craftsmanship.
Remember to follow any care instructions specific to the type of loop yarn you used. Some loop yarn may require gentle hand washing, while others may be machine washable. Take proper care of your blanket to preserve its beauty and functionality for years to come.
Now it’s time to enjoy the warmth and comfort of your loop yarn blanket. Snuggle up with it on chilly nights, drape it over your favorite chair, or gift it to someone special. Your finished blanket is a testament to your creativity and dedication, and it’s sure to bring joy to anyone who experiences its cozy embrace.
Thank you for joining us on this loop yarn blanket journey. We hope you had fun and found this guide informative and helpful. Happy crafting!
Conclusion
In conclusion, creating a loop yarn blanket is a delightful and rewarding craft project that allows you to unleash your creativity and produce a cozy and stylish piece for your home. Throughout this guide, we have covered the essential steps from choosing the right loop yarn and deciding on the size and pattern to making a slip knot, creating the foundation chain, and working the rows. We also discussed adding more yarn and the final steps of finishing your blanket.
With a few simple techniques and some patience, you can create a stunning loop yarn blanket that will become a cherished item in your home or a thoughtful gift for loved ones. The unique feature of loop yarn eliminates the need for knitting needles or crochet hooks, making it accessible for crafters of all skill levels.
Remember to infuse your own personal style and creativity into your loop yarn blanket. Experiment with different colors, textures, and patterns to create a truly unique and custom-made piece. Let your imagination run wild, and don’t be afraid to try new techniques or incorporate your own design elements.
Working on a loop yarn blanket can be a therapeutic and relaxing experience. The repetitive motion of looping the yarn creates a sense of calm and focus, allowing you to unwind and de-stress. Take your time with each stitch, savoring the process and the joy of seeing your creation come to life.
As you complete your loop yarn blanket, take pride in your craftsmanship. Weave in loose ends, straighten edges, and perform any necessary finishing touches to ensure your project looks polished and professional. The care and attention to detail you put into these final steps will enhance the overall appearance and longevity of your blanket.
Now that you have learned the step-by-step process of making a loop yarn blanket, it’s time to embrace your creative spirit and dive into this satisfying craft. Gather your materials, choose your favorite loop yarn, and let your hands channel your imagination.
We hope that this guide has empowered you to embark on your loop yarn blanket journey confidently. May your blanket wrap you in warmth and comfort, and may the process of creating it bring you joy and fulfillment. Happy crafting!
Frequently Asked Questions about How To Make A Loop Yarn Blanket
Was this page helpful?
At Storables.com, we guarantee accurate and reliable information. Our content, validated by Expert Board Contributors, is crafted following stringent Editorial Policies. We're committed to providing you with well-researched, expert-backed insights for all your informational needs.
0 thoughts on “How To Make A Loop Yarn Blanket”