Articles
How To Store A Pool For Winter
Modified: November 1, 2024
Discover effective ways to store your pool for winter in this informative article. Keep your pool in top condition during the off-season with these helpful tips and tricks.
(Many of the links in this article redirect to a specific reviewed product. Your purchase of these products through affiliate links helps to generate commission for Storables.com, at no extra cost. Learn more)
Introduction
As the winter season approaches, it’s time to start thinking about properly storing your pool to ensure its longevity and performance when the warmer weather returns. Storing a pool for winter involves a series of important steps to protect it from the harsh elements and prevent damage. By following a comprehensive winterization process, you can safeguard your pool and make the opening and maintenance process much smoother next season.
In this article, we will guide you through the step-by-step process of how to store a pool for winter. From cleaning the pool to winterizing the plumbing and covering it, we will cover all the essential tasks to help you preserve the integrity of your pool during the off-season.
But before we dive into the specific steps, let’s first understand why it’s necessary to store your pool properly for winter. Freezing temperatures, precipitation, and debris can wreak havoc on an unprotected pool, causing damage to the structure, equipment, and water chemistry. Investing the time and effort in winterizing your pool will not only save you money on repairs but also extend the lifespan of your pool.
Now that we understand the importance of winterizing, let’s delve into the step-by-step process of storing your pool.
Key Takeaways:
- Properly storing your pool for winter involves thorough cleaning, balancing water chemistry, and removing accessories. This comprehensive approach protects your pool from damage and ensures a smooth opening next season.
- Winterizing pool equipment and plumbing, along with covering the pool with a high-quality cover, are essential steps to safeguard your pool from harsh winter conditions. Investing time in proper winterization saves money on repairs and extends the pool’s lifespan.
Step 1: Clean the Pool
The first step in preparing your pool for winter storage is to thoroughly clean it. Removing debris, leaves, insects, and any other organic material will help prevent staining, algae growth, and damage to the pool’s surface during the winter months.
Start by using a skimmer net or leaf rake to remove leaves, twigs, and other larger debris from the water. Make sure to skim the surface and reach into the corners of the pool. Next, use a pool brush to scrub the walls, floors, and any other surfaces to remove algae or dirt buildup.
If you have a vinyl liner pool, be gentle while brushing to avoid causing any damage to the liner. For concrete or fiberglass pools, you can use a more vigorous brushing motion to remove stubborn stains or algae spots.
After scrubbing, it’s time to vacuum the pool. Use a manual vacuum or an automatic pool cleaner to remove any remaining debris or dirt from the bottom of the pool. Follow the manufacturer’s instructions for proper usage of the pool cleaner. Pay attention to areas with poor circulation, such as corners or steps, as debris tends to accumulate there.
Once the pool is vacuumed, it’s essential to backwash or clean the pool filter. This step will help maintain proper filtration during the storage period and ensure that the water remains clean and clear. Refer to your filter’s manual for specific instructions on how to properly clean or backwash it.
Finally, test the water chemistry and adjust it as needed. Properly balanced water will help prevent the growth of algae and bacteria during the winter. Use a reliable pool testing kit to measure the pH, total alkalinity, and chlorine levels. Adjust the chemical levels accordingly to bring them into the recommended range.
By starting the winterization process with a clean and balanced pool, you set the foundation for a trouble-free winter storage period and a smooth opening next season.
Step 2: Balance the Water Chemistry
Once you have cleaned your pool, the next step in preparing it for winter storage is to balance the water chemistry. Properly balanced water will help prevent scale formation, algae growth, and equipment damage during the inactive period.
Start by testing the pH level of the water using a reliable pool testing kit. The pH should ideally be maintained between 7.2 and 7.6. If the pH is too high, you can lower it by adding a pH decreaser or muriatic acid. If the pH is too low, you can raise it by adding a pH increaser or soda ash.
Next, test the total alkalinity (TA) of the water. The TA measures the pool water’s ability to resist pH fluctuations. The recommended range for TA is typically between 80 and 120 parts per million (ppm). If the TA is too high, you can lower it by adding a pH decreaser. If the TA is too low, you can raise it by adding an alkalinity increaser.
After balancing the pH and TA, it’s time to check the chlorine level. Chlorine helps to disinfect the water and prevent the growth of algae and bacteria. The ideal chlorine level should be between 1 and 3 ppm. If the chlorine level is too low, you can shock the pool by adding a chlorine shock treatment to raise it to the desired level.
Once you have balanced the pH, TA, and chlorine levels, you can also consider adding a winterizing algaecide. A winter algaecide will help prevent algae growth during the off-season, keeping your pool clean and clear when you reopen it.
Additionally, if you have a saltwater pool, it’s important to ensure that the salt level is within the recommended range. Use a salt test strip or a saltwater testing kit to measure the salt level. Adjust it if necessary by adding or diluting salt to maintain the proper concentration.
Remember, having properly balanced water chemistry is crucial for protecting your pool’s surfaces and equipment during the dormant winter period. By taking the time to balance the water chemistry now, you’ll save yourself from potential problems and costly repairs come springtime.
Step 3: Lower the Water Level
Lowering the water level in your pool is an important step in preparing it for winter storage. By reducing the water level, you help prevent potential damage caused by freezing and expanding water during cold weather.
The recommended water level for winter storage is usually between 4 to 6 inches below the skimmer opening. However, it’s important to check the specific guidelines provided by your pool manufacturer or consult with a professional to determine the appropriate water level for your particular pool.
To lower the water level, you have a few options. One common method is to use the pool’s main drain. Most pools have a main drain at the deep end, which can be used to drain the water. Make sure to turn off the pump and close the skimmer valves before opening the main drain valve. Allow the water to drain slowly until it reaches the desired level.
If your pool doesn’t have a main drain, you can also use a submersible pump to remove the excess water. Submersible pumps can be easily rented from a pool supply store or home improvement center. Place the pump in the pool and direct the discharge hose to an appropriate location to prevent flooding or erosion issues.
When lowering the water level, be cautious not to drain the pool too much. A complete drainage can lead to structural damage or liner shrinkage. It’s crucial to maintain a sufficient amount of water in the pool to avoid these issues.
After you have lowered the water level, it’s a good idea to clean and dry the pool’s skimmer and pump basket. Remove any debris or leaves from these areas, as they can cause blockages or damage if left inside during the winter months.
Lowering the water level not only helps protect your pool from freezing damage but also simplifies the cover installation process in the next step. By following this important step, you are setting your pool up for a successful winter storage period.
Step 4: Remove Pool Accessories
As part of the winterization process, it’s essential to remove any pool accessories before covering your pool for the winter. Removing these accessories will help prevent damage and prolong their lifespan.
Start by removing all pool toys, such as floats, noodles, and inflatables. These items are susceptible to damage from freezing temperatures and can also cause staining or discoloration if left in the pool for an extended period.
If you have a pool ladder or steps, carefully remove them from the pool. Clean them thoroughly using a mild detergent and water to remove any dirt or debris. Allow them to dry completely before storing them in a dry and secure location. This will help prevent rusting or deterioration during the winter months.
Additionally, if you have a pool heater or heat pump, it’s important to disconnect and remove them from the pool system. Follow the manufacturer’s instructions for proper disconnection and storage. Be sure to drain any water from the equipment to prevent freezing and damage.
Other accessories to consider removing include pool lights, skimmer baskets, and pool covers. If you have underwater pool lights, disconnect and carefully remove them from the pool. Clean and dry them before storing them in a safe place. Skimmer baskets should be cleaned and dried before storing as well.
Lastly, if you have a pool cover, remove it from the pool and inspect it for any damage or wear. Clean and dry the cover before folding and storing it in a dry location. If necessary, consider repairing or replacing the cover to ensure proper protection for your pool during the winter months.
By removing pool accessories, you decrease the risk of damage caused by freezing temperatures and protect your accessories from unnecessary wear and tear. Taking the time to properly store these items will ensure they are in good condition for the next swimming season.
Before storing your pool for winter, make sure to clean and balance the water, remove any debris, and cover it with a durable pool cover to protect it from the elements. This will help prevent damage and make it easier to reopen in the spring.
Read more: How To Store Ferns For The Winter
Step 5: Drain Pool Equipment
Draining pool equipment is a crucial step in winterizing your pool and protecting your equipment from potential damage caused by freezing temperatures. Water left inside the equipment can freeze, expand, and lead to cracks or other issues. By properly draining the equipment, you can prevent these costly problems.
Start by turning off the power to the pool equipment, including the pump, filter, and any other electrical components. This will help avoid any accidental start-ups while you’re working on draining the equipment.
Next, locate the drain plugs on the pump and filter. These plugs are usually found on the bottom or sides of the equipment. Unscrew the plugs and allow the water inside the equipment to drain completely. You may need to loosen the air release valves to aid in the drainage process.
Once the equipment is drained, take the time to clean and inspect the pump and filter. Remove any debris or buildup from the pump strainer basket and filter cartridges. Rinse them thoroughly with clean water and allow them to dry completely before storing them.
If you have a saltwater chlorine generator, it’s important to disconnect the power and plumbing connections. Remove the cell from the generator unit and clean it according to the manufacturer’s instructions. Store the cell in a dry and safe location.
At this stage, you should also drain any other pool equipment, such as pool heaters, automatic cleaners, or chlorinators. Follow the manufacturer’s instructions for proper drainage and storage procedures specific to each piece of equipment.
Remember to keep all the components in a dry and secure location throughout the winter months. Storing them properly will help prevent damage and ensure they remain in good working condition for the next swimming season.
By draining pool equipment, you are taking proactive measures to preserve the longevity and performance of your pool system. Proper winterization now will save you from costly repairs or replacements in the future.
Step 6: Winterize the Pool Plumbing
Winterizing the pool plumbing is an important step in the winterization process to protect the pipes and plumbing components from potential damage caused by freezing temperatures. Freezing water can expand and crack pipes, leading to leaks and costly repairs. By taking the time to properly winterize the pool plumbing, you can prevent these issues.
Start by closing the main drain and skimmer valves to prevent water from flowing into the plumbing lines. This will help isolate the plumbing system and allow you to properly prepare it for winter storage.
For pools with a dedicated plumbing line for winterizing, use an air compressor to blow out the water from the plumbing lines. Connect the air compressor to the outlet fitting of the plumbing line and slowly introduce air into the system. Start with low pressure and gradually increase until you safely reach a pressure that clears the water from the lines. This process will remove any remaining water that could potentially freeze and cause damage.
If you don’t have a dedicated winterizing line, you can use the skimmer line to blow out excess water. Attach a winterizing plate or plug to the skimmer opening to create a seal. Then, use the air compressor to blow air into the skimmer line, clearing any remaining water from the plumbing system.
It’s important to note that proper air pressure and technique are crucial during this step. Be cautious not to exceed the recommended air pressure, as it can cause damage to the plumbing lines. If you’re unsure about the air pressure or winterizing process, it’s always best to consult with a professional.
After blowing out the plumbing lines, add pool antifreeze to the lines as an extra precaution. Pool antifreeze is specifically formulated to protect against freezing temperatures. Pour the antifreeze into the lines using a funnel, ensuring that all lines are adequately filled.
Once the plumbing lines are winterized and filled with antifreeze, close the valves tightly to prevent any moisture or air from entering the lines. This will help maintain the integrity of the plumbing system during the winter months.
By winterizing the pool plumbing, you are safeguarding the pipes and plumbing components from potential damage. Proper winterization ensures that the plumbing system remains in good condition and ready for use when the pool is reopened in the spring.
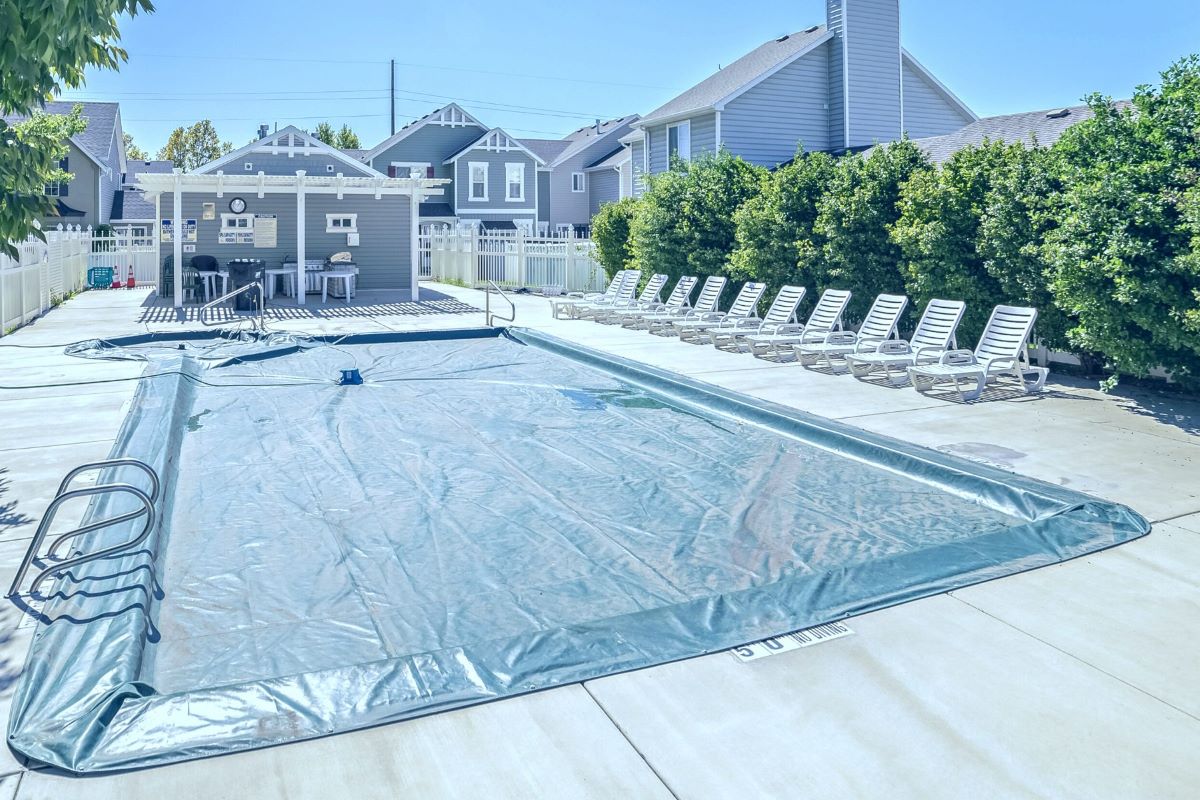
Step 7: Cover the Pool
Covering the pool is the final step in the winterization process and plays a crucial role in protecting it from debris, sunlight, and harsh weather conditions. A good quality pool cover will help keep the water clean, reduce evaporation, and prevent damage to the pool’s surfaces.
Before covering the pool, ensure that the water chemistry is properly balanced and the pool is clean. Any debris or contaminants left in the water can lead to staining or algae growth during the winter months.
There are different types of pool covers available, including solid covers, mesh covers, and automatic covers. Choose a cover that suits your needs and climate conditions. Solid covers provide complete coverage, preventing sunlight and debris from entering the pool. Mesh covers allow for water drainage and are ideal for areas with heavy rainfall or snow. Automatic covers offer convenience but may require professional installation.
To properly cover the pool, follow these steps:
- Spread the cover over the pool, ensuring that it’s centered and covers the entire surface.
- Tighten the cover using the provided straps or fastening system. This will help secure the cover in place and prevent it from sagging or shifting.
- If applicable, use water bags or weights to secure the cover along the pool’s edges. This will create a tight seal and prevent wind from getting under the cover.
- Inspect the covers for any tears, holes, or damage. Repair or replace the cover if necessary to ensure its effectiveness.
Regularly check the pool cover throughout the winter season to ensure it remains secure and in good condition. If there are heavy snowfalls, remove excess snow from the cover using a snow rake or a broom. This will prevent excessive weight and stress on the cover.
Properly covering the pool protects it from debris, reduces maintenance, and helps maintain its structural integrity. A well-maintained cover will make the opening process much easier and keep your pool looking its best.
Step 8: Store Pool Equipment
Storing pool equipment properly during the winter months is essential to protect it from damage and ensure its longevity. By following these steps, you can ensure that your pool equipment remains in good condition for the next swimming season.
Start by cleaning all pool equipment thoroughly. This includes pool brushes, vacuum heads, and poles. Remove any dirt, debris, or chemicals from the equipment using a mild detergent and water. Rinse them thoroughly and allow them to dry completely before storing.
If you have a pool pump and filter, it’s important to drain any remaining water from them. Open the drain plugs or valves and allow the water to fully drain. Remove and clean the pump strainer basket and filter cartridges. Store them in a dry location to prevent any damage or freezing during the winter months.
Store pool accessories such as pool toys, floats, and noodles in a dry and secure location. Clean them and ensure they are completely dry to prevent mold or mildew growth. Store them in a covered container or a storage shed to protect them from the elements.
For pool heaters, disconnect and drain any remaining water. Follow the manufacturer’s instructions for proper winterization and storage. It’s important to keep the heater in a dry and sheltered area to prevent any damage from moisture or freezing temperatures.
If you have an automatic pool cleaner, drain and clean it thoroughly. Remove any debris or dirt from the cleaner’s bag or filter. Store it in a dry and safe location, away from extreme temperatures or moisture.
Finally, inspect your pool cover for any damage or wear and tear. Clean and dry the cover before folding it and storing it in a dry area. Make sure to keep it away from sharp objects or rodents that could cause damage.
By properly storing your pool equipment, you are ensuring its longevity and effectiveness for future use. Taking the time to clean, dry, and store your equipment correctly now will save you time and money on replacements or repairs in the future.
Read more: How To Store Winter Shoes
Conclusion
Properly storing your pool for winter is an essential part of pool maintenance that ensures its longevity, performance, and overall health. By following the step-by-step process outlined in this article, you can protect your pool from the harsh winter elements and avoid potential damage caused by freezing temperatures, debris, and neglect.
Cleaning the pool thoroughly, balancing the water chemistry, and lowering the water level are crucial first steps in the winterization process. Removing pool accessories, draining pool equipment, and winterizing the pool plumbing are important tasks that safeguard your pool’s components and prevent potential damage.
Once the pool is prepared, covering it with a high-quality pool cover provides an extra layer of protection against debris and harsh weather conditions. Additionally, storing pool equipment properly ensures its longevity and effectiveness for future use.
By dedicating the time and effort to properly store your pool for winter, you are investing in the long-term health and performance of your pool. These steps will help save you money on repairs, extend the lifespan of your pool, and make the pool opening process easier when the warmer weather returns.
Remember, the key to successful winterization is a thorough and comprehensive approach that covers all aspects of pool maintenance. By taking these necessary steps, you can enjoy a worry-free winter knowing that your pool is well-protected and ready for another season of fun and relaxation.
Frequently Asked Questions about How To Store A Pool For Winter
Was this page helpful?
At Storables.com, we guarantee accurate and reliable information. Our content, validated by Expert Board Contributors, is crafted following stringent Editorial Policies. We're committed to providing you with well-researched, expert-backed insights for all your informational needs.


0 thoughts on “How To Store A Pool For Winter”