Articles
How To Store In ICloud
Modified: January 5, 2024
Learn how to store and manage your articles in iCloud for seamless access and organization across all your devices. Simplify your workflow and stay organized with iCloud storage.
(Many of the links in this article redirect to a specific reviewed product. Your purchase of these products through affiliate links helps to generate commission for Storables.com, at no extra cost. Learn more)
Introduction
With the rapid advancement of technology, the way we store and access our files has also evolved. Cloud storage has become an increasingly popular choice for individuals and businesses alike, offering a convenient and secure solution for managing our digital assets. One of the leading cloud storage providers is iCloud, a service provided by Apple.
In this article, we will explore the benefits of storing your files in iCloud, as well as guide you through the process of setting up and managing your iCloud storage. We will also discuss how to upload, organize, and access your files in iCloud, and provide solutions to common troubleshooting issues that you may encounter.
By the end of this article, you will have a thorough understanding of how to effectively utilize iCloud’s storage capabilities, empowering you to make the most of this powerful cloud storage solution.
Key Takeaways:
- iCloud offers seamless file accessibility, automatic backup, robust security, collaboration features, and flexible storage options, making it an ideal choice for individuals and businesses seeking a reliable and integrated cloud storage solution within the Apple ecosystem.
- Efficiently manage iCloud storage by setting up, organizing, and accessing files across Apple devices, while leveraging sharing capabilities. Troubleshoot common issues to ensure smooth operation and optimize storage usage for a seamless user experience.
Read more: How To Store Pictures In ICloud
Benefits of Storing in iCloud
Storing your files in iCloud offers numerous benefits that make it an attractive option for individuals and businesses. Let’s explore some of the key advantages:
1. Accessibility Across Devices
One of the primary benefits of using iCloud is the ability to access your files from any Apple device. Whether you’re using an iPhone, iPad, Mac, or even a PC with iCloud for Windows, your files are seamlessly synced, ensuring you have the latest version wherever you go. This accessibility allows for increased productivity and flexibility in managing your digital assets.
2. Automatic Backup
Another significant advantage of iCloud is its built-in backup feature. When you enable iCloud Backup on your device, it automatically creates a backup of your data, including photos, videos, contacts, messages, and more. Should your device be lost, stolen, or damaged, you can easily restore your data from iCloud, ensuring you never lose important files.
3. Enhanced Security and Privacy
iCloud employs robust security measures to protect your data. With features like end-to-end encryption, two-factor authentication, and a secure authentication token system, your files are kept safe from unauthorized access. Additionally, you have full control over who can access and share your files, ensuring your privacy is maintained.
Read more: How To Store IPhone Photos On ICloud
4. Collaboration and Sharing
iCloud allows for seamless collaboration and file sharing. You can easily share documents, folders, and even entire libraries with others, enabling real-time collaboration on projects. This makes iCloud an ideal choice for teams or individuals working together, as it streamlines communication and enhances productivity.
5. Generous Storage Options
iCloud offers flexible storage plans, giving you the freedom to choose the amount of storage that best suits your needs. You start with 5GB of free storage, but you can easily upgrade to larger plans if necessary. This scalability ensures you never run out of space and can continue storing your files without limitations.
6. Seamless Integration with Apple Ecosystem
iCloud seamlessly integrates with various Apple services and apps, such as Photos, Pages, Numbers, Keynote, and more. This integration allows for a seamless workflow, making it easy to edit and access your files across different apps and devices. It also ensures that your files are automatically updated and synced, saving you time and effort.
In summary, storing your files in iCloud offers accessibility, automatic backup, enhanced security, collaboration and sharing capabilities, flexible storage options, and seamless integration with the Apple ecosystem. By leveraging these benefits, you can streamline your file management and ensure your data is safe and readily available whenever you need it.
Setting Up iCloud Storage
Setting up iCloud storage is a simple process that can be done on your Apple device. Follow these steps to get started:
Read more: How To Store Photos On ICloud But Not IPhone
1. Turn on iCloud
Ensure that iCloud is enabled on your device. On iPhone or iPad, go to “Settings”, tap your name, and select “iCloud”. On a Mac, open “System Preferences”, click on “Apple ID”, and select “iCloud”. Sign in with your Apple ID if prompted.
2. Choose iCloud Storage Plan
Once you’re signed in to iCloud, you’ll have the option to choose a storage plan. iCloud offers several plans ranging from 5GB to 2TB. Select the plan that suits your storage needs and proceed with the purchase process if necessary. You can also start with the free 5GB plan and upgrade later.
3. Enable iCloud Backup
If you want to automatically back up your device to iCloud, ensure that iCloud Backup is turned on. This will back up your photos, videos, contacts, and other data to your iCloud storage. To do this, go to “Settings” > “iCloud” > “iCloud Backup” on your iPhone or iPad. On a Mac, go to “System Preferences” > “Apple ID” > “iCloud” > “Manage” > “Backups”. Toggle on iCloud Backup and click “Back Up Now” to initiate the backup.
4. Enable iCloud Drive
iCloud Drive allows you to store and access files in iCloud. To enable iCloud Drive on your device, go to “Settings” > “iCloud” > “iCloud Drive” on iPhone or iPad. On a Mac, go to “System Preferences” > “Apple ID” > “iCloud” > “iCloud Drive”. Toggle on iCloud Drive to sync your files across devices.
Read more: How To Store Store-Bought Bread
5. Set Up other iCloud Features
Explore other iCloud features like Photos, Notes, Contacts, and more, and customize their settings based on your preferences. This will ensure that these features are seamlessly integrated with your iCloud storage and can be accessed and synced across your devices.
Once you have completed these steps, your iCloud storage is set up and ready to use. You can now start uploading, organizing, and accessing your files in iCloud, taking advantage of the convenient and secure cloud storage solution provided by Apple.
Managing iCloud Storage
Managing your iCloud storage is essential to ensure you have enough space for your files and to optimize your storage usage. Here are some tips for effectively managing your iCloud storage:
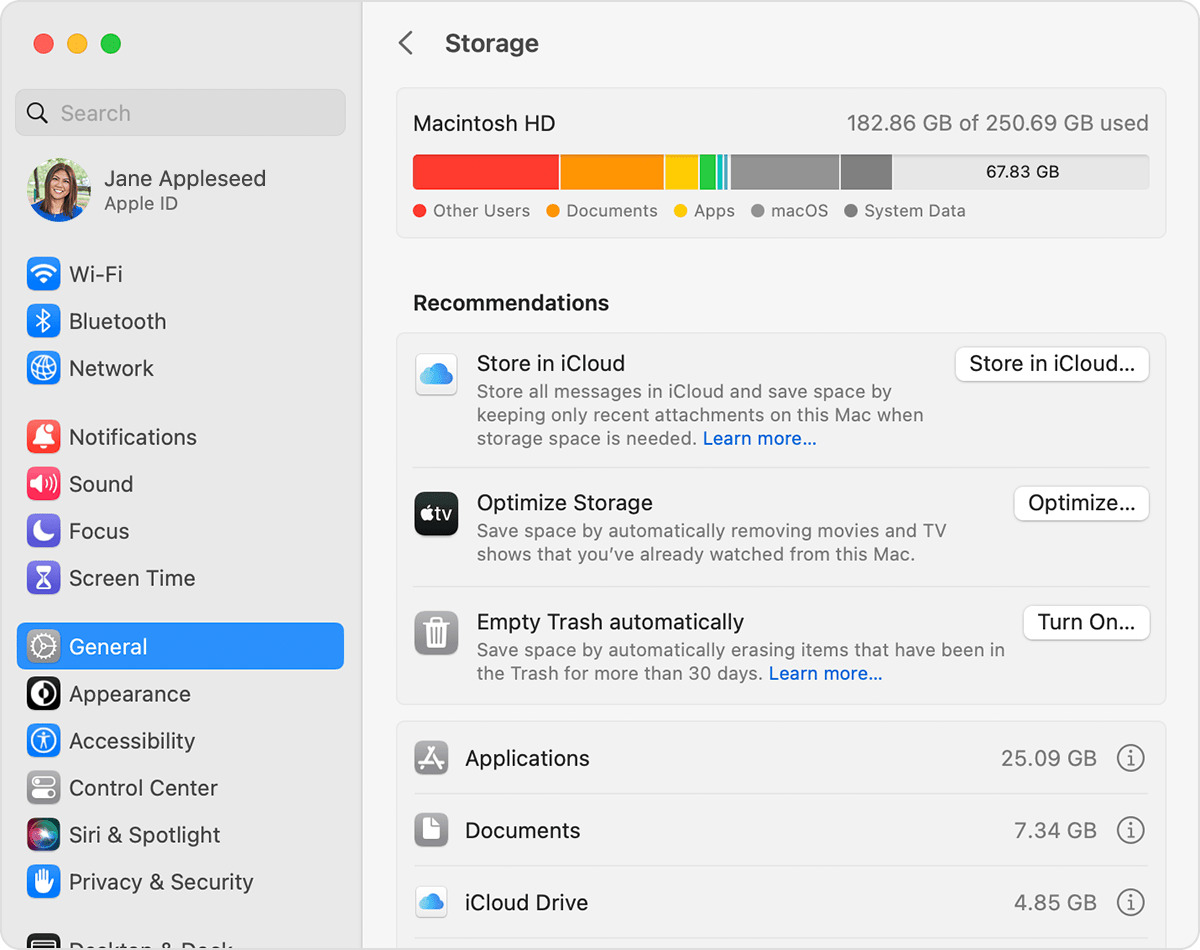
1. Check Storage Usage
To understand how your iCloud storage is being used, go to “Settings” > “iCloud” > “Manage Storage” on your iPhone or iPad. On a Mac, go to “System Preferences” > “Apple ID” > “iCloud” > “Manage”. This will provide an overview of the apps and data taking up the most space in your iCloud storage.
2. Delete Unnecessary Files
Identify files and data that you no longer need and delete them from your iCloud storage. This includes old backups, photos, videos, documents, and app data that are no longer relevant. Be cautious when deleting files and ensure you have backups of important data elsewhere.
Read more: How To Store Basil From Grocery Store
3. Optimize iCloud Photo Library
If you use iCloud Photo Library, enable the “Optimize iPhone Storage” option under “Settings” > “Photos” on your iPhone or iPad. This will automatically optimize your photo library, storing high-resolution versions in iCloud while keeping smaller versions on your device, saving storage space.
4. Manage App Data
Review the app data stored in iCloud and consider deleting unnecessary data. Some apps may have an option to offload data or clear cache within their settings. You can also go to “Settings” > “iCloud” > “Manage Storage” > “Apps” and manually delete data from specific apps.
5. Upgrade iCloud Storage Plan
If you find that your storage needs exceed your current plan, consider upgrading to a larger iCloud storage plan. This will give you more space to store your files and ensure you don’t run out of storage. You can easily upgrade your plan from the iCloud settings on your device.
6. Offload Unused Apps
If you’re running low on storage, you can offload unused apps from your device. This will remove the app itself while keeping its data in iCloud. To do this, go to “Settings” > “General” > “iPhone/iPad Storage” on your device, select an app, and choose the “Offload App” option.
Read more: How To Store Arrows
7. Regularly Backup and Restore
Perform regular backups of your device using iCloud Backup. This ensures that your data is safely stored in iCloud and can be easily restored if needed. Regular backups also allow you to free up space on your device by deleting unwanted files.
By implementing these management strategies, you can efficiently utilize your iCloud storage, optimize space, and keep your files organized and easily accessible across your Apple devices.
Uploading Files to iCloud
Uploading files to iCloud is a straightforward process that allows you to store your important documents, photos, and other files securely in the cloud. To upload files to iCloud, follow these steps:
1. iCloud Drive
To upload files to iCloud, you will primarily use iCloud Drive, which is essentially a virtual file storage system. On your iPhone or iPad, open the Files app. On a Mac, open Finder and click on iCloud Drive in the sidebar. This will open the iCloud Drive interface where you can upload your files.
2. Drag and Drop
The easiest way to upload files to iCloud is by using the drag and drop method. Simply locate the files you want to upload on your device or computer and select them. Then, drag and drop the files into the iCloud Drive interface. The files will automatically begin uploading to iCloud.
Read more: How To Store Roux
3. Uploading from Apps
Many apps on your Apple device have built-in iCloud integration, allowing you to directly upload files from within the app. For example, in the Photos app, you can select photos or videos and choose to upload them to iCloud. Similarly, in document editing apps like Pages or Keynote, you can save your documents directly to iCloud.
4. Uploading from Web
You can also upload files to iCloud from a web browser on any computer, including non-Apple devices. Open a web browser and navigate to iCloud.com. Sign in with your Apple ID and click on the iCloud Drive icon. From there, you can click on the upload button (usually represented by a cloud with an arrow) and select the files you want to upload.
5. Uploading Large Files
If you have large files or folders to upload, it’s recommended to compress them into a ZIP file before uploading. This will make the upload process faster and more efficient. To compress files on a Mac, select the files, right-click, and choose “Compress”. On Windows, right-click on the files, select “Send to”, and choose “Compressed (zipped) folder”. Then, upload the compressed file to iCloud.
6. Uploading via iCloud Drive App
On iOS devices, you can also use the iCloud Drive app to upload files to iCloud. Simply open the app, tap on the “+” icon, navigate to the location of the file you want to upload, and select it. The file will be uploaded to iCloud and made available across your devices.
By following these steps, you can easily upload your files to iCloud, ensuring that they are safely stored in the cloud and accessible from any of your Apple devices or via the web.
Read more: How To Store Cardstock
Organizing Files in iCloud
Organizing your files in iCloud is essential for easy accessibility and efficient management. Here are some strategies to help you keep your iCloud storage organized:
1. Create Folders
Creating folders is an effective way to categorize and group related files together. In the iCloud Drive app on iOS or the Finder on Mac, simply click the “+” button and select “New Folder”. Give the folder a descriptive name and move relevant files into it. You can create multiple levels of nested folders to create a hierarchical organization system.
2. Use Descriptive File Names
When saving files to iCloud, use clear and descriptive file names. This makes it easier to find and identify specific files later. Incorporate relevant keywords or include a brief description in the file name to quickly locate files when needed.
3. Utilize Tags
iCloud offers the option to tag files with keywords for easier searching and filtering. Tags allow you to assign colors or custom labels to files, making it simpler to visually identify and organize files based on specific criteria. To add tags, simply right-click on a file and select “Tags” or use the “Get Info” option.
Read more: How To Store Shisha
4. Sort and Arrange Files
Take advantage of the sorting and arranging options in iCloud Drive to keep your files in order. You can sort files by name, date, size, or tags. Use the “Arrange By” option to group files by specific criteria, such as kind, date, or tag. Experiment with these options to find the sorting and arranging method that works best for your workflow.
5. Delete Unnecessary Files
Regularly declutter your iCloud storage by deleting files that are no longer needed. Sometimes files may be duplicates, outdated, or no longer relevant. Be mindful of the files you keep in your storage and periodically review and delete any unnecessary files to optimize your organization system.
6. Take Advantage of Favorites
Favorites allow you to quickly access frequently used files. In the iCloud Drive app on iOS or the Finder on Mac, simply tap on the file and select the star icon to add it to your Favorites. This makes it easy to locate and access important files without having to navigate through folders.
7. Search for Files
If you have a large number of files in your iCloud storage, use the search function to quickly locate specific files. Simply enter keywords or file names in the search bar at the top of the iCloud Drive app on iOS or the Finder on Mac. iCloud will display all relevant files, helping you find what you need in seconds.
By implementing these organizing strategies, you can maintain a well-structured and easily navigable file system in iCloud, saving you time and effort when searching for and managing your files.
Read more: How To Store A Couch
Accessing iCloud Files
Accessing your files stored in iCloud is seamless and can be done from various Apple devices or via the web. Here are the different methods to access your iCloud files:
1. iOS Devices
On your iPhone or iPad, you can access your iCloud files through the Files app. Tap on the Files app to open it, and you will see the different locations available, including iCloud Drive. Tap on iCloud Drive to view and navigate through your files. You can open, edit, delete, or share files directly from the app.
2. Mac
On your Mac, you can access your iCloud files through the Finder. Open a Finder window and click on iCloud Drive in the sidebar. This will display all the files and folders stored in your iCloud Drive. You can double-click on a file to open it, move files between folders, or perform actions like copying, deleting, or renaming files.
3. iCloud.com
You can access your iCloud files from any computer or device with internet access by visiting iCloud.com. Sign in with your Apple ID and password, and you will have access to all your iCloud features, including iCloud Drive. From the iCloud Drive interface, you can view, download, upload, and manage your files just as you would on a device.
Read more: How To Store Scrapbooks
4. iCloud Drive App
The iCloud Drive app is available for iOS devices. Open the app, and you’ll have direct access to your iCloud files. You can navigate through folders, preview files, open them in other apps, and perform various file management tasks. The iCloud Drive app provides a dedicated and streamlined experience for accessing your files.
5. Collaboration and Sharing
iCloud allows for seamless collaboration on files. You can share files and folders with others, allowing them to view, edit, or comment on the documents. When someone shares a file with you, it will appear in the Shared with Me section of the Files app on iOS or the Shared section in iCloud Drive on Mac or iCloud.com.
6. Offline Access
If you need to access your files when you don’t have an internet connection, you can enable offline access. On iOS devices, open the Files app, tap on the three dots (…) next to the file or folder, and select “Make Available Offline”. On Mac, right-click on the file or folder in iCloud Drive and choose “Download Now”. This will download the file to your device for offline access.
With these methods, you can easily access and manage your iCloud files from your Apple devices or any computer with an internet connection. Whether you’re at home, in the office, or on the go, your files are easily accessible and synced across all your devices.
Sharing Files from iCloud
Sharing files from iCloud is a convenient way to collaborate with others or simply share documents, photos, and other files with friends, family, or colleagues. Here’s how you can easily share files from iCloud:
1. iOS Devices
To share a file from your iOS device, open the Files app and navigate to the file you want to share in iCloud Drive. Tap and hold on the file until the options menu appears, then tap “Share”. You can choose to share the file via AirDrop, Messages, Mail, or any other compatible app or service.
2. Mac
On a Mac, open Finder and navigate to the file you want to share in iCloud Drive. Right-click on the file and choose “Share” from the context menu. You can then select the desired sharing option, such as AirDrop, Mail, Messages, or any other compatible app or service.
3. iCloud.com
When accessing your iCloud files via iCloud.com, you can also share files directly from the web interface. Select the file you want to share by clicking on it, then click on the share icon (represented by a square with an arrow pointing up). From there, you can choose the sharing method, enter the recipient’s email address, and add an optional message.
4. Permissions and Access
When sharing files from iCloud, you can specify the permissions and level of access the recipient has. You can grant them permission to view an item, make changes, or even collaborate in real-time. Additionally, you can set whether the recipient can edit the file or only view it.
Read more: How To Store Beats
5. Collaborative Editing
If you want to collaborate on a file with others, you can invite them to edit the file directly in iCloud. As you make changes, the edits will be synced in real-time, allowing everyone involved to see and contribute to the document simultaneously. This makes collaboration and teamwork more efficient and streamlined.
6. Manage Shared Files
You can manage the files you have shared from iCloud by going to the Shared with You section in the Files app on iOS, the Shared section in iCloud Drive on Mac, or the Shared with Me section on iCloud.com. Here, you can view the files others have shared with you, make comments, and access any shared folders.
By leveraging the sharing capabilities of iCloud, you can easily collaborate with others, share files with friends and family, or collaborate on projects with colleagues. Enjoy the convenience and flexibility of sharing files directly from your iCloud storage.
Troubleshooting iCloud Storage
While iCloud provides a reliable and efficient storage solution, occasionally you may encounter some issues or errors. Here are some common troubleshooting tips to help resolve iCloud storage problems:
1. Check iCloud Storage Usage
Start by checking your iCloud storage usage. Go to “Settings” > “Your Name” > “iCloud” > “Manage Storage” on iOS devices or “System Preferences” > “Apple ID” > “iCloud” > “Manage” on Mac. This will give you an overview of how your iCloud storage is being used and help identify any apps or files consuming excessive space.
Read more: How To Store Victoza
2. Verify Internet Connection
Ensure that you have a stable and reliable internet connection. iCloud requires an active internet connection for syncing and accessing files. Check your Wi-Fi or cellular connection, and reboot your router or modem if necessary.
3. Restart Device
A simple restart can often resolve iCloud storage issues. Restart your device to refresh the system and potentially resolve any temporary glitches or conflicts affecting iCloud storage functionality.
4. Update iOS or macOS
Ensure that your device’s operating system is up to date. Apple regularly releases software updates that include bug fixes and performance improvements. Go to “Settings” > “General” > “Software Update” on iOS devices or “System Preferences” > “Software Update” on Mac to check for and install the latest updates.
5. Free Up iCloud Storage
If you’re running out of iCloud storage space, consider deleting unnecessary files or optimizing your storage usage. Remove duplicate files, delete old backups, offload unused apps, or purchase a larger iCloud storage plan if needed.
Read more: How To Store A Plunger
6. Reset iCloud Settings
If you’re experiencing persistent iCloud storage issues, you can try resetting your iCloud settings. On iOS devices, go to “Settings” > “Your Name” > “iCloud” > “Sign Out”. On Mac, go to “System Preferences” > “Apple ID” > “iCloud” > “Sign Out”. Sign back in with your Apple ID and reconfigure your iCloud settings.
7. Contact Apple Support
If the above troubleshooting steps don’t resolve your iCloud storage issues, it’s recommended to contact Apple Support for further assistance. They have the expertise to diagnose and resolve more complex iCloud storage problems specific to your device and account.
By following these troubleshooting tips, you can address common iCloud storage issues and ensure smooth operation of your iCloud storage. Remember to regularly maintain and optimize your iCloud storage to keep it running efficiently.
Conclusion
iCloud storage provides a convenient and secure solution for storing and accessing your files across Apple devices. By utilizing iCloud’s features and functionalities, you can effectively manage and organize your digital assets while collaborating with others. Whether you’re an individual user or part of a team, iCloud offers a seamless experience for file storage and sharing.
In this article, we explored the benefits of storing in iCloud, including accessibility across devices, automatic backup, enhanced security, collaboration and sharing capabilities, flexible storage options, and seamless integration with the Apple ecosystem. These advantages make iCloud a compelling choice for individuals and businesses alike.
We also discussed the process of setting up and managing iCloud storage, including enabling iCloud, choosing a storage plan, setting up iCloud backup, enabling iCloud Drive, and exploring other iCloud features. With these steps, you can tailor your iCloud storage to meet your specific needs and preferences.
Furthermore, we learned how to upload files to iCloud using methods such as drag and drop, uploading from apps, uploading from the web, and more. We also explored strategies for organizing files in iCloud, including creating folders, using descriptive file names, utilizing tags, and sorting and arranging files.
Accessing and sharing files from iCloud is a breeze, whether you’re using iOS devices, Mac, or even accessing your files via iCloud.com. We discussed the various methods for accessing iCloud files and the options for sharing files with others, including collaborative editing and managing shared files.
In case of any troubleshooting issues, we provided some common troubleshooting tips to resolve iCloud storage problems, including checking storage usage, verifying the internet connection, restarting the device, updating the operating system, freeing up storage, resetting iCloud settings, and contacting Apple Support when needed.
In conclusion, iCloud storage offers a reliable and efficient cloud storage solution, empowering users to store, organize, access, and share their files seamlessly across an array of Apple devices. With its robust features and user-friendly interface, iCloud streamlines file management, enhances productivity, and ensures the safety and accessibility of your valuable digital assets.
Frequently Asked Questions about How To Store In ICloud
Was this page helpful?
At Storables.com, we guarantee accurate and reliable information. Our content, validated by Expert Board Contributors, is crafted following stringent Editorial Policies. We're committed to providing you with well-researched, expert-backed insights for all your informational needs.

0 thoughts on “How To Store In ICloud”