
Articles
How To Store Photos On ICloud But Not IPhone
Modified: October 20, 2024
Learn how to store your photos on iCloud without taking up precious storage space on your iPhone. Follow our step-by-step guide and free up storage for more important things.
(Many of the links in this article redirect to a specific reviewed product. Your purchase of these products through affiliate links helps to generate commission for Storables.com, at no extra cost. Learn more)
Introduction
In this digital age, our photos hold countless memories and moments that we cherish. With the advancement of technology, storing photos on our devices has become easier and more convenient. However, the limited storage capacity of our iPhones often poses a challenge when it comes to managing and organizing our photo collections.
This is where iCloud Photo Library comes into play. iCloud Photo Library is a cloud-based service provided by Apple that allows you to store your photos and videos online, freeing up valuable space on your iPhone. It offers seamless integration across Apple devices, ensuring that your photos are accessible wherever and whenever you need them.
While iCloud Photo Library is a brilliant solution for managing your photo library, it can sometimes be overwhelming to figure out how to store photos on iCloud without taking up precious storage space on your iPhone. Fortunately, there is a way to do exactly that.
In this article, we will guide you through the process of storing photos on iCloud but not on your iPhone. We will discuss the benefits of using iCloud Photo Library, how to manage your iCloud storage, and the step-by-step instructions on how to store photos on iCloud without cluttering your iPhone.
By following these steps, you will be able to keep your photo library both organized and accessible, without worrying about running out of storage on your iPhone.
Key Takeaways:
- Store photos on iCloud to free up iPhone storage, access them from any device, and enjoy automatic synchronization, powerful search, and seamless integration within the Apple ecosystem.
- Manage iCloud storage effectively by purging unnecessary photos, enabling “Optimize iPhone Storage,” and reviewing storage settings to ensure optimal space allocation.
Read more: How To Store IPhone Photos On ICloud
Understanding iCloud Photo Library
iCloud Photo Library is a feature provided by Apple that allows you to store your photos and videos in the cloud. It acts as a synchronized repository for all your images and videos, making them available across all your Apple devices such as iPhones, iPads, Macs, and even on the web.
When you enable iCloud Photo Library, your entire photo library is automatically uploaded to the cloud and synchronized across your devices. This means that any changes you make to your photo collection, such as deleting or editing a photo, will be reflected on all of your devices.
The beauty of iCloud Photo Library is that it stores the photos in their original resolution and format. This ensures that you have access to the full quality of your images, even when viewing them on different devices. Additionally, iCloud Photo Library uses intelligent algorithms to optimize the storage of your photos, so you don’t have to worry about running out of storage space.
By utilizing iCloud Photo Library, you can seamlessly access and manage your photo collection from any device with an internet connection. This makes it incredibly convenient for sharing photos with friends and family, organizing your images into albums, and quickly locating specific photos using the powerful search feature.
Furthermore, iCloud Photo Library offers a feature called “Optimize iPhone Storage.” When this feature is enabled, your iPhone will store optimized versions of your photos, saving valuable space on your device. The full-resolution versions of your photos will be stored in iCloud and will only download on your iPhone when you view or edit them.
It is important to note that iCloud Photo Library is not a backup solution for your photos. While it provides redundancy by keeping multiple copies of your photos on different devices, it should not be relied upon as the sole method of backing up your precious memories. It is always recommended to have an additional backup of your photos on an external hard drive or in a cloud storage service specifically designed for data backup.
Now that we have a clear understanding of what iCloud Photo Library is and its capabilities, let’s explore the benefits of using this service to store your photos on iCloud.
Benefits of Storing Photos on iCloud
There are several advantages to storing your photos on iCloud rather than keeping them solely on your iPhone. Let’s take a look at some of the key benefits:
- Free up storage space on your iPhone: One of the primary benefits of using iCloud Photo Library is the ability to free up valuable storage space on your iPhone. As photos and videos can quickly consume a significant amount of storage, offloading them to iCloud allows you to keep your device’s storage capacity for other important data.
- Access your photos from any device: Storing your photos on iCloud ensures that you can access them from any device connected to your iCloud account. Whether you’re using your iPhone, iPad, Mac, or even a web browser, your entire photo library will be available at your fingertips, making it convenient to view and share your memories.
- Automatic synchronization: With iCloud Photo Library, any changes made to your photo library will be automatically synchronized across all your devices. This means that if you delete a photo or add a new one on one device, it will reflect those changes across all your other devices. This ensures that your photo library is always up to date and consistent.
- Optimized storage: iCloud Photo Library optimizes the storage of your photos by storing smaller, optimized versions on your iPhone while keeping the full-resolution versions in iCloud. This feature allows you to have access to your entire photo collection without taking up excessive storage space on your device.
- Powerful search and organization: iCloud Photo Library offers robust search capabilities, allowing you to quickly locate specific photos or videos using keywords, locations, or even recognitions of people or objects in the images. Additionally, you can organize your photos into albums, create shared albums to collaborate with others, and even customize the order in which your photos are displayed.
- Seamless integration with Apple ecosystem: iCloud Photo Library seamlessly integrates with Apple’s ecosystem, making it effortless to access your photos across all your Apple devices. You can start editing a photo on your iPhone and continue where you left off on your iPad or Mac without any interruptions or compatibility issues.
By leveraging these benefits, storing your photos on iCloud not only saves valuable storage space on your iPhone but also ensures that your entire photo library is easily accessible and organized across all your devices. Now, let’s dive into the details of managing your iCloud storage.
Managing iCloud Storage
As you store your photos on iCloud, it is important to be mindful of your iCloud storage capacity. iCloud offers users a limited amount of free storage space, typically starting at 5GB, with options to upgrade to higher storage tiers for a monthly fee.
To effectively manage your iCloud storage and optimize it for storing photos, follow these steps:
- Check your storage usage: Start by checking how much iCloud storage space you are currently using. On your iPhone, go to Settings > [Your Name] > iCloud > Manage Storage. Here, you will see a breakdown of your storage usage by different apps and services, including iCloud Photo Library.
- Purge unnecessary photos and videos: Review your photo library and remove any duplicate, blurry, or irrelevant photos and videos. This will not only free up storage space but also improve the overall organization of your library. Consider using third-party apps or photo management tools to assist you in identifying and deleting unnecessary images efficiently.
- Enable “Optimize iPhone Storage”: To save space on your iPhone, enable the “Optimize iPhone Storage” option in your iCloud Photo Library settings. With this feature enabled, your iPhone will store optimized versions of your photos, and the full-resolution versions will be stored in iCloud, downloading only when you need them. This helps maximize your iPhone’s storage capacity while maintaining access to your entire library.
- Upgrade your iCloud storage plan: If you find that your iCloud storage is running low, you may need to consider upgrading to a higher storage plan. Apple offers various storage plans to accommodate different needs. To upgrade, go to Settings > [Your Name] > iCloud > Manage Storage > Change Storage Plan. Choose a plan that suits your storage requirements, and follow the prompts to complete the upgrade process.
- Utilize iCloud Family Sharing: If you have a family sharing plan, you can share your iCloud storage with your family members. This can help optimize storage usage by pooling your available storage space with other family members, allowing everyone to store their photos without having to individually manage their own storage limits.
- Regularly review and optimize: As your photo library grows, it is essential to periodically review and optimize your stored photos. Whether it’s deleting old or unnecessary photos or offloading them to an external storage device, keeping your photo collection organized and pruned will help you make efficient use of your iCloud storage space.
By implementing these strategies, you can effectively manage your iCloud storage, ensuring that you have enough space to store your photos without worrying about running out of storage on your iPhone. Now, let’s dive into the steps on how to store photos on iCloud without cluttering your iPhone.
Steps to Store Photos on iCloud But Not iPhone
If you want to store your photos on iCloud without taking up storage space on your iPhone, follow these steps:
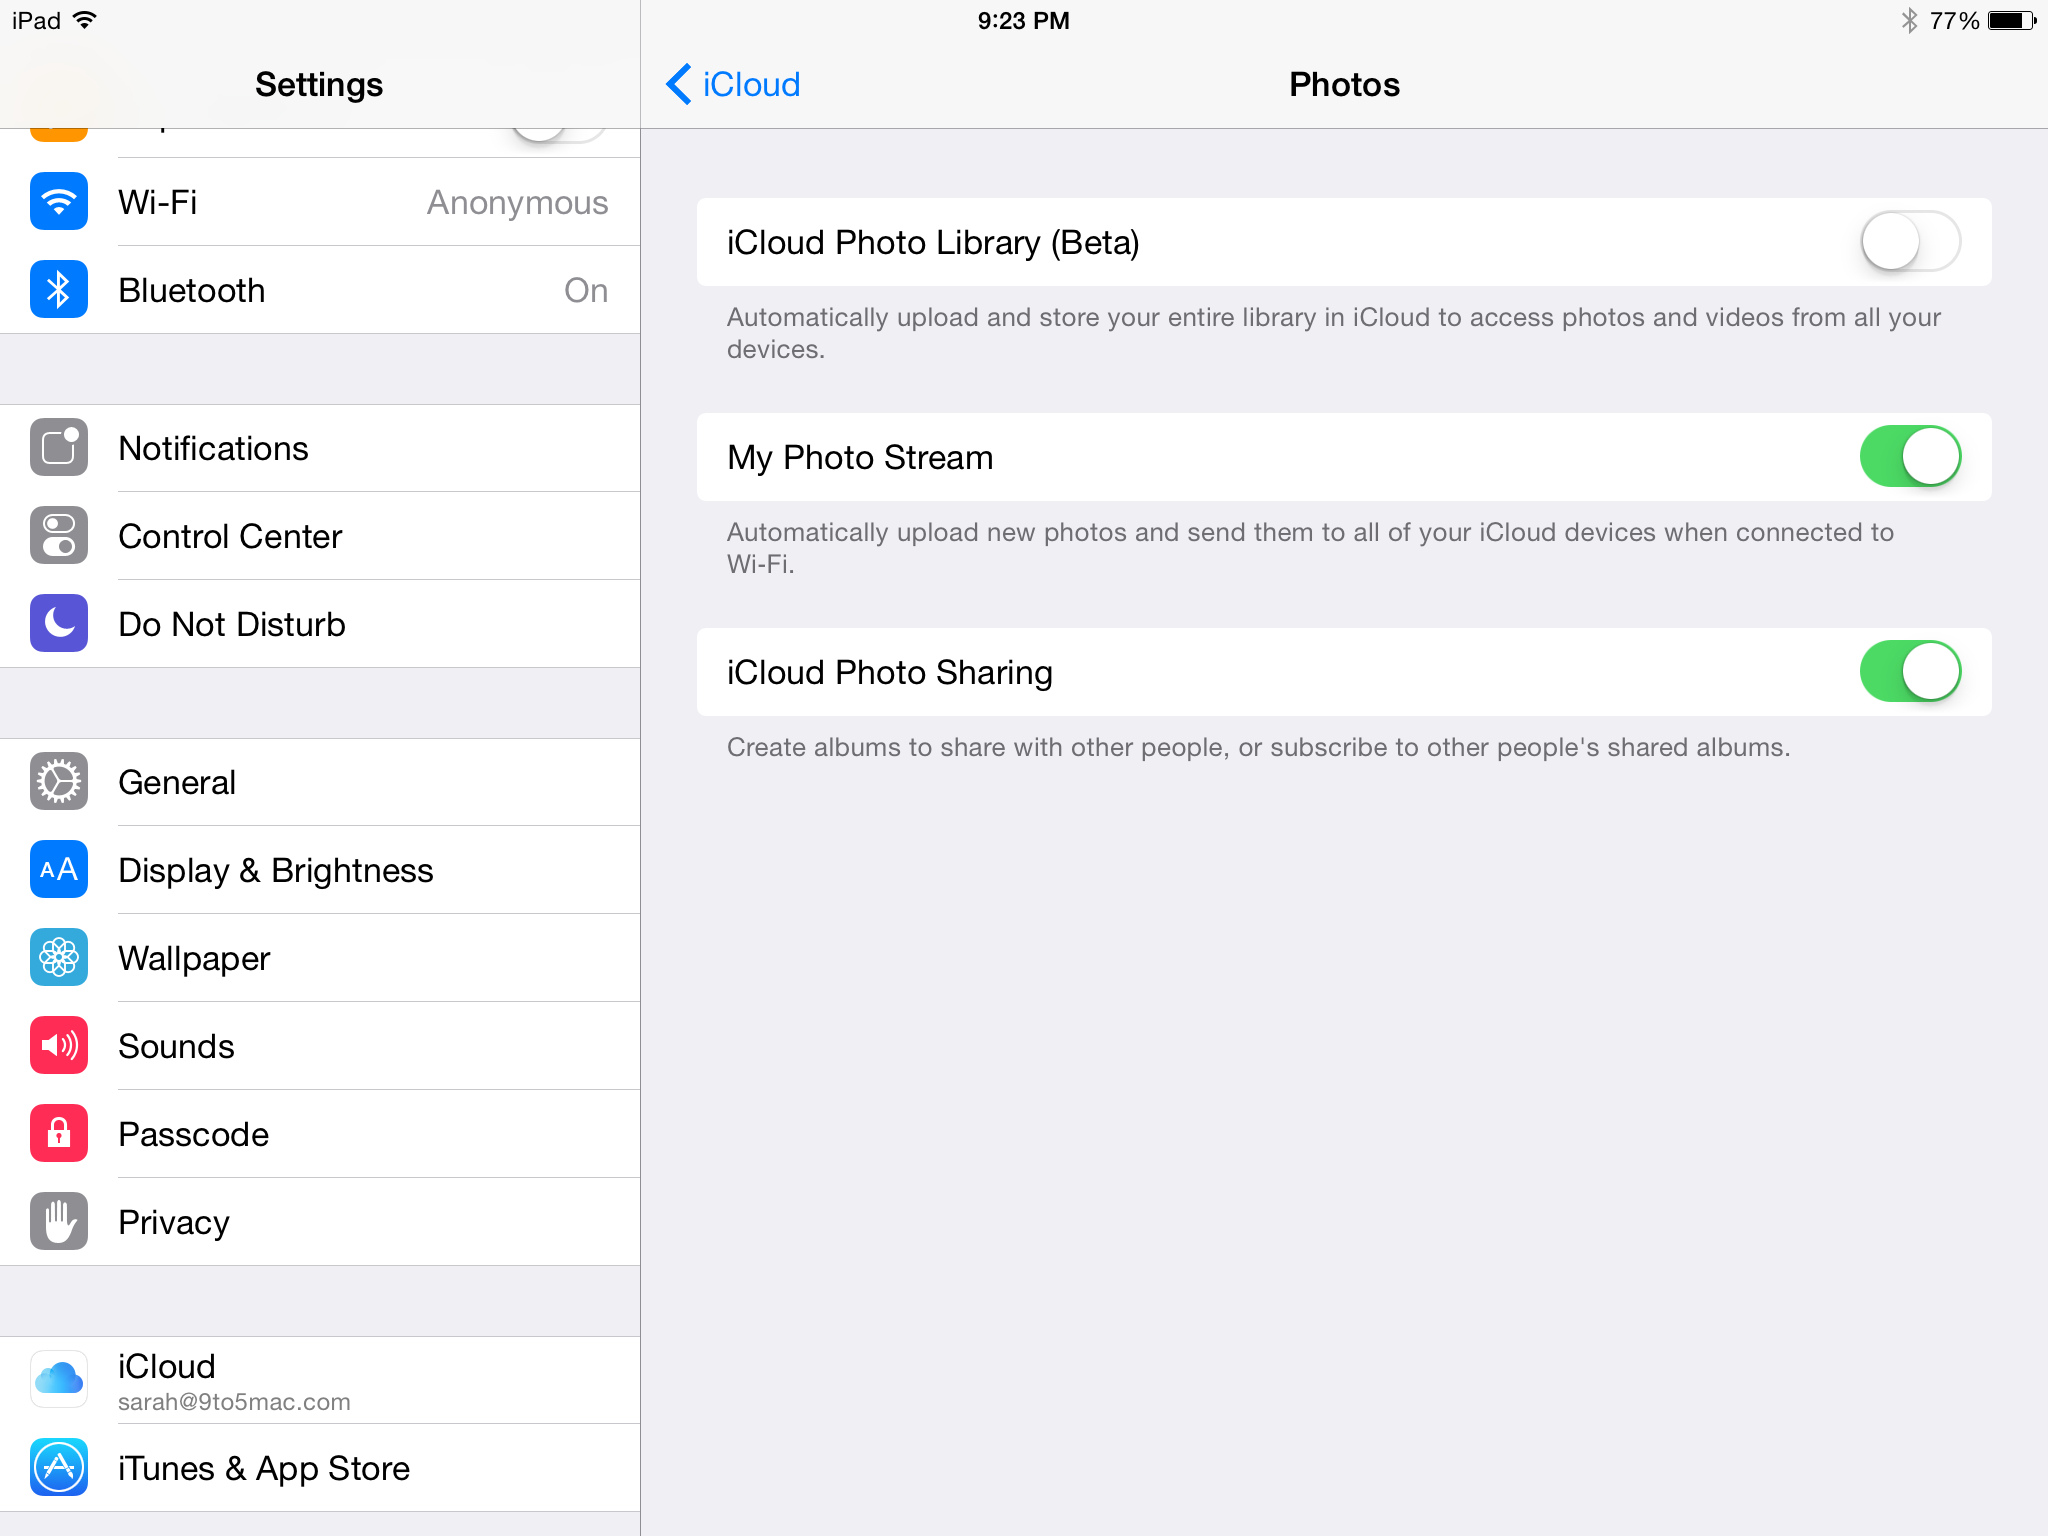
- Disable iCloud Photo Library on iPhone: On your iPhone, go to Settings > [Your Name] > iCloud > Photos. Toggle off the “iCloud Photo Library” option. This will remove the synced photos from your iPhone while keeping them stored on iCloud. Remember, this will not delete your photos from iCloud – it will just remove them from your iPhone.
- Enable iCloud Photo Library on iCloud: Access iCloud on your computer or visit iCloud.com on a web browser. Sign in with your Apple ID and click on “Photos.” Make sure to enable iCloud Photo Library in the iCloud settings. This will ensure that your photos are uploaded and stored in iCloud.
- Uploading Photos to iCloud from iPhone: To upload photos to iCloud from your iPhone, you have a few options. You can use the iCloud Photos app, available in the App Store, which allows you to selectively upload photos to your iCloud account. Alternatively, you can manually select and upload photos using the Files app or the iCloud Drive app on your iPhone.
- Accessing Photos Stored on iCloud: Once your photos are stored in iCloud, you can access them from any device with iCloud Photo Library enabled. Simply open the Photos app on your iPhone, iPad, or Mac, or visit iCloud.com on a web browser to view and manage your photo collection.
- Reviewing iCloud Storage Settings: It is important to periodically review your iCloud storage settings to ensure that your photos are being stored properly. Check your iCloud storage usage on your iPhone by going to Settings > [Your Name] > iCloud > Manage Storage. This will give you an overview of your storage allocation and allow you to make any necessary adjustments.
By following these steps, you can store your photos on iCloud without cluttering your iPhone’s storage space. This way, you can have access to your entire photo collection from any device while keeping your iPhone optimized for other apps and data.
Remember, it is always recommended to have an additional backup of your photos stored in a separate location or using a dedicated backup solution to ensure the safety and preservation of your precious memories.
Now that you know how to store photos on iCloud without taking up storage on your iPhone, you can confidently enjoy the benefits of iCloud Photo Library while keeping your devices clutter-free.
Disable iCloud Photo Library on iPhone
Disabling iCloud Photo Library on your iPhone is a simple process that allows you to remove the synced photos from your device while keeping them stored in iCloud. Follow these steps to disable iCloud Photo Library:
- Open the Settings app on your iPhone and tap on your Apple ID at the top of the screen.
- Scroll down and tap on “iCloud.”
- Next, tap on “Photos.”
- In the Photos settings, you will find the option for “iCloud Photo Library.” Toggle it off by tapping on the switch next to it. You may be prompted to “Delete Photos” or “Download Photos & Videos” when turning off iCloud Photo Library.
- If you choose to delete photos, your synced iCloud photos will be removed from your iPhone, but they will still remain stored in iCloud. Keep in mind that deleting the photos from your iPhone will free up storage space, but you will need an internet connection to view or download them again.
- If you choose to download photos and videos, your iPhone will keep a local copy of all the synced photos while allowing you to access and view them offline. However, this option will occupy storage space on your iPhone.
Once you have disabled iCloud Photo Library on your iPhone, you will no longer see the synced iCloud photos in your Photos app. However, they will remain accessible from other devices with iCloud Photo Library enabled, such as your iPad or Mac, or by visiting iCloud.com on a web browser.
It’s important to note that disabling iCloud Photo Library on your iPhone does not delete your photos from iCloud. They will still be stored in your iCloud account, and you can access and manage them from other devices linked to your Apple ID.
Disabling iCloud Photo Library on your iPhone allows you to have control over the space used by your synced photos, especially if you have limited storage capacity on your device. It gives you the freedom to customize your iPhone’s storage usage according to your needs, while still ensuring that your photos are safely stored in iCloud.
Now that you know how to disable iCloud Photo Library on your iPhone, you can make better use of the storage on your device while keeping your photos accessible through iCloud.
To store photos on iCloud but not on your iPhone, go to Settings > [your name] > iCloud > Photos and toggle off “iCloud Photos.” This will keep your photos in iCloud but not take up space on your iPhone.
Enable iCloud Photo Library on iCloud
Enabling iCloud Photo Library on iCloud is a crucial step to store and manage your photos in the cloud. By enabling this feature, you ensure that your entire photo library is securely stored and accessible across all your Apple devices. Follow these steps to enable iCloud Photo Library on iCloud:
- Access iCloud on your computer by navigating to the Apple website and signing in with your Apple ID credentials. Alternatively, you can launch the iCloud app on your Mac.
- Once you are logged in, locate and click on the “Photos” app.
- Next, click on the “Preferences” button located on the toolbar. This will open the preferences window for iCloud Photos.
- Make sure that the “iCloud Photos” option is checked or selected. This ensures that your photos are uploaded and stored in iCloud.
- You can also choose additional options, such as “Download Originals to this Mac” or “Optimize Mac Storage,” depending on your preferences. The first option downloads the full-resolution versions of your photos to your Mac, while the second option optimizes storage by storing smaller versions on your Mac and keeping the full-resolution photos in iCloud.
- Once you have selected your preferred options, click on the “Done” button to save the changes and close the preferences window.
By enabling iCloud Photo Library on iCloud, your photos and videos will be automatically uploaded and synced across all your Apple devices that have iCloud Photo Library enabled. This means that any changes you make to your photo library, such as adding or deleting photos, will be reflected across all devices.
Enabling iCloud Photo Library offers multiple benefits, such as freeing up storage space on your individual devices, ensuring the security and accessibility of your photos, and allowing seamless integration between your Apple devices.
Once iCloud Photo Library is enabled on iCloud, you can access your photo library from any device with iCloud Photo Library enabled. Whether you’re using your iPhone, iPad, Mac, or even a web browser, you can view, organize, and share your photos effortlessly.
Now that you know how to enable iCloud Photo Library on iCloud, you can start storing and managing your photos in the cloud, ensuring that your collection is easily accessible and backed up across all your Apple devices.
Uploading Photos to iCloud from iPhone
Uploading photos to iCloud from your iPhone is a straightforward process that allows you to store and access your pictures in the cloud. Follow these steps to upload photos to iCloud from your iPhone:
- Open the Photos app on your iPhone. It is the app with a multicolored flower icon.
- Navigate to the album or album view where the photos you want to upload are located.
- Tap on the “Select” button located at the top right corner of the screen.
- Now, tap on the photos or videos you want to upload. You will see a blue checkmark on the selected items.
- Once you have selected all the photos or videos you want to upload, tap on the share button. It looks like a box with an arrow pointing upwards and is located at the bottom left corner of the screen.
- In the sharing options, you will see a list of apps and actions. Look for the “Add to iCloud Drive” or “Save to Files” option and tap on it.
- If you are using the “Add to iCloud Drive” option, you will be prompted to select the folder where you want to save the photos. Choose a folder or create a new one if needed.
- If you are using the “Save to Files” option, you will see a file browser. Select the iCloud Drive folder and choose a location to save the photos.
- After selecting the folder or location to save the photos, tap on the “Save” or “Add” button to begin the upload process.
- Depending on the size and number of photos or videos you are uploading, the process may take some time. You can monitor the progress by checking the notification center on your iPhone.
- Once the upload is complete, your photos will be stored in iCloud and will be accessible from any device with iCloud Photo Library enabled.
By uploading photos to iCloud from your iPhone, you ensure that your valuable memories are backed up and easily accessible. Whether you want to free up space on your iPhone or have a secure backup of your photos, iCloud provides a reliable solution.
It’s important to note that you can also set up automatic photo uploads to iCloud in the settings of your iPhone. With this feature enabled, any new photos you capture will be automatically uploaded to iCloud, ensuring that your photo library is always up to date and backed up.
Now that you know how to upload photos to iCloud from your iPhone, you can easily store and access your photos in the cloud, making them available across all your Apple devices and ensuring their safety and accessibility.
Accessing Photos Stored on iCloud
Accessing your photos stored on iCloud is a breeze, as they are synchronized across all your Apple devices with iCloud Photo Library enabled. Whether you want to view, edit, or share your photos, you can do so seamlessly. Here’s how to access your photos stored on iCloud:
On iPhone and iPad:
- Open the Photos app on your iPhone or iPad.
- Navigate to the “Photos” tab, which is the default view.
- You will see your entire photo library, including all the albums you have created.
- By default, the photos displayed are organized by the “All Photos” view, showing your photos chronologically.
- To access specific albums or moments, tap on the “Albums” or “For You” tabs at the bottom of the screen.
- Tap on the specific album or moment you want to view.
- All the photos and videos within that album or moment will be displayed for you to browse, view, and interact with.
- To search for specific photos or videos, tap on the magnifying glass icon at the bottom of the screen and enter your search terms. iCloud Photos utilizes intelligent algorithms to recognize objects, faces, and locations in your photos, making it easy to find specific images.
On Mac:
- Launch the Photos app on your Mac from the Applications folder or the dock.
- In the Photos app, you will see various tabs such as “Photos,” “For You,” “Albums,” and more, located on the left sidebar.
- Select the “Photos” tab to view all your synced photos stored on iCloud.
- You can also choose to view specific albums by clicking on the “Albums” tab and selecting the desired album.
- Use the search bar located in the upper-right corner to search for specific photos or videos based on keywords, dates, or locations.
- To edit or share a photo, simply double-click on the image to open it in the editing view. From there, you can make adjustments, add filters, crop, and more.
On iCloud.com:
- Open a web browser and visit iCloud.com.
- Sign in with your Apple ID and password.
- Click on the “Photos” app icon.
- You will be able to view your entire photo library, including all the synced albums and moments.
- Click on the specific album or moment to view its content.
- To download a photo or video from iCloud to your computer, simply select the item and click on the download button, which looks like a cloud with an arrow pointing downwards.
By following these steps, you can easily access your photos stored on iCloud from your iPhone, iPad, Mac, or through the iCloud website. This allows you to view, organize, edit, and share your photos seamlessly across all your Apple devices.
Now that you know how to access your photos stored on iCloud, you can enjoy the convenience of having your entire photo library at your fingertips, no matter which device you are using.
Read more: How To Store In ICloud
Reviewing iCloud Storage Settings
Regularly reviewing your iCloud storage settings is essential to ensure that you are effectively managing your storage space and optimizing it for your needs. By keeping track of your iCloud storage usage, you can make informed decisions about how to best utilize your available space. Here’s how to review your iCloud storage settings:
- On your iPhone or iPad, open the “Settings” app.
- Tap on your Apple ID, which is usually located at the top of the Settings menu.
- Next, tap on “iCloud.”
- Under “iCloud Storage,” tap on “Manage Storage.”
- You will see a breakdown of your iCloud storage usage by different apps and services.
- Review the list to identify which apps or services are consuming the most space in your iCloud storage.
- If you notice that a specific app or service is using too much storage, you can tap on it to further explore the data it is storing in iCloud.
- Consider deleting unnecessary items or files from these apps to free up storage space.
- To see the total amount of iCloud storage allocated to different apps and services, scroll down to the bottom, where you will find a color-coded bar representing your storage usage.
- If you find that you are running low on iCloud storage, you can tap on “Buy More Storage” to upgrade your storage plan to a higher capacity.
- Review the available storage plans and choose the one that best suits your needs. Follow the prompts to upgrade your iCloud storage plan if necessary.
Reviewing your iCloud storage settings allows you to have a clear understanding of how your storage space is being utilized and helps you make informed decisions about managing it effectively. By identifying and removing unnecessary files and optimizing iCloud storage settings, you can ensure that you have sufficient space to store your photos, documents, and other important data.
It’s also worth noting that you can manage your iCloud storage settings on your Mac by accessing the Apple menu, selecting “System Preferences,” and clicking on “iCloud.” From there, you can follow similar steps to review and manage your storage usage.
By regularly reviewing your iCloud storage settings, you can maintain control over your storage space and ensure that you have enough room for your important files and data.
Now that you know how to review your iCloud storage settings, you can optimize your storage usage and make the most of the available space for your photos and other data stored in iCloud.
Conclusion
Managing and storing photos in the digital age can be a challenge, especially when dealing with limited storage space on our iPhones. Fortunately, iCloud Photo Library provides a seamless solution for storing, organizing, and accessing our photo collections. By following the steps outlined in this article, you can store photos on iCloud without cluttering your iPhone’s storage.
We discussed the benefits of using iCloud Photo Library, such as freeing up storage space on your iPhone, accessing your photos from any device, and automatic synchronization across all your Apple devices. We also explored how to manage your iCloud storage effectively, including purging unnecessary photos, enabling “Optimize iPhone Storage,” and upgrading your iCloud storage plan if needed.
Additionally, we provided a step-by-step guide on how to store photos on iCloud but not on your iPhone. By disabling iCloud Photo Library on your iPhone and enabling it on iCloud, you can upload photos from your iPhone to iCloud, making them accessible across all your devices.
Accessing your photos stored on iCloud is a straightforward process through the Photos app on your iPhone or through iCloud.com on any web browser. By reviewing your iCloud storage settings regularly, you can keep track of your storage usage, manage your storage effectively, and make informed decisions about how to optimize your space.
In conclusion, iCloud Photo Library offers an excellent solution for storing and managing your photos in the cloud. By harnessing the power of iCloud, you can keep your iPhone’s storage free, access your photos from any device, and ensure the safety of your precious memories. Take advantage of iCloud Photo Library and follow the steps outlined in this article to streamline your photo management and enjoy the convenience of having your entire photo collection at your fingertips.
Remember, while iCloud Photo Library provides a convenient way to store and access your photos, it is always recommended to have an additional backup of your photos in case of unforeseen circumstances. By following best practices for photo management and utilizing iCloud Photo Library, you can make the most of your photo storage while preserving your memories for years to come.
Frequently Asked Questions about How To Store Photos On ICloud But Not IPhone
Was this page helpful?
At Storables.com, we guarantee accurate and reliable information. Our content, validated by Expert Board Contributors, is crafted following stringent Editorial Policies. We're committed to providing you with well-researched, expert-backed insights for all your informational needs.


0 thoughts on “How To Store Photos On ICloud But Not IPhone”