Articles
How To Store Stamps
Modified: December 7, 2023
Learn how to store stamps properly with our informative articles. Preserve your stamp collection for years to come.
(Many of the links in this article redirect to a specific reviewed product. Your purchase of these products through affiliate links helps to generate commission for Storables.com, at no extra cost. Learn more)
Introduction
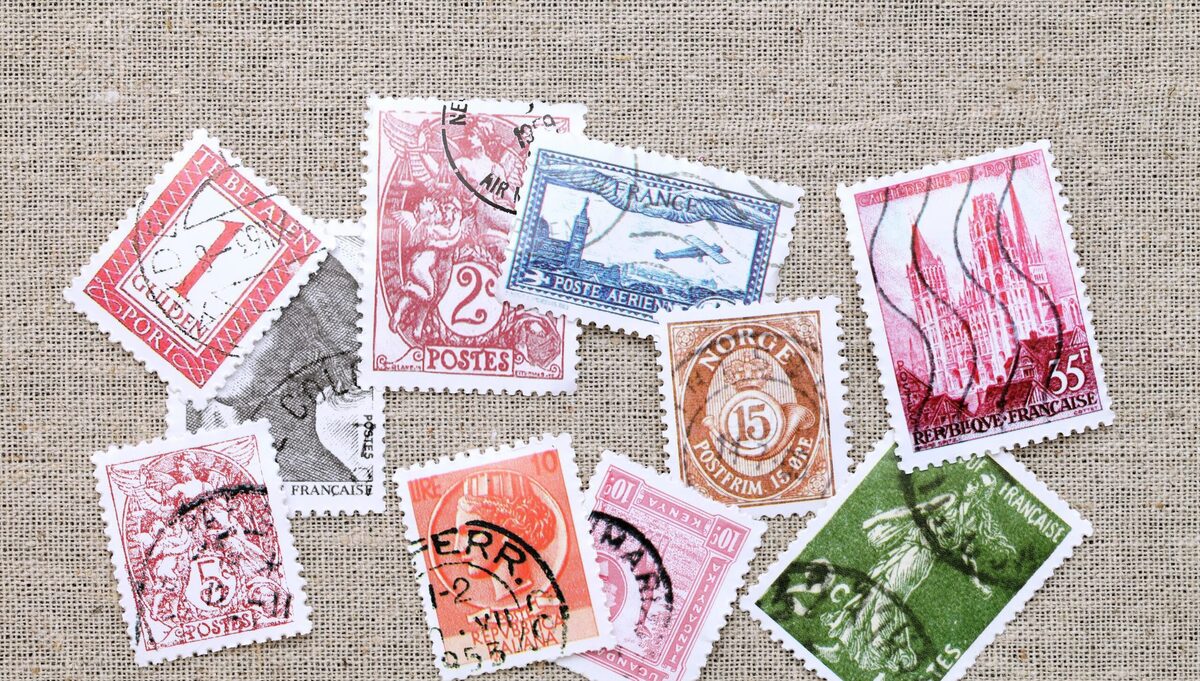
Stamps are not just tiny pieces of paper; they are treasures that hold historical and cultural significance. Whether you are an avid stamp collector or a casual enthusiast, proper storage is essential to preserve their value and condition. In this article, we will explore the art of storing stamps and provide you with essential tips and techniques.
Why is proper storage important? Stamps are sensitive to several factors that can cause damage over time, including moisture, light, temperature fluctuations, and handling. Therefore, it is crucial to protect them from these elements to maintain their integrity and value.
In the following sections, we will discuss the essential steps to properly store your stamp collection. We will cover topics such as choosing the right supplies, sorting and organizing, mounting and displaying, storing loose stamps, storing stamp albums, long-term preservation techniques, tips for maintaining stamp quality, and more. By implementing these practices, you can ensure the longevity and beauty of your stamps for years to come.
So, let’s dive in and explore the world of stamp storage!
Key Takeaways:
- Preserve the value and beauty of your stamp collection by choosing the right supplies, sorting and organizing with care, and implementing long-term preservation techniques to protect your stamps from damage and deterioration.
- Showcase the uniqueness and significance of your stamps through thoughtful mounting and displaying, proper storage of loose stamps, and meticulous attention to maintaining stamp quality for years of enjoyment and appreciation.
Read more: How To Store Stamp Collection
Choosing the Right Supplies
When it comes to storing stamps, selecting the right supplies is crucial for their protection and preservation. Here are some essential supplies you should consider:
- Stamp Albums: Invest in high-quality stamp albums that have acid-free and lignin-free pages. These materials prevent chemical reactions that can cause discoloration and deterioration of stamps. Look for albums with clear, non-PVC (polyvinyl chloride) plastic pockets to display and protect your stamps.
- Mounts: Mounts are transparent sleeves made of archival-quality materials that hold individual stamps securely. They protect stamps from fingerprints, moisture, and damage caused by sticking. Look for mounts that are sized accurately to fit your stamps and avoid using tape or hinges, as they can damage the stamps.
- Tweezers: Use stamp tweezers made from non-reactive materials such as stainless steel or acrylic. They allow you to handle stamps without damaging them or leaving fingerprints. Choose tweezers with rounded tips to avoid tearing delicate stamps.
- Handling Gloves: To further minimize the risk of damage from handling, consider wearing lint-free cotton gloves. These gloves help prevent oil and moisture transfer from your hands onto the stamps.
- Dehumidifier: Depending on your location, humidity levels can pose a threat to your stamp collection. Consider investing in a dehumidifier to maintain a controlled environment and prevent mold or moisture damage.
- UV-Blocking Sleeves: Protect your stamps from harmful UV (ultraviolet) radiation by storing them in UV-blocking sleeves or albums. Light can cause fading and discoloration, so keeping stamps away from direct sunlight or bright artificial light is crucial.
By choosing the right supplies, you can create a safe and protective environment for your stamps. Remember to regularly inspect your supplies for any signs of wear or damage and replace them if necessary to ensure continuous preservation.
Sorting and Organizing
One of the key aspects of stamp collection management is sorting and organizing your stamps. By having a systematic approach, you can easily locate and appreciate your collection. Here are some tips to help you sort and organize your stamps:
- Sort by Country or Region: Many collectors prefer sorting stamps by country or region. This makes it easier to group stamps according to their place of origin and identify any missing pieces.
- Sort by Theme or Topic: If you have stamps featuring specific themes or topics, you can organize them accordingly. Examples include wildlife, sports, historical events, or famous personalities. This approach allows you to create thematic collections within your overall stamp collection.
- Cataloging: Consider using a stamp catalog or inventory software to catalog your stamps. This helps keep track of the stamps you own, their condition, and any additional details you may want to include.
- Numerical or Alphabetic Order: Another option is to sort stamps in numerical or alphabetic order, based on catalog numbers or country names. This method provides a structured way to locate specific stamps within your collection.
- Protective Sleeves: To keep stamps safe and organized within your chosen sorting method, use protective sleeves or mounts. This prevents damage from handling and allows for easy viewing and identification.
- Labeling: Consider using labels or dividers to mark sections within your stamp albums or storage boxes. This way, you can quickly find and access specific groups of stamps without the need for extensive searching.
Remember to handle your stamps with care when sorting and organizing them. Always hold them by the edges to prevent any damage from moisture or oils on your fingers. Avoid using adhesives or sticky substances to attach labels or dividers, as these can cause damage to the stamps.
By implementing these sorting and organizing techniques, you can create a well-structured and easily manageable stamp collection that you can enjoy and share with others.
Mounting and Displaying
Mounting and displaying your stamp collection is a crucial step in showcasing the beauty and uniqueness of each stamp. Here are some tips to help you effectively mount and display your stamps:
- Use Mounts: As mentioned earlier, mounts are transparent sleeves that hold individual stamps securely. Carefully slide your stamps into the mounts, ensuring they are centered and positioned correctly. Avoid using adhesives or tape to attach stamps directly to display surfaces, as this can damage the stamps and decrease their value.
- Arrange by Theme or Design: When displaying stamps, consider arranging them by theme, design, or color scheme. This adds visual appeal and makes it easier for viewers to appreciate the different aspects of your collection.
- Create an Attractive Layout: Experiment with the positioning and spacing of your stamps to create an aesthetically pleasing layout. You may want to leave some white space between stamps or use different sizes of mounts to add variation and visual interest.
- Consider Framing: If you have a special set of stamps or a particularly valuable piece, you might consider framing it. Choose a frame that complements the size and design of the stamp and use acid-free materials to prevent damage over time. Ensure that the frame protects the stamp from dust and UV radiation.
- Rotate Displays: To avoid prolonged exposure to light and other environmental elements, consider rotating the stamps you display. This allows you to showcase different parts of your collection while protecting the rest from potential damage.
- Labeling and Descriptions: Provide labels or descriptions adjacent to your displayed stamps to provide further context and information. This can enhance viewers’ understanding and appreciation of the stamps.
Remember, when mounting and displaying your stamps, always use acid-free and archival-quality materials to ensure the long-term preservation of your collection. Regularly inspect your displays for any signs of damage or deterioration, and make adjustments as needed to maintain the integrity of your stamps.
By following these tips, you can showcase your stamp collection in an organized and visually appealing manner, allowing others to appreciate the beauty and significance of each stamp.
Storing Loose Stamps
Not all stamps are kept in albums or displays. Some collectors prefer to store loose stamps, whether they are duplicates, recent acquisitions, or stamps waiting to be added to their collection. Here are some tips for storing loose stamps:
- Use Glassine Envelopes: Glassine envelopes are a popular choice for storing loose stamps. Made from translucent and non-reactive material, they provide a protective barrier against dust, moisture, and handling. Place each stamp individually in a glassine envelope to prevent contact between stamps.
- Consider Stockbooks: Stockbooks, also known as stock pages, are sturdy albums with clear pockets. These are ideal for storing loose stamps as they allow easy viewing and organizing. Stockbooks come in various sizes and formats, accommodating different sizes and quantities of stamps.
- Divide by Country or Category: If you have a large quantity of loose stamps, you can organize them by country or category. Use dividers to create sections within your stockbook or storage box, making it easier to navigate and find specific stamps.
- Avoid Overstuffing: While it may be tempting to fit as many stamps as possible in one envelope or pocket, overstuffing can lead to damage and make retrieval difficult. Leave enough space to handle stamps comfortably and avoid friction or rubbing against each other.
- Store in a Dark, Dry Location: Storing loose stamps requires a stable environment. Choose a cool, dark, and dry location to avoid exposure to light, humidity, and temperature fluctuations that can damage the stamps over time.
- Avoid Acidic Materials: When storing loose stamps, avoid using materials that contain acids or lignin, as these can cause damage. Acid-free paper or archival-quality storage boxes are good alternatives to protect the stamps.
- Regularly Inspect: Periodic inspection is essential to ensure the condition of your stored stamps. Check for signs of moisture, mold, or pests, and handle the stamps with clean, dry hands. If any issues are detected, take appropriate measures to address them and protect your collection.
Storing loose stamps requires attention to detail and proper handling to preserve their value and quality. Following these guidelines will help ensure the long-term protection and enjoyment of your loose stamp collection.
Store stamps in a cool, dry place away from direct sunlight to prevent fading and damage. Use acid-free albums or storage materials to protect the stamps from deterioration.
Read more: How To Organize Stamps
Storing Stamp Albums
Storing stamp albums properly is crucial for preserving their contents and maintaining the condition of your stamp collection. Here are some tips for storing stamp albums:
- Choose a Stable Environment: Select a stable environment for storing your stamp albums, away from direct sunlight, extreme temperatures, and high humidity. Fluctuations in temperature and moisture can cause damage to stamps and album pages.
- Use Shelving or Cabinets: Consider using sturdy shelving or cabinets to store your stamp albums. Ensure that the shelves are strong enough to bear the weight of the albums without sagging. Avoid stacking the albums too high to prevent the risk of them toppling over.
- Protect from Dust and Spills: Keep your stamp albums protected from dust and accidental spills by using dust jackets or plastic covers. These provide an extra layer of protection against environmental elements and keep the albums clean.
- Avoid Overfilling: Avoid overfilling your stamp albums with too many pages or stamps. This can strain the binding and cause damage to the album. Maintain a comfortable number of pages to allow the album to close properly and avoid stressing the spine.
- Store Upright: Store your stamp albums upright rather than laying them flat. This helps prevent any bending or warping of the album pages. Use bookends or dividers to keep the albums standing and upright.
- Handling and Inspection: When handling stamp albums, always support them from the bottom to prevent any damage to the binding or pages. Avoid touching the stamps directly with your fingers to prevent oils or moisture transfer. Regularly inspect your albums for any signs of damage or deterioration and address any issues promptly.
- Consider Climate Control: If you live in areas with high humidity or extreme climate conditions, consider investing in climate-controlled storage. A controlled environment helps maintain stable temperature and humidity levels, minimizing the risk of damage to your stamp albums.
- Backup Digital Copies: Consider creating digital copies or scans of your stamp album pages as a backup. This provides an additional layer of protection in case of unexpected damage or loss.
By following these storage tips, you can ensure that your stamp albums remain in excellent condition and ready for future enjoyment and reference.
Long-Term Preservation Techniques
Preserving your stamp collection for the long term is essential to maintain its value and integrity. Here are some techniques to help you protect your stamps over time:
- Acid-Free Materials: Opt for acid-free materials when storing stamps, such as album pages, envelopes, and storage boxes. Acidic substances can cause discoloration and degradation of stamps over time.
- Archival-Quality Sleeves: Use archival-quality sleeves, mounts, or envelopes to protect your stamps from environmental elements and handling damage. These materials are specifically designed to be chemically stable and protect stamps from harmful effects.
- Climate-Controlled Environment: If possible, store your stamp collection in a climate-controlled environment. Control the temperature and humidity levels to prevent the growth of mold or the deterioration of stamps caused by extreme conditions.
- Avoid Laminating or Sealing Stamps: Do not laminate or seal stamps using adhesive materials or tape. This can trap moisture and cause damage to the stamps. Keep them in their original condition or use proper stamp mounts for display.
- Regular Inspections: Regularly inspect your stamps for any signs of damage, mold, or pests. Early detection allows you to take immediate action to prevent further harm to your collection.
- Handling with Clean Hands: When handling your stamps, make sure your hands are clean and dry. Oils and moisture from your hands can transfer to the stamps and cause staining or damage.
- Protect from Light: Protect your stamps from ultraviolet (UV) light, as it can fade colors and cause discoloration. Store them in a dark area or use UV-blocking sleeves or albums to shield them from harmful rays.
- Avoid Heavy Objects: Avoid placing heavy objects on top of stamp albums or storage boxes to prevent crushing or damaging the stamps inside.
- Monitor Environmental Conditions: Keep an eye on environmental conditions, such as temperature and humidity levels, especially if you live in areas prone to extreme weather changes. Make necessary adjustments to maintain a stable environment for your stamps.
- Consult Experts: If you have rare or valuable stamps, it’s recommended to consult with experts or professional conservators for specific preservation techniques. They can provide guidance and advice tailored to the unique requirements of your stamps.
By implementing these long-term preservation techniques, you can ensure that your stamp collection remains protected, cherished, and in excellent condition for future generations to appreciate.
Tips for Maintaining Stamp Quality
Maintaining the quality of your stamps is vital to preserve their value and beauty. Here are some tips to help you keep your stamps in pristine condition:
- Handle with Care: Always handle stamps with clean hands to avoid transferring oils or dirt onto the stamps. Hold them by the edges or use stamp tongs or tweezers for added precision.
- Avoid Excessive Touching: Limit the amount of direct contact with stamps to prevent damage from handling. Excessive touching can cause fingerprint marks, creases, or tears.
- Maintain Clean Surfaces: Ensure that the surfaces where you handle or work with stamps are clean and free of debris. Use a clean and smooth countertop or table to prevent any damage to the stamp’s surface.
- Protect from Moisture: Keep your stamps away from moisture or damp environments, as it can cause damage, such as mold growth, fading, or wrinkling. Store them in a dry location and avoid exposing them to water or high humidity.
- Avoid Adhesives: Refrain from using regular glue, tape, or adhesives on stamps. These substances can cause damage or leave residues that are difficult to remove. Use stamp hinges or mounts specifically designed for stamp attachment.
- Prevent Sunlight Exposure: Protect your stamps from direct sunlight or bright artificial light, as UV radiation can cause fading and discoloration. Store them in a dark or low-light area, or use UV-blocking sleeves or albums.
- Maintain Clean Environments: Store your stamps in clean and dust-free environments. Regularly clean your stamp albums or storage containers to prevent dust and debris buildup.
- Avoid Temperature Extremes: Avoid exposing your stamps to extreme temperatures, as this can cause damage to the paper or adhesive. Store them in a climate-controlled environment to maintain stable conditions.
- Avoid Licking Stamps: Refrain from licking stamps to adhere them to envelopes or paper. The moisture from saliva can damage the stamp’s surface and lead to discoloration or adhesive residue.
- Use Protection During Transportation: If you need to transport your stamps, take precautions to protect them. Place them in sturdy envelopes or protective sleeves to prevent bending, creasing, or tearing.
By following these tips for maintaining stamp quality, you can enjoy your collection for years to come while preserving their condition and value. Remember, proper handling and storage are key to preserving the beauty and integrity of your stamps.
Conclusion
Proper storage and preservation techniques are crucial when it comes to maintaining the value, beauty, and longevity of your stamp collection. By following the tips and guidelines outlined in this article, you can ensure that your stamps remain in excellent condition for years to come.
Choosing the right supplies, such as acid-free albums, mounts, and envelopes, is essential for protecting your stamps from environmental elements. Sorting and organizing your stamps by country, theme, or category helps you easily locate and appreciate your collection.
Mounting and displaying your stamps showcase their uniqueness and beauty while protecting them from damage. Storing loose stamps in glassine envelopes or stockbooks ensures their safety and easy retrieval.
Long-term preservation techniques, such as using acid-free materials, maintaining a stable environment, and regular inspections, safeguard your stamps from deterioration and maintain their value. Additionally, following tips for maintaining stamp quality, such as handling stamps with care, protecting them from moisture and sunlight, and avoiding the use of adhesives, ensures they stay in pristine condition.
Remember, the preservation of your stamp collection is an ongoing process. Regularly reassess the conditions of your storage areas, inspect your stamps, and make necessary adjustments to ensure their continued protection.
By implementing these strategies and techniques, you can safeguard your stamp collection as a cherished heirloom, a historical treasure, and a source of joy and fascination for generations to come. Enjoy the journey of collecting and preserving stamps, and may your collection bring you endless delight and discovery!
Frequently Asked Questions about How To Store Stamps
Was this page helpful?
At Storables.com, we guarantee accurate and reliable information. Our content, validated by Expert Board Contributors, is crafted following stringent Editorial Policies. We're committed to providing you with well-researched, expert-backed insights for all your informational needs.


0 thoughts on “How To Store Stamps”