Articles
How To Make A Postage Stamp Quilt
Modified: August 28, 2024
Looking for articles on how to make a postage stamp quilt? Discover easy step-by-step tutorials and helpful tips to create your own beautiful quilt.
(Many of the links in this article redirect to a specific reviewed product. Your purchase of these products through affiliate links helps to generate commission for Storables.com, at no extra cost. Learn more)
Introduction
Welcome to the wonderful world of quilting! Quilting has been a cherished craft for centuries, known for its ability to create beautiful and practical pieces of art. One popular quilting pattern is the postage stamp quilt. If you’re a quilting enthusiast looking to dive into a new project, then the postage stamp quilt might be just what you’re looking for.
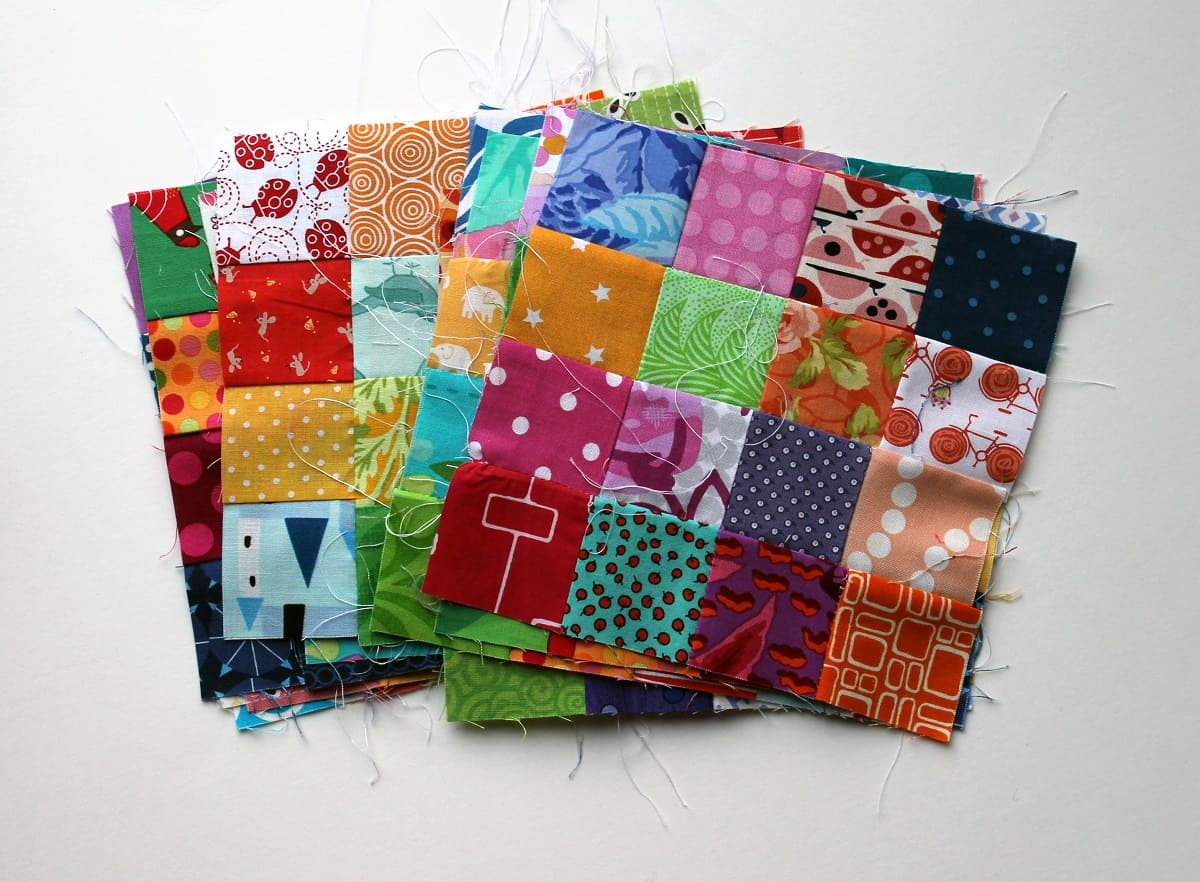
The name “postage stamp quilt” comes from the fact that each quilt block is made up of small fabric squares, similar in size to a postage stamp. These tiny squares are then sewn together to create a visually stunning pattern. The postage stamp quilt allows you to showcase a wide range of fabrics, making it perfect for using up fabric scraps or creating a unique design. Whether you’re a beginner or an experienced quilter, this article will guide you through the process of creating your own postage stamp quilt.
To embark on this quilting adventure, you’ll need a few essential materials. Don’t worry, none of them are too difficult to find, and you may even have some of them already in your sewing room. So gather your supplies and let’s get started on creating your very own postage stamp quilt!
Key Takeaways:
- The postage stamp quilt pattern offers endless opportunities to showcase creativity, experiment with color combinations, and create a design that is uniquely yours, making it a cherished and personalized piece of art.
- Quilting is not just a hobby or craft; it’s a way to connect with yourself, create something meaningful, and share your passion with others, inspiring and igniting their love for quilting.
Materials Needed
Before you begin your postage stamp quilt project, it’s important to gather all the necessary materials. Here’s a list of what you’ll need:
- Fabric: Choose a variety of fabrics in different colors and patterns. You can use scraps or buy fabric specifically for this project. Aim for a mix of light, medium, and dark shades.
- Cutting tools: You’ll need a rotary cutter, cutting mat, and quilting ruler to accurately cut your fabric squares.
- Sewing machine: A sewing machine will make the process of piecing together your quilt blocks much faster and easier.
- Thread: Select a high-quality thread that matches or complements your fabric colors.
- Pins: Use pins to hold your fabric pieces together while sewing.
- Iron and ironing board: Pressing your seams is essential for achieving crisp and professional-looking quilt blocks.
- Quilting needle: A quilting needle has a sharp point and a slightly larger eye, making it ideal for stitching through multiple layers of fabric.
- Quilting ruler: A quilting ruler with a 1/4-inch marking will help you achieve precise seam allowances.
- Batting: Choose a batting that matches the desired loftiness of your quilt. Options include cotton, polyester, or wool batting.
- Backing fabric: Select a fabric that complements the front of your quilt. Make sure it is larger than your quilt top.
- Binding fabric: Choose a fabric that coordinates with your quilt top to create the binding.
- Scissors: Sharp fabric scissors will come in handy for trimming threads and cutting fabric.
Having these materials on hand will ensure a smooth and enjoyable quilting process. Once you’ve gathered everything, you’re ready to move on to the next step: choosing the fabrics for your postage stamp quilt.
Step 1: Choosing Fabric
Choosing the fabric for your postage stamp quilt is an exciting part of the process. With countless colors and patterns to choose from, you have the opportunity to create a truly unique and personalized quilt. Here are some tips to help you select the perfect fabrics:
1. Consider your theme: Decide on a theme or color scheme for your quilt. It could be based on your favorite colors, a specific season, or a particular style you want to achieve. Having a theme in mind will help guide your fabric choices.
2. Variety is key: Aim for a good mix of fabrics with different patterns, colors, and textures. This will add visual interest and make your quilt more dynamic. Include fabrics with small patterns, large patterns, solids, and even some novelty prints if desired.
3. Coordinate or contrast: Decide whether you want your fabrics to coordinate or contrast with each other. Coordinating fabrics will give your quilt a more harmonious look, while contrasting fabrics will create a bolder and more eye-catching design.
4. Use up scraps: The postage stamp quilt is a great way to use up fabric scraps from previous projects. Don’t be afraid to mix and match different fabrics and colors to create a beautiful patchwork effect.
5. Consider scale: Pay attention to the scale of the fabric patterns. Mixing fabrics with different scales, such as large-scale florals with small-scale geometric prints, can create an interesting visual contrast.
6. Test the color palette: Lay out your fabric choices together and see how they look as a whole. Make sure the colors complement each other and create a cohesive color palette.
Remember, there are no hard and fast rules when it comes to fabric selection. Trust your instincts and choose fabrics that speak to you and reflect your personal style. Once you’ve gathered your fabrics, you’re ready to move on to the next step: cutting the fabric squares.
Step 2: Cutting the Fabric Squares
Now that you have your fabric selections ready, it’s time to start cutting the fabric squares for your postage stamp quilt. The size of your squares will depend on the desired finished size of your quilt blocks. Generally, quilt blocks range from 1.5 inches to 2.5 inches square, but feel free to adjust the size according to your preference. Here’s how to cut the fabric squares:
1. Prepare your cutting tools: Ensure that you have a sharp rotary cutter, a self-healing cutting mat, and a quilting ruler. It’s important to have precise cutting tools to achieve accurate squares.
2. Determine the square size: Decide on the size of your fabric squares. Measure and mark the desired size on your quilting ruler using a washable fabric pen or a piece of tape.
3. Layer your fabric: Take one of your chosen fabrics and fold it in half, right sides together. This will allow you to cut two squares at once and save time. If you’re using scraps, make sure the fold lines up with the edges.
4. Align and cut: Place the folded fabric on your cutting mat, aligning the fold with the marked line on your quilting ruler. Hold the ruler securely and use your rotary cutter to cut along the edge of the ruler. Repeat this process to cut multiple squares from the folded fabric.
5. Repeat with different fabrics: Continue folding and cutting your different fabric choices until you have enough squares to complete your desired quilt size. Remember to maintain a consistent size for all your squares to ensure even piecing.
6. Trim and square: After cutting the squares, check each one to ensure they are the correct size. Trim any uneven edges or excess fabric to make them perfectly square.
By following these steps, you’ll have a stack of fabric squares ready to be sewn together into stunning quilt blocks. Cutting the fabric squares is a crucial step in creating your postage stamp quilt, as it sets the foundation for the overall design. Now that you have your squares, let’s move on to the next step: sewing the squares together.
Step 3: Sewing the Squares Together
Now that you have your fabric squares cut and ready, it’s time to start sewing them together to create your postage stamp quilt blocks. This step requires accurate piecing and attention to detail. Here’s how to sew the squares together:
1. Arrange the squares: Lay out your fabric squares in the desired pattern or arrangement. This will give you a visual idea of how your quilt blocks will look when completed.
2. Take two squares: Select two fabric squares that will be sewn together. Place them right sides together, aligning the edges that will be sewn.
3. Sew the seam: Using a 1/4-inch seam allowance, sew a straight stitch along the aligned edges of the squares. Backstitch at the beginning and end of the seam to secure it.
4. Press the seam: After sewing the seam, press it open with an iron. This will help create flat and neat quilt blocks. Repeat this process to sew all the squares together in each row of your quilt block.
5. Sew the rows: Once your squares are sewn together in rows, it’s time to sew the rows together. Place two rows right sides together, aligning the edges, and sew along the seam line using a 1/4-inch seam allowance. Repeat with the remaining rows until all rows are sewn together.
6. Press the block: Press the seams open or to one side, depending on your preference. Make sure the block lies flat and smooth without any bulky seams.
Repeat these steps to sew all the fabric squares together and create the desired number of quilt blocks for your postage stamp quilt. As you sew, make sure to maintain accuracy in seam allowance and alignment to ensure the blocks fit together properly.
Once your quilt blocks are sewn together, step back and admire your progress. You’ve successfully completed the sewing stage of your postage stamp quilt. In the next step, we’ll add borders to frame the blocks and bring the quilt top together.
When making a postage stamp quilt, consider using a variety of small-scale prints to add visual interest and depth to the overall design. This will help prevent the quilt from looking too busy or overwhelming.
Read more: How To Make A Quilt
Step 4: Adding Borders
Adding borders to your postage stamp quilt not only frames the quilt blocks but also adds visual interest and a finished look to the quilt top. Borders can be simple or intricate, depending on the style you want to achieve. Here’s how to add borders to your quilt:
1. Measure the quilt top: Start by measuring the length and width of your quilt top. This will help you determine the size and dimensions of your borders.
2. Choose your border fabric: Select a fabric for your borders that complements the colors and patterns in your quilt blocks. Consider using a solid color, a tone-on-tone print, or a coordinating fabric.
3. Cut the border fabric: Cut strips of fabric for your borders, making sure they are the desired width and length. The width of your borders is a personal preference, but it’s commonly between 2 inches and 6 inches. The length of the strips should match the corresponding sides of your quilt top.
4. Sew the border strips: With right sides together, sew the border strips to the quilt top, aligning the edges. Start by pinning the border strip to one side of the quilt top, matching the raw edges. Sew using a 1/4-inch seam allowance. Repeat this process for the remaining sides of the quilt top.
5. Trim and press: After sewing the border strips, trim any excess fabric and press the seams open or towards the border fabric. This will create a smooth and flat border.
6. Add additional borders (optional): If you want to create multiple borders, repeat the process by sewing additional border strips to the sides of the quilt top, one at a time. Each border strip should be cut to the desired width and length.
7. Measure and trim: Once all the borders are added, measure the quilt top to ensure it remains square. Trim any excess fabric or adjust the borders as needed.
By following these steps, you’ll have successfully added borders to your quilt top. The borders will enhance the appearance of your postage stamp quilt and bring the blocks together as a cohesive unit. With the borders added, you’re ready to move on to the next step: quilting the layers.
Step 5: Quilting the Layers
Quilting is the process of stitching the three layers of your quilt together to create a cohesive and durable finished product. It not only secures the layers but also adds texture and visual interest to your postage stamp quilt. Here’s how to quilt the layers:
1. Prepare the layers: Lay your quilt backing fabric on a large, flat surface, wrong side up. Smooth out any wrinkles and secure it in place with tape or quilting clips. Next, layer the batting on top of the backing fabric, ensuring it is centered and slightly larger than the quilt top.
2. Place the quilt top: Carefully lay your quilt top on the batting, right side up. Smooth out any wrinkles and ensure that all the edges align with the backing fabric and batting.
3. Baste the layers: To hold the layers together during quilting, you can either hand-baste using long, loose stitches or use basting spray to temporarily adhere the layers. Start in the center and work your way to the edges, smoothing out any wrinkles as you go.
4. Choose your quilting design: Decide on your desired quilting design. This can be simple straight lines, free-motion quilting, or a pattern created with a quilting machine. Consider the overall aesthetic of your quilt and the level of quilting experience you have.
5. Quilt the layers: Using a walking foot or free-motion quilting foot on your sewing machine, start quilting from the center of the quilt and work your way outward. Follow your chosen quilting design, stitching through all three layers. Take your time and ensure that the stitches are even and secure.
6. Create texture: Experiment with different quilting techniques to add texture to your quilt. This can include stippling, meandering, echoing, or a combination of patterns. Let your creativity guide you as you quilt.
7. Secure loose threads: After quilting, trim any loose threads and remove basting stitches if you hand-basted. Give your quilt a final press with a hot iron to smooth out any wrinkles.
Your postage stamp quilt is coming together beautifully as you quilt the layers. The stitching not only secures the layers but also showcases your artistic flair. With the layers quilted, you’re ready for the final step: binding the quilt.
Step 6: Binding the Quilt
The final step in completing your postage stamp quilt is binding. Binding not only provides a finished look to the edges of your quilt but also acts as a protective barrier for the raw quilt edges. Here’s how to bind your quilt:
1. Prepare the binding fabric: Cut your binding fabric into strips that are 2.5 inches wide. The length of the strips should be equal to the perimeter of your quilt plus a few extra inches for mitered corners and overlapping ends.
2. Join the binding strips: Take the binding strips and join them together at a 45-degree angle to create one continuous strip. Press the seam open to reduce bulk.
3. Prepare the quilt: Fold and press the quilt binding in half lengthwise, wrong sides together. This will create a double-fold binding. Starting in the middle of one side of your quilt, leave a few inches of binding loose and align the raw edges of the binding with the raw edge of the quilt.
4. Sew the binding: Using a 1/4-inch seam allowance, sew the binding to the quilt, starting at the loose end and leaving approximately 9-10 inches of binding unstitched. Stop sewing a few inches away from the corner.
5. Miter the corners: To create mitered corners, fold the binding up at a 45-degree angle, then fold it back down, aligning the raw edges with the next side of the quilt. Continue sewing the binding along the sides, repeating this process at each corner.
6. Finish sewing the binding: When you reach the starting point, overlap the loose end with the loose end of the binding and trim any excess. Sew the ends together, right sides facing, using a 1/4-inch seam allowance. Press the seam open.
7. Complete the binding: Fold the binding over the raw edge of the quilt to the backside and hand-stitch it in place using a blind stitch or ladder stitch. Take care to hide the stitches, ensuring a neat and seamless finish.
Once you’ve completed the binding, give your quilt a final press to ensure it lays flat and the binding is secure. Admire your finished postage stamp quilt, ready to be cherished for years to come or gifted to a loved one.
With the quilt bound, you’ve successfully completed all the steps in creating your very own postage stamp quilt. Congratulations on your hard work and dedication! Enjoy the satisfaction of a beautifully crafted quilt that showcases your creativity and quilting skills.
Conclusion
Congratulations on completing your postage stamp quilt! You’ve embarked on a creative journey, from selecting fabrics to cutting squares, sewing them together, adding borders, quilting the layers, and finally, binding the quilt. The result is a stunning piece of art that represents your skill, passion, and dedication to the quilting craft.
The postage stamp quilt pattern, with its tiny fabric squares sewn together, offers endless possibilities for showcasing your favorite fabrics, experimenting with color combinations, and creating a design that is uniquely yours. Whether you’ve used scraps or carefully selected new fabrics, your quilt is a beautiful patchwork of memories and creativity.
Throughout this quilting process, you’ve learned essential techniques, such as accurate cutting, precise piecing, and the art of quilting itself. You’ve honed your skills and gained confidence in your ability to create magnificent quilts.
Remember, the joy of quilting doesn’t end here. There are countless quilt patterns and techniques waiting to be explored and mastered. Whether you decide to embark on a new quilting project or continue perfecting your postage stamp quilting skills, know that the possibilities are endless.
Now, it’s time to find the perfect spot to display or snuggle under your finished postage stamp quilt. Each stitch tells a story, and as you admire the quilt, memories and emotions will flood your heart. It’s a testament to your patience, creativity, and love for quilting.
Share your quilt with friends and family, or even participate in quilting communities to showcase your work. Your quilt has the power to inspire others and ignite their passion for quilting.
Lastly, enjoy the process of quilting. Let each stitch be a moment of relaxation and self-expression. Quilting is not just a hobby or craft; it’s a way to connect with yourself and create something meaningful.
So, gather your fabrics, pick up your sewing machine, and let the next quilting adventure begin. The world of quilting is awaiting your next masterpiece, and with each project, you’ll continue to grow as a quilter and artist.
Frequently Asked Questions about How To Make A Postage Stamp Quilt
Was this page helpful?
At Storables.com, we guarantee accurate and reliable information. Our content, validated by Expert Board Contributors, is crafted following stringent Editorial Policies. We're committed to providing you with well-researched, expert-backed insights for all your informational needs.


0 thoughts on “How To Make A Postage Stamp Quilt”