Articles
How To Tie Into Sewer Line In Basement
Modified: August 27, 2024
Learn the steps and techniques for tying into a sewer line in your basement with our informative articles. Expert advice and tips to ensure a successful connection.
(Many of the links in this article redirect to a specific reviewed product. Your purchase of these products through affiliate links helps to generate commission for Storables.com, at no extra cost. Learn more)
Introduction
Tying into a sewer line in the basement is a common task during home renovations or when adding new plumbing fixtures. Whether you are installing a new bathroom or rerouting existing plumbing, knowing how to properly tie into the sewer line is essential. By following the correct steps and using the right tools and materials, you can ensure a secure and leak-free connection.
In this article, we will guide you through the process of tying into a sewer line in the basement. From gathering the necessary tools and materials to securing the connection and testing for leaks, we will cover each step in detail. By the end of this article, you will have the knowledge and confidence to successfully tie into a sewer line in your basement.
Before we begin, it’s important to note that working with sewer lines involves handling wastewater and potentially hazardous materials. It is recommended to wear protective gear, such as gloves and safety goggles, and to work in a well-ventilated area. If you are unsure about any step of the process or do not feel comfortable performing the task yourself, it is always best to consult a professional plumber.
Now, let’s gather the necessary tools and materials to get started!
Key Takeaways:
- Proper preparation, precise cutting, and secure connections are crucial when tying into a sewer line in the basement. Following these steps ensures a leak-free and reliable plumbing system.
- Thoroughly inspecting the tie-in and testing for leaks are essential for a well-functioning plumbing system. If in doubt, consult a professional plumber for expert guidance.
Read more: What Does Sewer Line Belly Mean In Plumbing
Step 1: Gather the necessary tools and materials
Before you begin tying into a sewer line in the basement, it’s essential to gather all the necessary tools and materials. Having everything on hand will make the process smoother and more efficient. Here’s a list of what you’ll need:
- Trenching shovel: This will be used to dig the trench for the new pipe.
- Pipe-cutting tool: A pipe cutter or reciprocating saw with a metal-cutting blade will be needed to cut into the existing sewer line.
- Measuring tape: You’ll need this to accurately measure the length of the new pipe.
- Marker or chalk: This will be used to mark the cutting point on the existing sewer line.
- PVC pipe and fittings: Choose the appropriate size and type of PVC pipe and fittings based on your specific needs. Make sure they are rated for sewer use.
- PVC primer and cement: These will be used to create a secure and watertight connection between the new pipe and existing sewer line.
- Wrenches or pliers: These will be needed to tighten fittings and secure connections.
- Level or plumb bob: Use these tools to ensure the new pipe is installed properly and has the correct slope for drainage.
- Clean rags or paper towels: Have these on hand to wipe away any excess primer or cement during the installation process.
It’s important to ensure you have all the necessary tools and materials before starting the project. This will save you time and make the process much smoother. If you’re unsure about any specific tools or materials, consult with a professional at your local hardware store or a reputable plumber.
Once you have gathered all the tools and materials, you’re ready to move on to the next step: locating the existing sewer line in the basement.
Step 2: Locate the existing sewer line in the basement
Before you can tie into the sewer line in your basement, you first need to locate where the existing sewer line is. This step is crucial as it will determine where and how you will make the connection.
Here are some steps to help you locate the existing sewer line:
- Check the basement plans: If you have access to the original plans or blueprints of your house, they may indicate the location of the sewer line. Look for any drawings or notes related to plumbing in the basement area.
- Look for existing fixtures: Identify any existing fixtures in the basement, such as toilets, sinks, or floor drains. Typically, these fixtures will be connected to the main sewer line. Follow the pipes from these fixtures to trace the location of the sewer line.
- Inspect the basement walls: In some cases, the sewer line may be visible through the walls in the basement. Look for any pipes running along the walls or coming out of the floor. These may indicate the path of the sewer line.
- Use a sewer camera: If you’re having trouble locating the sewer line visually, you can use a sewer camera to inspect the pipes. This can provide valuable information about the location and condition of the existing sewer line.
- Consult a professional: If you’re still unable to locate the sewer line or if you’re unsure about the accuracy of your findings, it’s best to consult a professional plumber. They have the expertise and specialized equipment to accurately locate the sewer line.
Remember, it’s crucial to have a clear understanding of the existing sewer line’s location before proceeding with the tie-in process. This will ensure that you make the connection in the correct spot and avoid any potential issues.
Once you’ve located the existing sewer line, it’s time to move on to the next step: preparing the area for tying into the sewer line.
Step 3: Prepare the area for tying into the sewer line
Now that you have located the existing sewer line in the basement, it’s time to prepare the area for tying into it. Proper preparation is essential to ensure a successful and smooth connection.
Follow these steps to prepare the area:
- Clear the area: Remove any obstacles or objects around the area where you will be making the connection. This will give you enough space to work comfortably.
- Mark the cutting point: Use a marker or chalk to clearly indicate the location where you will cut into the existing sewer line. Make sure your mark is precise and easily visible.
- Prepare the new pipe: Measure and cut the new PVC pipe to the desired length using a pipe cutter or reciprocating saw. Ensure that the cut is clean and smooth.
- Deburr the pipe: Use a deburring tool or sandpaper to remove any rough or sharp edges from the cut end of the new pipe. This will ensure a proper fit and prevent any leaks.
- Clean the pipes: Use a clean rag or paper towels to wipe away any dirt or debris from both the existing sewer line and the new pipe. This will help create a clean and secure connection.
- Prepare the PVC primer and cement: Follow the manufacturer’s instructions to prepare the PVC primer and cement. Make sure to work in a well-ventilated area and wear gloves for safety.
By properly preparing the area and the materials, you are setting the stage for a successful tie-in to the sewer line. Take your time during this step to ensure that everything is clean, marked, and ready for the next phase of the process.
Once the area is prepared, it’s time to move on to the next step: cutting into the existing sewer line.
Step 4: Cut into the existing sewer line
Now that you have prepared the area, it’s time to cut into the existing sewer line. This step is crucial as it allows you to create a connection point for the new pipe.
- Double-check the cutting point: Before making any cuts, double-check the marked cutting point on the existing sewer line. Ensure that it is accurate and aligns with your plans for tying into the line.
- Use a pipe cutter or reciprocating saw: Depending on the size and material of your existing sewer line, use a pipe cutter or reciprocating saw with a metal-cutting blade to make the cut. Follow the manufacturer’s instructions for the specific tool you are using.
- Make a clean and straight cut: Apply steady pressure and make a clean, straight cut through the sewer line. Take your time to ensure the cut is smooth and doesn’t damage the surrounding pipe.
- Remove any debris: After making the cut, use a rag or paper towels to clean away any debris or residue from the inside of the sewer line. This will help create a clean surface for the new connection.
It’s important to be extremely cautious when making the cut in the existing sewer line. Take your time and follow proper safety protocols to minimize the risk of injury or damage to the surrounding pipes.
Once you have successfully cut into the existing sewer line, you’re ready to move on to the next step: connecting the new pipe to the existing sewer line.
Before tying into a sewer line in the basement, make sure to check local building codes and obtain any necessary permits. It’s also important to accurately measure and cut the existing sewer line to ensure a proper connection.
Read more: What To Do If Sewer Backs Up In Basement
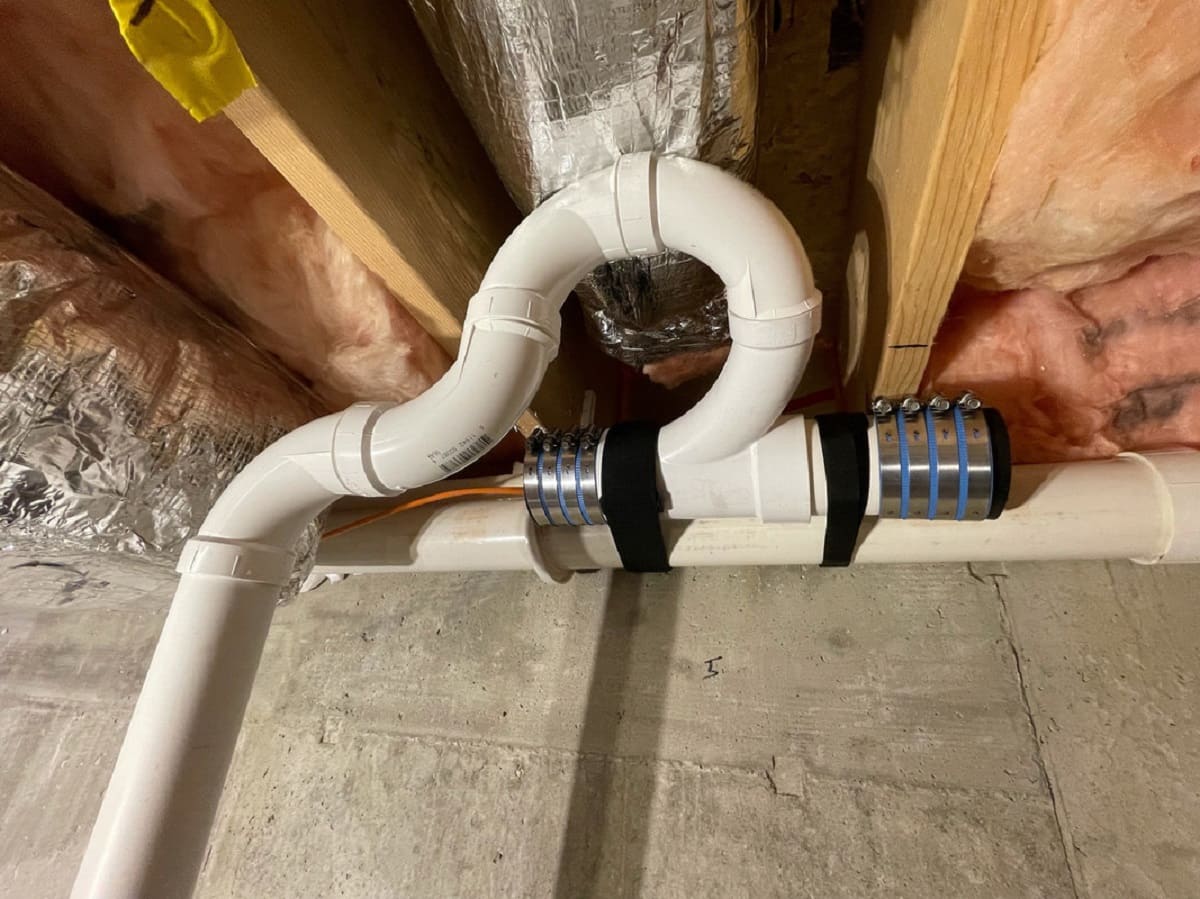
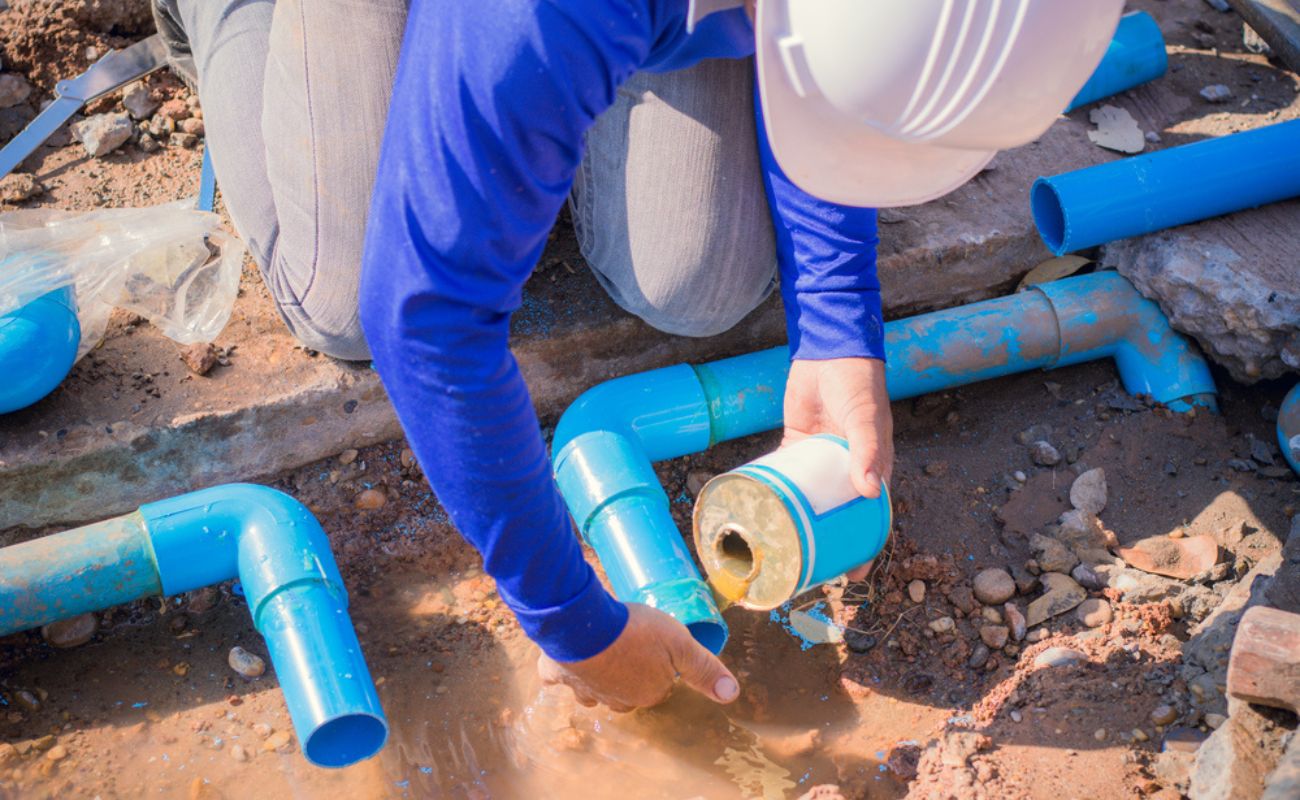
Step 5: Connect the new pipe to the existing sewer line
Now that you have cut into the existing sewer line, it’s time to connect the new pipe to it. This step is crucial as it establishes the link between the existing and new plumbing system.
- Apply PVC primer: Using a brush, apply PVC primer to the outer edge of the existing sewer line where you made the cut. The primer will clean the surface and help the cement adhere properly.
- Apply PVC cement: Immediately after applying the primer, apply PVC cement to the same area of the existing sewer line. Make sure to apply an even and generous layer of cement.
- Insert the new pipe: Insert the cut end of the new pipe into the primed and cemented area of the existing sewer line. Push it in firmly and twist slightly to ensure a secure fit.
- Hold the connection: Hold the new pipe in place for several seconds to allow the cement to dry and create a strong bond between the two pipes. Follow the manufacturer’s instructions for the specific drying time required.
- Secure the connection: Once the cement has dried, use a wrench or pliers to tighten any fittings or connectors that may be necessary to secure the connection. Make sure not to overtighten, as this can damage the pipes.
It’s important to follow the manufacturer’s instructions for the specific PVC primer and cement you are using. This will ensure a secure and leak-free connection between the existing sewer line and the new pipe.
Once the new pipe is connected to the existing sewer line, you’re almost done. The next step is to secure the connection and test for leaks.
Step 6: Secure the connection and test for leaks
After connecting the new pipe to the existing sewer line, it’s important to secure the connection and test for leaks. This step ensures that the tie-in is strong and watertight, providing a reliable plumbing system.
- Tighten fittings: Use a wrench or pliers to tighten any fittings or connectors that were used to secure the connection. Make sure they are snug but avoid overtightening, as it can cause damage to the pipes.
- Inspect the connection: Take a close look at the connection point between the new pipe and the existing sewer line. Ensure that it is properly aligned and there are no visible gaps or leaks.
- Test for leaks: Fill a bucket with water and pour it into the new pipe or flush a toilet connected to the line. Monitor the connection area closely for any signs of leakage. If you notice any drips or leaks, it’s important to address them promptly.
- Address leaks: If you discover any leaks during the testing process, it’s crucial to fix them immediately. Drain the pipes and dry the connection area thoroughly. Apply additional PVC cement using the same method as before to seal any leaks.
- Re-test for leaks: After addressing any leaks, re-test the connection to ensure that it is now watertight. Repeat the water pouring or flushing process and carefully inspect the connection for any signs of leakage.
Properly securing the connection and testing for leaks will give you peace of mind, knowing that your tie-in to the sewer line is secure and functioning as intended. It’s always better to catch and fix any leaks early on rather than allowing them to cause further damage or issues down the line.
Once you’re confident that the connection is secure and watertight, you are almost done. The final step is to inspect and finalize the tie-in.
Step 7: Inspect and finalize the tie-in
After securing the connection and testing for leaks, it’s time to inspect and finalize the tie-in to the sewer line in the basement. This step ensures that everything is in proper working order and ready for use.
- Inspect the connection: Take a close look at the entire tie-in area, including the connection point between the new pipe and the existing sewer line. Check for any signs of leakage or misalignment.
- Check for proper slope: Ensure that the new pipe has the correct slope for drainage. Use a level or a plumb bob to check if the pipe is properly aligned and that it has a gradual downward slope towards the main sewer line.
- Test the plumbing fixtures: Once the tie-in is inspected, test the plumbing fixtures connected to the new pipe. Turn on faucets, flush toilets, and run water in sinks or showers to ensure proper drainage and flow.
- Monitor for any issues: After testing the plumbing fixtures, monitor the system for any signs of clogs, backups, or unusual odors. If any issues arise, address them promptly to prevent further damage or inconvenience.
- Consult a professional if needed: If you encounter any persistent problems or if you’re unsure about the functionality of the tie-in, it’s best to consult a professional plumber. They can assess the situation and provide expert guidance.
By thoroughly inspecting the tie-in and ensuring that everything is working properly, you can have confidence in the quality and effectiveness of your plumbing system.
With the tie-in inspected and finalized, you have successfully completed the process of tying into the sewer line in your basement. Congratulations!
Remember to keep a record of the tie-in for future reference and maintenance purposes. This documentation can be helpful if any issues arise or if you plan to make further modifications or additions to your plumbing system.
Finally, it’s always a good idea to clean up the work area and properly dispose of any waste materials generated during the tie-in process.
By following these steps and taking the necessary precautions, you have successfully tied into the sewer line in your basement, expanding your plumbing system and ensuring the proper functioning of your home’s sewer infrastructure.
Remember, if you are ever unsure about any step of the process or if you don’t feel confident in completing the task yourself, it’s always best to consult a professional plumber who can assist you and provide expert guidance.
Conclusion
Tying into a sewer line in the basement may seem like a daunting task at first, but with the right knowledge and approach, it can be successfully accomplished. By following the steps outlined in this article, you can confidently tie into the existing sewer line and expand your plumbing system.
We began by emphasizing the importance of gathering the necessary tools and materials before starting the project. Proper preparation sets the foundation for a smooth and efficient tie-in process.
Next, we discussed the crucial step of locating the existing sewer line in the basement. By using various methods such as referencing blueprints, identifying existing fixtures, and consulting professionals if needed, you can accurately determine the location of the sewer line before proceeding.
We then delved into the process of preparing the area for tying into the sewer line. Clearing the workspace, marking the cutting point, and properly cleaning and deburring the pipes were highlighted as essential steps to ensure a successful connection.
The subsequent step focused on cutting into the existing sewer line. We emphasized the importance of being cautious, double-checking the cutting point, and using the appropriate tools to make a clean and precise cut.
With the existing sewer line cut, we moved on to connecting the new pipe. Applying PVC primer and cement, inserting the new pipe, and securing the connection were discussed in detail to ensure a tight and leak-free joint.
Securing the connection and testing for leaks was then highlighted as a critical step to ensure the integrity of the tie-in. Properly tightening fittings, inspecting the connection, and conducting thorough leak tests will help identify and address any issues before finalizing the tie-in.
Finally, we discussed the importance of inspecting and finalizing the tie-in. Checking for proper slope, testing plumbing fixtures, and monitoring the system for any issues will ensure a well-functioning and reliable plumbing system.
In conclusion, by following these steps and exercising caution throughout the process, you can successfully tie into a sewer line in the basement. However, if you ever feel unsure or uncomfortable performing the task, it’s advisable to consult a professional plumber who can offer expert assistance and guidance.
Remember, a well-executed tie-in to the sewer line will not only expand your plumbing system but also contribute to the overall functionality and efficiency of your home’s sewer infrastructure.
Now that you've got a handle on tying into your basement's sewer line, why not expand your skills further? If managing pipes and installations sounds up your alley, diving into our detailed guide on basement plumbing will surely prove beneficial. This next read offers step-by-step insights, ensuring you're well-equipped to handle any plumbing challenge that comes your way. Don't miss out on boosting your home improvement capabilities!
Frequently Asked Questions about How To Tie Into Sewer Line In Basement
Was this page helpful?
At Storables.com, we guarantee accurate and reliable information. Our content, validated by Expert Board Contributors, is crafted following stringent Editorial Policies. We're committed to providing you with well-researched, expert-backed insights for all your informational needs.


0 thoughts on “How To Tie Into Sewer Line In Basement”