Articles
How To Tile A Small Entryway
Modified: December 7, 2023
Learn how to tile a small entryway with these helpful articles. Find step-by-step instructions and expert tips to create a stunning entrance in your home.
(Many of the links in this article redirect to a specific reviewed product. Your purchase of these products through affiliate links helps to generate commission for Storables.com, at no extra cost. Learn more)
Introduction
Welcome to the ultimate guide on how to tile a small entryway. Your entryway is the first impression people have when they enter your home, and tiling it can add both beauty and functionality to this high-traffic area. Whether you are a seasoned DIY enthusiast or a beginner, this step-by-step guide will help you transform your entryway into a stunning space that sets the tone for your entire home.
When it comes to tiling a small entryway, several key factors need to be taken into consideration. From choosing the right tiles and gathering the necessary tools and materials to properly preparing the area and applying the mortar, each step plays a crucial role in achieving a successful tiling project.
Not only will we walk you through the entire process, but we will also provide you with helpful tips and tricks to ensure a seamless tiling experience. So, let’s dive in and explore the world of tile installation!
Key Takeaways:
- Transform your small entryway into a stunning space by choosing the right tiles, gathering essential tools, and meticulously preparing, laying, and grouting to achieve a professional and durable result.
- Gain valuable skills and knowledge in tile installation while adding beauty and functionality to your home’s high-traffic area. Follow step-by-step instructions and tips for a successful tiling project.
Choosing the Right Tiles
When it comes to choosing tiles for your small entryway, there are several factors to consider. The type of tiles you choose will affect not only the overall aesthetic of the space, but also its durability and maintenance requirements. Here are some key points to keep in mind:
- Size: In a small entryway, it’s best to opt for smaller tiles. Larger tiles can overwhelm the space and make it feel cramped. Consider tiles in sizes between 12×12 inches to 24×24 inches for a balanced look.
- Material: There are various materials to choose from, including ceramic, porcelain, natural stone, and glass. Each material has its own unique characteristics and maintenance requirements. Ceramic and porcelain tiles are popular choices due to their durability and versatility in design. Natural stone can provide a more luxurious and natural look, but may require more maintenance. Glass tiles can add a touch of elegance and reflect light, but can be more delicate.
- Texture: Consider the level of slip resistance needed for your entryway. Textured tiles provide better traction and are ideal for areas that may get wet or accumulate dirt easily. Smooth and polished tiles, on the other hand, offer a sleek and modern look.
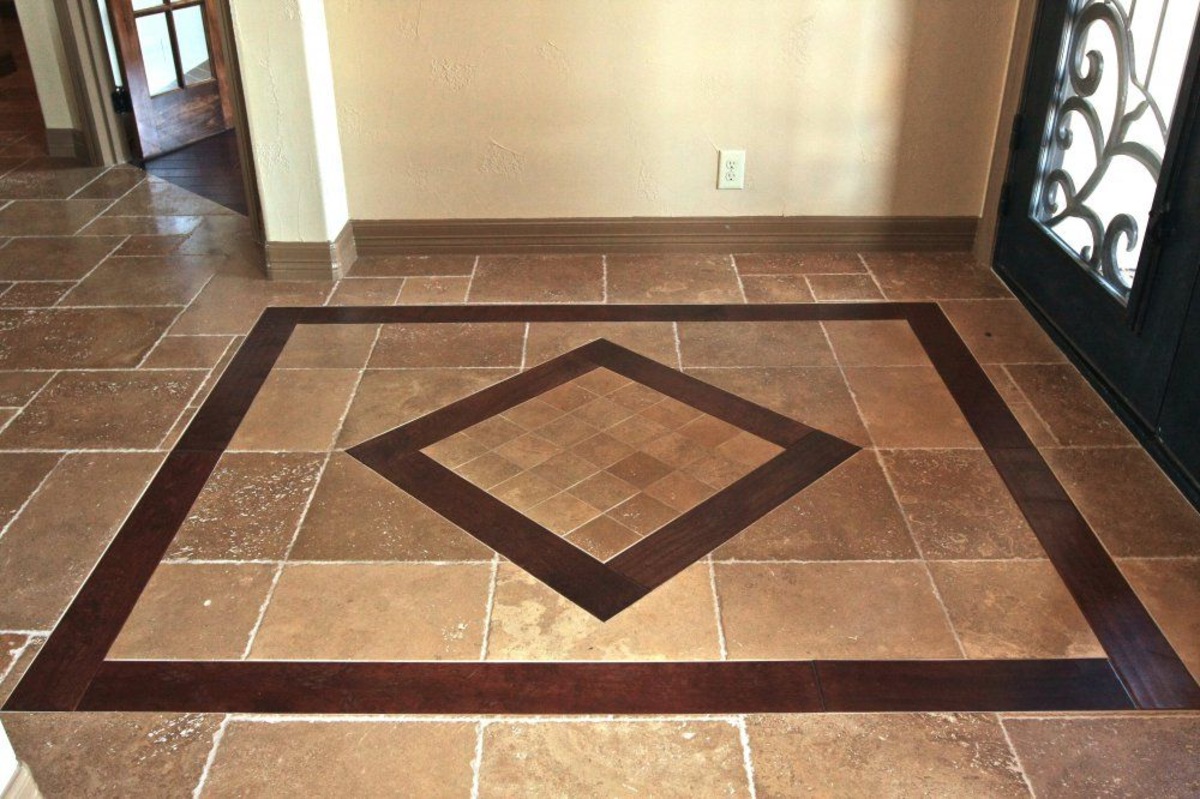
- Color and Pattern: The color and pattern of the tiles will significantly impact the overall aesthetic of your entryway. Light-colored tiles can make a small space appear larger and brighter, while darker tiles can add depth and drama. Consider the existing color palette of your home and choose tiles that complement it. Additionally, patterns such as geometric designs or subtle motifs can add visual interest.
- Budget: Set a budget for your tiling project and find tiles that fit within that range. Remember to consider installation costs and any additional materials required.
By considering these factors and balancing your personal style with practicality, you can choose the perfect tiles for your small entryway. Once you’ve selected your tiles, it’s time to gather the necessary tools and materials for the tiling process.
Gathering the Necessary Tools and Materials
Before you begin tiling your small entryway, it’s important to gather all the necessary tools and materials. Having everything you need at hand will streamline the process and ensure a successful outcome. Here’s a list of essential items you’ll need:
- Tiles: Purchase enough tiles to cover the entire entryway, plus some extras for cuts and replacements.
- Tile adhesive: Choose a high-quality adhesive that is suitable for the type of tiles you have selected.
- Notched trowel: This tool is used to spread the adhesive evenly on the floor.
- Tile spacers: These small plastic crosses are inserted between tiles to ensure even spacing and alignment.
- Tile cutter or wet saw: Depending on the complexity of your tile layout, you may need a tile cutter for straight cuts or a wet saw for more intricate cuts.
- Grout: Choose a grout color that complements your tiles and consider using a stain-resistant grout for easier maintenance.
- Grout float: This rubber tool is used to spread the grout and ensure it fills the gaps between tiles.
- Sponge: A damp sponge is necessary for cleaning excess grout during the finishing process.
- Bucket: Use a bucket to mix the adhesive and grout.
- Level: A level is essential for checking the flatness and alignment of the tiles as you proceed.
- Tape measure: Measure the dimensions of your entryway accurately to determine the number of tiles needed and for making precise cuts.
- Knee pads: Tiling can be hard on the knees, so invest in a pair of knee pads for comfort and protection.
- Eye and ear protection: Ensure your safety by wearing goggles and ear protection, especially when using power tools.
Make sure to have all these tools and materials ready and easily accessible before you start tiling your small entryway. Additionally, it’s a good idea to have a clean and organized work area to maintain efficiency throughout the process.
Now that we have everything we need, it’s time to move on to preparing the entryway for tiling.
Preparing the Entryway
Before you can start tiling your small entryway, it’s essential to properly prepare the space to ensure a smooth and long-lasting installation. Here’s a step-by-step guide on how to prepare your entryway:
- Clean the area: Remove any furniture, rugs, or debris from the entryway. Sweep or vacuum the floor to ensure it is clean and free of any dust or dirt.
- Check for unevenness: Use a level to check the flatness of the floor. If you notice any high or low spots, use a self-leveling compound to create a smooth and even surface. Follow the manufacturer’s instructions for application.
- Repair any damages: Inspect the floor for any cracks, chips, or loose tiles. Use a patching compound or mortar to repair and fill in any damaged areas. Allow it to dry completely before proceeding.
- Remove baseboards: If you have baseboards or trim along the walls, consider removing them before tiling. This will create a cleaner and more professional-looking finish. Use a pry bar or a putty knife to gently remove the baseboards without causing any damage.
- Protect adjacent surfaces: Use painter’s tape or plastic sheeting to protect any adjacent surfaces, such as walls or existing flooring, from accidental adhesive or grout spills.
- Apply a primer: If the floor is highly porous or if you have selected natural stone tiles, it is recommended to apply a primer. This will ensure better adhesion of the adhesive and create a strong bond between the tiles and the floor. Follow the manufacturer’s instructions for the primer application.
By properly preparing your entryway, you are setting the foundation for a successful tiling project. Take your time during this stage to ensure that the floor is clean, level, and free from any damage. Once you’ve completed the preparation process, you’re ready to move on to applying the mortar and laying the tiles.
Applying Mortar
Now that you have prepared your small entryway, it’s time to apply the mortar, also known as the tile adhesive, to create a strong bond between the tiles and the floor. Follow these steps to properly apply the mortar:
- Mix the mortar: Follow the manufacturer’s instructions to mix the mortar in a clean bucket. Make sure to achieve a smooth and lump-free consistency.
- Spread the mortar: Start by using a notched trowel to spread a layer of mortar onto the floor. It’s best to work in small sections to prevent the mortar from drying too quickly.
- Create ridges: After spreading the mortar, use the notched side of the trowel to create ridges in the mortar. These ridges will help ensure proper adhesion and bonding between the tiles and the floor.
- Begin tiling: Start laying the tiles onto the mortar, starting from one corner of the entryway. Press each tile firmly into the mortar and give it a slight twist to secure it in place. Use tile spacers to maintain even spacing between the tiles.
- Check for level: As you lay each tile, use a level to ensure they are flat and even. Adjust as necessary by adding or removing mortar underneath the tiles.
- Continue tiling: Work your way across the entryway, laying tiles in a staggered pattern. Use a tile cutter or wet saw to make any necessary cuts to fit tiles around corners or edges.
- Wipe off excess mortar: As you lay each tile, use a damp sponge or cloth to wipe off any excess mortar on the surface of the tiles.
- Allow mortar to dry: Let the mortar dry and cure according to the manufacturer’s instructions. This typically takes about 24-48 hours.
When applying the mortar, it’s important to work efficiently and ensure that the mortar remains workable while you lay the tiles. Avoid spreading too much mortar ahead of time, as it may dry out before you have a chance to lay the tiles. Additionally, periodically check the mortar thickness to ensure it is consistent throughout the tiling process.
Once the mortar has dried and cured, you can move on to the next step, which is cutting tiles to fit in specific areas of the entryway.
When tiling a small entryway, start by measuring and planning the layout to ensure the tiles fit evenly. Use a high-quality adhesive and grout to ensure durability in high-traffic areas. Consider using smaller tiles to create the illusion of a larger space.
Laying the Tiles
With the mortar applied and dried, it’s time to move on to laying the tiles in your small entryway. Follow these steps to ensure a seamless and professional-looking tile installation:
- Start from the center: Find the center point of your entryway and mark it as your starting point. This will help create a balanced and symmetrical layout.
- Dry lay the tiles: Before applying adhesive, dry lay a few rows of tiles from the center point. This will allow you to visually assess the layout and make any adjustments if needed.
- Apply adhesive: Working in small sections, apply a layer of adhesive onto the mortar using a notched trowel.
- Lay the tiles: Press each tile firmly into the adhesive, starting from your center point and working outwards. Use tile spacers to maintain even spacing between the tiles.
- Check for level and alignment: Use a level to ensure that the tiles are flat and even. Also, regularly check that the tiles are aligned properly, both horizontally and vertically, as you work.
- Continue laying tiles: Work in small sections, applying adhesive and laying tiles until you have covered the entire entryway. Take your time and make any necessary adjustments along the way.
- Clean off excess adhesive: As you lay each tile, be sure to clean off any excess adhesive from the surface of the tiles using a damp sponge or cloth.
- Allow adhesive to cure: Once all the tiles are laid, allow the adhesive to cure according to the manufacturer’s instructions. This typically takes around 24-48 hours.
It’s important to maintain consistency in the thickness of the adhesive as you lay the tiles to ensure a level surface. Take care to avoid stepping on freshly laid tiles, as this may disturb their position or cause them to shift.
Once the adhesive has completely cured, it’s time to move on to the next step, which is cutting tiles to fit specific areas of your entryway.
Cutting Tiles to Fit
When tiling a small entryway, you often encounter areas that require tiles to be cut to fit properly. Whether it’s around corners, along edges, or for intricate designs, cutting tiles allows you to achieve a precise and professional finish. Here’s how you can cut tiles to fit in your entryway:
- Measure the area: Take accurate measurements of the area where you need to cut the tiles. Use a tape measure and transfer these measurements onto the tile you’re planning to cut.
- Mark the cut: Use a pencil or a marker to clearly mark the cutting line on the tile surface. Double-check the measurements and ensure that the line is straight and accurate.
- Choose the right tool: Depending on the type of tiles and the complexity of the cuts, you can use various tools to cut the tiles. A tile cutter is suitable for straight cuts, while a wet saw is more effective for curved or intricate cuts.
- For straight cuts: Place the tile on a tile cutter, aligning the marked cutting line with the cutting wheel. Apply even pressure and score the tile along the line. Then, use the tile cutter’s lever to snap the tile along the scored line.
- For curved or intricate cuts: Use a wet saw equipped with a diamond blade. Carefully guide the tile along the saw’s blade, following the marked cutting line. Take your time and make precise cuts to achieve the desired shape.
- Smooth the edges: After cutting the tile, use a tile file or sandpaper to smooth any rough edges or sharp corners. This will ensure a clean and polished look.
- Test the fit: Place the cut tile into the designated area to test the fit. Make any necessary adjustments or additional cuts to achieve a perfect fit.
It’s important to work slowly and carefully when cutting tiles, especially if you’re working with expensive or delicate materials. Remember to wear safety goggles, gloves, and ear protection when using power tools, and always follow the manufacturer’s instructions for the specific cutting tool you’re using.
Once you have all the necessary tiles cut and fitted in place, it’s time to move on to grouting the tiles.
Grouting the Tiles
Grouting is a crucial step in the tiling process that not only enhances the appearance of your small entryway but also ensures the durability and stability of the tiled surface. Follow these steps to properly apply the grout:
- Select the right grout: Choose a grout color that complements your tiles and aligns with your desired aesthetic. Additionally, consider using a stain-resistant or waterproof grout for easier maintenance.
- Mix the grout: Follow the manufacturer’s instructions to mix the grout in a clean bucket. Achieve a smooth and consistent consistency without any lumps.
- Apply the grout: Using a grout float, spread the grout diagonally across the tiled surface, ensuring all gaps between the tiles are completely filled. Work in small sections to prevent the grout from drying out.
- Remove excess grout: Hold the grout float at a 45-degree angle and use it to remove excess grout from the surface of the tiles. Scrape diagonally across the tiles to avoid pulling the grout out from the gaps.
- Clean the tiles: After about 15-20 minutes, when the grout has partially dried, use a damp sponge to gently wipe away any grout residue from the surface of the tiles. Rinse the sponge frequently in clean water to avoid spreading grout haze.
- Final cleaning: Once the grout has fully dried, typically after 24-48 hours, use a clean, dry cloth to buff away any remaining grout haze or smudges on the tiles.
- Apply grout sealer: To protect the grout from stains and discoloration, consider applying a grout sealer according to the manufacturer’s instructions. This step will help prolong the lifespan and appearance of the grout.
During the grouting process, it’s important to work efficiently and avoid letting the grout dry on the tiles for too long. Keep the tiled surface clean and moist as you work, allowing the grout to cure properly.
Once the grout is applied, cleaned, and sealed (if desired), take a moment to admire your beautifully tiled small entryway. Before you finish, however, there are a few cleaning and finishing touches to complete.
Cleaning and Finishing Touches
After grouting the tiles in your small entryway, it’s crucial to properly clean the tiled surface and add some finishing touches to ensure a polished and professional result. Follow these final steps to complete your tiling project:
- Clean off grout haze: Once the grout has fully dried, use a clean, dry cloth to buff away any remaining grout haze or smudges on the tiles. Take care not to disturb the cured grout.
- Check for any missed areas: Inspect the entire tiled surface for any areas where grout may have been missed or where the grout lines may need touch-ups. Use a small brush or toothpick to fill in any gaps or correct imperfections.
- Replace baseboards: If you removed the baseboards before tiling, now is the time to reinstall them. Cut them to the appropriate size if necessary and secure them in place using finishing nails or adhesive.
- Apply silicone sealant: In areas where the tiles meet walls or fixtures, apply a bead of silicone sealant to create a watertight and clean edge. This will prevent water infiltration and protect the tiled surface.
- Final cleaning: Give the entire entryway a thorough cleaning, wiping down the tiles and removing any remaining dust, debris, or cleaning residue. Use a mild detergent or tile cleaner and a soft cloth or sponge to avoid scratching the tiles.
- Enjoy your newly tiled entryway: Once your small entryway is clean and all finishing touches are complete, take a step back and admire your beautifully tiled space. Enjoy the enhanced appearance and durability that your newly installed tiles bring to your home.
Remember to follow any specific cleaning and maintenance instructions provided by the tile manufacturer to ensure the longevity and beauty of your tiled entryway. With proper care and maintenance, your tiles will continue to enhance your home’s aesthetic for years to come.
Now that you have successfully completed tiling and finishing your small entryway, you can take pride in the transformation you have accomplished. You not only added beauty and functionality to this high-traffic area but also gained valuable skills and knowledge in tile installation. Congratulations on a job well done!
Thank you for following this step-by-step guide on how to tile a small entryway. We hope you found it informative and helpful throughout your tiling journey.
Conclusion
Congratulations! You have reached the end of our comprehensive guide on how to tile a small entryway. By following the step-by-step instructions and tips outlined in this guide, you have learned the necessary skills to transform your entryway into a stunning and functional space.
From choosing the right tiles and gathering the necessary tools and materials to preparing the area, applying mortar, laying the tiles, cutting them to fit, grouting, and adding the finishing touches, each step is essential to achieving a successful tiling project.
Remember, attention to detail and taking your time during each stage of the tiling process is key to ensuring a professional-looking result. By properly preparing the entryway, applying the mortar evenly, laying the tiles with precision, and grouting meticulously, you have created a beautiful and durable tiled surface.
As you enjoy your newly tiled small entryway, remember to follow the manufacturer’s recommendations for maintenance and cleaning to preserve the beauty and longevity of the tiles. Regularly clean, seal, and inspect the tiled surface to keep it looking its best for years to come.
We hope that this guide has empowered you to confidently tackle your tiling projects. Whether you’re a seasoned DIY enthusiast or a beginner, the knowledge and skills you have gained will serve you well in future tiling endeavors.
Thank you for joining us on this tiling journey. We wish you the best of luck with all your home improvement projects!
Frequently Asked Questions about How To Tile A Small Entryway
Was this page helpful?
At Storables.com, we guarantee accurate and reliable information. Our content, validated by Expert Board Contributors, is crafted following stringent Editorial Policies. We're committed to providing you with well-researched, expert-backed insights for all your informational needs.


0 thoughts on “How To Tile A Small Entryway”