Articles
How To Trim A Bay Window
Modified: August 27, 2024
Learn how to trim a bay window with our informative articles. Get step-by-step instructions and expert tips to achieve a professional finish.
(Many of the links in this article redirect to a specific reviewed product. Your purchase of these products through affiliate links helps to generate commission for Storables.com, at no extra cost. Learn more)
Introduction
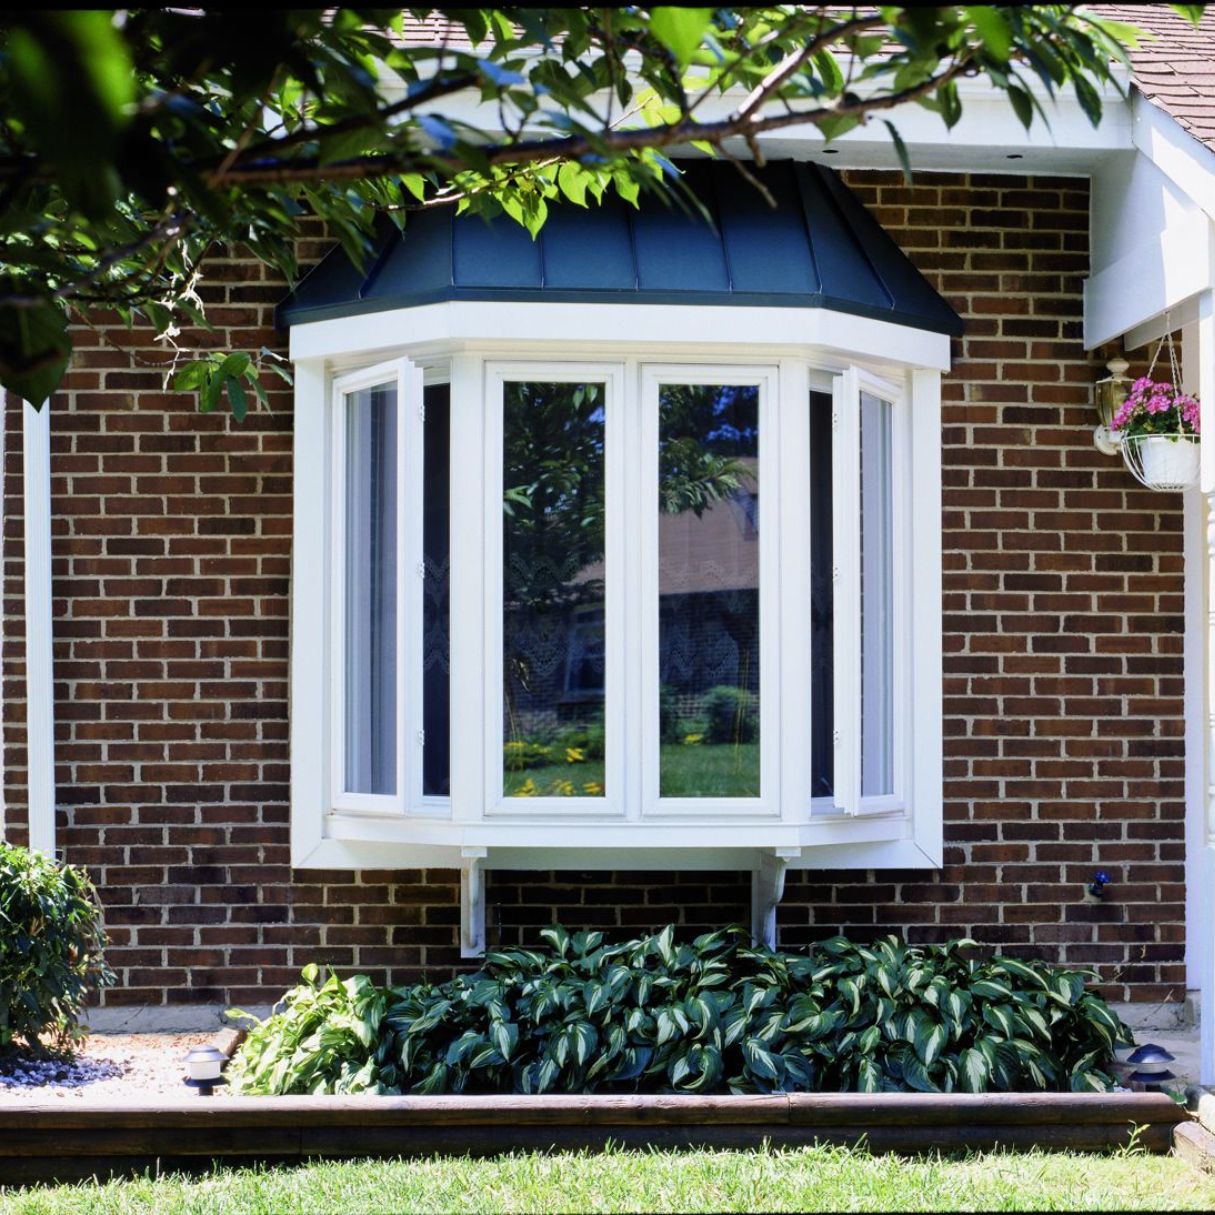
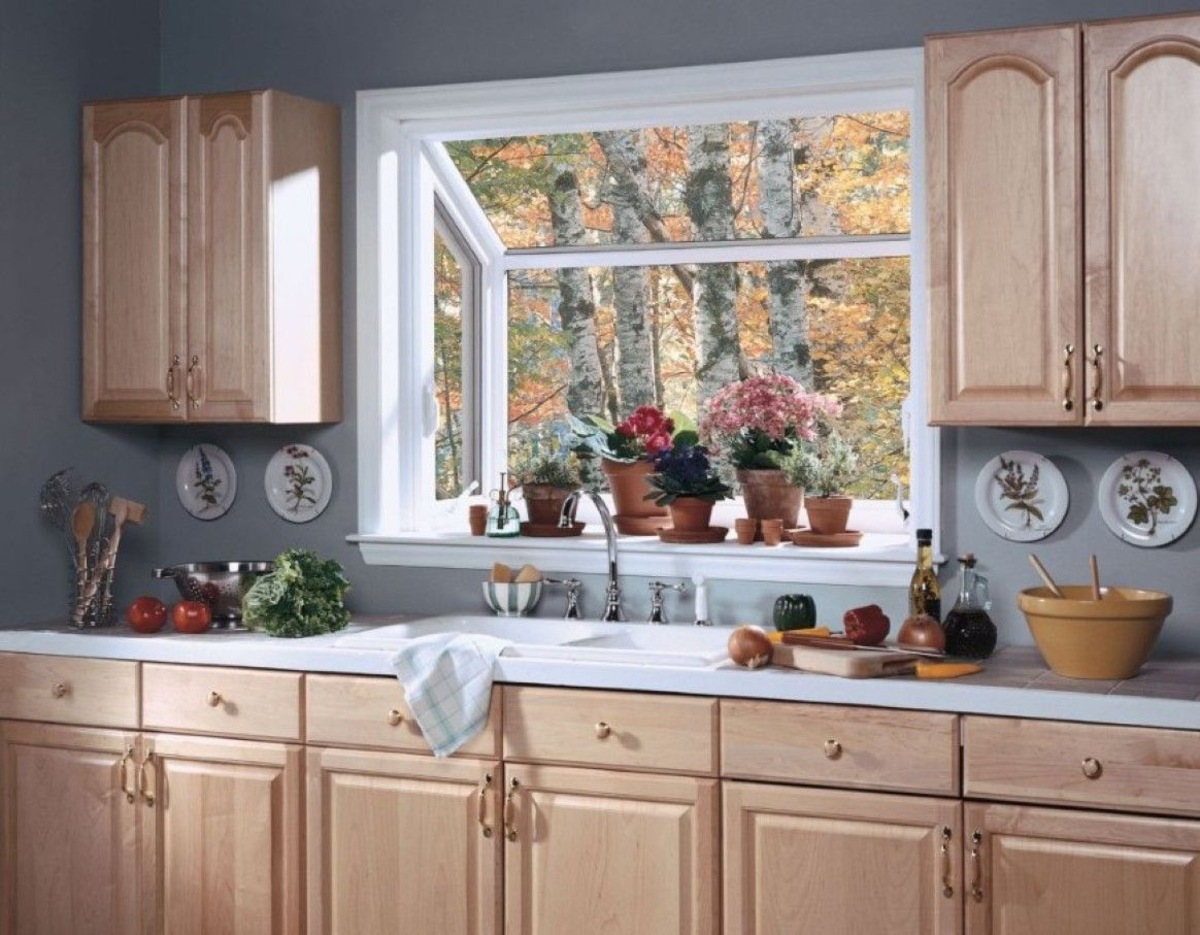
Trimming a bay window can significantly enhance the aesthetic appeal of your home while adding a touch of elegance and character. A well-planned and properly executed trim installation can make a dramatic difference in the overall appearance of your bay window, transforming it from a simple architectural feature to a stunning focal point. Whether you’re looking to give your bay window a fresh update or starting from scratch, this comprehensive guide will walk you through the step-by-step process of trimming a bay window.
Before you embark on this DIY project, it’s essential to gather all the necessary tools and materials to ensure a smooth and successful installation. Understanding the measurements and dimensions of your bay window, selecting the right trim design, and properly preparing and installing the trim pieces are crucial for achieving professional-looking results.
In this article, we’ll provide detailed instructions on how to measure your bay window, choose the right trim design, prepare and cut the trim pieces, install them, fill and sand the nail holes, prime and paint the trim, and finalize the project with touch-ups. By following these steps, you’ll be well-equipped to tackle this project and create a stunning trim for your bay window.
So, let’s dive into the world of bay window trimming and discover how to enhance the beauty of your home with this DIY project.
Key Takeaways:
- Elevate your home’s aesthetic appeal and add character with a well-trimmed bay window. Follow precise measurements, select the right design, and execute each step for a stunning and polished finish.
- Transform your bay window into a stunning focal point with careful measurement, precise cutting, and meticulous installation. Attention to detail and quality materials yield a visually appealing and durable outcome.
Read more: How To Install A Bay Window
Tools and Materials Needed
Before you begin trimming your bay window, gather the necessary tools and materials to ensure a smooth and efficient installation process. Here is a list of essential items you’ll need:
- Measuring tape: To accurately measure the dimensions of your bay window.
- Miter saw: A saw used for cutting precise angles on the trim pieces.
- Power sander: To smoothen the surfaces and edges of the trim pieces.
- Nail gun: For secure and efficient attachment of the trim pieces.
- Level: To ensure the trim pieces are installed straight and level.
- Paintbrushes and rollers: For priming and painting the trim pieces.
- Caulk gun: To apply caulk for a seamless finish.
- Wood filler: For filling in any gaps or nail holes in the trim.
- Paint or stain: Choose a color or finish that complements your home’s style.
- Safety goggles and gloves: To protect yourself from dust and debris.
- Dust mask: For respiratory protection while sanding or cutting trim pieces.
In addition to the tools, you’ll also need the following materials:
- Trim boards: Choose trim boards that are suitable for your bay window’s style and preferred design.
- Wood glue: For secure bonding of the trim pieces.
- Finishing nails: To attach the trim pieces to the window frame.
- Caulk: Use caulk to seal gaps between the trim and the wall or window frame.
- Primer: Apply primer to the trim before painting for better adhesion and durability.
- Paint or stain: Select a high-quality paint or stain for a beautiful and long-lasting finish.
- Sandpaper: Different grits for smoothing the trim surfaces and edges.
- Dropping cloth or plastic sheeting: To protect surfaces from paint or debris.
Make sure you have all the tools and materials readily available before you start your bay window trim project. This will help streamline the process and ensure that you have everything you need to achieve a professional and visually appealing outcome.
Step 1: Measure the Bay Window
The first step in trimming your bay window is to measure its dimensions accurately. This will help you determine the length of the trim pieces and ensure a precise fit.
Here’s how to measure your bay window:
- Start by measuring the width of the window opening. Position the measuring tape horizontally across the top of the opening and record the measurement.
- Next, measure the height of the window opening. Place the measuring tape vertically along the side of the opening and record the measurement.
- Measure the depth or projection of the window by measuring from the front edge to the back edge. This will determine the length of the side trim pieces.
- Measure the angle of the bay window. Use an angle finder or a protractor to determine the angle where the side windows meet the front window.
- Measure the length of the front trim piece by measuring from the outside corner of one side window to the outside corner of the other side window.
Take precise measurements to ensure that your trim pieces fit accurately. It’s always a good idea to double-check your measurements to avoid any potential mistakes.
Once you have recorded all the measurements, add a few extra inches to each measurement to account for any potential trimming or adjustment during the installation process. This will provide some leeway to ensure a perfect fit.
Accurate measurements are the foundation of a successful trim installation. Take your time and be meticulous in this step to ensure that your trim fits snugly and complements your bay window perfectly.
Step 2: Select the Trim Design
After measuring your bay window, the next step is to choose the right trim design that suits your personal style and complements the architecture of your home. The trim design you select can greatly enhance the overall aesthetic appeal of your bay window.
Here are a few popular trim design options for bay windows:
- Craftsman Style Trim: This design features clean lines and simple profiles, emphasizing the natural beauty of the wood. It often includes tapered or square columns, horizontal trim pieces, and decorative corner blocks.
- Colonial Style Trim: This traditional design showcases elegant details, such as decorative crown molding, rosettes, and intricate paneling. It adds a touch of sophistication and classic charm to your bay window.
- Modern Style Trim: For those who prefer a sleek and contemporary look, modern trim designs utilize minimalist profiles with straight lines and geometric shapes. They often feature narrow trim pieces and a smooth, streamlined surface.
- Farmhouse Style Trim: This design focuses on rustic and traditional elements, incorporating wider trim boards with beveled edges. It creates a cozy and welcoming atmosphere around your bay window.
Consider the architectural style of your home and your personal preferences when selecting the trim design. Take into account the existing interior and exterior design elements to ensure a cohesive look throughout the space.
It’s also important to choose the right type of wood or material for your trim. Common wood options include pine, oak, and poplar, each with their own distinct characteristics. Alternatively, you can choose synthetic trim materials that offer durability and low maintenance, such as PVC or composite trim boards.
By carefully selecting the trim design and material, you can create a cohesive and visually appealing look that enhances the overall charm and character of your bay window.
Step 3: Prepare the Trim Pieces
Before you start cutting and installing the trim pieces, it’s important to properly prepare them to ensure a smooth and seamless installation process. Here are the steps to prepare the trim pieces for your bay window:
- Measure and mark: Using the measurements you took in Step 1, transfer those measurements onto the trim pieces. Use a pencil and a measuring tape to mark the lengths and angles accurately.
- Cut the trim pieces: With your marked measurements as a guide, use a miter saw to carefully cut the trim pieces at the designated angles. Make sure to double-check your measurements and angle settings before cutting.
- Smooth the edges: Use sandpaper or a power sander to smooth the cut edges of the trim pieces. This will ensure a clean and professional look when the trim is installed.
- Test the fit: Place each trim piece against the bay window to check its fit and make any necessary adjustments. This can help you identify any areas that may require further trimming or sanding.
- Label the trim pieces: To maintain organization and prevent confusion during installation, label each trim piece according to its designated location on the bay window.
- Apply wood glue: Before attaching the trim pieces, apply a thin, even layer of wood glue to the backside of each piece. This will ensure a secure bond with the window frame.
Properly preparing the trim pieces is crucial for achieving a professional-looking finish. Taking the time to measure accurately, cut precisely, and smooth the edges will result in trim pieces that fit seamlessly and enhance the overall appearance of your bay window.
Once the trim pieces are prepared, you’re ready to move on to the next step: cutting and installing the trim pieces.
Read more: How To Measure Bay Windows For Blinds
Step 4: Cut the Trim Pieces
Now that you have prepared the trim pieces, it’s time to cut them to the correct lengths and angles for your bay window. Cutting the trim pieces accurately is essential for a precise fit and a professional-looking installation. Here’s how to cut the trim pieces:
- Measure twice, cut once: Double-check your measurements to ensure accuracy. Use a measuring tape and pencil to mark the measurements directly on the trim pieces.
- Set the miter saw: Adjust the miter saw to the appropriate angle for each cut. Refer to your measurements and markings to determine the correct angle for each piece.
- Secure the trim: Place the trim piece securely against the fence of the miter saw, making sure it is flat against the saw’s base. Hold the piece firmly in place to prevent any movement during the cut.
- Cut the trim: With the trim piece in position and your hand safely away from the blade, carefully lower the saw’s blade to make the cut. Use a smooth, consistent motion and apply gentle pressure to maintain control.
- Repeat for each trim piece: Repeat the measuring and cutting process for each trim piece, taking care to label them accordingly to avoid confusion during installation.
When cutting trim pieces for your bay window, it’s important to handle the saw with caution and wear appropriate safety gear, such as safety goggles and gloves. Taking your time and using proper technique will help ensure accurate cuts and reduce the risk of accidents.
Remember to refer to your measurements and markings to ensure precise cuts at the correct angles. If necessary, make slight adjustments to the miter saw as you move through the different trim pieces.
Once all the trim pieces are cut, you’re ready to move on to the next step – installing the trim pieces onto your bay window.
When trimming a bay window, measure each section individually for accurate cuts. Use a miter saw for precise angles and ensure the trim is securely attached to the window frame.
Step 5: Install the Trim Pieces
With the trim pieces cut to the correct lengths and angles, it’s time to install them onto your bay window. Proper installation is crucial for achieving a secure and visually appealing finish. Here’s how to install the trim pieces:
- Start with the corner pieces: Begin by installing the trim pieces at the corners of your bay window. Apply a thin bead of wood glue to the back of the trim piece and press it firmly against the window frame, ensuring it is level and plumb.
- Secure with nails: Use a nail gun to drive finishing nails through the trim and into the window frame. Place the nails at equal intervals along the length of the trim, sinking them slightly below the surface of the wood.
- Continue with the side trim pieces: Move on to installing the side trim pieces. Apply wood glue to the back of each piece and press them against the window frame, aligning them with the corner trim pieces. Secure them with nails as before.
- Install the front trim piece: Finally, install the front trim piece. Apply wood glue to the back and press it against the window frame, aligning it with the side trim pieces. Secure it with nails.
- Check for gaps: Once all the trim pieces are installed, check for any visible gaps between the trim and the window frame. Use a caulk gun to fill any gaps with caulk, smoothing it out with your finger or a damp cloth for a seamless finish.
As you install each trim piece, use a level to ensure they are straight and aligned. Adjust as needed before securing with nails. Take care not to overdrive the nails, as this can damage the trim or window frame.
When positioning the trim pieces, make sure they are flush with the window frame and sit snugly against it. Use a scrap piece of trim or a block of wood to protect the trim piece’s surface when using the nail gun.
Once all the trim pieces are installed and any gaps are caulked, step back and inspect your work. Make any necessary adjustments or touch-ups to ensure a clean and professional look.
With the trim pieces securely installed, you’re ready to move on to the next step and give your trim a finished and polished appearance.
Step 6: Fill and Sand the Nail Holes
After installing the trim pieces, it’s common to have small nail holes that need to be filled for a smooth and seamless finish. Filling and sanding the nail holes will help create a polished look and ensure that the trim blends seamlessly with the window frame. Here’s how to fill and sand the nail holes:
- Clean the trim: Before filling the nail holes, clean the trim surface with a damp cloth to remove any dust or debris.
- Choose the filler: Select a suitable wood filler that matches the color of your trim. Ensure that the filler is compatible with the type of wood or material used for the trim.
- Apply the filler: Using a putty knife or a small spatula, apply the wood filler to each nail hole, filling it flush with the surface of the trim. Smooth out the filler to create an even finish.
- Let it dry: Allow the wood filler to dry completely according to the manufacturer’s instructions. This typically takes anywhere from a few hours to overnight.
- Sand the filler: Once the wood filler is dry, use fine-grit sandpaper to sand the filled nail holes until they are smooth and flush with the surrounding trim surface. Sand in a circular motion, taking care not to damage the surrounding trim.
- Clean and touch up: After sanding, wipe away any dust residue with a damp cloth. Inspect the filled nail holes and touch up any imperfections with additional filler or sanding, if necessary.
This step is crucial for achieving a seamless and professional finish. The filled and sanded nail holes should be indistinguishable from the rest of the trim, creating a cohesive and polished look.
Remember to follow the manufacturer’s instructions for the wood filler and allow it sufficient time to dry completely. Be patient during the sanding process to ensure a smooth and even surface.
Once the nail holes are filled and sanded, you’re ready to move on to the next step – priming and painting the trim.
Step 7: Prime and Paint the Trim
Now that the trim pieces are installed, filled, and sanded, it’s time to prime and paint them to achieve a finished and polished look. Primer helps enhance the paint adhesion and durability while providing a smooth base for the paint color of your choice. Here’s how to prime and paint the trim:
- Preparation: Protect the surrounding surfaces by covering them with a drop cloth or plastic sheeting. Remove any dust or debris from the trim surface by wiping it down with a clean, damp cloth.
- Apply primer: Use a high-quality primer suitable for your trim material. Apply the primer evenly to the trim surface using a paintbrush or roller. Follow the manufacturer’s instructions for drying time.
- Sand the primer: After the primer has dried, lightly sand the trim surface with fine-grit sandpaper. This will help smooth out any brush or roller marks and ensure a flawless finish.
- Clean the surface: Remove any sanding dust with a damp cloth or sponge. Allow the surface to dry completely before proceeding to the next step.
- Apply the paint: Choose a high-quality paint that is designed for your trim material and desired finish. Apply the paint smoothly and evenly using a brush or roller, following the manufacturer’s instructions for drying time between coats.
- Apply multiple coats: Depending on the desired color intensity and coverage, you may need to apply multiple coats of paint. Allow each coat to dry completely before applying the next one.
- Inspect and touch up: Once the final coat of paint has dried, inspect the trim surface for any imperfections or missed spots. Touch up as needed with a small brush or roller.
Primed and painted trim adds the final touch to your bay window and enhances its overall appearance. Take your time during this step to achieve a smooth and flawless finish. Consider using low or no VOC (volatile organic compounds) paint for a more environmentally friendly option.
After the paint has dried and any touch-ups are complete, you’re ready for the final step – touching up and finalizing the trim.
Read more: How To Put Blinds In A Bay Window
Step 8: Touch Up and Finalize the Trim
In the final step of trimming your bay window, you’ll focus on making any necessary touch-ups and completing the finishing touches. This step will ensure that your trim looks clean, polished, and seamlessly integrated with your bay window. Here’s how to touch up and finalize the trim:
- Inspect the trim: Carefully examine the entire trim installation, looking for any areas that may need touch-ups or adjustments.
- Touch up paint: Using a small brush, touch up any areas where the paint may have chipped or where the trim and wall meet. Blend the touch-up paint with the surrounding area for a consistent finish.
- Check for gaps: Inspect the seams between the trim pieces and the window frame. If you notice any gaps, use a caulk gun to fill them with a paintable caulk. Smooth out the caulk with a damp cloth or your finger for a seamless appearance.
- Clean and polish: Wipe down the entire trim surface with a clean, damp cloth to remove any dust or debris. Polish the trim using a soft cloth or furniture polish for an added shine.
- Step back and assess: Step back and assess the finished trim installation from different angles to ensure that it meets your expectations. Make any final adjustments or touch-ups as needed.
During this step, pay close attention to the overall aesthetics of the trim and how it integrates with the surrounding elements. Ensure that the trim is seamless, aligned, and visually appealing to enhance the overall beauty of your bay window.
By taking the time to touch up and finalize the trim, you’ll achieve a finished look that adds sophistication and style to your bay window.
Congratulations! You have successfully completed the process of trimming your bay window, enhancing its appearance and giving it that extra touch of elegance. Now, you can sit back, relax, and enjoy the beautiful transformation of your bay window.
Conclusion
Trimming a bay window is a fulfilling and rewarding DIY project that can elevate the aesthetic appeal of your home. Through careful measurement, selection of the right trim design, precise cutting, and proper installation, you can create a stunning and polished look for your bay window.
By following the step-by-step guide outlined in this article, you have learned how to measure your bay window, select the appropriate trim design, prepare and cut the trim pieces, install them securely, fill and sand the nail holes, prime and paint the trim, and finalize the project with touch-ups. Each step plays a crucial role in achieving a professional-looking finish that seamlessly integrates with your bay window and enhances its architectural beauty.
Remember, attention to detail is key throughout the process. Taking accurate measurements, using quality materials, utilizing proper techniques, and allowing ample drying and curing time will yield outstanding results. It’s important to exercise patience and precision to ensure that every element of the trim installation aligns harmoniously, resulting in a visually appealing and durable outcome.
Not only does a well-trimmed bay window enhance the exterior appearance of your home, but it also adds character to the interior. The refined craftsmanship and attention to detail will captivate the eyes of admirers and create a focal point that showcases your personal style and enhances the overall charm of your living space.
So, take the time and effort to trim your bay window with care and watch as it transforms from a simple architectural feature to a stunning masterpiece. Enjoy the satisfaction of completing a DIY project that adds value, beauty, and personality to your home.
Frequently Asked Questions about How To Trim A Bay Window
Was this page helpful?
At Storables.com, we guarantee accurate and reliable information. Our content, validated by Expert Board Contributors, is crafted following stringent Editorial Policies. We're committed to providing you with well-researched, expert-backed insights for all your informational needs.


0 thoughts on “How To Trim A Bay Window”