Articles
What Are Roof Jacks And How To Use Them
Modified: October 20, 2024
Learn what roof jacks are and how to use them with our informative articles. Improve your roofing skills and ensure safety on the job.
(Many of the links in this article redirect to a specific reviewed product. Your purchase of these products through affiliate links helps to generate commission for Storables.com, at no extra cost. Learn more)
What Roof Jacks Are
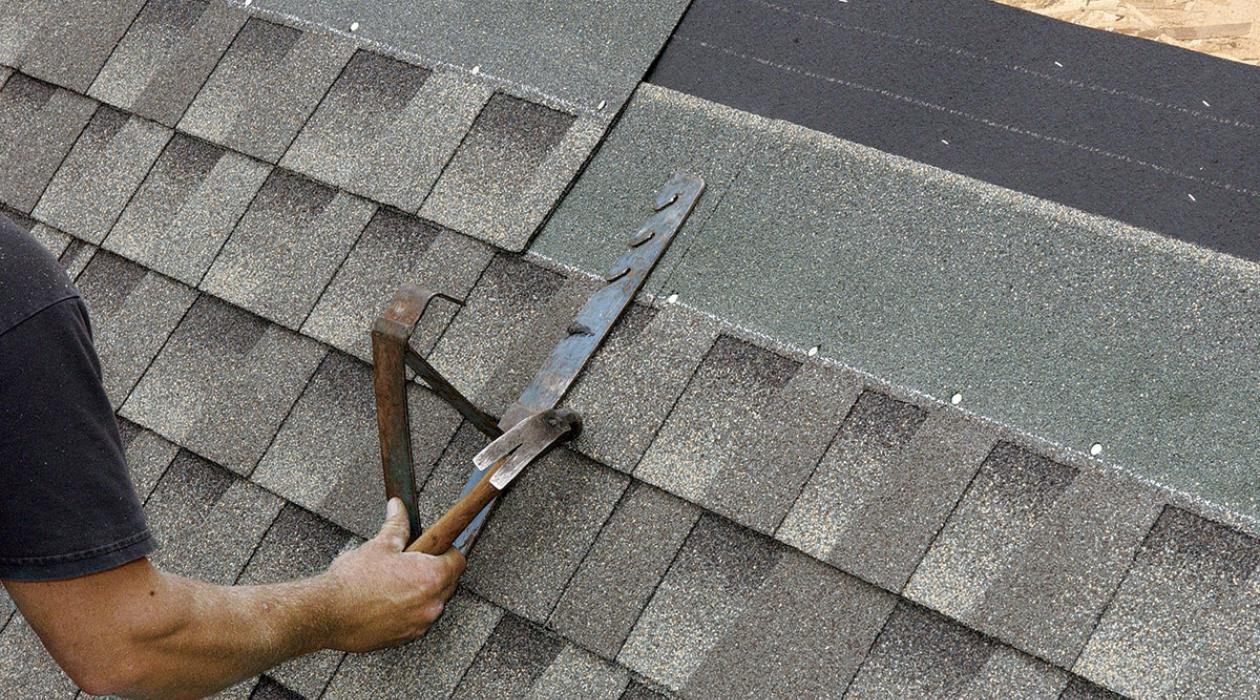
Roof jacks are essential tools for anyone involved in construction or roofing projects. They are designed to provide a stable platform for workers to stand on when accessing rooftops. A roof jack consists of a metal bracket, often made of durable steel, that is secured to the roof surface to create a safe and secure standing area.
Roof jacks play a crucial role in ensuring the safety and efficiency of roofing projects. They provide stability and support for workers, allowing them to complete their tasks with ease. Roof jacks are commonly used for activities such as installing or repairing roofing materials, inspecting the roof for damages, and performing routine maintenance tasks.
Roof jacks come in various sizes and designs to accommodate different types of roofs and construction requirements. The most common type is the adjustable roof jack, which can be easily adjusted to fit different roof pitches. Other types include roof jacks with hooks for attaching ladders, roof jacks with guardrails for added safety, and roof jacks with adjustable arms for uneven surfaces.
Regardless of the type, it is important to choose high-quality roof jacks that meet the necessary safety standards. Look for roof jacks that are sturdy, durable, and capable of supporting the weight of workers and any necessary equipment.
Overall, roof jacks are indispensable tools for any roofing project. They provide a secure and stable platform for workers, ensuring their safety and enabling them to carry out their tasks effectively. By using roof jacks, construction and roofing professionals can work with confidence and peace of mind, knowing that they can access rooftops safely and efficiently.
Key Takeaways:
- Roof jacks are essential for safe and efficient roofing projects, providing stability and support for workers. Choose the right type, prioritize safety, and follow proper usage guidelines for successful outcomes.
- Proper maintenance and storage of roof jacks are crucial for their longevity and optimal performance. Regular inspection, cleaning, and adherence to manufacturer recommendations will ensure safe and effective usage in future projects.
Understanding the Types of Roof Jacks
When it comes to roof jacks, there are several different types available on the market. Each type is designed to meet specific roofing needs and requirements. Understanding the different types of roof jacks will help you choose the right one for your project. Here are some of the most common types:
- Adjustable Roof Jacks: This type of roof jack is versatile and can be adjusted to fit different roof pitches. It consists of a metal bracket with slots or holes that allow for easy height adjustment. Adjustable roof jacks are a popular choice for their flexibility and ease of use.
- Ladder Hook Roof Jacks: These roof jacks are designed with a hook that securely attaches to the rung of a ladder. They provide a stable and secure platform for workers to stand on while accessing the roof. Ladder hook roof jacks are commonly used for tasks such as cleaning gutters or installing roof shingles.
- Guardrail Roof Jacks: Safety is of utmost importance when working on roofs. Guardrail roof jacks are equipped with built-in guardrails that provide additional safety and fall protection. These roof jacks are ideal for projects that require workers to be on the roof for an extended period or for working on steep-slope roofs.
- Roof Jacks with Adjustable Arms: Sometimes, roofs have uneven surfaces or slopes, making it challenging to find a flat and stable area to work on. Roof jacks with adjustable arms are designed to accommodate such situations. These roof jacks have arms that can be adjusted independently, allowing for a level and stable working platform on uneven surfaces.
It is crucial to select the right type of roof jack that aligns with your specific project requirements. Consider factors such as roof pitch, safety concerns, and the nature of the task at hand. Additionally, always prioritize quality and durability when choosing roof jacks to ensure the safety of workers and the success of your roofing project.
Safety Precautions before Using Roof Jacks
Prior to using roof jacks, it is crucial to prioritize safety to prevent accidents and ensure a secure working environment. Here are some important safety precautions to follow before using roof jacks:
- Inspect the Roof: Before setting up roof jacks, thoroughly inspect the roof for any signs of damage or weakness. Look for loose, damaged, or deteriorated areas that could compromise the stability of the roof. It is essential to address any issues before proceeding with the installation of roof jacks.
- Plan and Prepare: Proper planning is key to a safe roofing project. Take the time to assess the requirements of the job, including the number of roof jacks needed and their placement. Always consult safety guidelines and manufacturer instructions to ensure compliance and efficient setup.
- Wear Protective Gear: Personal protective equipment (PPE) is crucial for the safety of workers. Prior to using roof jacks, ensure that all workers wear appropriate PPE such as helmets, gloves, safety glasses, and non-slip footwear. This will protect against potential hazards and minimize the risk of injury.
- Secure the Roof Jacks Properly: When installing roof jacks, ensure that they are securely fastened to the roof surface. Use the appropriate nails or fasteners recommended by the manufacturer and follow the installation instructions closely. This will prevent the roof jacks from shifting or becoming unstable during use.
- Use a Stable Ladder: To access the roof, always use a stable and properly positioned ladder. Ensure that the ladder is securely placed on a level surface and that it extends several feet past the roofline for easy access. Use ladder stabilizers or ladder jack systems if necessary for added stability.
- Check Weight Capacity: Consider the weight capacity of the roof jacks and ensure that they can support the weight of workers, equipment, and materials. Overloading the roof jacks can lead to structural failure and accidents. Always adhere to the weight limits specified by the manufacturer.
- Maintain a Clean and Organized Work Area: Keep the work area clean and free from debris, tools, or equipment that could pose a tripping hazard. Organize materials and tools properly to minimize the risk of accidents caused by clutter or obstacles.
- Monitor Weather Conditions: Weather conditions can affect the safety of working on a roof. Avoid using roof jacks during inclement weather, strong winds, or slippery conditions. Consider rescheduling the work or take appropriate measures to ensure the safety of workers.
By following these safety precautions, you can significantly reduce the risk of accidents and injuries when using roof jacks. Always prioritize safety and provide appropriate training to all workers involved in the roofing project.
Step-by-Step Guide on How to Use Roof Jacks
Using roof jacks in a proper and safe manner is essential to ensure the success of your roofing project. Follow this step-by-step guide to use roof jacks effectively:
- Gather the Required Tools: Before starting, gather all the necessary tools and materials, including roof jacks, nails or fasteners, a hammer, a ladder, and personal protective equipment (PPE).
- Inspect the Roof: Conduct a thorough inspection of the roof for any signs of damage or weakness. Ensure that the roof is structurally sound and can support the weight of workers and equipment.
- Plan the Placement of Roof Jacks: Determine the number of roof jacks you will need based on the size of the roof and the tasks you will be performing. Plan the placement of roof jacks evenly across the roof to provide a stable working platform.
- Secure the Roof Jacks: Position the roof jack brackets over a solid area on the roof and secure them using the recommended nails or fasteners. Ensure that the brackets are tightly and securely attached to the roof surface.
- Adjust the Roof Jacks: If using adjustable roof jacks, adjust the height to the desired level, ensuring that they are in line with the roof pitch. Follow the manufacturer’s instructions for proper adjustment.
- Attach the Planks: Place sturdy planks or scaffolding boards across the roof jacks to create a solid and secure working surface. Ensure that the planks overlap the roof jacks on each side for stability.
- Check the Stability: Test the stability of the roof jacks and planks by gently applying pressure. Ensure that they are securely fastened and can support the weight of workers and equipment without any wobbling or shifting.
- Use Personal Protective Equipment (PPE): Prior to stepping onto the roof jacks, wear appropriate PPE, including helmets, gloves, safety glasses, and non-slip footwear.
- Climb the Ladder: Use a stable ladder to safely climb up to the roof. Ensure that the ladder is securely positioned and extends several feet past the roofline for easy access.
- Step onto the Roof Jacks: Carefully step onto the secure planks or scaffolding boards supported by the roof jacks. Maintain proper balance and footing while moving across the roof.
Always exercise caution and follow safety guidelines when working on roofs. Periodically check the stability of the roof jacks and planks throughout the project, and make adjustments as necessary. Taking proper precautions and using roof jacks correctly will ensure a safe and efficient roofing experience.
When using roof jacks, always make sure to follow the manufacturer’s instructions for proper installation and use. This will help ensure the safety and stability of the jacks while working on the roof.
Tips for Properly Using Roof Jacks
To ensure the optimal and safe use of roof jacks, consider the following tips:
- Choose the Right Type: Select the appropriate type of roof jacks for your specific project requirements. Consider factors such as roof pitch, safety needs, and the nature of the task at hand.
- Inspect and Maintain: Regularly inspect the roof jacks for any signs of wear, damage, or loose components. Replace any worn-out or damaged parts and ensure that the roof jacks are in good working condition.
- Secure the Planks: Always secure the planks or scaffolding boards properly on the roof jacks. The planks should be tightly fit and overlap the roof jacks on each side to provide a stable and secure working surface.
- Ensure Proper Weight Distribution: Distribute the weight evenly across the roof jacks and planks to maintain stability. Avoid overloading the roof jacks and ensure they can handle the weight of workers, equipment, and materials.
- Use Fall Protection Equipment: In situations where roof jacks may not provide adequate fall protection, consider using additional safety measures such as harnesses, lanyards, and guardrails to prevent falls.
- Follow Manufacturer Instructions: Read and follow the manufacturer’s instructions for proper setup and use of the roof jacks. Adhering to these guidelines will help ensure the safety and effectiveness of the roof jacks.
- Secure the Ladder: Ensure that the ladder used to access the roof is securely positioned and properly stabilized. Use ladder stabilizers or ladder jack systems to provide additional stability and prevent accidents.
- Weather Considerations: Avoid using roof jacks during adverse weather conditions, such as rain, snow, or high winds. Slippery conditions can increase the risk of accidents and compromise the stability of the roof jacks.
- Proper Footwear: Wear appropriate non-slip footwear when working on roof jacks. This will provide better grip and traction, reducing the risk of slips and falls.
- Communication and Teamwork: Maintain clear communication with other workers on the roof. Coordinate movements and tasks to ensure everyone is aware of each other’s presence and actions.
By following these tips, you can ensure the proper and safe use of roof jacks. Prioritize safety, take necessary precautions, and consult professional guidance when needed to ensure successful and incident-free roofing projects.
Common Mistakes to Avoid when Using Roof Jacks
Using roof jacks incorrectly can lead to accidents, injuries, and damage to the roof. Avoid these common mistakes to ensure safe and effective use of roof jacks:
- Improper Installation: Failing to install roof jacks properly is a major mistake. Ensure that the brackets are securely fastened to the roof surface using the recommended nails or fasteners. Improper installation can lead to roof jack instability and compromise worker safety.
- Overloading the Roof Jacks: Exceeding the weight capacity of the roof jacks is a common mistake. Check the manufacturer’s weight limits and make sure not to overload the roof jacks with excessive weight. Overloading can cause the roof jacks to fail and result in accidents.
- Inadequate Planning: Not properly planning the placement of roof jacks can lead to an unstable working platform. Plan the number and placement of roof jacks evenly across the roof to ensure balance and stability during work.
- Ignoring Safety Precautions: Neglecting safety precautions is a major mistake when using roof jacks. Always wear appropriate personal protective equipment (PPE), inspect the roof for any signs of damage, and follow safety guidelines to prevent accidents.
- Failing to Secure the Planks: Not properly securing the planks or scaffolding boards on the roof jacks can lead to instability. Ensure that the planks are tightly fit and overlap the roof jacks on each side for a stable working surface.
- Using Damaged Roof Jacks: Continuing to use roof jacks that are damaged or worn out is a significant mistake. Regularly inspect the roof jacks for any signs of wear or damage, and replace them immediately to maintain safety.
- Working during Inclement Weather: Attempting to use roof jacks during adverse weather conditions is hazardous. Slippery surfaces from rain or snow can increase the risk of falls. Avoid working on the roof when the weather is unfavorable.
- Ignoring Proper Footwear: Not wearing appropriate non-slip footwear is a mistake that can result in slips and falls. Wear sturdy, non-slip footwear that provides traction and grip on the roof surface.
- Lack of Communication: Failing to communicate with other workers on the roof can lead to accidents. Maintain clear and consistent communication to coordinate movements and tasks to ensure everyone’s safety.
- Not Seeking Professional Guidance: Attempting to use roof jacks without proper training or guidance is a mistake. If you are unfamiliar with roof jacks or have doubts about their correct usage, seek professional advice to ensure safe and efficient practices.
By avoiding these common mistakes, you can ensure the safe and effective use of roof jacks, protecting both workers and the integrity of the roofing project.
Maintaining and Storing Roof Jacks
Maintaining and properly storing roof jacks is essential to ensure their longevity and optimal performance. Here are some tips to help you maintain and store roof jacks effectively:
- Clean After Use: After each use, clean the roof jacks to remove any dirt, debris, or corrosive substances that may have accumulated. Use a brush or a damp cloth to wipe them down, and make sure they are completely dry before storing.
- Inspect for Damage: Regularly inspect the roof jacks for any signs of wear, damage, or loose components. Look for cracks, bends, or rust, and replace any damaged parts immediately. Damaged roof jacks can compromise safety and should not be used.
- Lubricate Moving Parts: Apply lubricant to the moving parts and mechanisms of the roof jacks, such as the adjustment bolts or arms. This will help prevent rust and ensure smooth operation when adjusting the height or position of the roof jacks.
- Store in a Dry Area: Store the roof jacks in a clean and dry area to prevent moisture damage. Moisture can cause rust and corrosion, which can weaken the structural integrity of the roof jacks. Consider using a storage box or covering them with a tarp for added protection.
- Organize and Label: Keep the roof jacks organized and labeled for easy identification and access. This will help avoid confusion and save time when retrieving them for future use. Consider using a storage rack or system to keep them neatly arranged.
- Protect from Extreme Temperatures: Avoid exposing the roof jacks to extreme temperatures, as this can result in metal expansion or contraction. Store them in a temperature-controlled space to maintain their structural integrity and prevent damage.
- Follow Manufacturer Recommendations: Always refer to the manufacturer’s guidelines for specific maintenance and storage instructions. Different types of roof jacks may have unique requirements, so it is important to follow the manufacturer’s recommendations for optimal care.
- Periodic Maintenance Checks: Even when in storage, periodically check the stored roof jacks to ensure they remain in good condition. Inspect for any signs of damage or deterioration, and perform any necessary maintenance or repairs before using them again.
- Properly Transport: When transporting roof jacks, take care to secure them to prevent shifting or damage. Use tie-downs, straps, or a dedicated roof rack to secure them in your vehicle, ensuring they remain stable during transit.
- Train Personnel: Properly train personnel on the correct use, maintenance, and storage of roof jacks. This will ensure that everyone involved understands the importance of proper care and can contribute to their safe and efficient use.
By following these maintenance and storage tips, you can prolong the lifespan of your roof jacks and maintain their safety and functionality. Proper care and storage will also save you time and effort when using them for future roofing projects.
Frequently Asked Questions about What Are Roof Jacks And How To Use Them
Was this page helpful?
At Storables.com, we guarantee accurate and reliable information. Our content, validated by Expert Board Contributors, is crafted following stringent Editorial Policies. We're committed to providing you with well-researched, expert-backed insights for all your informational needs.


0 thoughts on “What Are Roof Jacks And How To Use Them”