Articles
How To Use Floor Jack
Modified: December 7, 2023
Learn how to effectively use a floor jack with these informative articles. Discover tips and techniques for safely and efficiently lifting your vehicle.
(Many of the links in this article redirect to a specific reviewed product. Your purchase of these products through affiliate links helps to generate commission for Storables.com, at no extra cost. Learn more)
Introduction
Using a floor jack is an essential skill for any car owner or mechanic. Whether you need to change a tire, perform maintenance underneath your vehicle, or simply want to add some extra clearance, a floor jack is a valuable tool to have in your arsenal. However, using a floor jack correctly and safely requires some knowledge and practice.
In this article, we will guide you through the step-by-step process of using a floor jack effectively. From choosing the right floor jack to safely lowering your vehicle, we will cover all the necessary information you need to know. So, grab your tools, put on your safety gear, and let’s dive into the world of floor jacks!
Disclaimer: Before using a floor jack, always consult your vehicle’s owner’s manual for specific instructions and safety guidelines. If you are unsure about any steps or feel uncomfortable, seek the assistance of a professional.
Key Takeaways:
- Properly using a floor jack involves gathering the right tools, choosing the correct jack for your vehicle, and locating the appropriate lifting points to ensure safe and effective vehicle lifting.
- Safety is paramount when using a floor jack. Always stabilize the vehicle with jack stands, wear safety gear, and follow the manufacturer’s guidelines to prevent accidents and injuries.
Read more: How Much Is A Floor Jack
Gather the necessary tools and equipment
Before you begin using a floor jack, it’s essential to gather all the necessary tools and equipment to ensure a smooth and successful operation. Here are the items you’ll need:
- Floor jack: Choose a floor jack that is suitable for the weight of your vehicle. Look for a jack with a lifting capacity that exceeds your vehicle’s weight to ensure safety.
- Jack stands: Jack stands are crucial for providing additional support to prevent the vehicle from falling while it is lifted. Make sure you have a set of jack stands that are rated for your vehicle’s weight.
- Tire chocks or wheel blocks: These are used to prevent the vehicle from rolling while it is lifted. Place the chocks or blocks on the opposite side of the vehicle from where you’re working.
- Lug wrench or socket set: Depending on your vehicle, you’ll need either a lug wrench or a socket set to loosen the lug nuts on your tires.
- Tire pressure gauge: It’s always a good idea to check your tire pressure before and after using a floor jack, especially if you’re performing tire maintenance.
- Safety goggles and gloves: Safety should be your top priority when working with a floor jack. Protect your eyes with goggles and your hands with gloves.
Once you have gathered all the necessary tools and equipment, ensure that they are in good working condition. Check the condition of the floor jack, jack stands, and other tools for any signs of wear or damage. It’s crucial to use reliable and properly maintained equipment to ensure your safety and the safety of your vehicle.
Note: Always follow the manufacturer’s instructions and safety guidelines for the tools and equipment you are using. It’s important to be well-informed about their proper usage and limitations.
Choose the right floor jack for your vehicle
When it comes to using a floor jack, selecting the right one for your vehicle is essential. The right floor jack will ensure safe and efficient lifting of your vehicle. Here are a few factors to consider when choosing a floor jack:
- Lifting capacity: Check your vehicle’s weight and choose a floor jack with a lifting capacity that exceeds it. It’s important not to overload the floor jack as it can lead to accidents.
- Construction and durability: Look for a floor jack that is made of high-quality materials such as steel, as it provides durability and stability during lifting.
- Height range: Consider the minimum and maximum height range of the floor jack. Make sure it can reach the desired height needed for your vehicle.
- Portability: If you often work on different vehicles or need to transport your floor jack, consider its weight and size. A lightweight and compact floor jack will be easier to carry and store.
- Safety features: Look for safety features such as a safety valve to prevent overloading, a wide base for stability, and a rubber pad or saddle to protect your vehicle’s frame.
- Reviews and recommendations: Before making a purchase, read reviews and seek recommendations from experienced users or professionals. Their insights can help you make an informed decision.
Remember, it’s better to invest in a high-quality floor jack that meets your vehicle’s requirements and ensures your safety, rather than settling for a cheaper option that may compromise stability and durability.
Note: If you are unsure about choosing the right floor jack for your vehicle or have any specific requirements, consult a professional at an auto parts store or seek advice from a knowledgeable mechanic.
Locate the proper lifting points on your vehicle
Before you can start using a floor jack, it’s crucial to identify the proper lifting points on your vehicle. Lifting your vehicle from the wrong points can cause damage to the vehicle’s frame or components, leading to costly repairs. Here’s how to locate the correct lifting points:
- Refer to the owner’s manual: The best source of information regarding the lifting points of your vehicle is the owner’s manual. It will provide specific instructions and diagrams for your vehicle’s make and model.
- Inspect the vehicle: Take a close look at your vehicle’s undercarriage. Look for designated lifting points, such as reinforced areas or metal frames. These points are typically indicated by arrows, notches, or symbols.
- Avoid plastic or bodywork: Avoid placing the floor jack on areas made of plastic or bodywork, as they are not designed to support the weight of the vehicle. Using these areas as lifting points can result in damage.
- Use pinch welds or frame rails: Pinch welds or frame rails are common lifting points in many vehicles. These are sturdy metal structures that can safely support the weight of the vehicle. Place the floor jack’s saddle or lifting pad on these points.
- Check for stability: Once the jack is positioned, give the vehicle a gentle shake to ensure it is stable. If there is any movement or wobbling, reposition the floor jack to ensure proper contact with the lifting point.
Keep in mind that different vehicles may have different lifting points, so it’s crucial to familiarize yourself with the specific requirements of your vehicle. Take your time to locate the appropriate lifting points before proceeding with lifting your vehicle.
Note: Avoid lifting your vehicle from the suspension components, differential, or any other non-designated areas. Using improper lifting points can lead to damage and accidents.
Prepare the floor jack for use
Before you can begin lifting your vehicle with a floor jack, it’s important to properly prepare the jack for safe and efficient operation. Here are the steps to follow:
- Ensure a solid and level surface: Place the floor jack on a stable and level ground. Avoid using the jack on an inclined or uneven surface as it can compromise stability and safety.
- Inspect the floor jack: Conduct a visual inspection of the floor jack to ensure that all components are in good working condition. Check for any signs of damage, leaks, or loose fittings. If you notice any issues, do not proceed and seek professional assistance if needed.
- Purge air from the hydraulic system: This step is especially important if your floor jack has been sitting unused for a while. To purge the air from the hydraulic system, locate the release valve and turn it counterclockwise until it reaches its maximum position.
- Pump the jack handle: Grab the handle of the floor jack and pump it several times to build pressure in the hydraulic system. This will ensure that the jack is ready for lifting.
- Check the oil level: Some floor jacks have a oil level indicator or a filler plug that you can remove to check the oil level. Make sure the oil is at the appropriate level. If it is low, consult the manufacturer’s instructions for adding the correct type and amount of hydraulic oil.
By following these preparation steps, you can ensure that your floor jack is in proper working condition for lifting your vehicle. It’s important to take the time to go through these steps to minimize the risk of accidents and ensure a successful lifting experience.
Note: If you have any doubts about the condition or operation of your floor jack, consult the manufacturer’s instructions or seek professional assistance.
Read more: How To Jack Up Floor Joists
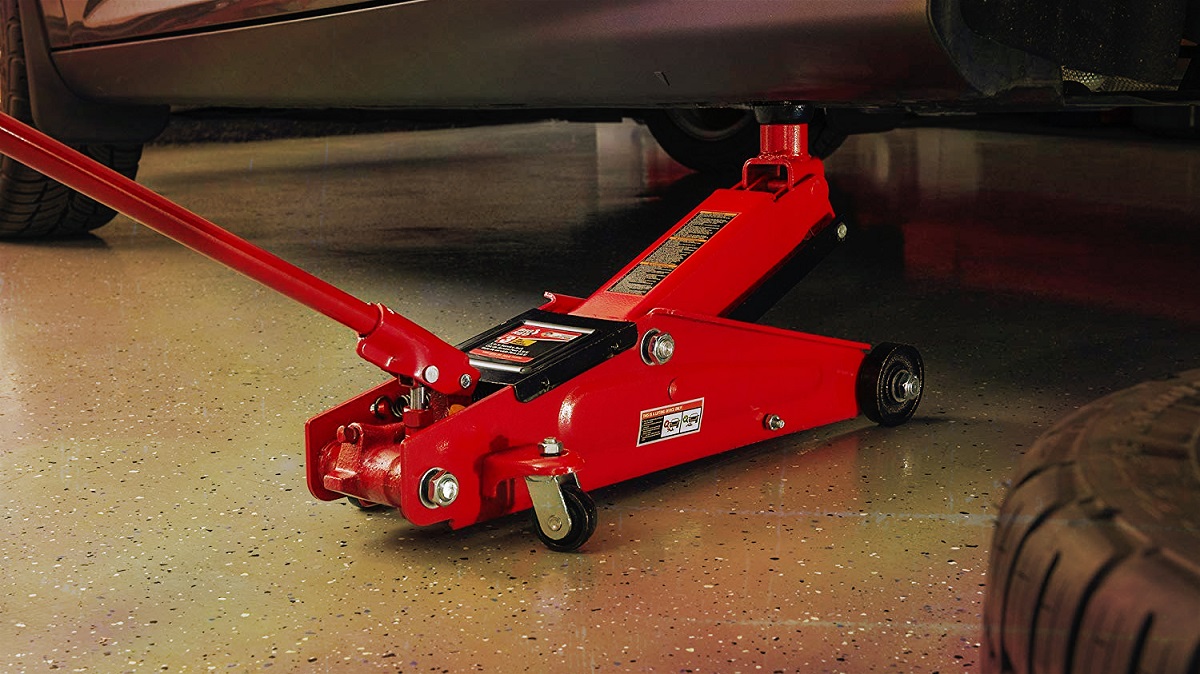
Position the floor jack correctly under the lifting point
Positioning the floor jack correctly under the lifting point of your vehicle is crucial for safe and stable lifting. Here’s a step-by-step guide to help you position the floor jack properly:
- Align the floor jack: Position the floor jack in line with the lifting point on your vehicle. Make sure the jack is parallel to the lifting point for optimal support.
- Position the lifting pad: Adjust the position of the lifting pad or saddle on the floor jack to align it with the lifting point. The lifting pad should be centered under the lifting point to ensure even weight distribution.
- Slide the floor jack into place: Carefully slide the floor jack under the vehicle towards the lifting point until the lifting pad makes contact with the vehicle’s frame or designated lifting area.
- Adjust the position: Once the floor jack is in position, ensure that the lifting pad is securely positioned on the lifting point. You can gently wiggle the floor jack to ensure proper contact and stability.
It’s important to note that the lifting point may vary depending on the specific make and model of your vehicle. Always refer to the owner’s manual or consult a professional for accurate information on the lifting points for your specific vehicle.
Note: Avoid placing the floor jack on any plastic or bodywork areas, as they are not designed to support the weight of the vehicle. Always use the designated lifting points to ensure safe lifting.
Once the floor jack is positioned correctly under the lifting point, you are ready to proceed with lifting the vehicle. However, it’s essential to follow the next steps carefully to ensure a safe and controlled lifting process.
When using a floor jack, always ensure that the vehicle is on a flat, stable surface and the emergency brake is engaged. Position the jack under the vehicle’s designated lift points for safe and effective lifting.
Raise the vehicle using the floor jack
Now that you have positioned the floor jack correctly under the lifting point, it’s time to raise your vehicle. Follow these steps to safely raise the vehicle using the floor jack:
- Stabilize the vehicle: Before you start lifting, ensure that the vehicle is in park (for automatic transmission) or in gear (for manual transmission), and engage the parking brake. This will prevent the vehicle from rolling or moving during the lifting process.
- Pump the handle: Begin pumping the handle of the floor jack to raise the vehicle. Use smooth and steady pumping motions to gradually raise the vehicle off the ground. Pay attention to any signs of instability or tilting, and adjust accordingly if needed.
- Keep an eye on the lifting process: As the vehicle is being raised, visually monitor the lifting points and listen for any unusual sounds. If you notice any instability or hear strange noises, lower the vehicle immediately and reposition the floor jack.
- Reach the desired height: Continue pumping the handle until the vehicle reaches the desired height. Be cautious not to exceed the lifting capacity of the floor jack. Refer to the floor jack’s weight rating and ensure that it is capable of supporting the weight of the vehicle.
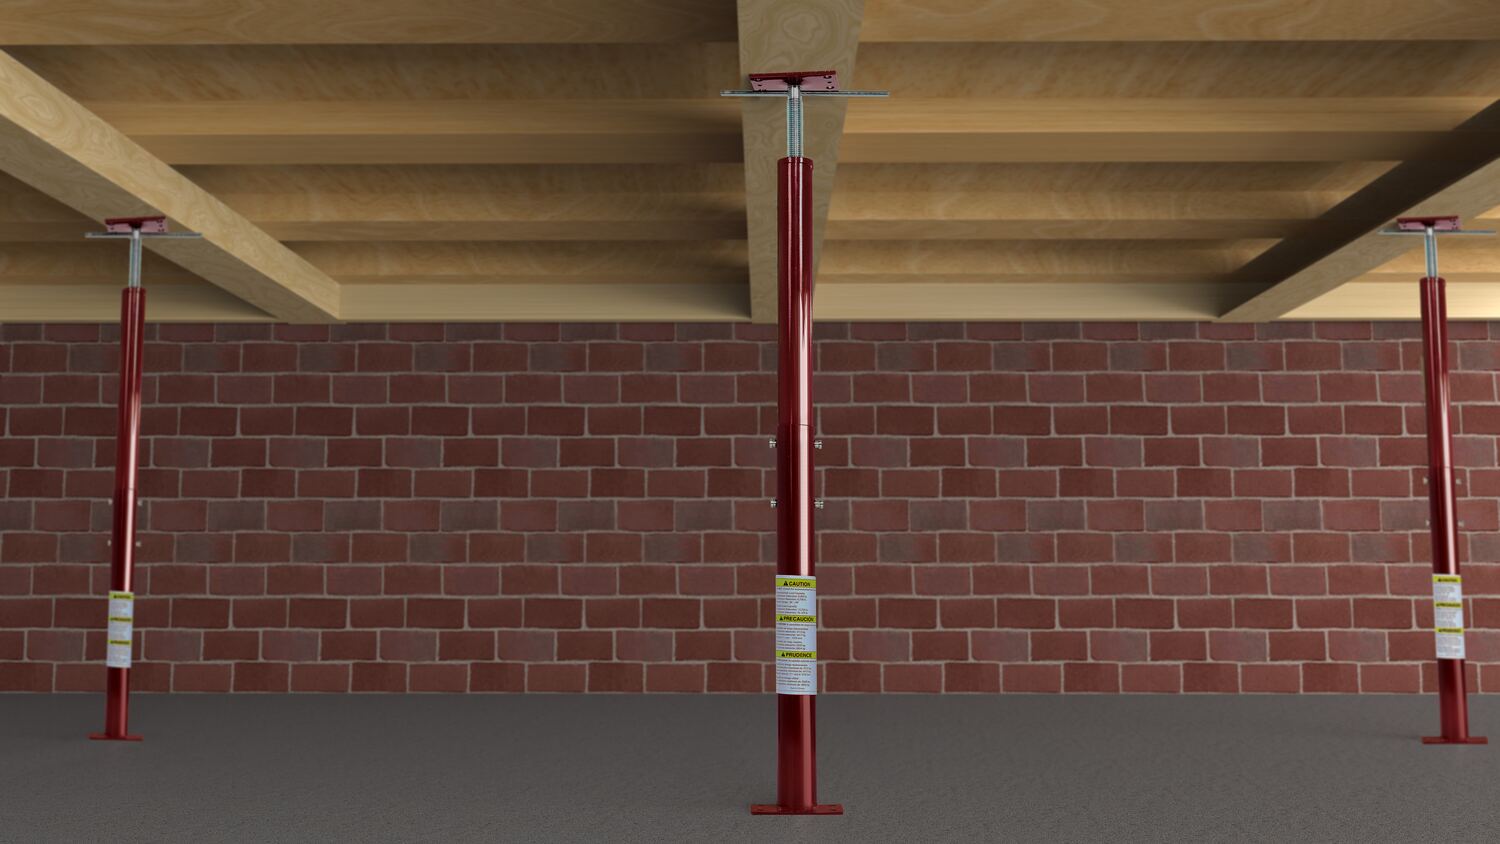
- Place jack stands: Once the vehicle is raised to the desired height, immediately place jack stands under the vehicle’s designated lifting points for additional support. Lower the floor jack slowly until the vehicle rests securely on the jack stands.
- Test stability: Give the vehicle a gentle shake to ensure that it is stable and properly supported by the jack stands. If there is any movement or instability, lower the vehicle and adjust the jack stands accordingly.
It’s important to proceed with caution and take your time during the lifting process. Rushing or mishandling the floor jack can lead to accidents and possible damage to your vehicle. Always prioritize safety and follow the manufacturer’s guidelines for proper use of the floor jack.
Note: Never work underneath a vehicle that is solely supported by a floor jack. Always use jack stands or other approved support devices for additional safety.
Secure the vehicle before working underneath
Before you start working underneath your vehicle, it is crucial to take the necessary precautions to ensure your safety. Follow these steps to securely stabilize the vehicle:
- Double-check the stability: Once the vehicle is raised and resting on the jack stands, give it a gentle shake to ensure that it is stable and secure. If there is any movement or instability, lower the vehicle and reposition the jack stands until it is properly supported.
- Use wheel chocks: Place wheel chocks or blocks behind the tires that are still on the ground. This will prevent the vehicle from rolling or shifting while you are working underneath.
- Remove any obstacles: Make sure there are no obstacles or debris in the immediate work area that could interfere with your work or cause accidents. Clear the area to provide a safe and unobstructed workspace.
- Wear appropriate safety gear: Before you start working, put on safety goggles, gloves, and any other necessary safety gear to protect yourself from debris, fluids, or other potential hazards.
- Lower the vehicle partway: If you only need partial access to the underside of the vehicle, lower the vehicle partway so that it is still secured on the jack stands but allows you to work comfortably.
- Use additional supports (if needed): For added security, you can use additional supports such as ramps, cribbing, or blocks to provide stability to certain areas of the vehicle or specific components you are working on.
By following these steps, you can ensure that the vehicle is properly secured and stable while you are working underneath. Keep in mind that safety should always be a top priority, and if you have any doubts or concerns, it may be best to seek professional assistance.
Note: Never rely solely on the floor jack to support the weight of the vehicle when working beneath it. Always use jack stands or other approved supports to prevent accidents and injuries.
Lower the vehicle safely
After you have finished working underneath your vehicle, it’s important to lower it safely and gradually to prevent any accidents or damage. Follow these steps to safely lower your vehicle:
- Remove any additional supports: If you used additional supports such as ramps, cribbing, or blocks, remove them carefully and ensure that the area is clear before proceeding with lowering the vehicle.
- Double-check stability: Before lowering the vehicle, double-check that all tools, equipment, and debris are removed from beneath the vehicle. Give it a gentle shake to ensure that it is stable and properly supported by the jack stands.
- Position the floor jack: Place the floor jack back under the lifting point of the vehicle, ensuring that it is aligned properly and can safely support the weight of the vehicle.
- Begin lowering: Slowly turn the release valve on the floor jack in a clockwise direction to release the hydraulic pressure. This will gradually lower the vehicle back down to the ground. Take your time and lower the vehicle in a controlled manner.
- Remove the jack stands: As the vehicle is being lowered, remove the jack stands one by one. Make sure to securely place them to the side before fully lowering the vehicle.
- Monitor the process: Pay close attention to any signs of instability or tilting as you lower the vehicle. If you notice anything unusual, stop lowering immediately and reassess the situation.
- Ensure proper clearance: Once the vehicle is safely on the ground, visually inspect the area to ensure that there is enough clearance for the vehicle to move without hitting any obstructions.
By following these steps, you can safely and gradually lower your vehicle back to the ground. Take your time and stay focused on the process to avoid any mishaps or accidents.
Note: Never place any body parts or objects beneath the vehicle while it is being lowered. This can lead to serious injury or damage. Always exercise caution and prioritize safety.
Read more: How To Install Floor Jacks In A Crawl Space
Store the floor jack properly after use
Properly storing your floor jack after use is essential to maintain its longevity and ensure that it remains in good working condition. Here are some guidelines to help you store your floor jack effectively:
- Clean the floor jack: Before storing the floor jack, wipe off any dirt, debris, or oil that may have accumulated during use. Use a clean cloth or rag to remove any residue and ensure that the jack is clean and dry.
- Inspect for any damage: Take a close look at the floor jack to check for any signs of wear, damage, or leaking hydraulic fluid. If you notice any issues, it may be necessary to have the jack inspected or repaired by a professional before storing it.
- Release the pressure: Turn the release valve counterclockwise to release any remaining pressure in the hydraulic system. This will protect the seals and prevent any damage to the floor jack over time.
- Secure any loose parts: Check all nuts, bolts, and other connections on the floor jack to ensure that they are tight and secure. If you find any loose parts, tighten them appropriately before storing the jack.
- Store in a clean and dry area: Find a suitable storage location for your floor jack that is clean, dry, and protected from extreme temperatures and moisture. Avoid storing the jack in areas with excessive humidity or where it may be exposed to corrosive substances.
- Keep it in an upright position: Store the floor jack in an upright position to prevent any damage to the hydraulic system or any potential leaks. If your jack has a handle, make sure it is in a locked and secure position.
- Consider using a protective cover: To further safeguard the floor jack from dust and debris, you may choose to use a protective cover. This can help prolong the lifespan of the jack and keep it in good condition.
By following these storage guidelines, you can ensure that your floor jack is well-preserved and ready for future use. Proper storage will also help prevent any accidents or damage that could occur if the jack is not stored correctly.
Note: Always refer to the manufacturer’s instructions for any specific storage recommendations or guidelines for your particular model of floor jack.
Conclusion
Using a floor jack is an essential skill for car owners and mechanics alike. Whether you need to change a tire, perform maintenance, or simply elevate your vehicle for additional clearance, knowing how to use a floor jack correctly is crucial for a safe and successful operation.
In this comprehensive guide, we covered the important steps involved in using a floor jack, from gathering the necessary tools and equipment to safely lowering your vehicle and storing the floor jack afterwards.
Remember, safety should always be the top priority when using a floor jack. Always choose the right floor jack for your vehicle, locate the proper lifting points, and ensure that the vehicle is securely supported before working underneath. Follow the manufacturer’s instructions, consult your vehicle’s owner’s manual, and seek professional help when needed.
By following the step-by-step procedures outlined in this guide and incorporating best practices for floor jack usage, you can confidently lift and lower your vehicle without compromising safety or damaging your vehicle.
Now armed with this knowledge, you can tackle various tasks with your floor jack, from routine maintenance to emergency situations, ensuring that you can handle them efficiently and effectively.
So, the next time you find yourself needing to lift your vehicle, remember the proper techniques and precautions outlined here. With practice and adherence to safety guidelines, you’ll become skilled and confident in using a floor jack, making your automotive projects easier and safer than ever before.
Frequently Asked Questions about How To Use Floor Jack
Was this page helpful?
At Storables.com, we guarantee accurate and reliable information. Our content, validated by Expert Board Contributors, is crafted following stringent Editorial Policies. We're committed to providing you with well-researched, expert-backed insights for all your informational needs.


0 thoughts on “How To Use Floor Jack”