Articles
How To Work With Fiberglass Tape
Modified: February 24, 2024
Discover valuable articles on how to effectively work with fiberglass tape, including step-by-step instructions and expert tips. Enhance your skills and get professional results with our comprehensive guides.
(Many of the links in this article redirect to a specific reviewed product. Your purchase of these products through affiliate links helps to generate commission for Storables.com, at no extra cost. Learn more)
Introduction
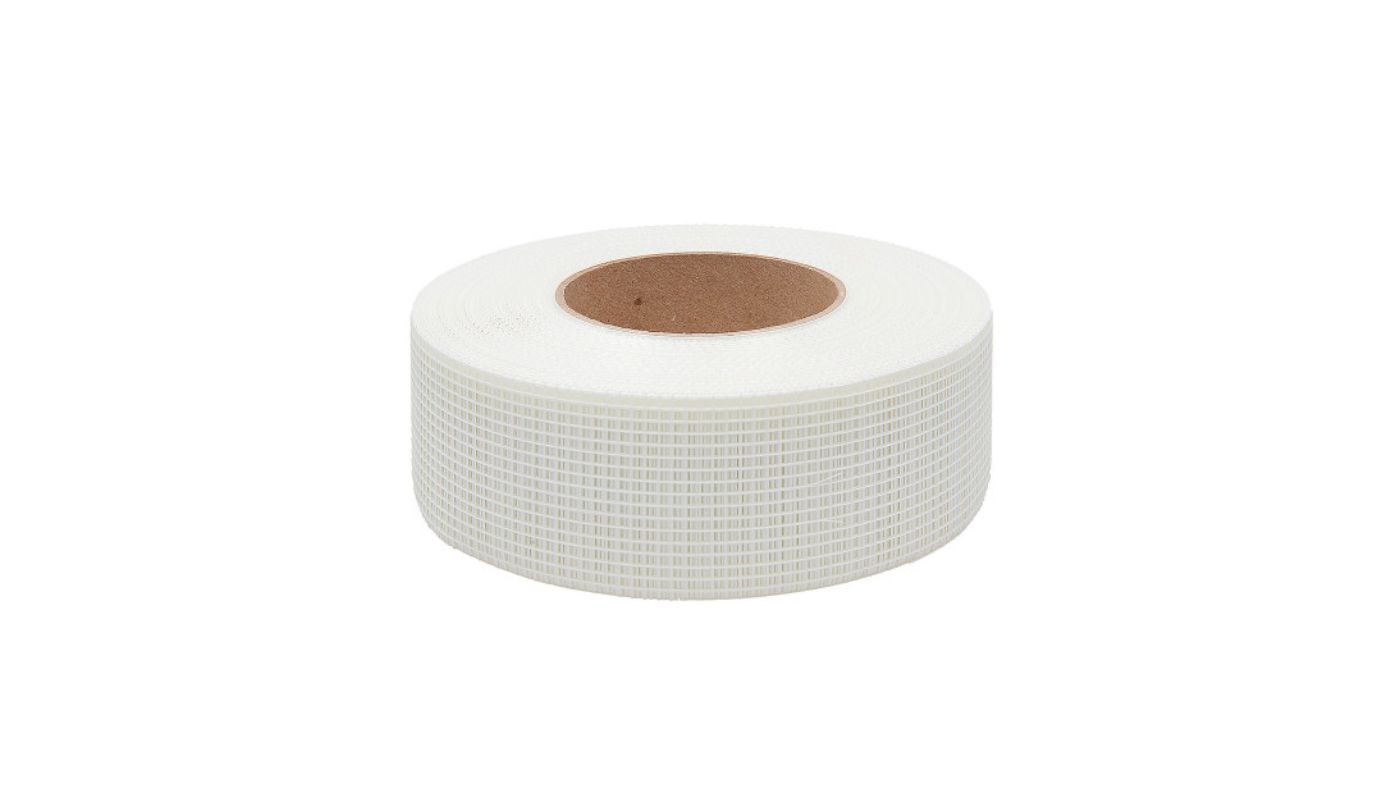
Fiberglass tape is a versatile material that is widely used in various DIY projects, particularly in construction and repairs. It is made of woven strands of fiberglass that are coated with a resin adhesive, providing strength and flexibility. Fiberglass tape is commonly used for reinforcing joints, repairing cracks, and adding structural support to surfaces.
In this article, we will explore the ins and outs of working with fiberglass tape and provide you with a step-by-step guide on how to use it effectively. Whether you are a seasoned DIY enthusiast or a beginner looking to tackle your first fiberglass tape project, this article will equip you with the necessary knowledge and skills to get the job done right.
Before we dive into the details of working with fiberglass tape, let’s first understand its purpose and benefits. Fiberglass tape is known for its high tensile strength, durability, and resistance to corrosion and moisture. These properties make it an excellent choice for reinforcing and repairing surfaces that are exposed to heavy loads or harsh environmental conditions.
Additionally, fiberglass tape is easy to work with, as it can be cut to the desired length and shape. It is also compatible with a variety of adhesives, making it suitable for different types of applications. Whether you are working on a small home repair project or a larger construction venture, fiberglass tape can be a valuable tool in your arsenal.
Now that you understand the basics of fiberglass tape, let’s move on to the tools and materials you will need to complete your project successfully.
Key Takeaways:
- Proper preparation is key. Clean and dry the surface, cut the fiberglass tape accurately, and apply the adhesive evenly for a successful application. Attention to detail ensures a strong and durable result.
- Avoid common mistakes. From surface prep to adhesive application, be mindful of potential errors. Following proper techniques and safety precautions leads to a flawless finish.
Read also: 11 Best Fiberglass Measuring Tape For 2025
Understanding Fiberglass Tape
Fiberglass tape is a type of reinforcement material that is commonly used in construction and repair projects. It is made by weaving thin strands of fiberglass together to form a tape-like fabric. This fabric is then coated with a resin adhesive, which provides added strength and durability.
One of the main advantages of fiberglass tape is its high tensile strength. The individual fiberglass strands are extremely strong and resistant to stretching, making the tape ideal for applications where additional reinforcement is needed. It can help prevent cracks from widening and provide structural stability to surfaces.
In addition to its strength, fiberglass tape is also highly resistant to moisture, chemicals, and harsh weather conditions. This makes it suitable for both indoor and outdoor use. Whether you are repairing a leaking pipe or reinforcing a wall, fiberglass tape can withstand exposure to water, chemicals, and fluctuating temperatures.
Another characteristic of fiberglass tape is its flexibility. Unlike other types of reinforcement materials that are rigid and difficult to shape, fiberglass tape can easily conform to curved surfaces and irregular shapes. This allows for greater versatility and ease of use in various applications.
Fiberglass tape is available in different widths and thicknesses to accommodate different projects. The width typically ranges from 1 inch to 4 inches, while the thickness can vary between 0.02 inches to 0.1 inches. Choosing the right size of fiberglass tape depends on the specific requirements of your project.
While fiberglass tape is commonly used in construction and repair projects, it can also be utilized in other applications. It is often used in automotive repairs, boat building, and even in crafting and art projects. The versatility and strength of fiberglass tape make it a trusted choice for many DIY enthusiasts and professionals alike.
Now that you have a better understanding of what fiberglass tape is and its various properties, let’s move on to the tools and materials you will need to work with it effectively.
Tools and Materials Needed
Before you start working with fiberglass tape, it’s important to gather all the necessary tools and materials. Having the right equipment at hand will ensure a smooth and efficient process, leading to better results. Here are the essential tools and materials you will need:
- Fiberglass tape: Purchase fiberglass tape suitable for your project. The width and thickness of the tape will depend on the specific application.
- Scissors or utility knife: You will need a sharp pair of scissors or a utility knife to cut the fiberglass tape to the desired length.
- Resin adhesive: Choose a high-quality resin adhesive that is compatible with fiberglass. This adhesive will help secure the tape in place and provide additional strength.
- Squeegee or putty knife: A squeegee or putty knife is useful for applying and smoothing the adhesive and fiberglass tape onto the surface.
- Sanding block or sandpaper: You may need to sand the surface before and after applying the fiberglass tape to ensure a smooth finish. A sanding block or sandpaper with a medium grit will work well.
- Protective gear: Working with fiberglass tape involves handling chemicals and adhesives. To protect yourself, wear gloves, safety goggles, and a dust mask to prevent any potential irritation.
- Clean cloth or rag: Keep a clean cloth or rag nearby to wipe away any excess adhesive.
- Surface preparation materials: Depending on the project, you might need additional tools and materials for surface preparation, such as a wire brush, cleaner, or degreaser.
Having these tools and materials ready before you begin will save you time and ensure a successful fiberglass tape application. Remember to read and follow the manufacturer’s instructions for all products and take proper safety precautions while working.
Now that you have everything you need, let’s move on to the step-by-step guide on how to work with fiberglass tape.
Step-by-Step Guide to Working with Fiberglass Tape
Working with fiberglass tape requires careful preparation and precise application. Follow these step-by-step instructions to ensure a successful project:
- Prepare the surface: Start by preparing the surface where you will be applying the fiberglass tape. Clean the area thoroughly, removing any dirt, dust, or grease. Use a wire brush, cleaner, or degreaser if necessary. Ensure that the surface is dry before proceeding.
- Cut the fiberglass tape: Measure and cut the fiberglass tape to the desired length using scissors or a utility knife. It’s recommended to cut the tape slightly longer than the area you intend to cover to allow for a better overlap.
- Apply the resin adhesive: Apply a thin layer of resin adhesive to the prepared surface using a squeegee or putty knife. Ensure that the adhesive is evenly spread and covers the entire area where the fiberglass tape will be placed.
- Position the fiberglass tape: Carefully place the fiberglass tape onto the adhesive, starting from one end of the prepared surface. Press it down gently to adhere it to the adhesive. If your project requires overlapping multiple pieces of tape, ensure that they are positioned consistently and smoothly.
- Smooth out the tape: Use a squeegee or putty knife to smooth out the fiberglass tape, removing any air bubbles or wrinkles. Work from the center outward to ensure proper adhesion and a seamless finish. Pay extra attention to corners and edges to ensure they are firmly secured.
- Apply a second coat of adhesive (optional): If necessary, you can apply a second coat of resin adhesive over the fiberglass tape to enhance its strength and durability. Follow the manufacturer’s instructions regarding the curing time between coats.
- Allow it to dry: Let the fiberglass tape and adhesive dry completely according to the manufacturer’s instructions. This may take a few hours to a day, depending on the specific product and environmental conditions.
- Sand and finish (if needed): Once the fiberglass tape is fully dry, you can use a sanding block or sandpaper to sand any rough edges or uneven areas. Wipe away any dust with a clean cloth or rag. You can then finish the surface with paint, varnish or another suitable coating, if desired.
Following these step-by-step instructions will ensure a successful application of fiberglass tape and help you achieve a strong and durable result. Remember to take the necessary safety precautions and refer to the manufacturer’s guidelines for the specific products you are using.
Now that you know how to work with fiberglass tape, let’s address some common mistakes to avoid for a flawless finish.
Preparation
Proper preparation is essential when working with fiberglass tape to ensure a successful and long-lasting result. Taking the time to prepare the surface and gather the necessary tools and materials will make the application process smoother and more efficient. Here are some key steps to follow during the preparation phase:
- Clean the surface: Before applying fiberglass tape, it’s crucial to clean the surface thoroughly. Remove any dirt, dust, grease, or loose particles that may affect the adhesion of the tape. Use a mild detergent, water, and a clean cloth to wipe down the surface. If there are any tough stains or residues, consider using a suitable cleaner or degreaser specific to the surface material.
- Dry the surface: After cleaning, ensure that the surface is completely dry before proceeding with the application. Any moisture on the surface can prevent proper adhesion of the adhesive and compromise the effectiveness of the fiberglass tape. Use a clean cloth or allow sufficient time for air drying.
- Sand the surface (if needed): In some cases, the surface may require sanding to create a better bonding surface for the adhesive and the fiberglass tape. Use a sanding block or sandpaper with a medium grit to gently sand the surface. This will help remove any rough areas, smooth out imperfections, and enhance the adhesion of the tape.
- Protect surrounding areas: If you are working on a specific section of a larger surface, such as repairing a crack or reinforcing a joint, it’s wise to protect the surrounding areas. Use painter’s tape or plastic sheeting to cover adjacent surfaces and prevent any accidental damage or adhesive overspill.
- Gather tools and materials: Ensure you have all the necessary tools and materials ready before starting the application. This includes fiberglass tape, scissors or a utility knife, resin adhesive, a squeegee or putty knife, protective gear, a sanding block or sandpaper, and a clean cloth or rag. Having everything within reach will streamline the process and prevent any delays.
By following these preparation steps, you are setting the stage for a successful application of fiberglass tape. Taking the time to clean, dry, and prepare the surface, as well as gathering the required tools and materials, will help ensure a strong bond and professional-looking finish.
Now that you’re fully prepared, it’s time to move on to the next step: applying the fiberglass tape.
When working with fiberglass tape, make sure to wear gloves to protect your hands from irritation. Also, use a sharp pair of scissors to cut the tape to the desired length for a clean edge.
Read more: What Tape Works On Brick
Applying the Tape
Once you have prepared the surface and gathered all the necessary tools and materials, it’s time to apply the fiberglass tape. Proper application is crucial for creating a strong and durable bond. Follow these steps to ensure a successful application:
- Measure and cut the tape: Take the pre-cut fiberglass tape you prepared and measure it to the desired length for the area you will be covering. Use a pair of scissors or a utility knife to cut the tape to the appropriate size. It’s recommended to cut the tape slightly longer than the area to allow for a better overlap.
- Apply the resin adhesive: Take your chosen resin adhesive and apply a thin, even layer onto the prepared surface using a squeegee or putty knife. Ensure that the adhesive covers the entire area where the fiberglass tape will be placed. Work in small sections to prevent the adhesive from drying before you apply the tape.
- Position the tape: Carefully place the fiberglass tape onto the adhesive, starting at one end of the prepared surface. Gently press the tape onto the adhesive, smoothing it out as you go. If your project requires overlapping multiple pieces of tape, make sure they are positioned consistently and smoothly for a seamless result.
- Smooth out the tape: Use a squeegee or putty knife to gently smooth out the fiberglass tape, eliminating any air bubbles or wrinkles. Start from the center and work your way outward, applying even pressure. Pay extra attention to corners and edges to ensure they are firmly adhered.
- Repeat for additional layers (if needed): Depending on the strength and reinforcement required, you may choose to apply additional layers of fiberglass tape. If so, repeat the adhesive application and tape placement process, ensuring proper overlap and alignment with the previous layer.
- Remove excess adhesive: Use a clean cloth or rag to wipe away any excess adhesive that may have squeezed out from the edges of the tape. This will help create a neat, finished appearance.
It is important to work efficiently when applying the fiberglass tape, as the adhesive can start to set and become less sticky over time. Take care to work in small sections and avoid stretching or distorting the tape during application.
Once you have applied the tape, allow it to dry and cure according to the manufacturer’s instructions. This usually involves giving it enough time to fully set and harden, which can typically take a few hours to a day depending on the specific product and environmental conditions.
Now that you have successfully applied the fiberglass tape, it’s time to move on to the next step: smoothing and finishing the surface.
Smoothing and Finishing
After applying the fiberglass tape, it’s important to smooth out the surface and achieve a finished appearance. This step ensures that the tape is securely adhered and provides a seamless and professional finish. Follow these steps to achieve a smooth and polished result:
- Inspect the tape: Carefully examine the applied fiberglass tape for any visible air bubbles, wrinkles, or uneven areas. Identifying these issues early will allow you to correct them before moving forward with the smoothing and finishing process.
- Sanding (if necessary): If there are any rough edges, raised areas, or uneven surfaces, you may need to sand them down. Use a sanding block or sandpaper with a medium grit to gently sand the problem areas. Be careful not to sand too aggressively, as this can damage the fiberglass tape or the underlying surface.
- Cleaning: Before proceeding with the finishing process, ensure that the surface is free of any dust, debris, or loose particles. Use a clean cloth or rag to wipe away any residue left behind from the sanding process.
- Apply a second coat of adhesive (optional): If desired, you can apply a second coat of resin adhesive over the fiberglass tape. This helps to further strengthen the bond and provides added protection. Follow the manufacturer’s instructions regarding the curing time between coats.
- Drying and curing: Allow the second coat of adhesive or the initial layer to dry and cure fully according to the manufacturer’s instructions. This may take several hours or longer, depending on the specific product and environmental conditions.
- Inspect and touch up: After the drying and curing process is complete, inspect the surface for any imperfections or areas that may need touch-ups. Smooth out any rough spots or apply additional adhesive if necessary to achieve a flawless finish.
- Finishing coat (if desired): Depending on the project and your preferences, you may choose to apply a finishing coat over the fiberglass tape. This can include paint, varnish, or another suitable coating. Follow the manufacturer’s instructions for the chosen finishing product and allow it to dry completely.
By following these steps, you will be able to smooth out any rough areas and achieve a finished look for your fiberglass tape application. This will leave you with a surface that is not only strong and durable but also aesthetically pleasing.
Now that you have completed the smoothing and finishing process, it’s important to be aware of common mistakes to avoid when working with fiberglass tape. Stay tuned to learn about these mistakes and how to prevent them.
Common Mistakes to Avoid
Working with fiberglass tape can be a rewarding and successful experience if done correctly. However, there are some common mistakes that can compromise the integrity and effectiveness of your fiberglass tape application. By being aware of these mistakes and taking the necessary precautions, you can ensure a smooth and professional finish. Here are some common mistakes to avoid when working with fiberglass tape:
- Poor surface preparation: Failing to adequately prepare the surface before applying fiberglass tape is a common mistake. Make sure to clean the surface thoroughly, remove any dirt, dust, or grease, and ensure it is dry before proceeding. Failure to do so can result in poor adhesion and a weak bond.
- Inadequate adhesive application: Applying too little or too much adhesive can affect the effectiveness of the fiberglass tape. Follow the manufacturer’s instructions regarding the amount of adhesive to apply. A thin, even layer is usually sufficient to bond the tape securely to the surface.
- Improper positioning and alignment: Placing the fiberglass tape incorrectly or failing to align it properly can lead to an uneven application and compromised strength. Take your time to position the tape accurately, ensuring consistent and smooth overlaps if multiple pieces are used.
- Failure to smooth out air bubbles: Air bubbles that form beneath the fiberglass tape can weaken its bond and compromise its effectiveness. Use a squeegee, putty knife, or your fingers to smooth out any air bubbles as you apply the tape, ensuring a tight and secure bond to the surface.
- Not allowing sufficient drying and curing time: Rushing the drying and curing process can result in a premature or weak bond. Follow the manufacturer’s instructions regarding the recommended drying and curing time. It’s essential to allow the adhesive to thoroughly dry and cure to achieve maximum strength and durability.
- Ignoring safety precautions: Working with fiberglass tape involves handling adhesives and chemicals. Ignoring safety precautions can lead to skin irritation or respiratory issues. Always wear gloves, safety goggles, and a dust mask when working with fiberglass tape to protect yourself from potential harm.
By being mindful of these common mistakes and taking the necessary precautions, you can ensure a successful fiberglass tape application and achieve the desired results. Now that you’re aware of these mistakes, let’s move on to some helpful tips and tricks for working with fiberglass tape.
Tips and Tricks for Working with Fiberglass Tape
Working with fiberglass tape requires attention to detail and proper technique to achieve the best possible results. Here are some tips and tricks to help you work with fiberglass tape effectively and efficiently:
- Measure and cut accurately: Take precise measurements and cut the fiberglass tape to the right length before applying it. Using a ruler or a straight edge can help ensure accurate cuts and a neat application.
- Work in small sections: When applying the tape and adhesive, it’s best to work in small sections. This allows you to focus on one area at a time and ensures that the adhesive doesn’t dry before you place the tape.
- Overlap tape layers: If your project requires multiple layers of fiberglass tape, make sure to overlap them slightly. This helps to create a stronger and more cohesive bond.
- Smooth out the tape: Use a squeegee, putty knife, or your fingers to smooth out the fiberglass tape as you apply it. This helps to remove any air bubbles or wrinkles and ensures a tight bond with the adhesive and surface.
- Consider using a roller: If you’re working on a larger surface area, using a roller can help ensure even pressure as you apply the fiberglass tape. This promotes better adhesion and reduces the risk of air bubbles or wrinkles.
- Apply two thin coats: Instead of applying one thick coat of adhesive, consider using two thin coats. This allows for better control and ensures a more even distribution of the adhesive, resulting in a stronger bond.
- Smooth edges with a rounded tool: To achieve smooth and rounded edges with fiberglass tape, use a rounded tool such as a spoon or a rounded corner of a putty knife. Gently press the tool against the edge of the tape to create a clean and finished look.
- Protect your skin: Fiberglass tape can cause skin irritation, so it’s important to protect yourself. Wear gloves and long sleeves to prevent direct contact with the tape and adhesive. If you do come into contact with fiberglass, wash the affected area immediately with soap and water.
- Practice on a small test piece: If you’re new to working with fiberglass tape, it’s a good idea to practice on a small test piece before tackling larger projects. This will help you familiarize yourself with the application process and allow you to fine-tune your technique.
By following these tips and tricks, you can work with fiberglass tape more confidently and achieve professional-looking results. Remember to take your time, be patient, and pay attention to detail. With practice, you’ll become more proficient in working with fiberglass tape.
Now that you have a thorough understanding of working with fiberglass tape and some valuable tips, it’s time to wrap up our article.
Read more: How To Whiten A Fiberglass Bathtub
Conclusion
Working with fiberglass tape can be a rewarding experience, allowing you to reinforce structures, repair cracks, and add strength to various surfaces. By understanding the properties of fiberglass tape, properly preparing the surface, and following the step-by-step guide, you can achieve strong and durable results.
Remember, thorough surface preparation is essential for a successful application. Clean and dry the surface, and ensure it is free from any dirt, dust, or grease. Cut the fiberglass tape to the desired length and apply a thin, even layer of resin adhesive before positioning the tape. Smooth out the tape to remove any air bubbles or wrinkles, and allow it to dry and cure fully before finishing the surface if desired.
Throughout the process, it’s important to avoid common mistakes such as inadequate surface preparation, improper adhesive application, and insufficient drying and curing time. By being aware of these errors and following the proper techniques, you can achieve a professional-looking finish with fiberglass tape.
Additionally, some tips and tricks can enhance your success with fiberglass tape. Accurate measurements, working in small sections, and overlapping tape layers can contribute to a stronger bond. Smoothing out the tape and using tools like rollers or rounded edges can help achieve a polished appearance. And always remember to protect yourself by wearing gloves and long sleeves to prevent skin irritation.
By utilizing these techniques and being mindful of common mistakes, you can confidently work with fiberglass tape and accomplish your repair or reinforcement projects with ease. Whether you’re tackling a small home improvement task or a larger construction project, fiberglass tape is an invaluable tool.
Now that you have a comprehensive understanding of working with fiberglass tape, it’s time to roll up your sleeves and put this knowledge into action. Embrace the versatility and strength of fiberglass tape, and enjoy the successful outcomes it brings to your DIY endeavors.
Frequently Asked Questions about How To Work With Fiberglass Tape
Was this page helpful?
At Storables.com, we guarantee accurate and reliable information. Our content, validated by Expert Board Contributors, is crafted following stringent Editorial Policies. We're committed to providing you with well-researched, expert-backed insights for all your informational needs.

0 thoughts on “How To Work With Fiberglass Tape”