Articles
What To Put Under Tile Floor
Modified: December 7, 2023
Discover the best articles on what to put under tile floor for a perfect installation. Get expert tips and recommendations for a long-lasting and durable flooring solution.
(Many of the links in this article redirect to a specific reviewed product. Your purchase of these products through affiliate links helps to generate commission for Storables.com, at no extra cost. Learn more)
Introduction
When it comes to installing tile flooring, ensuring a solid foundation is key to its longevity and overall performance. While many people may focus on the selection of tiles and the aesthetic appeal, what goes underneath the tiles is just as essential. The materials that are placed under the tile, commonly referred to as underlayment, provide support, stability, insulation, and moisture control.
In this article, we will explore the various options available for what to put under tile floor. We will discuss different types of underlayment materials, moisture barrier options, considerations for radiant heat systems, and techniques for floor leveling. Understanding the importance of these factors will not only help you make informed decisions but also ensure a successful and durable tile flooring installation.
Key Takeaways:
- Proper subfloor preparation, underlayment selection, and moisture barrier installation are crucial for a successful and long-lasting tile flooring installation.
- Consider radiant heat systems for added comfort, but ensure compatibility with tile materials and proper installation techniques.
Read more: How To Put Tile On Floor
Subfloor Preparation
Before installing any type of underlayment for tile flooring, it is crucial to properly prepare the subfloor. The subfloor is the structural base that supports the entire floor system, and it must be in good condition to ensure a stable and long-lasting tile installation.
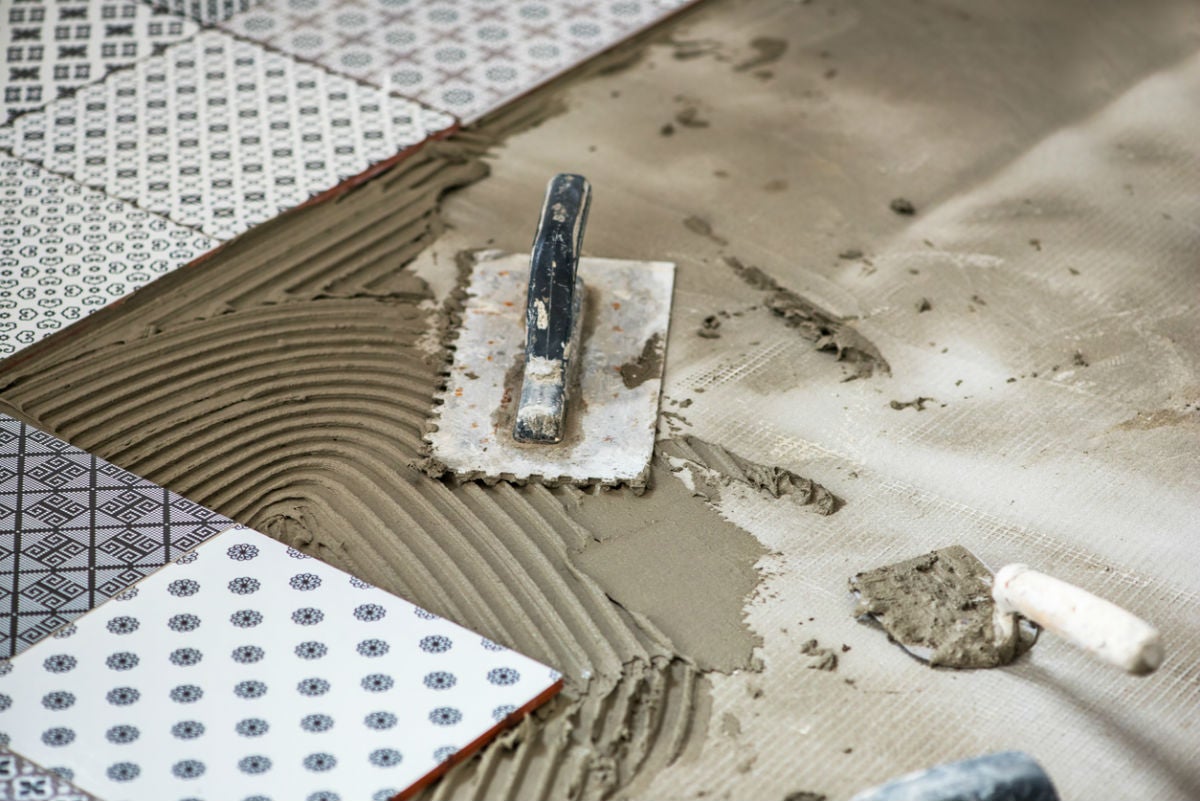
The first step in subfloor preparation is to thoroughly clean the surface. Remove any debris, dust, or loose materials using a broom or vacuum cleaner. Next, inspect the subfloor for any signs of damage, such as rot, moisture, or unevenness. Address any issues before proceeding with the underlayment installation.
If the subfloor is not level, it is necessary to level it using either a self-leveling compound or plywood underlayment. A self-leveling compound is a liquid mixture that can be poured onto the subfloor to create a smooth and level surface. It is ideal for minor level discrepancies. However, for larger deviations, plywood underlayment can be used. Plywood sheets are installed over the subfloor to create a level and stable foundation for the tile installation.
Additionally, it is important to ensure that the subfloor is dry and free from moisture. Moisture can cause tile and grout to crack and can lead to mold and mildew growth. Use a moisture meter to check the moisture levels in the subfloor. If the levels are too high, it may be necessary to address any underlying moisture issues before proceeding.
By properly preparing the subfloor, you will create a solid and stable base for the underlayment and tile flooring. This will minimize any potential problems and ensure a smooth and successful installation.
Underlayment Options
Choosing the right underlayment for tile flooring is essential to ensure its long-term durability and performance. There are several options available, each with its own advantages and suitability for different situations. Let’s explore some of the common underlayment materials:
Foam Underlayment: Foam underlayment is a popular choice due to its affordability, ease of installation, and good sound absorption properties. It provides cushioning and helps to reduce noise transmission. Foam underlayment is available in rolls or sheets and is typically made from polyethylene or polypropylene materials.
Cork Underlayment: Cork underlayment is an eco-friendly option that offers excellent sound insulation and thermal properties. It is made from the bark of cork oak trees and is highly resilient and durable. Cork underlayment is moisture-resistant and provides a comfortable and cushioned feel underfoot.
Cement Backer Board: Cement backer board is a rigid underlayment material that is often used in wet areas such as bathrooms and kitchens. It is made from a combination of cement and reinforcing fibers, making it highly durable and resistant to moisture. Cement backer board provides a stable and flat surface for tile installation and helps to prevent cracking.
Soundproofing Underlayment: If reducing noise transmission between floors is a priority, a soundproofing underlayment can be used. These underlayments are specifically designed to absorb and dampen sound vibrations, creating a quieter environment. They are typically made from materials like rubber, cork, or foam with enhanced soundproofing properties.
Ultimately, the choice of underlayment will depend on factors such as the type of tile flooring, the location of the installation, and specific project requirements. It is important to consider factors such as moisture resistance, sound absorption, and thermal insulation when selecting the appropriate underlayment.
Consulting with a flooring professional or installer can provide valuable insights and recommendations based on your specific needs and circumstances. By choosing the right underlayment, you can enhance the performance and longevity of your tile flooring while enjoying added comfort and sound reduction.
Foam Underlayment
Foam underlayment is a popular choice for tile flooring installations due to its affordability, ease of installation, and desirable properties. It is a versatile underlayment material that provides numerous benefits for both residential and commercial applications.
One of the primary advantages of foam underlayment is its cushioning effect. The foam material absorbs impact and helps to reduce stress on the tiles when walked upon. This cushioning effect not only enhances comfort underfoot but also helps to prevent tile breakage or cracking, especially in high-traffic areas.
In addition to its cushioning properties, foam underlayment also provides sound absorption benefits. The foam material acts as a barrier, reducing noise transmission to the rooms below and creating a quieter environment. This is particularly beneficial in multi-level buildings or areas where noise reduction is a priority.
Another advantage of foam underlayment is its thermal insulation properties. The foam material helps to insulate the floor, providing a barrier against cold temperatures. This can be especially beneficial in colder climates or rooms that require additional warmth, such as basements or bathrooms.
Furthermore, foam underlayment is easy to install. It is available in rolls or sheets, making it simple to cut and fit to the dimensions of the room. Most foam underlayment products come with adhesive strips or overlap edges for easy installation, eliminating the need for additional adhesives or fastening materials.
It is important to note that not all foam underlayment products are created equal. When selecting foam underlayment for your tile flooring, consider factors such as density, thickness, and moisture resistance. Higher density foam provides enhanced durability and support, while thicker foam offers greater cushioning and insulation properties. Additionally, choosing a moisture-resistant foam underlayment is crucial to prevent any damage caused by moisture infiltration.
Ultimately, foam underlayment is a cost-effective solution that offers comfort, sound absorption, and thermal insulation benefits. It is a versatile choice for various tile flooring installations, including kitchens, living rooms, and bedrooms. Consult with a flooring professional to determine the best foam underlayment option for your specific project requirements.
Cork Underlayment
Cork underlayment is a popular choice for tile flooring installations due to its unique properties and environmental benefits. Derived from the bark of cork oak trees, it is a sustainable and eco-friendly underlayment option that offers numerous advantages.
One of the standout features of cork underlayment is its exceptional sound insulation properties. The cellular structure of cork makes it highly effective in absorbing and reducing sound vibrations. It acts as a natural barrier, significantly reducing noise transmission between floors and rooms. This makes it an ideal choice for apartments, condos, or any areas where noise control is important.
Aside from its soundproofing capabilities, cork underlayment also provides excellent thermal insulation. It helps to maintain a comfortable room temperature by acting as a barrier against heat loss or gain. The natural insulating properties of cork help to keep the floor warm in colder climates and cool in warmer climates.
Another advantage of cork underlayment is its resilience and durability. Cork is naturally resistant to mold, mildew, and pests, making it a hygienic and long-lasting option. It has a natural “bounce back” quality, which helps it to retain its shape even under heavy foot traffic. This resilience ensures that the tiles on top remain intact and prevents cracking or shifting.
Additionally, cork underlayment is comfortable underfoot. It has a slight give and cushioning effect, creating a soft and comfortable surface to walk on. This can be especially beneficial in areas where people spend a lot of time standing, such as kitchens or commercial spaces.
Cork underlayment is also easy to install due to its lightweight nature. It comes in rolls or sheets and can be easily cut and trimmed to fit the dimensions of the room. Depending on the specific product, cork underlayment may require adhesive for installation, but this process is typically straightforward.
When selecting cork underlayment, it is important to choose a high-quality product that is specifically designed for tile flooring. Look for cork underlayment with a thickness that meets your soundproofing and insulation needs. It is also essential to consider moisture resistance, as some cork underlayments come with a moisture barrier to protect against potential water damage.
In summary, cork underlayment is a sustainable, durable, and versatile option for tile flooring installations. Its superior sound insulation, thermal insulation, and comfort properties make it an excellent choice for various settings. Consult with a flooring professional to determine the best cork underlayment for your specific project requirements.
Read more: How To Install Heated Floor Under Tile
Cement Backer Board
Cement backer board is a popular choice for underlayment when installing tile flooring, particularly in areas that are prone to moisture or require additional stability. It offers a strong and stable foundation for tile installations, ensuring long-term durability and preventing issues such as cracking or shifting.
One of the key advantages of cement backer board is its superior moisture resistance. Compared to other underlayment materials, such as plywood or particle board, cement backer board is highly resistant to water damage. It does not swell, warp, or deteriorate when exposed to moisture, making it an ideal choice for wet areas like bathrooms, kitchens, or laundry rooms.
Cement backer board is typically made from a combination of cement and reinforcing fibers, which provide strength and stability. This rigid composition helps to prevent any flexing or movement in the subfloor, ensuring that the tiles remain securely in place. This stability is especially important for large format tiles or areas with heavy foot traffic.
An additional benefit of cement backer board is its compatibility with various tile adhesives and mortar. It has a rough surface, allowing the adhesive or mortar to bond effectively and create a strong bond with the tiles. This ensures proper adhesion and reduces the risk of tiles becoming loose or shifting over time.
Another advantage of cement backer board is its fire resistance. Due to its mineral composition, it is highly resistant to fire and can help to prevent the spread of flames. This can be particularly beneficial in commercial or industrial settings where fire safety is a concern.
When installing cement backer board, it is important to follow the manufacturer’s instructions and guidelines. This typically involves using screws or nails to secure the backer board to the subfloor, ensuring proper spacing between the sheets, and using mortar or thin-set to fill any gaps or seams. Proper installation will ensure a level and stable surface for tile installation.
It is worth noting that cement backer board can be heavy and challenging to work with, so it is essential to take proper precautions when handling and installing it. This may include wearing protective gear, using proper lifting techniques, and working in a well-ventilated area.
In summary, cement backer board is a reliable and durable underlayment option for tile flooring installations. Its moisture resistance, stability, compatibility with tile adhesives, and fire resistance properties make it a preferred choice for areas that require additional support and protection. Consult with a flooring professional to determine the most suitable cement backer board for your specific project needs.
Soundproofing Underlayment
Soundproofing underlayment is specifically designed to minimize noise transmission and create a quieter environment in your space. Whether you want to reduce impact sound from footsteps or block airborne noises like voices and music, a soundproofing underlayment is an excellent choice for tile flooring installations.
One of the primary benefits of soundproofing underlayment is its ability to absorb and dampen sound vibrations. It is typically made from materials with high-density and excellent acoustic properties, such as rubber, cork, or foam. These materials effectively absorb the energy created by impact or airborne sound waves, reducing the sound that travels through the floor.
When compared to traditional underlayments, soundproofing underlayment provides superior noise reduction properties. It minimizes sound transmission between floors, preventing sounds from being easily heard in rooms below or above. This is especially important in multi-level buildings, apartments, or any areas where noise control is essential.
In addition to its sound absorption qualities, soundproofing underlayment also contributes to a more comfortable and enjoyable living or working environment. By reducing noise distractions, it helps create a peaceful atmosphere, making it easier to concentrate, relax, or enjoy conversations without the interference of excessive noise.
Soundproofing underlayment is available in various forms, such as rolls, sheets, or tiles, making it suitable for different types of installations. Some products come with self-adhesive backing, simplifying the installation process. It can be applied directly to the subfloor before tile installation, providing a seamless and effective sound barrier.
When selecting soundproofing underlayment, consider factors such as thickness, density, and material composition. Thicker underlayments generally provide better noise reduction, while higher density materials offer improved soundproofing performance. It’s also crucial to choose an underlayment designed for tile flooring to ensure compatibility with the adhesive or mortar used for tile installation.
It’s important to note that while soundproofing underlayment significantly reduces impact and airborne noise, it may not completely eliminate all sounds. Some sounds, such as heavy impacts or loud music, may still be audible to some degree. However, the overall reduction in noise will greatly enhance the comfort and tranquility of your space.
In summary, soundproofing underlayment is an excellent investment for those seeking to minimize noise and create a peaceful environment in their homes or workplaces. Considering its noise absorption properties and comfort benefits, it is a valuable addition to any tile flooring installation. Consult with a flooring professional to find the best soundproofing underlayment for your specific needs and requirements.
Moisture Barrier Options
Moisture can be a significant concern when installing tile flooring, as excessive moisture can lead to damage, mold, and other issues. Installing a moisture barrier is essential to protect the integrity of the floor and ensure a long-lasting installation. There are several moisture barrier options available, each with its own features and benefits.
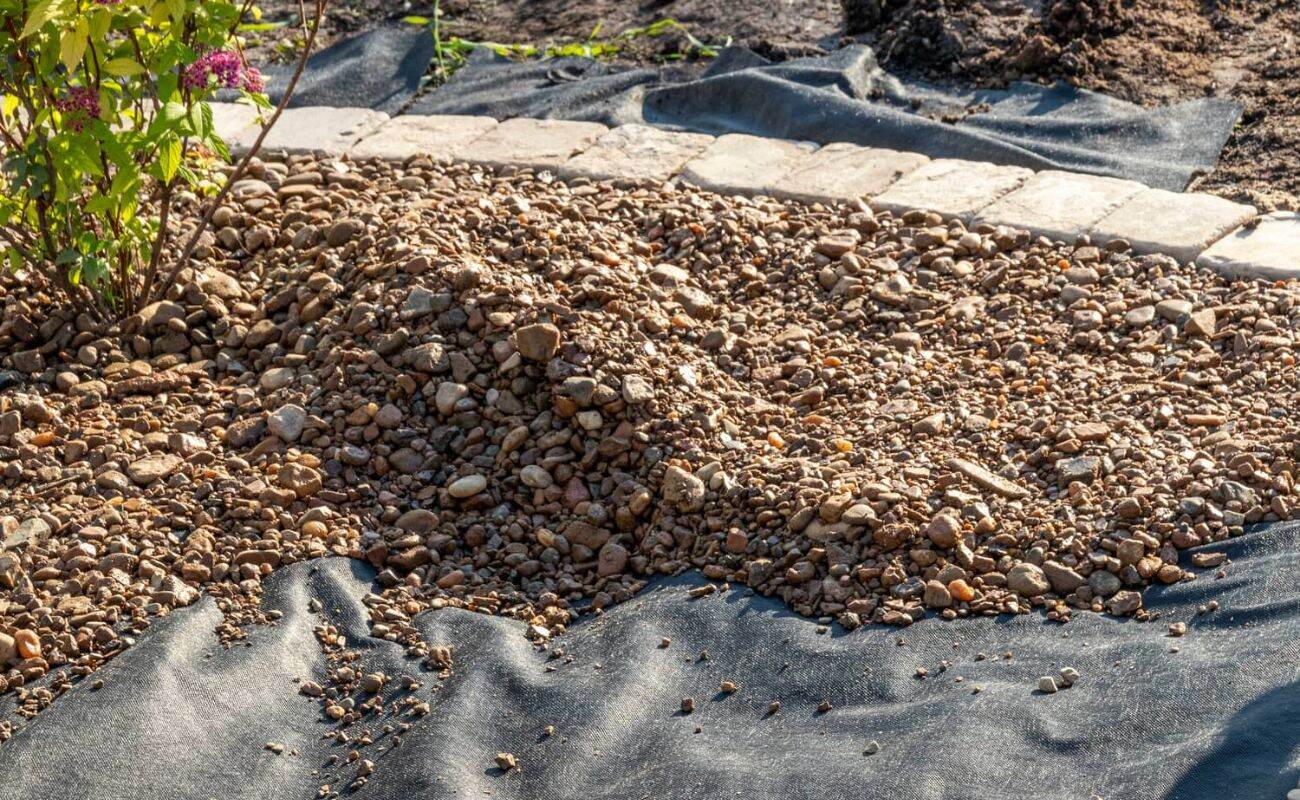
Plastic Sheet Vapor Barrier: Plastic sheet vapor barriers are one of the most commonly used moisture barrier options. They are made from thick polyethylene or PVC material and provide a physical barrier that prevents moisture from penetrating the subfloor. These barriers are typically used in above-grade installations. Plastic sheet vapor barriers are easy to install and affordable, making them a popular choice for many tile flooring projects.
RedGard Waterproofing Membrane: RedGard waterproofing membrane is a liquid product that is applied directly to the subfloor or cement backer board. It forms a flexible, waterproof layer that protects against moisture and allows for the expansion and contraction of the tile installation. RedGard is popular for its ease of application and versatility, as it can be used in both wet and dry areas.
Schluter DITRA Uncoupling Membrane: Schluter DITRA uncoupling membrane is a unique moisture barrier system that not only provides moisture protection but also serves as an uncoupling and crack isolation membrane. It is made of an uncoupling membrane, which allows for in-plane movement of the tile flooring, reducing the risk of cracks. The DITRA system incorporates waterproofing properties to protect against moisture and water vapor transmission.
When selecting a moisture barrier, it’s essential to consider factors such as the specific installation site, subfloor condition, and moisture levels. It’s also crucial to follow the manufacturer’s instructions for proper installation.
It’s worth noting that while moisture barriers help protect against moisture, it’s important to address any underlying moisture issues before installing the tile flooring. This may include addressing sources of water leakage, repairing plumbing issues, or improving drainage in the area.
Additionally, proper moisture management doesn’t end with the installation of the moisture barrier. Adequate ventilation and regular maintenance, such as checking for and promptly addressing any signs of moisture damage, are crucial for ensuring the longevity of the tile flooring.
In summary, installing a moisture barrier is a crucial step in protecting your tile flooring from moisture-related damage. Plastic sheet vapor barriers, RedGard waterproofing membrane, and Schluter DITRA uncoupling membrane are popular options that offer varying degrees of protection and features. Consulting with a flooring professional will help you determine the best moisture barrier option for your specific project needs.
Plastic Sheet Vapor Barrier
A plastic sheet vapor barrier is a commonly used and cost-effective method of protecting tile flooring from moisture. It acts as a physical barrier, preventing moisture from seeping through the subfloor and compromising the integrity of the tiles. This type of moisture barrier is particularly useful for above-grade installations where moisture intrusion from below is a concern.
Plastic sheet vapor barriers are typically made from thick polyethylene or PVC materials. These materials are durable and resistant to moisture, making them an effective choice for moisture protection. The plastic sheet is installed between the subfloor and the underlayment or cement backer board, creating a barrier that prevents moisture from penetrating the flooring system.
The installation of a plastic sheet vapor barrier is relatively straightforward. The sheet should be installed with overlaps and sealed using moisture-resistant tape to ensure a continuous barrier. It is important to carefully cut and fit the sheet to cover the entire surface, including any gaps or seams, to provide maximum protection against moisture intrusion.
One advantage of a plastic sheet vapor barrier is its affordability. It is a cost-effective solution for moisture protection when compared to other moisture barrier options. Additionally, it is readily available and easy to find in most home improvement stores.
Plastic sheet vapor barriers are suitable for various types of tile installations. Whether you are installing ceramic, porcelain, or natural stone tiles, a plastic sheet vapor barrier can provide the necessary protection against moisture damage.
It is important to note that a plastic sheet vapor barrier primarily acts as a moisture barrier and does not offer soundproofing or thermal insulation properties. If sound absorption or thermal insulation is a concern in your project, you may want to consider additional underlayment options that provide those specific benefits in addition to moisture protection.
While a plastic sheet vapor barrier can help prevent moisture-related damage, it is essential to address any underlying moisture issues before installing the barrier. This may involve inspecting the subfloor for leaks, repairing any plumbing issues, or improving drainage in the area.
In summary, a plastic sheet vapor barrier is an affordable and effective method of protecting tile flooring from moisture. It provides a physical barrier that prevents moisture from seeping through the subfloor and compromising the tiles. Consult with a flooring professional to determine if a plastic sheet vapor barrier is suitable for your specific tile flooring installation.
Before laying tile, make sure to install a cement backer board to create a stable and moisture-resistant base. This will help prevent cracking and ensure a long-lasting tile floor.
RedGard Waterproofing Membrane
The RedGard waterproofing membrane is a liquid product that offers excellent protection against moisture for tile flooring installations. It is specifically designed to create a flexible and waterproof barrier that prevents water from penetrating the subfloor and causing damage to the tiles.
One of the key advantages of using RedGard waterproofing membrane is its versatility. It can be applied to various substrates, including concrete, cement backer board, and plywood. This makes it suitable for both wet and dry areas, such as bathrooms, showers, and laundry rooms.
Applying RedGard is relatively simple. The liquid membrane is spread evenly onto the surface using a paintbrush, roller, or trowel. It dries quickly and forms a continuous and seamless waterproofing layer. The flexibility of the membrane allows for natural movement of the subfloor and prevents the development of cracks or leaks in the tiled surface.
RedGard offers several benefits beyond moisture protection. Firstly, it is a crack isolation membrane, meaning it helps to prevent cracks in the tiles caused by movement in the subfloor. This is especially important in areas where expansive soils or heavy loads may cause subfloor movement.
Additionally, RedGard is resistant to mold and mildew growth, enhancing the overall durability and longevity of the tile installation. By preventing moisture from seeping into the subfloor, it eliminates the conditions necessary for mold and mildew to thrive, providing a healthier environment.
Another advantage of using RedGard is that it acts as an anti-fracture membrane, reducing the risk of cracks appearing in the tile layer. This is especially beneficial when installing large format or heavy tiles, as any subfloor movement or tension can be absorbed and minimized by the membrane.
It is important to ensure proper coverage when applying RedGard. According to the manufacturer’s recommendations, at least two coats should be applied, with drying time between coats. This ensures that the membrane forms a robust and reliable barrier against moisture.
While RedGard waterproofing membrane offers excellent water protection, it is worth noting that it is not intended for use as a standalone moisture barrier in areas with substantial water exposure, such as pools or active water leaks. In such cases, additional moisture management techniques may be necessary.
In summary, RedGard waterproofing membrane is a versatile and reliable solution for moisture protection in tile flooring installations. Its flexible and crack-resistant properties, along with its mold and mildew resistance, make it an excellent choice for wet areas and situations where subfloor movement may be a concern. Consult with a flooring professional to determine if RedGard waterproofing membrane is suitable for your specific tile flooring project.
Schluter DITRA Uncoupling Membrane
The Schluter DITRA uncoupling membrane is an innovative and highly effective moisture barrier system that provides not only moisture protection but also uncoupling and crack isolation properties. This multi-functional membrane is designed to ensure a durable and long-lasting tile flooring installation.
One of the key advantages of using the Schluter DITRA uncoupling membrane is its ability to uncouple the tile covering from the substrate, such as the subfloor or concrete slab. This means that any movement or stress from the substrate is absorbed by the membrane, reducing the risk of cracks in the tile layer.
The DITRA membrane also acts as a crack isolation membrane, protecting the tile installation from cracks that may appear in the subfloor due to movement or stress. This is particularly beneficial in areas where the subfloor experiences significant movement, such as in older buildings or areas with expansive soils.
In addition to its uncoupling and crack isolation properties, the Schluter DITRA membrane provides excellent moisture protection. The membrane is made of a polyethylene material with channels or cavities on the underside. These channels allow for the easy movement of moisture, preventing water accumulation beneath the tile surface and ensuring that any moisture is directed to the drains.
The Schluter DITRA membrane is also lightweight and easy to handle. It can be quickly and easily cut to fit the dimensions of the area, making it suitable for both large and small tile flooring projects. The membrane is installed using a thin-set mortar, ensuring a secure bond between the membrane and the substrate.
One of the additional benefits of using the Schluter DITRA uncoupling membrane is that it helps to ensure a level and even tile installation. The membrane has a grid pattern on the top surface, providing guides for correct tile placement and space for proper bonding. It eliminates the need for traditional thick bed mortar installations, resulting in a thinner overall assembly.
When using the Schluter DITRA uncoupling membrane, it is important to follow the manufacturer’s instructions and guidelines for proper installation. This includes appropriate substrate preparation, trowel selection, and the correct installation of waterproofing and sealing materials where necessary.
In summary, the Schluter DITRA uncoupling membrane provides an all-in-one solution for moisture protection, uncoupling, and crack isolation in tile flooring installations. It offers superior performance, durability, and ease of installation. Consult with a flooring professional to determine if the Schluter DITRA membrane is suitable for your specific tile flooring project.
Radiant Heat Considerations
Radiant heat systems provide luxurious warmth and comfort underfoot, making them a popular choice for tile flooring installations. However, there are several important considerations to keep in mind when installing tile over a radiant heat system to ensure optimal performance and durability.
Electric Radiant Heating Mats: Electric radiant heating mats consist of electric cables or wires embedded in a thin mesh that is installed directly under the tile flooring. Before installing the heating mats, it is crucial to ensure that the subfloor is properly prepared and leveled. The heating mats should be installed according to the manufacturer’s guidelines, and the electrical connections should be handled by a licensed electrician. It is also essential to choose tile adhesives and grouts that are compatible with the heating system and will not be negatively affected by the heat.
Hydronic Radiant Floor Heating: Hydronic radiant floor heating involves the use of hot water flowing through pipes installed under the tile flooring. The pipes are typically embedded in a layer of cement or thin-set mortar. Proper installation of the pipes and the insulation layer is crucial to ensure even heat distribution and prevent any leaks or damage. The water temperature and flow rate should be carefully controlled to provide consistent and comfortable heat. As with electric radiant heating, it is important to select tile adhesives and grouts that are compatible with the heating system.
When installing tile over a radiant heat system, it is important to consider the thermal conductivity and expansion coefficients of the tile material. Some tiles, such as ceramic or porcelain, have better thermal conductivity and are more suitable for use with radiant heat. Additionally, it’s crucial to choose a tile installation method that allows for movement caused by temperature changes, such as using flexible adhesives and grouts.
It is also important to ensure that the radiant heat system is properly controlled. Most systems include thermostats that allow you to set and regulate the desired temperature. You should also consider zoning options, which allow you to control different areas of your space independently. Proper insulation of the subfloor is essential to maximize energy efficiency and ensure the heat is directed upward toward the tile flooring and not wasted by heating the subfloor.
Before installing the tile, it is recommended to conduct a heat test to ensure the system is functioning correctly and that there are no hot or cold spots. This can be done by gradually increasing the temperature and monitoring the heat distribution on the surface of the tile.
In summary, when installing tile over a radiant heat system, it is important to consider proper preparation, compatibility with the heating system, tile selection, installation methods, and proper control and insulation. Consulting with a flooring professional who specializes in radiant heat systems will ensure a successful and comfortable tile flooring installation.
Electric Radiant Heating Mats
Electric radiant heating mats are an excellent choice for providing warmth and comfort under tile flooring. These mats consist of electric cables or wires embedded in a thin mesh that is installed directly beneath the tile surface. Electric radiant heating systems offer several advantages and considerations when it comes to installing them with tile flooring.
One of the main advantages of electric radiant heating mats is their ease of installation. The mats are typically available in pre-configured sizes, allowing for quick and straightforward installation. They can be easily placed on the subfloor and secured using a compatible adhesive or thin-set mortar. It’s important to follow the manufacturer’s instructions and consult with a licensed electrician for proper electrical connections.
Another benefit of electric radiant heating mats is the ability to customize heating zones. By dividing the space into different zones, you can control the temperature in various areas according to specific heating requirements. This allows for energy efficiency and personalized comfort throughout the room.
Electric radiant heating mats offer excellent energy efficiency. The cables or wires in the mats are designed to evenly distribute heat across the floor surface, minimizing heat loss. With the proper insulation and temperature control, electric radiant heat systems can provide efficient and cost-effective heating for your tile flooring.
When installing electric radiant heating mats, it is important to consider the compatibility of the system with the tile flooring. Check the manufacturer’s guidelines to ensure that the underlayment and tile adhesives are suitable for use with electric radiant heat. Using the wrong materials can lead to heat buildup, which may damage the tile or affect its performance. It is also important to choose a tile adhesive and grout that can withstand the heat generated by the system without compromising their integrity.
Additionally, it’s crucial to consider the thickness and insulation of the electric radiant heating mats. Thicker mats provide more heat output, but they may require adjustments to the subfloor height to accommodate the additional thickness. Proper insulation beneath the mats helps to direct the heat upward, minimizing heat loss and maximizing energy efficiency.
Before installing the tile over the electric radiant heating mats, it is essential to conduct a heat test. Gradually increase the temperature and monitor the heat distribution on the tile surface to ensure that the system is operating correctly and uniformly. This will help identify any potential issues before proceeding with the installation.
In summary, electric radiant heating mats offer a convenient and efficient way to heat tile flooring. Proper installation, compatibility with the tile materials, customization of heating zones, and conducting a heat test are all crucial considerations to ensure a successful and comfortable installation. Consult with a flooring professional or electrician to determine the best solution for your specific tile flooring project.
Hydronic Radiant Floor Heating
Hydronic radiant floor heating is a highly efficient and luxurious heating system that involves the circulation of hot water through pipes installed beneath the tile flooring. This type of system offers several advantages and considerations when it comes to installing it with tile flooring.
One of the main advantages of hydronic radiant floor heating is its energy efficiency. Hot water is an excellent heat conductor, allowing for efficient and even distribution of heat throughout the room. The thermal mass of the tile flooring helps retain heat, resulting in a comfortable and consistent warmth underfoot.
Hydronic radiant floor heating provides customizable heating control. By using a thermostat or zone control system, it is possible to set different temperatures for various areas or rooms. This allows for energy savings by heating only the areas that are in use, providing personalized comfort throughout the space.
Another benefit of hydronic radiant floor heating is its longevity. Unlike traditional forced-air heating systems, which may require frequent maintenance and replacements, hydronic systems have fewer components that can wear out over time. With proper installation and maintenance, hydronic radiant floor heating can provide reliable and efficient heating for many years.
Proper installation is crucial when integrating hydronic radiant floor heating with tile flooring. The pipes should be evenly spaced and securely fastened to the subfloor or embedded in a layer of thin-set mortar. It is important to use a high-quality insulation layer beneath the pipes to prevent heat loss and ensure optimal energy efficiency.
When selecting the tile for use with hydronic radiant floor heating, it is important to consider thermal conductivity. Materials with high thermal conductivity, such as ceramic or porcelain tiles, transfer heat more effectively. It is also crucial to choose a tile adhesive and grout that can withstand the heat generated by the system without compromising their performance or integrity.
Hydronic radiant floor heating systems require a heat source, such as a boiler or water heater, to warm the water. These heat sources can be powered by various fuels, including natural gas, propane, or electricity. The selection of a heat source should be based on factors like cost, availability, and environmental impact.
It is essential to work with a knowledgeable professional during the design and installation of a hydronic radiant floor heating system. They can help determine the optimum pipe layout, insulation requirements, and provide guidance on heat source selection. Following proper installation practices and regular maintenance will ensure the system’s longevity and efficient operation.
In summary, hydronic radiant floor heating is a highly efficient and luxurious heating option for tile flooring. The customizable heating control, energy efficiency, and long-term reliability make it an attractive choice. Working with a professional and considering factors such as proper installation, thermal conductivity of the tiles, and heat source selection, will help ensure a successful integration of hydronic radiant floor heating with your tile flooring.
Floor Leveling Techniques
Having a level and even subfloor is essential for a successful tile flooring installation, as it ensures proper alignment, adhesion, and overall stability. If the subfloor is uneven or has dips and bumps, it may cause tiles to crack, shift, or create an uneven surface. Thankfully, there are several floor leveling techniques available to address these issues and create a smooth and level surface for tile installation.
Self-Leveling Compound: Self-leveling compound is a popular choice for correcting minor level discrepancies in the subfloor. It is a cement-based product that can be poured onto the subfloor and spreads out on its own to create a level and smooth surface. Self-leveling compound is easy to use and provides quick and effective leveling results. It is important to follow the manufacturer’s instructions for proper mixing and application.
Plywood Underlayment: Plywood underlayment is a suitable option for correcting more significant level variations in the subfloor. It involves laying plywood sheets over the subfloor to create a level and stable base for tile installation. The thickness of the plywood will depend on the degree of unevenness in the subfloor. Plywood can be screwed or nailed down onto the subfloor, and the seams should be properly staggered and sealed to prevent movement or gaps.
Grinding or Scabbling: In cases where the subfloor has high spots or bumps, grinding or scabbling can be employed to level the surface. Grinding involves using a power tool with a grinding wheel to grind down the elevated areas, while scabbling utilizes a specialized machine to chip away at the surface. Both methods require skill and caution to ensure a level and even result. After grinding or scabbling, it is necessary to thoroughly clean the subfloor before proceeding with tile installation.
Floor Patching Compound: Floor patching compound is a versatile product used to fill in cracks, holes, or low spots in the subfloor. It is typically a cement-based material that can be troweled onto the subfloor to create a level surface. Floor patching compound is a great option for localized repairs and minor level adjustments. It is important to follow the manufacturer’s instructions for proper mixing, application, and drying times.
It is crucial to note that floor leveling techniques should be used in conjunction with proper subfloor preparation, including addressing any underlying moisture issues and ensuring subfloor stability. Leveling techniques are meant to correct minor to moderate level discrepancies, and for more significant problems, it may be necessary to consult with a professional to determine the best course of action.
In summary, achieving a level subfloor is essential for a successful tile flooring installation. Self-leveling compound, plywood underlayment, grinding or scabbling, and floor patching compound are common techniques used to level the subfloor. It is important to assess the degree of unevenness and consult with a flooring professional to determine the most appropriate leveling method for your specific project.
Self-Leveling Compound
Self-leveling compound is a versatile and effective solution for correcting minor level discrepancies in the subfloor before tile flooring installation. It is a cement-based product that, when mixed with water, creates a fluid consistency that self-levels to create a smooth and level surface.
The primary advantage of self-leveling compound is its ease of use. It is specifically designed to flow and settle into low spots, bumps, or uneven areas of the subfloor. The compound spreads out on its own, eliminating the need for manual leveling or extensive trowel work. This makes it a efficient and time-saving solution for achieving a level surface.
Self-leveling compound is commonly used to correct dips, unevenness, or small imperfections in the subfloor. It is suitable for various subfloor materials, including concrete, wood, and existing tile or linoleum surfaces. However, it is important to ensure that the subfloor is properly cleaned and prepared before applying the compound.
The application process for self-leveling compound involves a few key steps. Firstly, the subfloor should be thoroughly cleaned to remove any dust, debris, or loose materials. It is also important to fill any cracks or holes in the subfloor using a suitable patching compound before proceeding.
Next, a primer is typically applied to the subfloor to promote better adhesion of the self-leveling compound. The primer helps to reduce the absorption of moisture from the self-leveling compound into the subfloor, which can impact its drying time and performance. Following the manufacturer’s instructions, the primer is applied and allowed to dry before pouring the self-leveling compound.
The self-leveling compound is then mixed with water and poured onto the subfloor. It is spread out evenly using a gauge rake or other appropriate tools. The compound will flow and level itself, filling in low spots and creating a smooth surface. It is important to work quickly and avoid overworking the compound to prevent any air bubbles or uneven settling.
After the self-leveling compound has been applied, it should be left undisturbed to dry and cure according to the manufacturer’s instructions. The drying time can vary depending on the thickness of the applied compound and environmental conditions. It is important to allow sufficient time for the compound to fully cure before proceeding with tile installation.
When using self-leveling compound for tile flooring, it is important to select a compound that is suitable for tile installation and compatible with the specific adhesive and tile materials being used. Following the manufacturer’s recommendations for thickness, drying time, and other application guidelines is crucial to ensure a successful and durable tile installation.
In summary, self-leveling compound is an efficient and effective solution for correcting minor level discrepancies in the subfloor. Its self-leveling properties make it easy to use, and it can be applied to a variety of subfloor materials. Proper subfloor preparation, including cleaning and priming, along with following manufacturer’s instructions, will ensure optimal results when using self-leveling compound for tile flooring installations.
Plywood Underlayment
Plywood underlayment is a common and effective method used to level and stabilize subfloors before tile flooring installation. It involves laying plywood sheets over the subfloor to create a smooth and level surface, ensuring proper support for the tiles and preventing issues such as cracking or shifting.
One of the primary advantages of plywood underlayment is its ability to correct more significant level variations in the subfloor. If the subfloor has noticeable dips, unevenness, or structural issues, laying plywood over it can provide a stable and level base for the tile installation.
When selecting plywood for underlayment, it is important to use a high-quality product that is specifically designed for this purpose. CDX (exposure 1) or AC (exterior) grade plywood is commonly used for underlayment. It is essential to choose plywood with the correct thickness, typically ranging from 1/4 to 3/4 inch, depending on the degree of unevenness in the subfloor.
Plywood underlayment is typically installed using screws or nails to secure it to the subfloor. Proper spacing and fastening techniques should be followed to ensure the plywood remains securely in place. It is important to stagger the seams between the plywood sheets and leave a small gap between them to allow for natural expansion and contraction.
Prior to laying the plywood, it is crucial to prepare the subfloor by thoroughly cleaning it to remove any debris, dust, or loose materials. Any underlying moisture issues should be addressed before proceeding with the installation. Applying a suitable moisture barrier or primer may be necessary to prevent moisture infiltration from affecting the plywood.
After the plywood underlayment is installed, it is important to ensure the surface is level. Using a long level or straightedge, check for any high or low spots and make any necessary adjustments using floor patching compound or sanding. The goal is to achieve a flat and even surface to ensure proper support for the tile installation.
Once the plywood underlayment is properly leveled, it is ready for tile installation. Depending on the specific requirements of the project, additional underlayment materials such as cement backer board or an uncoupling membrane may also be used in conjunction with the plywood underlayment to further enhance stability and moisture resistance.
Plywood underlayment provides a solid and level foundation for a successful tile flooring installation. It is important to follow industry standards and manufacturer’s guidelines for proper installation techniques and materials. Consulting with a flooring professional can provide valuable insights and recommendations based on the specific subfloor conditions and tile installation requirements.
In summary, plywood underlayment is a reliable and effective solution for leveling and stabilizing subfloors before tile flooring installation. Proper subfloor preparation, selecting the appropriate plywood grade and thickness, and following proper installation guidelines will ensure a smooth and successful tile flooring installation.
Read more: What To Put Under Bathtub
Conclusion
When it comes to installing tile flooring, what goes beneath the tiles is just as important as the tiles themselves. Proper subfloor preparation and the selection of the right underlayment materials are crucial to ensure a successful and long-lasting tile installation.
Subfloor preparation involves cleaning the surface, addressing any damage or unevenness, and ensuring that moisture issues are resolved. This provides a solid foundation for the underlayment and tile flooring to be installed upon.
Underlayment options such as foam underlayment, cork underlayment, cement backer board, and soundproofing underlayment offer various benefits including cushioning, sound absorption, moisture resistance, and thermal insulation. Choosing the appropriate underlayment depends on factors such as the type of tiles, location of the installation, and specific project requirements.
Moisture barrier options like plastic sheet vapor barriers, RedGard waterproofing membrane, and Schluter DITRA uncoupling membrane protect the tile flooring from moisture seepage, preventing damage and mold growth. Proper selection and installation of the moisture barrier are crucial for effective moisture protection.
For added comfort and luxury, radiant heat systems can be considered. Electric radiant heating mats and hydronic radiant floor heating systems offer efficient and customizable heating solutions. However, compatibility with tile materials, proper installation techniques, and heat management considerations should be taken into account.
Finally, floor leveling techniques such as self-leveling compound and plywood underlayment provide solutions for correcting uneven subfloors, ensuring a smooth and stable surface for tile installation. Proper installation techniques, subfloor preparation, and selection of suitable materials are essential for achieving level and even results.
In conclusion, a successful tile flooring installation requires attention to detail and careful consideration of subfloor preparation, underlayment options, moisture barrier choices, radiant heat system considerations, and floor leveling techniques. Consulting with a flooring professional can provide valuable guidance and ensure that the correct materials and techniques are applied for a durable and visually appealing tile flooring that will stand the test of time.
Frequently Asked Questions about What To Put Under Tile Floor
Was this page helpful?
At Storables.com, we guarantee accurate and reliable information. Our content, validated by Expert Board Contributors, is crafted following stringent Editorial Policies. We're committed to providing you with well-researched, expert-backed insights for all your informational needs.


0 thoughts on “What To Put Under Tile Floor”