Home>Dining>Table Decor>How To Knit An Apple Table Centerpiece
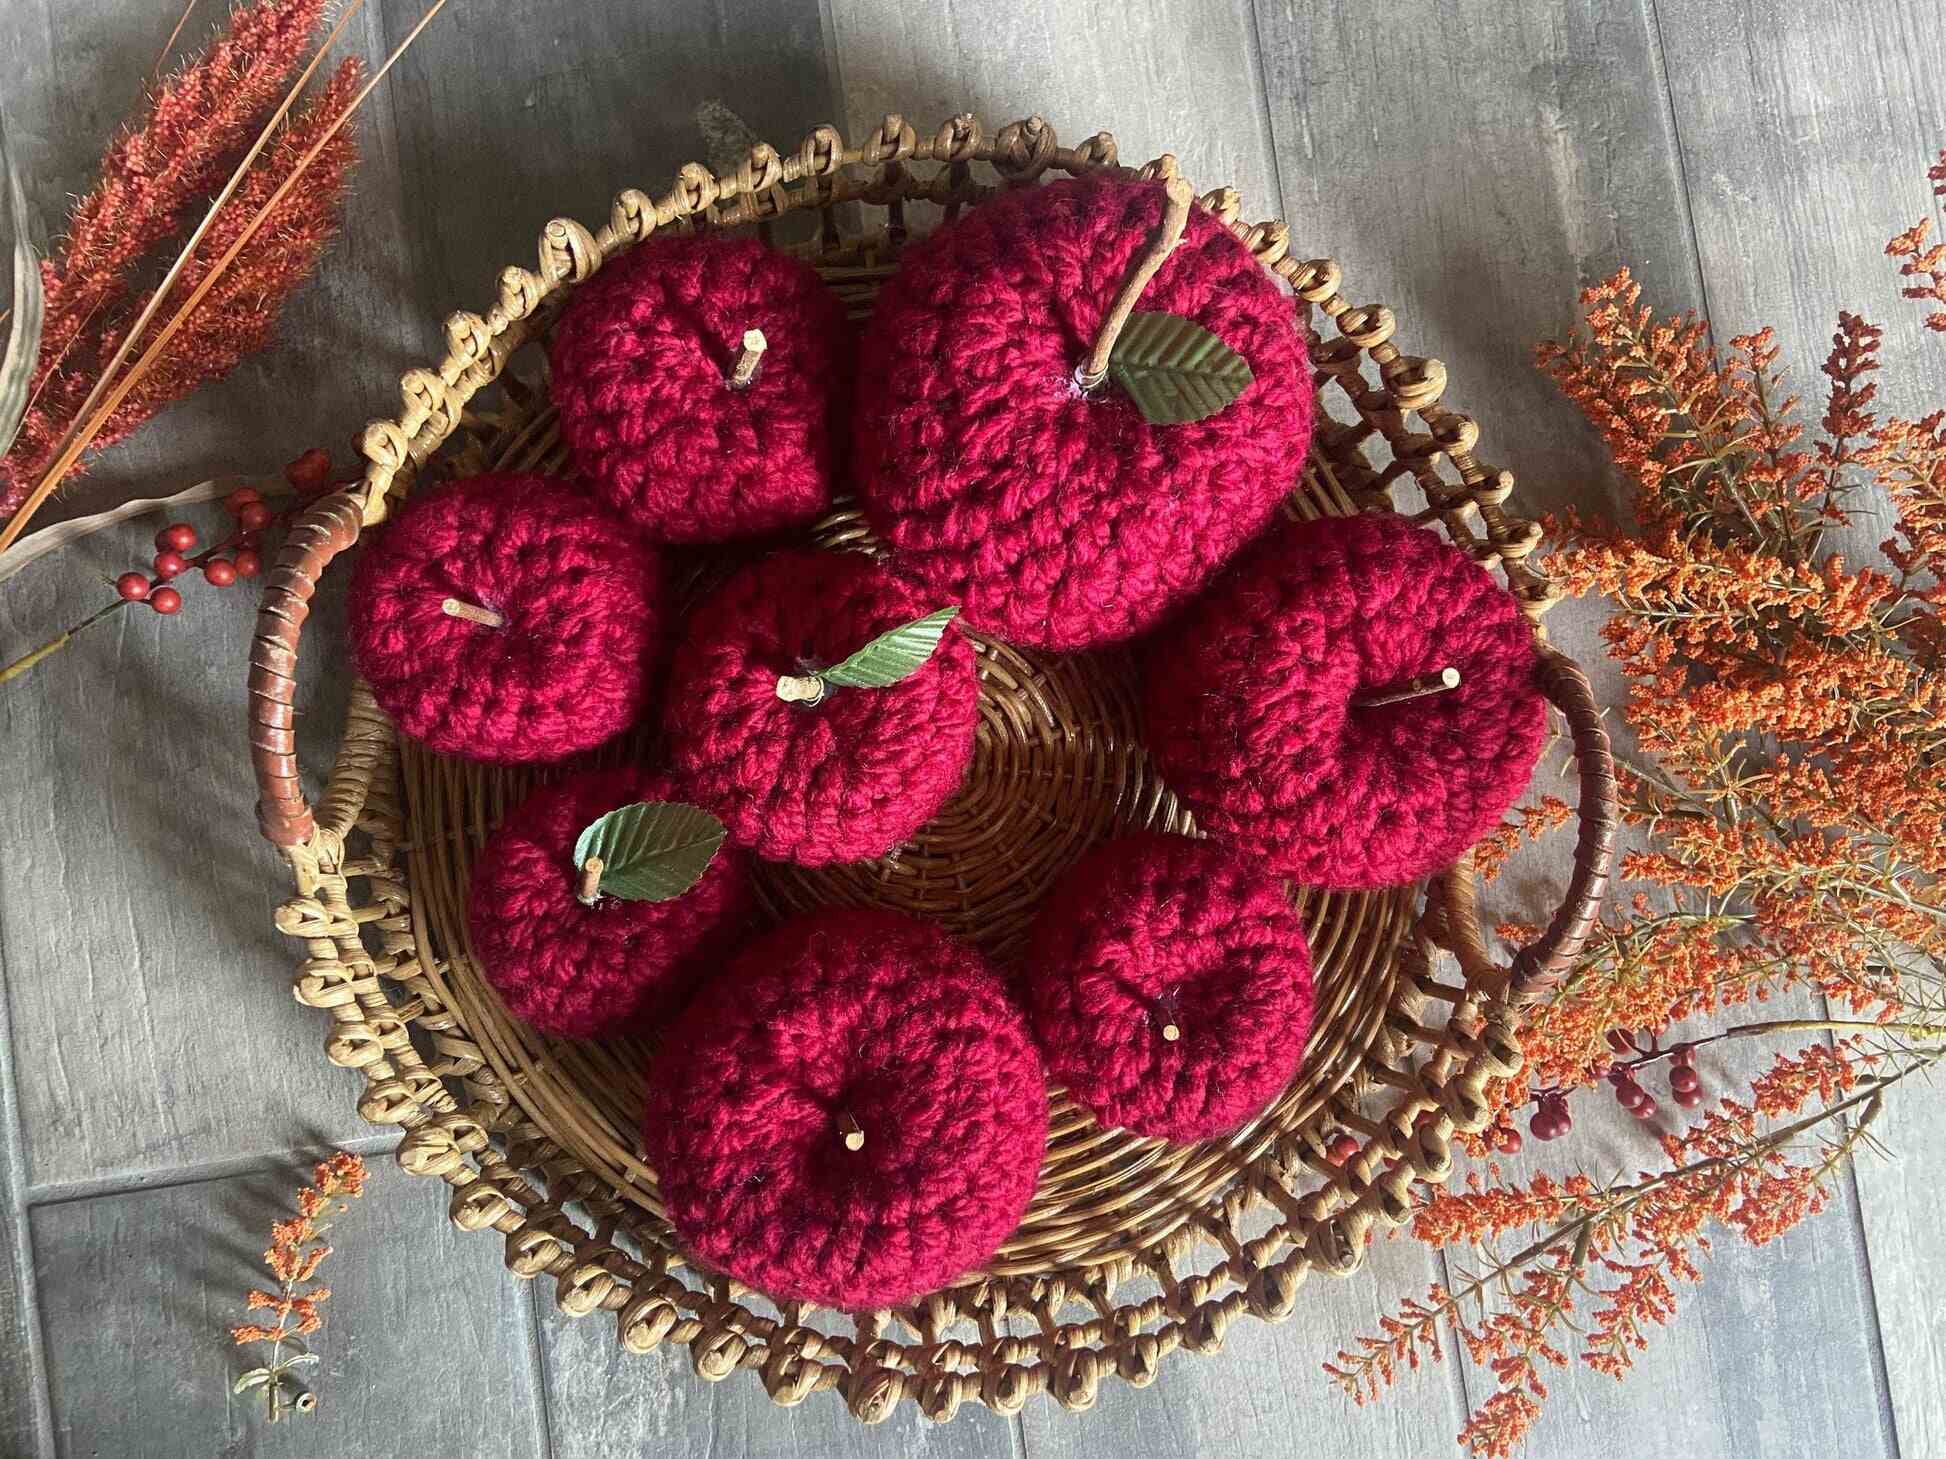

Table Decor
How To Knit An Apple Table Centerpiece
Modified: January 4, 2024
Learn how to knit an apple table centerpiece and add a charming touch to your table decor. Create a unique focal point with this fun and easy knitting project.
(Many of the links in this article redirect to a specific reviewed product. Your purchase of these products through affiliate links helps to generate commission for Storables.com, at no extra cost. Learn more)
Introduction
Welcome to the world of table decor, where every detail can make a big difference in transforming an ordinary dining table into a stunning focal point. When it comes to table centerpieces, there are endless options to choose from. From floral arrangements to candle displays, the choices are vast. However, if you are looking to add a touch of uniqueness and creativity to your table, why not try knitting an apple table centerpiece?
Knitting is a versatile craft that allows you to create various items, and knitting a table centerpiece is no exception. Not only will it showcase your knitting skills, but it will also add a cozy and charming element to your table. The best part is that you can customize the colors and sizes to match your personal style and the overall theme of your table setting.
In this article, we will guide you through the steps of knitting an apple table centerpiece. We will provide you with a list of materials needed, as well as detailed instructions on each step of the process. So grab your knitting needles and let’s get started!
Key Takeaways:
- Knitting an apple table centerpiece adds a cozy and charming element to your table decor, showcasing your creativity and personal style while impressing your guests with a unique handmade centerpiece.
- The process of knitting an apple table centerpiece involves casting on stitches, knitting the base, purling the sides, decreasing stitches, shaping the apple, stuffing it, and adding finishing touches, allowing you to create a realistic and visually appealing decor piece.
Read more: How To Knit A Diagonal Rectangle Placemat
Materials Needed
To knit an apple table centerpiece, you will need the following materials:
- Worsted weight yarn in the color of your choice for the apple
- Green yarn for the stem and leaf
- Knitting needles in the appropriate size for the yarn you are using
- Stuffing material
- Tapestry needle for weaving in ends
- Scissors
Choose yarn colors that match your desired apple aesthetic. You can go for a traditional red apple or get creative with different shades like green, yellow, or even patterned yarns. The choice is yours!
When it comes to knitting needles, the size will depend on the thickness of your yarn. Check the yarn label for the recommended needle size or use a needle size that gives you the desired tension and gauge.
For stuffing the apple, you can use polyester fiberfill or any other soft material that will give it a plump appearance. Avoid using materials that are lumpy or bulky, as they may affect the shape of your apple.
Now that you have gathered your materials, it’s time to move on to the knitting process!
Step 1: Casting On Stitches
To begin knitting your apple table centerpiece, you will first need to cast on your stitches. The number of stitches will depend on the size of your desired apple. Here’s how to get started:
- Hold the knitting needles in your dominant hand, with the yarn attached to the first needle.
- Make a slipknot by making a loop with the yarn, crossing the end over the loop, and pulling it through. Tighten the knot around the needle, leaving a small tail of yarn.
- Insert the needle with the slipknot into your non-dominant hand, allowing the needles to cross. The working yarn should be at the back, and the tail should be at the front.
- With your non-dominant hand, insert the empty needle into the slipknot, pointing it away from you. Hold it between your thumb and forefinger.
- Using your dominant hand, bring the working yarn over the top of the empty needle, creating a loop.
- Slide the loop onto the empty needle, then gently pull the yarn to tighten the loop around the needle.
- Repeat steps 4 to 6 until you have cast on the desired number of stitches. Make sure to maintain an even tension throughout.
Once you have cast on the stitches, you are ready to move on to the next step: knitting the base of the apple. Let’s continue our knitting adventure!
Step 2: Knitting the Base
Now that you have cast on your stitches, it’s time to start knitting the base of your apple table centerpiece. This will create the foundation for the shape of the apple. Follow these steps:
- Hold the knitting needles in your preferred hand holding style.
- With the working yarn in the back, insert the right-hand needle into the first stitch on the left-hand needle.
- Wrap the working yarn around the right-hand needle, from back to front, creating a loop.
- Using the right-hand needle, pull the loop through the first stitch, slipping it off the left-hand needle.
- Repeat steps 2 to 4 until you have knitted all the stitches on the left-hand needle. The knitted stitches will now be on your right-hand needle.
- Slide the stitches from the right-hand needle onto the left-hand needle. The right-hand needle is now empty, and you are ready to knit the next row.
- Continue knitting rows of stitches in the same manner until the base of your apple reaches the desired size. Remember to maintain an even tension and check your stitch count periodically.
As you knit the base of the apple, you’ll start to see its shape taking form. The number of rows you knit will depend on the size of your apple and the height you want to achieve.
Once you are satisfied with the size of the base, you can move on to the next step: purling the sides to create texture and depth. Let’s keep knitting!
Step 3: Purling the Sides
Now that you have knitted the base of your apple table centerpiece, it’s time to add some texture and depth by purling the sides. Purl stitches have a different appearance from knit stitches and will create a contrasting pattern on the apple. Follow these steps to purl the sides:
- Hold the knitting needles in your preferred hand holding style.
- With the working yarn in front of the needles, insert the right-hand needle into the first stitch on the left-hand needle from right to left.
- Wrap the working yarn around the right-hand needle, from front to back, creating a loop.
- Using the right-hand needle, pull the loop through the first stitch, slipping it off the left-hand needle.
- Repeat steps 2 to 4 until you have purled all the stitches on the left-hand needle. The purled stitches will now be on your right-hand needle.
- Slide the stitches from the right-hand needle onto the left-hand needle. The right-hand needle is now empty, and you are ready to purl the next row.
- Continue purling rows of stitches in the same manner until the sides of your apple reach your desired height. This will create a textured pattern that resembles the natural contours of an apple.
By purling the sides, you are adding visual interest and giving your knitted apple a lifelike appearance. Take your time to ensure that your purl stitches are consistent and evenly spaced.
Once you have finished purling the sides of your apple, it’s time to move on to the next step: decreasing stitches to shape the top. Let’s continue our knitting journey!
When knitting an apple table centerpiece, use a tight gauge to create a sturdy shape. Consider using a combination of red and green yarn to create a realistic apple appearance.
Read more: How To Make Centerpieces With Candy
Step 4: Decreasing Stitches
As we progress in knitting the apple table centerpiece, it’s time to decrease stitches to shape the top of the apple. Decreasing stitches will bring the sides of the apple together, creating a rounded shape. Follow these steps to decrease stitches:
- Hold the knitting needles in your preferred hand holding style.
- Insert the right-hand needle into the first two stitches on the left-hand needle, as if you were going to knit them together.
- Wrap the working yarn around the right-hand needle, from back to front, creating a loop.
- Using the right-hand needle, pull the loop through the first two stitches, slipping them off the left-hand needle.
- Repeat steps 2 to 4 until you have decreased all the stitches on the left-hand needle. The decreased stitches will now be on your right-hand needle.
- Slide the stitches from the right-hand needle onto the left-hand needle. The right-hand needle is now empty, and you are ready to decrease the next row.
- Continue decreasing rows of stitches in the same manner until you have reached a small number of stitches, typically between 6 and 8.
Decreasing stitches will gradually shape the top of your apple. As the number of stitches decreases, the apple will start to take on a rounded form. This shaping is essential for creating a realistic apple appearance.
Once you have finished decreasing stitches, you’re ready to move on to the next step: shaping the apple by increasing stitches. Let’s continue knitting!
Step 5: Shaping the Apple
Now that you’ve decreased stitches to create the top of your apple, it’s time to shape it by increasing stitches. Increasing stitches will give the apple a rounded and full shape. Follow these steps to shape the apple:
- Hold the knitting needles in your preferred hand holding style.
- Insert the right-hand needle into the first stitch on the left-hand needle, as if you were going to knit it.
- Instead of knitting the stitch, place the tip of the right-hand needle under the strand between the stitch just knitted and the next stitch on the left-hand needle.
- Lift the strand onto the left-hand needle, creating a new stitch.
- Repeat steps 2 to 4 until you have increased all the stitches on the left-hand needle. The increased stitches will now be on your right-hand needle.
- Slide the stitches from the right-hand needle onto the left-hand needle. The right-hand needle is now empty, and you are ready to increase again on the next row.
- Continue increasing rows of stitches in the same manner until you have reached the desired width of your apple. This will give the apple a plump and rounded shape.
Increasing stitches will gradually shape your knitted apple, making it look fuller and more three-dimensional. Be sure to maintain an even tension and distribute the increases evenly throughout the rows.
Once you are satisfied with the shape of your apple, it’s time to move on to the next step: stuffing it to give it a firm and realistic feel. Let’s keep knitting!
Step 6: Stuffing the Apple
Now that you’ve shaped your knitted apple, it’s time to bring it to life by stuffing it. Stuffing adds volume and gives the apple a firm and realistic feel. Here’s how to stuff your apple:
- Take your stuffing material and fluff it up to ensure it’s evenly distributed.
- Using your fingers or a small tool, gently push the stuffing into the opening at the top of the apple.
- Continue adding stuffing until the apple feels firm and plump, but not overly stuffed. You want to maintain the rounded shape of the apple while allowing it to retain a soft and plush texture.
- Once you’re satisfied with the amount of stuffing, use your fingers to shape and mold the apple, ensuring it retains its desired shape.
- If needed, add more stuffing to areas that may need additional volume to create a balanced appearance.
Be sure not to overstuff your apple, as it may distort the shape or put stress on the stitches. Take your time and adjust the stuffing as needed to achieve the desired result.
Now that you’ve successfully stuffed your apple, it’s time to move on to the final step: adding the finishing touches to make your table centerpiece truly delightful. Let’s complete the knitting process!
Step 7: Finishing Touches
Congratulations! You’re in the final step of knitting your apple table centerpiece. It’s time to add those finishing touches that will truly bring your creation to life. Follow these steps to complete your masterpiece:
- With the green yarn, create a small stem for your apple. You can simply knot the yarn to create a short length, then sew it onto the top center of the apple using a tapestry needle.
- Next, create a leaf by knitting a small rectangle or triangle shape using the green yarn. Once complete, stitch it onto the stem using the tapestry needle, positioning it at an angle to add a natural touch.
- Inspect your apple for any loose ends or stitches. Use the tapestry needle to weave in any loose ends, ensuring they are securely tucked away.
- Give your apple a fluffy and polished look by gently fluffing the outer stitches with your fingers. This will enhance the texture and add a touch of natural realism.
Take a moment to admire your beautiful knitted apple table centerpiece. Its vibrant colors and unique handmade charm will surely be a conversation starter at your next gathering or special occasion.
Remember, you can create multiple apples in different sizes and colors to create a stunning centerpiece arrangement on your dining table. Let your creativity shine and experiment with different yarns, patterns, and even adding small embellishments like tiny beads or embroidered details.
Now that you’ve completed all the steps, your knitted apple table centerpiece is ready to take its place as the star of your table. Enjoy the pride and satisfaction that comes with creating something beautiful with your own hands, and be prepared to receive compliments on your unique and creative decoration!
Happy knitting!
Read more: How To Make Tulle Centerpieces
Conclusion
Congratulations on completing your knitted apple table centerpiece! By following the steps outlined in this guide, you have created a charming and unique decor piece that will undoubtedly add warmth and character to any table setting.
Knitting your own table centerpiece allows you to showcase your creativity, personalize your decor, and impress your guests with your craft skills. The process of knitting an apple table centerpiece involves casting on stitches, knitting the base, purling the sides, decreasing stitches, shaping the apple, stuffing it, and adding the finishing touches. Each step plays a crucial role in achieving a realistic and visually appealing result.
Remember to choose yarn colors and textures that suit your taste and complement your existing tableware. You can also explore different sizes and patterns to create a cohesive and eye-catching centerpiece arrangement.
Not only does knitting provide an enjoyable and relaxing pastime, but it also allows you to create meaningful and cherished items for your home or loved ones. Knitted decorations, like this apple centerpiece, add a personal touch and contribute to a cozy and inviting atmosphere.
So why not give it a try? Gather your materials, follow the step-by-step instructions, and bring your imagination to life through the art of knitting. Whether you’re a seasoned knitter or just starting out, this project is sure to bring you joy and satisfaction.
Thank you for joining us on this knitting journey! We hope that you have learned valuable techniques, found inspiration, and most importantly, enjoyed the process of creating your very own knitted apple table centerpiece. May it become a cherished piece in your home, adding beauty and warmth to your gatherings for years to come.
Frequently Asked Questions about How To Knit An Apple Table Centerpiece
Was this page helpful?
At Storables.com, we guarantee accurate and reliable information. Our content, validated by Expert Board Contributors, is crafted following stringent Editorial Policies. We're committed to providing you with well-researched, expert-backed insights for all your informational needs.


0 thoughts on “How To Knit An Apple Table Centerpiece”