Home>Furniture & Design>Bathroom Accessories>How To Adjust Bathtub Trip Lever
Bathroom Accessories
How To Adjust Bathtub Trip Lever
Modified: October 19, 2024
Learn how to adjust the bathtub trip lever for smooth operation and improved functionality. Find out the best techniques for maintaining bathroom accessories.
(Many of the links in this article redirect to a specific reviewed product. Your purchase of these products through affiliate links helps to generate commission for Storables.com, at no extra cost. Learn more)
Introduction
The bathtub trip lever is a crucial component of your bath's drainage system, responsible for controlling the opening and closing of the drain. Over time, the trip lever may require adjustments to ensure smooth operation and prevent issues such as water leakage or drainage problems. Understanding how to adjust the bathtub trip lever is essential for maintaining a functional and efficient bathroom.
In this comprehensive guide, we will delve into the intricacies of the bathtub trip lever, providing step-by-step instructions on how to adjust its height, fix alignment issues, and lubricate the mechanism for optimal performance. Whether you are a seasoned DIY enthusiast or a novice homeowner, mastering the art of adjusting the trip lever will empower you to tackle common bathroom maintenance tasks with confidence.
Join us as we explore the inner workings of the bathtub trip lever and equip you with the knowledge and skills needed to keep your bath running smoothly. Let's dive into the world of bathroom accessories and discover the secrets to a well-maintained and hassle-free bathing experience.
Key Takeaways:
- Mastering the art of adjusting the bathtub trip lever is essential for a well-functioning bathroom. By understanding and performing simple maintenance tasks, homeowners can ensure efficient drainage and a hassle-free bathing experience.
- Regularly adjusting the trip lever height, fixing alignment issues, and lubricating the mechanism are key to maintaining a smooth and efficient bathtub drainage system. These simple maintenance tasks empower homeowners to preserve the functionality and longevity of their bathroom accessories.
Read more: What Does The Lever In The Bathtub Do
Understanding the Bathtub Trip Lever
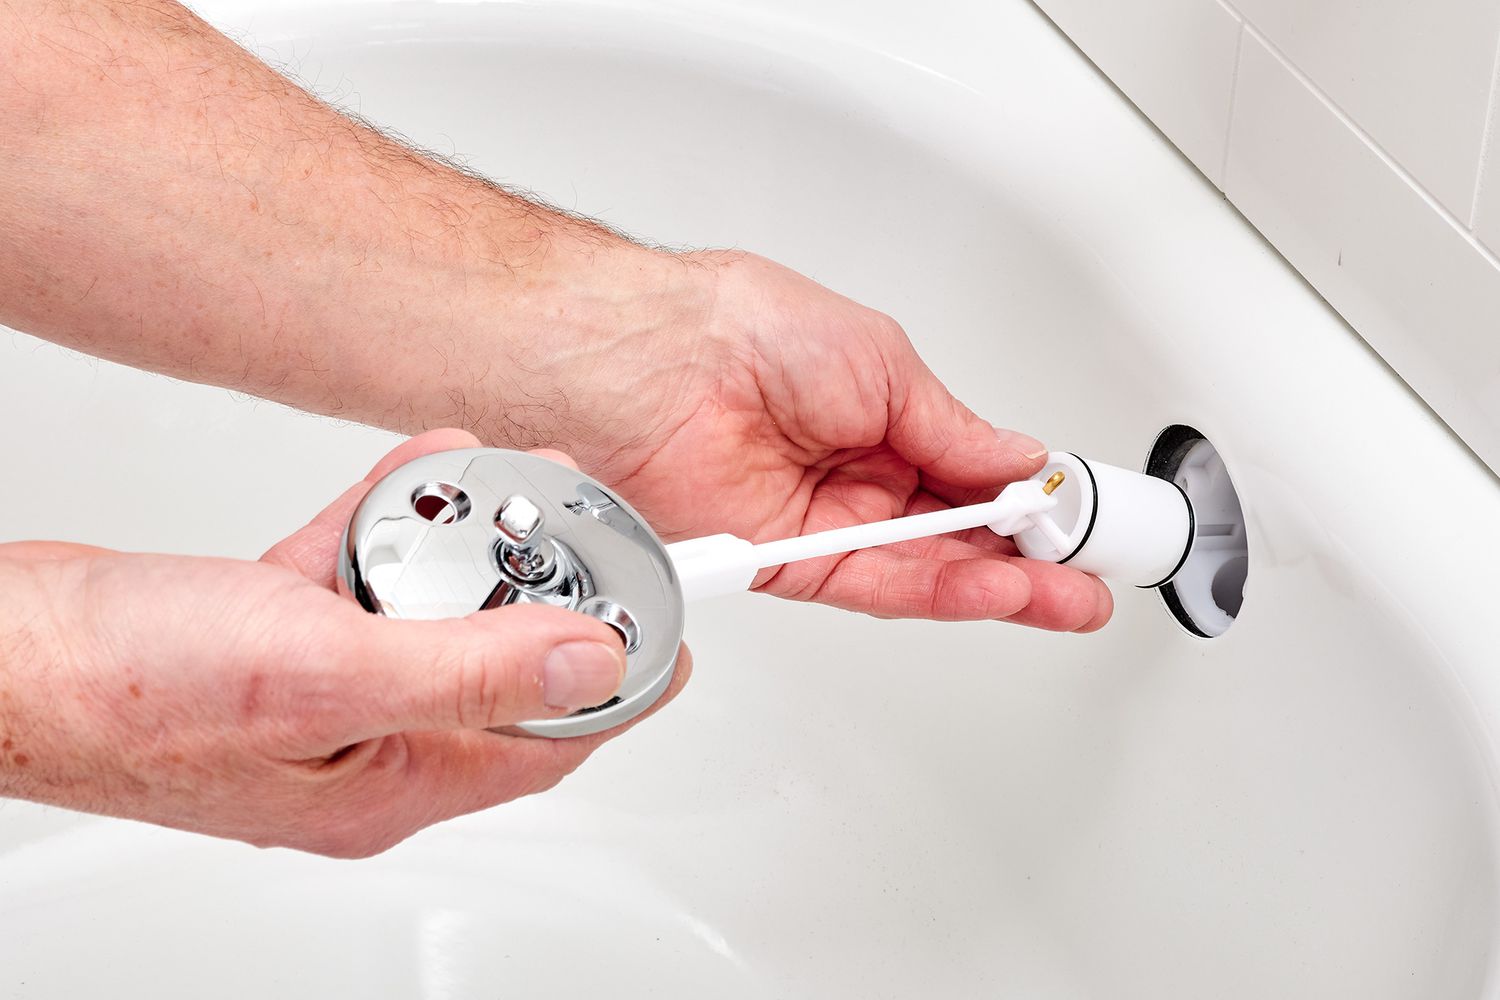
The bathtub trip lever is a fundamental component of the bath's drainage system, serving as the control mechanism for opening and closing the drain. It consists of several interconnected parts, including the trip lever handle, linkage, and overflow plate. Understanding the anatomy and function of the trip lever is essential for effectively maintaining and adjusting this vital bathroom accessory.
The trip lever handle, typically located on the outer side of the bathtub, is the visible part of the mechanism that allows users to open and close the drain. When the handle is lifted or pushed down, it activates the linkage, a metal rod that extends into the overflow pipe. The overflow plate, situated beneath the trip lever handle, covers the overflow opening and is connected to the linkage. As the trip lever handle is operated, the linkage moves within the overflow pipe, controlling the position of the drain stopper.
To comprehend the operation of the trip lever, envision a lever system where the movement of the handle translates into the vertical displacement of the linkage within the overflow pipe. This displacement, in turn, adjusts the position of the drain stopper, either allowing water to flow out or sealing the drain to retain water in the bathtub. The trip lever's functionality is pivotal in facilitating efficient drainage and ensuring a comfortable bathing experience.
In addition to its mechanical components, the trip lever is integrated with the bathtub's drainage and overflow systems, playing a crucial role in preventing water overflow and maintaining optimal water levels during use. By understanding the intricate interplay between the trip lever, linkage, and overflow plate, homeowners can gain insight into the mechanisms governing their bathtub's drainage and make informed decisions when adjustments or maintenance are required.
As we delve deeper into the world of bathtub maintenance, a comprehensive understanding of the trip lever's design and function will serve as the foundation for effectively addressing common issues and optimizing the performance of this essential bathroom accessory. Let's embark on a journey to unravel the mysteries of the bathtub trip lever and equip ourselves with the knowledge needed to maintain a well-functioning bath.
Adjusting the Trip Lever Height
Adjusting the trip lever height is a straightforward yet essential maintenance task that can significantly impact the functionality of your bathtub's drainage system. Over time, the trip lever may require height adjustments to ensure proper operation and prevent issues such as slow drainage or water leakage. By following these simple steps, you can effectively adjust the trip lever height and optimize its performance.
-
Access the Trip Lever Assembly: Begin by removing the trip lever cover plate, which is typically located on the overflow opening of the bathtub. Use a screwdriver to carefully unscrew and remove the cover plate, exposing the trip lever mechanism.
-
Locate the Adjustment Screw: Once the trip lever assembly is accessible, locate the adjustment screw or nut connected to the linkage. This screw or nut controls the height of the trip lever and can be adjusted to raise or lower the position of the drain stopper.
-
Adjust the Height: Using a suitable tool, such as a screwdriver or adjustable wrench, carefully turn the adjustment screw or nut to modify the trip lever's height. Turning the screw clockwise will typically raise the trip lever, while turning it counterclockwise will lower it. Make gradual adjustments and test the trip lever's operation after each modification to ensure the desired height is achieved.
-
Test the Drainage: Once the trip lever height has been adjusted, test the bathtub's drainage system to ensure that the drain stopper opens and closes smoothly. Fill the bathtub with water and operate the trip lever handle to observe the stopper's movement. Adjust the height further if necessary to achieve optimal drainage performance.
-
Reassemble the Trip Lever Cover Plate: After confirming that the trip lever height is adjusted to your satisfaction, reattach the cover plate to the overflow opening. Ensure that the plate is securely fastened to prevent any water leakage or instability in the trip lever assembly.
By following these steps, you can effectively adjust the trip lever height and maintain a well-functioning bathtub drainage system. Regularly inspecting and adjusting the trip lever height as needed will contribute to a seamless bathing experience and prevent potential drainage issues. Mastering this simple yet essential maintenance task empowers homeowners to take proactive measures in preserving the functionality of their bathroom accessories.
Remember, a properly adjusted trip lever height is key to ensuring efficient drainage and a hassle-free bathing experience. With a little know-how and the willingness to tackle minor maintenance tasks, you can keep your bathtub in optimal working condition and enjoy the comfort and convenience it provides.
To adjust a bathtub trip lever, remove the cover plate and adjust the screws or linkage to ensure the lever operates smoothly. If the lever is still not working properly, consider replacing the trip lever assembly.
Fixing Trip Lever Alignment
Ensuring proper alignment of the trip lever is essential for maintaining the efficient operation of your bathtub's drainage system. Misaligned trip levers can lead to issues such as difficulty in opening or closing the drain stopper, resulting in inconvenience and potential water leakage. By addressing trip lever alignment concerns, you can restore the functionality of this vital bathroom accessory and prevent common drainage problems.
To begin the process of fixing trip lever alignment, it is crucial to access the trip lever assembly and visually inspect the alignment of the linkage and overflow plate. The following steps outline the process of realigning the trip lever to optimize its performance:
-
Access the Trip Lever Assembly: Start by removing the trip lever cover plate, typically situated on the overflow opening of the bathtub. Use a screwdriver to carefully unscrew and detach the cover plate, providing access to the trip lever mechanism.
-
Inspect the Alignment: Once the trip lever assembly is exposed, visually inspect the alignment of the linkage and overflow plate. Ensure that the linkage is positioned correctly within the overflow pipe and that the overflow plate is aligned with the trip lever handle.
-
Adjust the Trip Lever Alignment: If misalignment is detected, gently manipulate the linkage and overflow plate to realign them with the trip lever handle. Ensure that the linkage moves smoothly within the overflow pipe and that the overflow plate sits flush against the bathtub surface.
-
Test the Trip Lever Operation: After realigning the trip lever components, test the trip lever's operation by lifting and lowering the handle. Observe the movement of the linkage and the response of the drain stopper to ensure that the alignment adjustments have been effective.
-
Secure the Cover Plate: Once the trip lever alignment is corrected, reattach the cover plate to the overflow opening, ensuring a secure and stable fit. This step is crucial for preventing water leakage and maintaining the stability of the trip lever assembly.
By following these steps, you can effectively address trip lever alignment issues and restore the proper functioning of your bathtub's drainage system. Regularly inspecting and realigning the trip lever as needed will contribute to a seamless bathing experience and prevent potential drainage problems.
Remember, maintaining the alignment of the trip lever is key to ensuring efficient drainage and a hassle-free bathing experience. With a little attention to detail and the willingness to address minor maintenance tasks, you can keep your bathtub in optimal working condition and enjoy the comfort and convenience it provides.
Lubricating the Trip Lever Mechanism
Lubricating the trip lever mechanism is a crucial aspect of maintaining the smooth and efficient operation of your bathtub's drainage system. Over time, the moving parts of the trip lever assembly can experience friction and wear, leading to stiffness or resistance in the mechanism. By applying lubrication to the trip lever components, you can reduce friction, enhance the responsiveness of the drainage system, and prolong the lifespan of this essential bathroom accessory.
To effectively lubricate the trip lever mechanism, follow these step-by-step instructions:
-
Access the Trip Lever Assembly: Begin by removing the trip lever cover plate, which provides access to the internal components of the trip lever mechanism. Using a screwdriver, carefully unscrew and detach the cover plate, exposing the trip lever assembly.
-
Inspect the Components: Once the trip lever assembly is accessible, visually inspect the moving parts, including the linkage and pivot points. Look for signs of wear, corrosion, or stiffness that may indicate the need for lubrication.
-
Select the Lubricant: Choose a suitable lubricant for the trip lever mechanism. Silicone-based lubricants are often recommended for bathroom accessories due to their water-resistant properties and compatibility with metal and plastic components. Avoid using oil-based lubricants, as they can attract dirt and debris, potentially leading to clogging or damage to the mechanism.
-
Apply the Lubricant: Using a small brush or applicator, apply a thin layer of the selected lubricant to the pivot points, moving joints, and any areas where metal components interact. Ensure that the lubricant is evenly distributed and reaches the critical contact points within the trip lever assembly.
-
Operate the Trip Lever: After applying the lubricant, operate the trip lever handle to allow the lubricant to penetrate and coat the moving parts. Lift and lower the handle several times to distribute the lubricant and facilitate smooth movement within the mechanism.
-
Test the Drainage System: Once the lubrication process is complete, test the bathtub's drainage system by filling the tub with water and operating the trip lever handle. Observe the responsiveness of the drain stopper and the overall smoothness of the mechanism's operation.
-
Reassemble the Cover Plate: After confirming that the trip lever mechanism is lubricated and functioning smoothly, reattach the cover plate to the overflow opening. Ensure that the plate is securely fastened to prevent any water leakage or instability in the trip lever assembly.
By following these steps, you can effectively lubricate the trip lever mechanism and maintain the optimal performance of your bathtub's drainage system. Regular lubrication of the trip lever components is essential for preventing stiffness, reducing wear, and ensuring a seamless bathing experience.
Remember, proper lubrication of the trip lever mechanism contributes to the longevity and efficiency of your bathtub's drainage system. By incorporating this simple maintenance task into your regular home care routine, you can enjoy the comfort and convenience of a well-maintained bathroom for years to come.
Read more: How To Adjust Hot Water In Bathtub
Conclusion
In conclusion, mastering the art of adjusting the bathtub trip lever is a valuable skill that empowers homeowners to maintain a well-functioning and efficient bathroom. By understanding the intricacies of the trip lever mechanism and its integral role in the drainage system, individuals can confidently address common issues and optimize the performance of this essential bathroom accessory.
Throughout this comprehensive guide, we have explored the various aspects of adjusting the trip lever, including modifying its height, realigning the components, and lubricating the mechanism. These maintenance tasks, while seemingly simple, play a pivotal role in ensuring the smooth operation of the bathtub's drainage system and preventing potential issues such as water leakage, slow drainage, or stiffness in the mechanism.
By adjusting the trip lever height, homeowners can fine-tune the position of the drain stopper, facilitating efficient drainage and a comfortable bathing experience. Additionally, addressing trip lever alignment concerns is crucial for restoring the proper functionality of the mechanism and preventing operational issues. Furthermore, regular lubrication of the trip lever components reduces friction, enhances responsiveness, and prolongs the lifespan of this vital bathroom accessory.
By incorporating these maintenance tasks into their home care routine, individuals can take proactive measures to preserve the functionality and longevity of their bathroom accessories. Whether you are a seasoned DIY enthusiast or a novice homeowner, the knowledge and skills gained from this guide empower you to tackle common trip lever maintenance tasks with confidence and efficiency.
In essence, the bathtub trip lever serves as a gateway to a seamless and enjoyable bathing experience. By understanding its operation and mastering the art of adjustment and maintenance, homeowners can ensure that their bathroom remains a haven of comfort and convenience for years to come. With a little know-how and a proactive approach to maintenance, you can keep your bathtub in optimal working condition and enjoy the peace of mind that comes with a well-maintained bathroom.
Frequently Asked Questions about How To Adjust Bathtub Trip Lever
Was this page helpful?
At Storables.com, we guarantee accurate and reliable information. Our content, validated by Expert Board Contributors, is crafted following stringent Editorial Policies. We're committed to providing you with well-researched, expert-backed insights for all your informational needs.


0 thoughts on “How To Adjust Bathtub Trip Lever”