Home>Garden Essentials>How To Grow Honeydew From Seeds
Garden Essentials
How To Grow Honeydew From Seeds
Modified: August 27, 2024
Learn the steps to grow honeydew in your garden from seeds and enjoy fresh homegrown fruit. Get expert tips and start your own honeydew garden today!
(Many of the links in this article redirect to a specific reviewed product. Your purchase of these products through affiliate links helps to generate commission for Storables.com, at no extra cost. Learn more)
Introduction
Growing your own honeydew melons from seeds can be a rewarding and enjoyable experience. Not only will you have the pleasure of watching the plants flourish and bear fruit, but you’ll also be able to enjoy the delicious, juicy melons straight from your own garden.
Honeydew melons are a popular choice among gardeners, thanks to their sweet and refreshing flavor. They are also packed with essential vitamins, minerals, and antioxidants, making them a healthy addition to your diet. By following a few simple steps, you can successfully grow honeydew melons from seeds and savor their mouthwatering taste.
In this article, we will guide you through the process of growing honeydew melons from seeds. We will cover everything from selecting the right seeds to caring for the plants, managing pests and diseases, and harvesting the fruits. So, let’s get started on this exciting journey of growing your own honeydew melons!
Key Takeaways:
- Growing honeydew melons from seeds is a fun and rewarding experience. From selecting high-quality seeds to providing proper care, you can enjoy the sweet and juicy fruits straight from your own garden.
- By following the steps outlined in this guide, you can nurture healthy honeydew plants and savor the delicious rewards of your gardening efforts. Embrace the joy of homegrown produce and share your green thumb with others!
Read more: How To Grow Okra From Seed
Step 1: Selecting the Honeydew Seeds
The first step in growing honeydew melons is to select high-quality seeds. When choosing your seeds, look for varieties that are well-suited to your climate and growing conditions. Opt for certified organic seeds whenever possible to ensure they are free from harmful chemicals or genetically modified organisms (GMOs).
It’s also important to consider the ripening time of the honeydew melons. Some varieties mature faster than others, so choose seeds that align with your desired harvest time. Additionally, check the germination rate of the seeds. Seeds with a higher germination rate will have a better chance of sprouting successfully.
You can find honeydew melon seeds at your local garden center, or you can purchase them online from reputable seed suppliers. It’s a good idea to buy from a reputable source to ensure you’re getting high-quality seeds that will give you the best chance of success.
Once you have obtained your honeydew seeds, store them in a cool, dry place until you are ready to plant them. Avoid exposing the seeds to excess moisture or extreme temperatures, as this can affect their viability.
Keep in mind that honeydew melons are typically grown from hybrid seeds, which are crossbred to produce plants with desirable traits. However, if you prefer to save your own seeds for future planting, it’s best to choose open-pollinated or heirloom varieties.
Before moving on to the next step, gather all the necessary materials for planting the seeds, including seedling pots, potting soil, and labeling tags. Ensuring you have everything prepared will make the process smoother and more efficient.
Step 2: Preparing the Seedling Pots
Once you have selected your honeydew seeds, it’s time to prepare the seedling pots for planting. Proper preparation of the pots will create an ideal environment for the seeds to germinate and grow into healthy seedlings.
Choose pots or containers that are at least 4-6 inches deep to provide enough space for the growing roots. Make sure the pots have drainage holes at the bottom to prevent waterlogging, which can lead to root rot. Clay or plastic pots both work well for growing honeydew melons.
Before filling the pots with potting soil, sanitize them to eliminate any potential pathogens or pests. You can do this by washing the pots with a mild soap and water solution or by soaking them in a mixture of one part bleach to nine parts water. Rinse the pots thoroughly afterward to remove any residue.
Next, fill the pots with a well-draining potting soil mixture. You can either purchase a commercial potting mix from your local garden center or create your own by mixing equal parts of high-quality compost, peat moss, and perlite or vermiculite.
Once the pots are filled with potting soil, gently tamp down the soil to eliminate any air pockets. Leave about an inch of space between the soil surface and the rim of the pot to allow for watering.
If you want to start multiple seeds, you can place multiple pots in a plastic tray or use a seedling tray with individual compartments. This will help keep the pots organized and make it easier to water and care for the seedlings.
Label each pot or compartment with the variety of honeydew melon you are planting. This will prevent confusion later on when the seedlings start to emerge, as different varieties may have slightly different growth habits or characteristics.
Now that the seedling pots are prepared, it’s time to move on to the next step: planting the honeydew seeds!
Step 3: Planting the Honeydew Seeds
Now that your seedling pots are ready, it’s time to plant the honeydew seeds. Follow these steps to ensure successful germination and healthy seedling growth:
- Moisten the potting soil: Before planting the seeds, water the potting soil gently until it is evenly moist but not soggy. This will provide a favorable environment for the seeds to start germinating.
- Plant the seeds: Make small holes in the potting soil, about half an inch deep. Space the holes 2-3 inches apart to allow room for the seedlings to grow. Place one seed into each hole and cover it with soil, gently pressing down to secure it in place.
- Provide optimal conditions: Place the seedling pots in a warm location where they can receive plenty of sunlight. A temperature of around 70-85°F (21-29°C) is ideal for seed germination. If needed, you can also use a seedling heat mat to maintain the desired temperature.
- Keep the soil moist: It is crucial to keep the soil consistently moist but not waterlogged. Check the soil moisture daily and water as needed, ensuring that the soil doesn’t dry out completely. Use a gentle watering method, such as misting or bottom watering, to avoid disturbing the seeds or seedlings.
- Be patient: Germination can take anywhere from 7 to 14 days, depending on the variety and growing conditions. Be patient and resist the urge to overwater or disturb the soil during this period.
- Thin out the seedlings: Once the seedlings have emerged and developed their first true leaves, thin them out if necessary. Remove weaker or overcrowded seedlings, leaving only the healthiest and strongest ones in each pot.
Remember to label each pot with the variety of honeydew melon to keep track of the different plants. With proper care and patience, your honeydew seeds will transform into healthy seedlings, ready for the next stage of growth.
Now that the seeds are planted, it’s time to move on to step 4: providing proper care and maintenance for the young seedlings.
Step 4: Providing Proper Care and Maintenance
Once your honeydew seedlings have emerged, it’s essential to provide them with the proper care and maintenance to ensure their healthy growth and development. Follow these guidelines as you nurture your young honeydew plants:
- Watering: Water the seedlings regularly, keeping the soil consistently moist. Avoid overwatering, as excessively wet soil can lead to root rot. Water the plants at the base, avoiding overhead watering, which can increase the risk of diseases.
- Sunlight: Place the seedlings in a location that receives at least 6-8 hours of direct sunlight per day. Honeydew melons thrive in warm, sunny conditions, so providing adequate sunlight is crucial for their growth and fruit production.
- Fertilization: Once the seedlings have established their first set of true leaves, you can start fertilizing them. Use a balanced organic fertilizer or a slow-release granular fertilizer specifically designed for vegetables. Follow the product instructions for application rates and frequency.
- Supporting growth: As the vine begins to grow, provide support for it to climb. You can use trellises, stakes, or cages to guide the growth and prevent the plants from sprawling on the ground. This not only saves space but also improves air circulation and reduces the risk of diseases.
- Weeding and mulching: Regularly remove weeds around the seedlings to prevent competition for nutrients and water. Applying a layer of organic mulch, such as straw or shredded leaves, around the plants can help suppress weeds, retain moisture, and regulate soil temperatures.
- Pruning: Occasionally, check for any damaged or diseased leaves or branches and promptly remove them. Pruning can help improve airflow, reduce the risk of diseases, and direct the plant’s energy into producing healthy fruits.
- Monitoring pests and diseases: Keep a close eye on the seedlings for signs of pests or diseases. Common pests that can affect honeydew melons include aphids, cucumber beetles, and spider mites. Use organic pest control methods, such as insecticidal soap or neem oil, to manage infestations.
- Training the vines: As the vine continues to grow, gently guide it along the support structure, ensuring it doesn’t become tangled or overcrowded. This will help maintain an organized and orderly growth pattern for the plant.
By providing proper care and maintenance, you are setting the foundation for healthy honeydew plants that will eventually produce a bountiful harvest. Now, let’s move on to step 5: transplanting the seedlings to their final growing location.
Plant honeydew seeds in well-draining soil, keep them warm and moist, and provide plenty of sunlight. Once the seedlings are established, thin them to the strongest plants for better growth.
Read more: How To Grow A Tree From A Seed
Step 5: Transplanting the Seedlings
Once your honeydew seedlings have grown and developed a few sets of true leaves, it’s time to transplant them into their final growing location. Follow these steps to ensure a successful transplant:
- Choose the right time: Wait until the seedlings are about 4-6 weeks old and have developed a strong root system before transplanting them. The weather should also be warm and frost-free, as honeydew melons thrive in temperatures between 70-85°F (21-29°C).
- Prepare the transplant site: Select a well-draining area in your garden that receives full sun. Remove any weeds or grass from the site and loosen the soil to a depth of about 12 inches. Incorporate organic matter, such as compost or well-rotted manure, to improve soil fertility and drainage.
- Dig planting holes: Dig holes in the prepared soil that are slightly larger than the root ball of the seedlings. Space the holes about 3-4 feet apart to allow room for the mature plants to spread. If you’re planting multiple rows, maintain a distance of 5-6 feet between them.
- Transplant the seedlings: Gently remove the seedlings from their pots, being careful not to damage the delicate roots. Place each seedling into a planting hole, ensuring that the soil level matches the level of the seedling’s previous container. Backfill the hole with soil, gently firming it around the base of the plant.
- Water thoroughly: Immediately after transplanting, water the seedlings deeply to help settle the soil and remove any air pockets surrounding the roots. Provide enough water to thoroughly moisten the root zone but avoid waterlogging the soil.
- Support the plants: Honeydew melons are vining plants that require support as they grow. Install trellises, stakes, or cages near the seedlings to provide the necessary support and guide the vines upward. Train the vines to climb the support structure as they grow.
- Mulch the soil: Apply a layer of organic mulch, such as straw or wood chips, around the base of the seedlings. Mulching helps conserve soil moisture, suppress weeds, and maintain more consistent soil temperatures.
After transplanting, continue to provide regular watering, sunlight, and maintenance, as outlined in step 4. The transplanted seedlings may experience a period of adjustment, but with proper care, they will soon establish themselves in their new location and begin growing vigorously.
Now that your honeydew seedlings are settled in their new home, it’s time to move on to step 6: managing pests and diseases to protect your plants from potential threats.
Step 6: Managing Pests and Diseases
Keeping your honeydew melon plants healthy and free from pests and diseases is essential for a successful harvest. Here are some tips for managing common pests and diseases:
- Monitor regularly: Regularly inspect your honeydew plants for any signs of pests or diseases. Look for chewed leaves, discolored spots, wilting, or unusual growth patterns. Early detection enables you to take prompt action before the problem worsens.
- Practice crop rotation: Rotate the planting location of your honeydew plants each year to prevent the buildup of soil-borne diseases. Avoid planting them in the same spot or close to other cucurbit crops, such as cucumbers or squash, as they are susceptible to similar diseases.
- Control pests naturally: Some common pests that can affect honeydew melons include aphids, cucumber beetles, and spider mites. Encourage natural pest predators, such as ladybugs and lacewings, by planting companion plants like marigolds or attracting beneficial insects with a diverse garden. You can also use organic pest control methods like insecticidal soap or neem oil to manage infestations.
- Practice good hygiene: Remove any affected leaves or plant parts promptly to prevent the spread of diseases. Clean and sanitize your gardening tools regularly to ensure they are not carrying any pathogens from one plant to another.
- Use organic fungicides: If fungal diseases like powdery mildew or downy mildew appear on the foliage of your honeydew plants, you can use organic fungicides like sulfur or copper-based sprays to control and prevent further spread. Follow the instructions on the product label for proper application.
- Provide proper airflow: Proper spacing between plants and adequate airflow can reduce the risk of fungal diseases. Avoid overcrowding plants and remove any weeds or excessive foliage that may impede air circulation around the plants.
- Water management: Overwatering can contribute to the development of fungal diseases. Water the plants at the base, preferably in the morning, to allow the leaves to dry out during the day. Avoid overhead watering, as it can promote the spread of foliar diseases.
- Organic pest control: If chemical pesticide use is necessary, always opt for organic and environmentally friendly products. Follow the instructions carefully and avoid spraying when bees or other beneficial pollinators are active.
By diligently managing pests and diseases, you can help your honeydew melon plants thrive and produce healthy and delicious fruits. Regular monitoring, preventive measures, and organic pest control methods will go a long way in maintaining the health of your plants throughout the growing season.
Now that you’re equipped with pest and disease management strategies, let’s move on to step 7: harvesting the sweet rewards of your hard work!
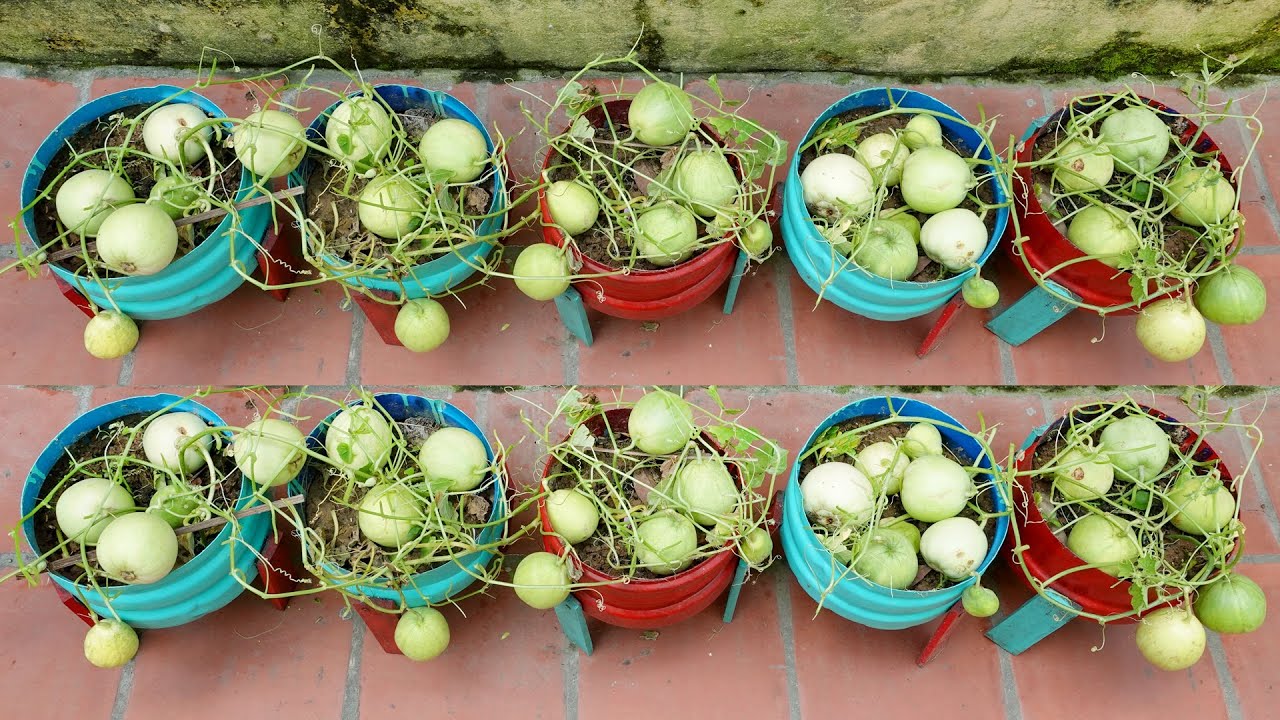
Step 7: Harvesting and Enjoying Honeydew Melons
After patiently tending to your honeydew melon plants, the time will finally come to harvest the ripe and flavorful fruits. Follow these guidelines to ensure you harvest and enjoy your honeydew melons at their peak:
- Observe the signs of ripeness: Honeydew melons are ready to harvest when they have a smooth skin texture, a creamy yellow color, and emit a sweet aroma. Another indicator of ripeness is a slight softness at the blossom end of the fruit.
- Check the tendrils: Look at the tendrils (small curly vines) near the fruit. When they turn brown and dry, it’s a good sign that the melon is ready to be harvested. However, don’t rely solely on this method, as it can vary depending on the variety.
- Use a gentle twist motion: When harvesting honeydew melons, use a gentle twisting motion to detach them from the vine. If the fruit doesn’t easily detach, it may not be fully ripe yet, so leave it on the vine for a few more days and recheck later.
- Handle with care: Honeydew melons have a delicate skin, so handle them with care to avoid bruising or damage. Place the harvested melons on a soft surface, such as a bed of straw or a cushioned basket, to prevent any impact or pressure on the fruit.
- Store properly: If you’re not planning to consume the honeydew melons immediately, store them in a cool, dry place, away from direct sunlight. They can be stored at room temperature for a few days or in the refrigerator for 1-2 weeks. However, keep in mind that refrigeration may affect their flavor and texture.
- Slice and enjoy: When you’re ready to enjoy your honeydew melons, wash them thoroughly and slice them open. Remove the seeds and cut the flesh into desired sizes. Honeydew melons are delicious when eaten fresh on their own, added to fruit salads, blended into smoothies, or used in desserts.
- Save the seeds: If you come across a honeydew melon variety that you particularly enjoy, consider saving the seeds for future planting. Allow the seeds to dry completely, then store them in a cool, dry place in a labeled envelope or container.
Remember, the flavor of freshly harvested honeydew melons is unmatched, so try to consume them as soon as possible for the best taste and texture. Enjoy the juicy and sweet rewards of your gardening efforts!
With this final step, you have completed the journey of growing honeydew melons from seeds. Congratulations on your successful venture into homegrown melons! Now, take a moment to celebrate your green thumb and start planning your next garden adventure.
Remember to share the joy of homegrown produce with family and friends, and perhaps even inspire others to embark on their own gardening endeavors.
Conclusion
Growing honeydew melons from seeds is a fulfilling and rewarding experience that allows you to savor the delicious, sweet fruits right from your own garden. By following the steps outlined in this guide, from selecting high-quality seeds to providing proper care, you can successfully grow healthy honeydew melon plants and enjoy a bountiful harvest.
Throughout the journey, you learned the importance of selecting the right seeds, preparing seedling pots, planting the seeds, and providing proper care and maintenance for the seedlings. Transplanting the seedlings to their final location and managing pests and diseases ensured the plants’ health and vitality.
When the time for harvest arrived, you were equipped with the knowledge to determine the optimal ripeness and handle the melons with care. Finally, you had the pleasure of indulging in the sweet and juicy flavor of freshly harvested honeydew melons.
Remember, gardening is not just about the end result but also the joy of nurturing and witnessing the growth of nature’s gifts. The journey of growing honeydew melons from seeds taught you patience, perseverance, and the art of cultivating life.
Now that you have successfully grown honeydew melons, continue to explore the world of gardening and consider experimenting with different varieties, expanding your garden, or even trying your hand at growing other fruits and vegetables.
Share your gardening experience with others, inspire them to reconnect with nature, and spread the joy of homegrown produce. Whether it’s gathering around the table with loved ones, sharing gardening tips with neighbors, or simply enjoying the beauty of a flourishing garden, the rewards of your efforts extend far beyond the delicious melons themselves.
So, embrace the wonders of gardening, savor the fruits of your labor, and let the love for nature and growth continue to flourish. Happy gardening!
Frequently Asked Questions about How To Grow Honeydew From Seeds
Was this page helpful?
At Storables.com, we guarantee accurate and reliable information. Our content, validated by Expert Board Contributors, is crafted following stringent Editorial Policies. We're committed to providing you with well-researched, expert-backed insights for all your informational needs.


0 thoughts on “How To Grow Honeydew From Seeds”