Home>Garden Essentials>How To Mark Plant Symbols In Landscape Design
Garden Essentials
How To Mark Plant Symbols In Landscape Design
Modified: March 7, 2024
Learn how to effectively mark plant symbols in your landscape design with these easy tips and techniques for creating a stunning garden layout.
(Many of the links in this article redirect to a specific reviewed product. Your purchase of these products through affiliate links helps to generate commission for Storables.com, at no extra cost. Learn more)
Introduction
Welcome to the world of landscape design! If you have a green thumb and a passion for creating beautiful outdoor spaces, then you are in the right place. One of the key elements in landscape design is the use of plant symbols to represent different types of plants and their placement in the design. Properly marking these symbols ensures that your design vision is accurately translated into reality.
Plant symbols are a universal language that allows designers, contractors, and clients to communicate effectively about the placement of plants in a landscape design. They provide a visual representation of each plant, including its size, shape, and specific characteristics. This allows everyone involved in the project to have a clear understanding of how the final design will look and where each plant will be located.
Marking plant symbols in landscape design is not only important for the professionals involved in the project. It also plays a crucial role in the successful execution of the design. Whether you are a homeowner DIYing your own landscape project or a professional landscape designer, properly marking plant symbols is key to achieving your desired outcome.
In this article, we will explore the importance of marking plant symbols in landscape design and provide you with a step-by-step guide to help you accurately mark these symbols in your own projects. We will also discuss the tools and materials you will need, common mistakes to avoid, and the benefits of properly marked plant symbols. So let’s dig in and discover how to create stunning landscapes with carefully marked plant symbols!
Key Takeaways:
- Properly marked plant symbols in landscape design ensure clear communication, accurate implementation, and streamlined maintenance, leading to successful and visually stunning outdoor spaces.
- Marking plant symbols requires attention to detail, consistency, and the use of the right tools, contributing to effective collaboration and client satisfaction in landscape design projects.
Understanding Plant Symbols
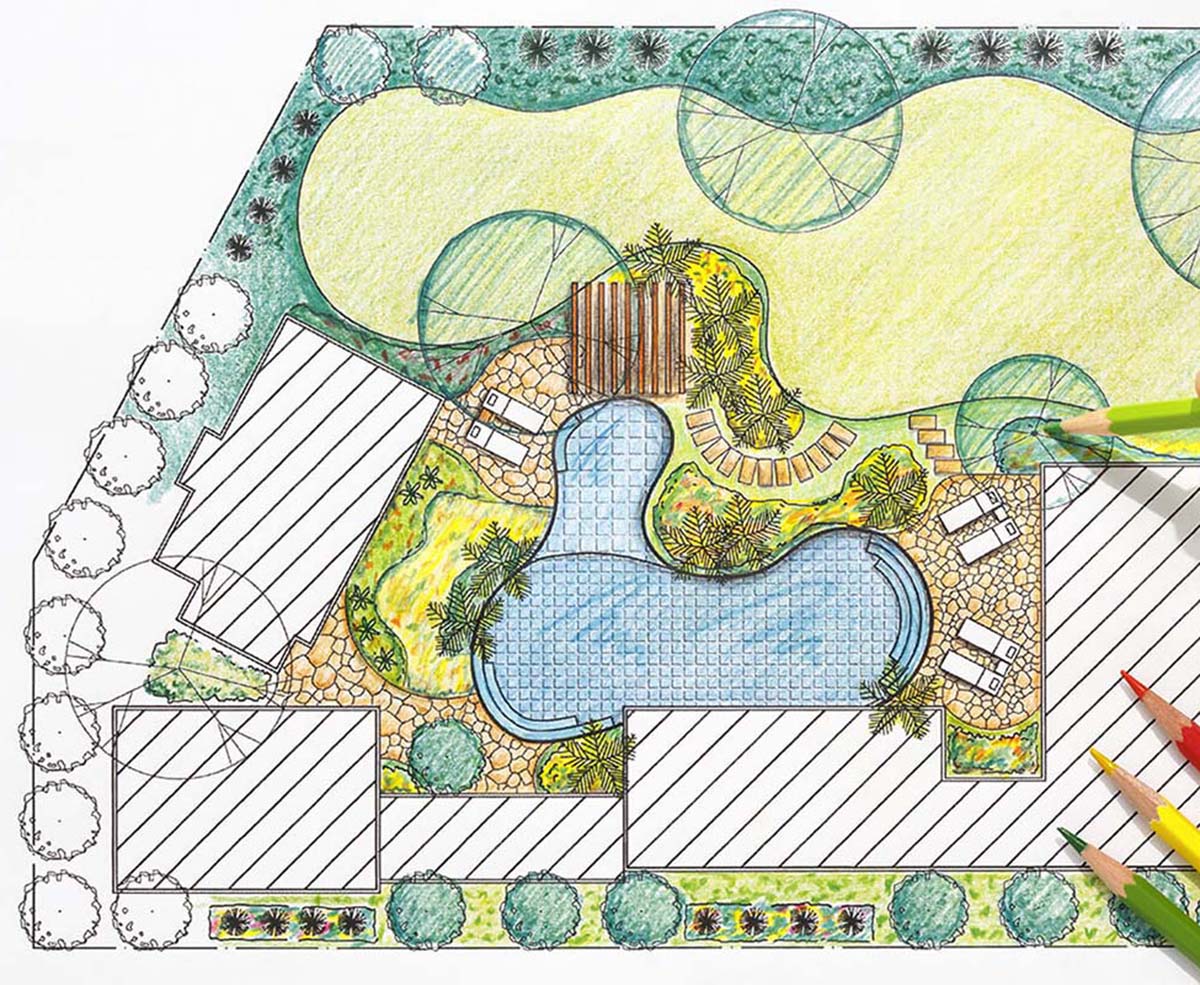
Before we dive into the process of marking plant symbols, it’s important to have a clear understanding of what these symbols represent. Plant symbols are graphic representations that are used to depict different types of plants in landscape design plans. These symbols are often standardized and follow industry conventions to ensure clear communication.
Each plant symbol consists of various elements that convey important information about the plant. The shape of the symbol represents the overall appearance of the plant, whether it’s a tree, shrub, flower, or grass. The size of the symbol indicates the height and spread of the plant. For example, a circle may represent a small shrub, while an elongated shape could represent a towering tree.
The symbols also include visual cues to indicate specific features of the plant. This may include the shape and color of the leaves, the presence of flowers or fruits, and even the texture of the plant. These details help designers and installers accurately represent the characteristics of each plant in the design.
It’s important to note that plant symbols may vary slightly depending on the region or designer. However, the basic principles and conventions remain consistent throughout the industry. Familiarizing yourself with these symbols will not only help you understand landscape design plans but also enable you to effectively communicate with professionals in the field.
To enhance your understanding of plant symbols, it’s beneficial to consult industry resources such as landscape design books, websites, or even attend workshops and seminars. These resources often provide comprehensive guides on different plant symbols, their meanings, and how to interpret them in the context of a landscape design plan.
By familiarizing yourself with plant symbols, you will gain the ability to decode landscape design plans, understand the placement and characteristics of plants, and make informed decisions when it comes to implementing your own landscape designs.
Now that we have a solid understanding of plant symbols, let’s explore the importance of properly marking these symbols in landscape design.
Importance of Marking Plant Symbols in Landscape Design
Properly marking plant symbols in landscape design is essential for multiple reasons. From ensuring accurate plant placement to facilitating efficient communication among project stakeholders, here are some key reasons why marking plant symbols is of utmost importance:
1. Design Accuracy: Marking plant symbols allows for precise and accurate representation of the planned landscape design. It ensures that the designer’s vision is properly communicated and implemented. With accurately marked symbols, installers and contractors can follow the design plan more effectively, resulting in a landscape that closely resembles the intended outcome.
2. Plant Identification: Marking plant symbols in landscape design makes it easier to identify and distinguish between different types of plants. This is particularly important when designing with a variety of plant species or incorporating specific plant requirements, such as planting zones or sunlight exposure. Clear identification of plant symbols allows for easy reference and implementation of planting schemes.
3. Client Collaboration: Marking plant symbols provides an effective tool for communicating the design plan with clients. It allows them to visualize how the different plant species will be distributed and organized within their outdoor space. This collaborative approach fosters better communication and helps clients gain a clearer understanding of the final design concept.
4. Construction Efficiency: Properly marked plant symbols streamline the construction process. Contractors and installers can easily identify the location and quantity of each plant, making it easier to allocate resources and plan the installation process. This saves time and reduces the chances of errors or misunderstandings during the implementation phase.
5. Maintenance and Upgrades: By marking plant symbols, you create a valuable reference for future maintenance and upgrades. With symbols indicating the type and location of plants, it becomes easier to identify specific plant species during maintenance procedures like pruning or replanting. Additionally, if modifications or enhancements are needed in the future, the marked symbols can serve as a guide for making appropriate changes.
6. Design Consistency: Consistency is key in landscape design. By accurately marking plant symbols, you ensure that the same design concept can be replicated across different locations or by different teams. This is particularly important for commercial or residential developments with multiple sites or stages of implementation. Consistent marking of plant symbols maintains the design integrity and cohesive aesthetics throughout the project.
7. Communication with Suppliers: When purchasing plants from nurseries or suppliers, marked symbols can simplify the communication process. By providing the marked symbols from your landscape design plan, you ensure that the supplier understands your specific plant needs and can provide the right species, sizes, and quantities for your project.
Overall, the proper marking of plant symbols in landscape design plays a vital role in ensuring design accuracy, effective communication, construction efficiency, and ease of maintenance. It enhances collaboration with clients and suppliers while maintaining design consistency. Now, let’s explore the tools and materials required to mark plant symbols effectively in your landscape designs.
Tools and Materials for Marking Plant Symbols
When it comes to marking plant symbols in landscape design, having the right tools and materials at your disposal can make a significant difference in the accuracy and readability of your designs. Here are some essential tools and materials you will need:
1. Architectural Scale Ruler: An architectural scale ruler is a must-have tool for accurately measuring and scaling your landscape design plans. It allows you to convert real-world measurements into a smaller scale, making it easier to represent plant symbols and other design elements proportionally.
2. Pencils and Erasers: Good quality pencils and erasers are essential for sketching and marking plant symbols on your design plans. Using different pencil grades will help you achieve varying line weights for better visibility and distinction between symbols.
3. Colored Markers or Pens: Adding color to your plant symbols can enhance visual clarity and make them stand out on the plan. Use colored markers or pens to differentiate between different types of plants or to highlight special features such as blooming periods or textures.
4. Tracing Paper or Overlay Sheets: Tracing paper or overlay sheets are handy for making revisions or iterations of your design without altering the original plan. They allow you to experiment with different plant arrangements and symbols while maintaining the integrity of the main design.
5. Plant Symbol Templates: Pre-made plant symbol templates are useful for consistent and uniform representation of different plant types. These templates come in various shapes and sizes, making it easier to quickly and accurately mark plant symbols on your design plans.
6. Plant Identification Resources: Invest in plant identification resources such as books, manuals, or online databases. These resources provide you with detailed information about different plant species, including their botanical names, characteristics, and symbol representations. Having access to accurate and reliable plant identification resources will ensure you mark the correct symbols for each plant in your designs.
7. Laptop or Drawing Software: If you prefer digital design, a laptop or computer with landscape design software can be a valuable tool. These software programs allow you to create and manipulate design plans digitally, making it easier to mark plant symbols, generate plant lists, and create detailed documentation.
8. Labeling Materials: Don’t forget to have labeling materials on hand to mark specific plant names or additional notes on your design plans. You can use sticky notes, small labels, or text boxes to provide more information about a particular plant or design element.
By utilizing these tools and materials, you will be well-equipped to accurately mark plant symbols on your landscape design plans. The next section will provide you with a step-by-step guide on how to mark plant symbols effectively.
Step-by-Step Guide to Marking Plant Symbols
Marking plant symbols in your landscape design plans is a crucial step to ensure clear communication and accurate implementation of your design vision. Follow these steps to effectively mark plant symbols:
Step 1: Prepare Your Design Plan: Start by having a clear and scaled design plan ready. Ensure that your plan includes all the necessary elements such as property boundaries, structures, pathways, and existing features. Having a well-prepared plan provides a solid foundation for marking plant symbols.
Step 2: Identify Plant Locations: Review your design plan and identify the specific locations where you plan to place different plant species. Consider factors such as sunlight exposure, soil conditions, and compatibility among plants. This will help you determine the appropriate symbols for each plant based on their characteristics.
Step 3: Select and Apply Symbols: Use plant symbol templates or create them yourself using pencils or markers. Use a consistent symbol for each type of plant and ensure that it is easily distinguishable. For example, use a circle for shrubs, a square for trees, and a triangle for flowers. Carefully place the symbols in the designated plant locations on your design plan.
Step 4: Add Details and Labels: Enhance your plant symbols by adding details that represent specific characteristics of each plant. For example, use different lines or textures to denote the leaf shape or color. Add labels next to the symbols, including the common or botanical name of the plant, and any additional important information such as flowering season or special care instructions.
Step 5: Use Color to Differentiate: If desired, use colored markers or pens to differentiate between various types of plants or to highlight specific features. This can be especially useful if you’re using black and white printing for your design plan. Color coding will make it easier to identify different plant groups or specific elements within the design.
Step 6: Review and Edit: Take a step back and review your marked plant symbols on the design plan. Ensure that all symbols are accurately placed, clearly visible, and provide enough information. Make any necessary edits or adjustments to improve clarity and readability.
Step 7: Document and Communicate: Once you’re satisfied with the marked symbols, make copies or digital scans of your design plan to share with clients, contractors, or suppliers. Clearly communicate the meaning of each plant symbol and provide any additional documentation or plant lists that may be required for implementation.
By following these steps, you can effectively mark plant symbols on your landscape design plans, ensuring accurate communication and successful execution of your design vision. However, it’s essential to be aware of common mistakes that can occur during the marking process. Let’s explore those in the next section.
When marking plant symbols in landscape design, use clear and simple shapes to represent different types of plants. For example, use a circle for trees, a square for shrubs, and a triangle for flowers. This will make it easier to understand and follow the design plan.
Read more: How To Mark Ground For Landscaping
Common Mistakes to Avoid in Marking Plant Symbols
While marking plant symbols in your landscape design plans, it’s important to be aware of common mistakes that can compromise the accuracy and effectiveness of your markings. Here are some key mistakes to avoid:
1. Inconsistent Symbol Usage: Using different symbols for the same plant type or using the same symbol for different plant types can cause confusion. Be consistent in your symbol usage throughout the design plan to ensure clear identification and communication of each plant.
2. Unclear or Smudged Symbols: Make sure your symbols are drawn clearly and legibly. Unclear or smudged symbols can lead to misinterpretation or misplacement during the implementation phase. Use sharp pencils or pens and regularly check the quality of your markings to avoid any ambiguity.
3. Lack of Scale Proportion: Pay attention to the scale of your design plan when marking symbols. Ensure that the size of your symbols accurately represents the height and spread of the corresponding plants in the real world. Using an architectural scale ruler will help you maintain proper scale proportions.
4. Missing or Inadequate Labels: Labels are essential for providing additional information about each plant, such as the common or botanical name, flowering period, or care instructions. Neglecting to include labels or providing inadequate information can lead to confusion during installation and maintenance.
5. Ignoring Plant Characteristics: Consider the unique characteristics of each plant when marking symbols. Different plants have distinct features, such as specific leaf shapes, colors, or textures. Incorporating these details into your symbols will enhance the accuracy and visual representation of each plant.
6. Overcomplicated Symbols: Keeping your symbols clear and simple is key. Overcomplicated symbols can be difficult to interpret and may hinder effective communication. Strive for simplicity while still capturing the essential elements and characteristics of each plant.
7. Lack of Color Differentiation: If using colored markers or pens, ensure that there is sufficient differentiation between the colors you select. Using too many similar shades can make it challenging to distinguish between different plant types or highlight important features on the design plan.
8. Failing to Document Changes: If you make any revisions or modifications to your design plan, be sure to update the marked plant symbols accordingly. Failure to document changes can lead to confusion and inconsistencies during implementation. Keep your design plan up to date with accurate and current markings.
By being mindful of these common mistakes, you can avoid unnecessary confusion, ensure clear communication, and maintain the accuracy of your marked plant symbols. Next, let’s explore the benefits of properly marked plant symbols in landscape design.
Benefits of Properly Marked Plant Symbols in Landscape Design
Properly marked plant symbols in landscape design offer numerous benefits, ranging from efficient communication to improved implementation. Let’s explore the advantages of accurately marked plant symbols:
1. Clear Communication: Marked plant symbols serve as a universal language that facilitates effective communication between designers, clients, contractors, and suppliers. They provide a visual representation of the planned landscape design, ensuring that everyone involved has a clear understanding of plant placement and design intent.
2. Accurate Implementation: Properly marked plant symbols minimize the risk of misinterpretation during the implementation phase. Contractors and installers can refer to the symbols to accurately place plants and create a layout that aligns with the designer’s vision. This leads to a more precise execution of the design plan.
3. Time and Cost Efficiency: Clear plant symbols save time and reduce errors during plant installation. Contractors can easily identify and locate each plant based on the marked symbols, resulting in a streamlined and efficient process. This can lead to cost savings by avoiding unnecessary delays or misplacements.
4. Consistency and Replicability: Properly marked symbols ensure design consistency across multiple projects or stages of implementation. Using the same symbols for specific plant types allows designers to replicate successful designs, maintain brand identity, and create a cohesive aesthetic in different outdoor spaces.
5. Client Understanding: Well-marked plant symbols help clients better visualize the final design outcome. Clients can easily comprehend the proposed plant layout and understand how different types of plants will contribute to the overall landscape. This promotes client satisfaction and enhances their confidence in the design process.
6. Maintenance and Upkeep: Clearly marked plant symbols serve as a valuable reference for ongoing maintenance and upkeep. Gardeners and homeowners can easily identify specific plant species, making tasks like pruning, watering, or fertilizing more efficient and targeted. The symbols also aid in replanting or replacing plants when necessary.
7. Collaboration and Consultation: Accurately marked plant symbols promote effective collaboration between designers, clients, and other stakeholders. They enable meaningful discussions and consultations, allowing for input and adjustments to the plant layout or selection. This collaborative approach enhances overall design quality and client satisfaction.
8. Learning and Education: Studying properly marked plant symbols in landscape design plans provides an opportunity for education and learning. Students, aspiring designers, and gardening enthusiasts can gain valuable knowledge about different plant species, their symbols, and specific design contexts through careful examination of marked plans.
By recognizing and appreciating the benefits of properly marked plant symbols, designers can enhance the effectiveness of their designs, streamline implementation, and create beautiful and well-executed landscapes.
Now, let’s delve into some troubleshooting and offer solutions for common challenges encountered when marking plant symbols in landscape design.
Troubleshooting and Solutions for Plant Symbol Marking
While marking plant symbols in landscape design plans, you may encounter some challenges that can impact the accuracy and effectiveness of your markings. Here are some common troubleshooting scenarios and their solutions:
1. Symbol Clutter: If your design plan becomes cluttered with an abundance of plant symbols, it can make it difficult to interpret and understand the layout. To alleviate this issue, consider grouping plants together with a single symbol when they are the same species or variety. This simplifies the plan and improves readability.
2. Lack of Space: In some cases, you may run out of space to adequately mark plant symbols, especially if the design plan is small or there is a dense planting scheme. To address this, consider using smaller, more compact symbols or abbreviations for plant names. Alternatively, you can create a separate legend or key adjacent to the plan to list the plant symbols with their corresponding names.
3. Changing Design Requirements: Design plans are not set in stone, and there may be instances where design requirements change or specific plants need to be modified. To address this, use overlay sheets or tracing paper to make changes without altering the original plan. This allows for flexibility and easy revision without compromising the integrity of the design.
4. Insufficient Plant Information: Sometimes, the markings on the design plan may not provide enough information about a particular plant, leading to confusion or misunderstandings. To overcome this, consider including a separate sheet or document that provides detailed information about each plant symbol. This can include the common name, botanical name, size, care instructions, and any other relevant details.
5. Symbol Inaccuracy: If you discover that a plant symbol is inaccurate or doesn’t align with the intended representation, it’s important to correct it promptly. Make the necessary adjustments by erasing or revising the symbol and add a note explaining the change, so that anyone reviewing the plan can understand the correction.
6. Collaboration Challenges: When working with a team of designers or contractors, it’s essential to ensure that everyone interprets and understands the plant symbols consistently. To address collaboration challenges, conduct regular team meetings or workshops to review and discuss the symbol system used in the design plan. This helps foster clear communication and aligns everyone’s understanding of the symbols.
7. Learning and Skill Improvement: If you’re new to marking plant symbols or want to enhance your skills, take advantage of educational resources or professional development opportunities. Attend workshops, participate in online courses, or consult experienced landscape designers to improve your symbol marking techniques and knowledge of plant representation.
By being aware of these potential challenges and implementing the provided solutions, you can overcome any obstacles that may arise while marking plant symbols. This will result in accurate, clear, and effective communication through your landscape design plans.
Now, let’s summarize the key points and conclude our journey into the world of plant symbol marking in landscape design.
Conclusion
In the world of landscape design, marking plant symbols is an essential step in ensuring clear communication, accurate implementation, and successful outcomes. By understanding plant symbols and their representations, you can effectively convey your design vision to clients, contractors, and suppliers.
Properly marked plant symbols offer a range of benefits, including clear communication, accurate implementation, time and cost efficiency, design consistency, improved client understanding, streamlined maintenance, and effective collaboration. These benefits contribute to the overall success of your landscape designs and enhance client satisfaction.
To mark plant symbols effectively, gather the necessary tools and materials such as an architectural scale ruler, pencils, colored markers, tracing paper, and plant symbol templates. Follow a step-by-step guide that includes preparing your design plan, identifying plant locations, selecting and applying symbols, adding details and labels, using color differentiation, reviewing and editing, and documenting and communicating your design plan.
Avoid common mistakes in plant symbol marking, such as inconsistent symbol usage, unclear or smudged symbols, lack of scale proportion, missing or inadequate labels, ignoring plant characteristics, overcomplicated symbols, lack of color differentiation, and failing to document changes. Awareness of these mistakes will help you create clear and accurate markings that provide a solid foundation for implementation.
If you encounter any challenges while marking plant symbols, troubleshoot and find solutions such as addressing symbol clutter, accommodating for limited space, adapting to changing design requirements, providing sufficient plant information, ensuring symbol accuracy, managing collaboration challenges, and seeking opportunities for skill improvement and learning.
Remember, marking plant symbols is an ongoing learning process. Continue to explore educational resources, consult experienced designers, and refine your skills to consistently deliver high-quality designs with accurately marked symbols.
As you embark on your landscape design journey, may the proper marking of plant symbols guide you towards creating stunning outdoor spaces that delight and inspire. Happy designing!
Frequently Asked Questions about How To Mark Plant Symbols In Landscape Design
Was this page helpful?
At Storables.com, we guarantee accurate and reliable information. Our content, validated by Expert Board Contributors, is crafted following stringent Editorial Policies. We're committed to providing you with well-researched, expert-backed insights for all your informational needs.


0 thoughts on “How To Mark Plant Symbols In Landscape Design”