Home>Garden Essentials>How To Use Photoshop For Landscape Design
Garden Essentials
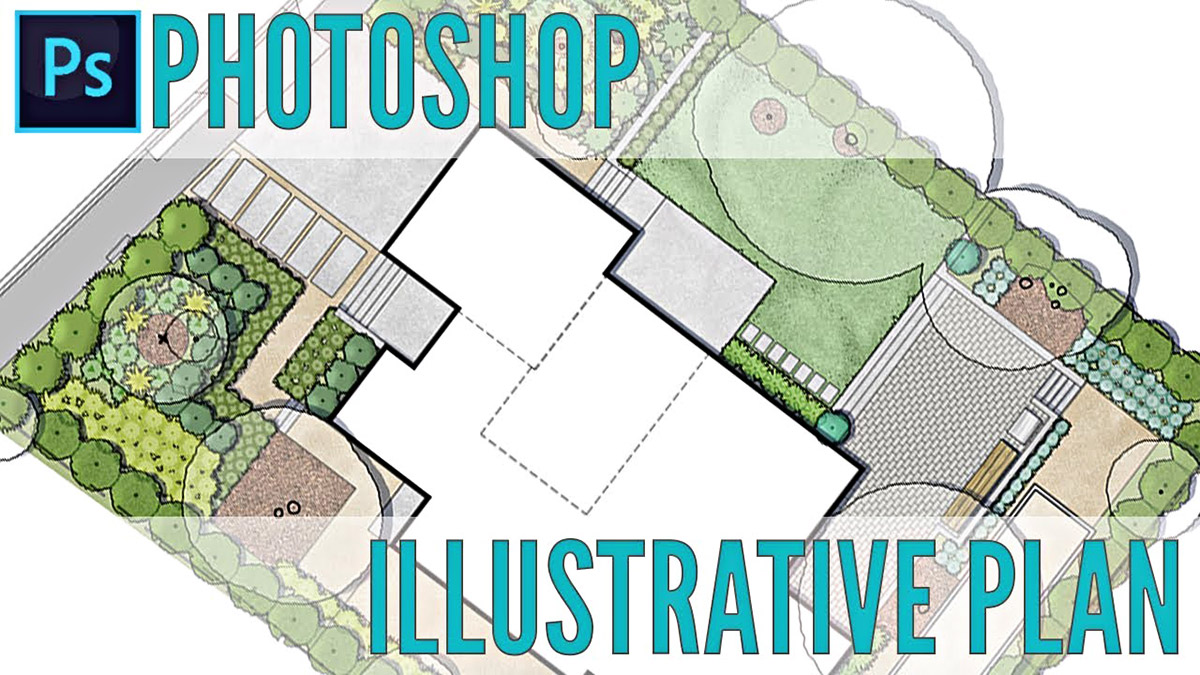
How To Use Photoshop For Landscape Design
Modified: March 7, 2024
Learn how to use Photoshop for landscape design and create stunning garden designs. Enhance your gardening skills with our step-by-step tutorials.
(Many of the links in this article redirect to a specific reviewed product. Your purchase of these products through affiliate links helps to generate commission for Storables.com, at no extra cost. Learn more)
Introduction
Welcome to the world of landscape design! Whether you have a green thumb or simply appreciate the beauty of nature, creating stunning landscapes can bring joy and tranquility to any space. One tool that can greatly aid in landscape design is Adobe Photoshop. With its powerful features and endless possibilities, Photoshop allows you to transform ordinary images into extraordinary works of art.
In this article, we will guide you through the process of using Photoshop for landscape design. From choosing the right images to applying various tools and techniques, we will cover everything you need to know to bring your vision to life. So, if you’re ready to elevate your landscape design skills and create breathtaking scenes, let’s dive in!
Key Takeaways:
- Choosing the Right Images
Select high-resolution, well-composed images with suitable lighting and colors. Combine multiple images for variety and don’t be afraid to experiment until you find the perfect ones for your project. - Enhancing Landscaping Elements
Use Photoshop tools to refine composition, add depth, and apply color adjustments. Experiment with texture overlays, selective focus, and color adjustments to create visually captivating landscapes.
Read more: How To Design A Low-Maintenance Landscape
Choosing the Right Images
When it comes to landscape design in Photoshop, selecting the right images is crucial. The quality and content of your base images will determine the success of your final design. Here are a few tips to help you choose the right images:
- High-resolution images: Look for high-resolution images to ensure clarity and detail in your design. Images with a resolution of at least 300 dots per inch (DPI) are ideal for professional-looking results.
- Composition and perspective: Consider the composition and perspective of the images you choose. Look for images that have interesting angles, depth, and focal points to create visually appealing landscapes.
- Lighting conditions: Take into account the lighting conditions in the images. Choose images with consistent lighting or ones that can be easily adjusted to match the desired atmosphere of your design.
- Color scheme: Pay attention to the color scheme of the images. Look for images that align with the color palette you have in mind for your design. This will make it easier to blend and enhance elements seamlessly.
- Multiple images for variety: Don’t limit yourself to just one image. Combining and blending multiple images can create a more diverse and dynamic landscape. Look for images with different elements like trees, flowers, water, and structures to add depth and interest.
Remember, choosing the right images is the first step in creating a captivating landscape design in Photoshop. Take your time to find images that inspire you and align with your vision. Don’t be afraid to experiment and explore different options until you find the perfect images for your project.
Basic Tools and Techniques
Once you have selected your images, it’s time to familiarize yourself with the basic tools and techniques in Photoshop that will help you bring your landscape design to life. Here are some essential tools and techniques to get you started:
- Selection Tools: Use the selection tools, such as the Marquee tool or the Quick Selection tool, to isolate specific areas or objects in your image. Selections allow you to make targeted adjustments or apply effects to specific parts of your landscape.
- Layers: Understanding layers is crucial in Photoshop. Layers allow you to work non-destructively by separating different elements and adjustments. This way, you can easily edit individual components without affecting the rest of your design.
- Brushes: The brush tool is one of the most versatile tools in Photoshop. Experiment with different brush sizes, opacities, and blending modes to paint in details, adjust colors, or create custom effects in your landscape design.
- Adjustment Layers: Adjustment layers are a powerful tool for making non-destructive changes to your design. Use adjustment layers like Levels, Curves, or Hue/Saturation to fine-tune the lighting, contrast, colors, and overall mood of your landscape.
- Clone Stamp Tool: The Clone Stamp tool allows you to clone or duplicate specific areas of your image. This tool comes in handy when you need to remove unwanted objects, fill in gaps, or create patterns in your landscape design.
- Transform Tools: The Transform tools, such as Scale, Rotate, and Warp, enable you to resize, rotate, and distort your images to fit your desired composition. These tools are essential for integrating different elements seamlessly.
These are just a few of the basic tools and techniques in Photoshop that you can utilize for your landscape design. As you become more comfortable with these tools, you can explore advanced techniques and features to further enhance your designs.
Adjusting Lighting and Colors
Lighting and colors play a crucial role in creating a visually stunning landscape design. With Photoshop, you have full control over adjusting and enhancing the lighting and colors of your images. Here are some techniques to help you achieve the desired ambiance for your design:
- Exposure and Contrast: Use adjustment layers like Levels or Curves to adjust the overall exposure and contrast of your image. Increase the brightness or darken specific areas to create desired lighting effects.
- Color Balance: The Color Balance adjustment allows you to fine-tune the colors in your image. You can adjust the tone and balance of shadows, midtones, and highlights to achieve a desired color scheme for your landscape.
- Gradient Map: The Gradient Map adjustment is a powerful tool for creating dramatic color effects. It maps different colors to the tonal range of your image, allowing you to create unique and atmospheric color schemes.
- Dodge and Burn: The Dodge and Burn tools can be used to selectively lighten or darken areas of your image. This technique is especially useful for adding depth and highlighting specific elements in your landscape.
- Color Overlay: Apply a color overlay using a solid color adjustment layer to create a tinted effect. This can be useful for adding warmth or coolness to your overall design.
- Selective Color: With the Selective Color adjustment layer, you can target specific colors and adjust their levels individually. This technique allows you to fine-tune the hues and saturation of different elements in your landscape.
Experiment with these techniques to create the desired lighting and color effects in your landscape design. Use them subtly to enhance the natural beauty of the scene or boldly to create a more artistic and surreal atmosphere. The key is to find the right balance that brings your vision to life.
Enhancing Landscaping Elements
Now that you have adjusted the lighting and colors of your landscape design, it’s time to enhance the landscaping elements to make them visually appealing and cohesive. Photoshop offers a range of tools and techniques to bring out the best in your landscape. Here are some ways you can enhance the landscaping elements:
- Cropping and Composition: Use the crop tool to refine the composition of your landscape. Crop out unnecessary elements or adjust the framing to create a more balanced and visually pleasing design.
- Sharpening and Detail: Apply sharpening techniques, such as the High Pass filter or the Unsharp Mask, to enhance the details and textures of your landscape. This will make your design look crisper and more defined.
- Adding Depth: Use the brush tool with different opacities to paint in shadows and highlights, adding depth and dimension to your landscape. This technique can make objects appear more three-dimensional and realistic.
- Texture Overlay: Overlay textures like leaves, grunge, or watercolor on specific elements of your landscape to add visual interest and create a unique look. Blend the textures using blending modes and opacity settings to achieve the desired effect.
- Selective Focus: Use the blur and sharpen tools to create selective focus effects. This technique can draw attention to specific elements in your landscape by keeping them sharp while blurring the background or surrounding areas.
- Color Adjustments: Apply selective color adjustments to specific elements in your landscape to enhance their vibrancy or create a more cohesive color scheme. Target individual objects or areas using selection tools for precise adjustments.
By enhancing the landscaping elements in your design, you can create a visually captivating and immersive landscape. Use these techniques creatively and experiment with different settings to achieve the desired effects and make your landscape design truly stand out.
When using Photoshop for landscape design, make sure to use layers for different elements such as trees, buildings, and terrain. This will allow you to easily make adjustments without affecting the entire design.
Read more: How To Use Rocks For Landscaping
Adding or Removing Objects
In landscape design, you may sometimes want to add or remove objects to create the perfect composition or make improvements to the scene. With Photoshop, you have the power to seamlessly add or remove objects from your landscape. Here are some techniques to help you accomplish this:
- Clone Stamp Tool: The Clone Stamp tool allows you to duplicate pixels from one area of your image to another. Use it to remove unwanted objects by cloning nearby areas and blending them seamlessly into the background.
- Content-Aware Fill: Content-Aware Fill is a powerful feature in Photoshop that can intelligently fill in selected areas with content that matches the surrounding pixels. Use it to remove objects by selecting them and letting Photoshop fill in the gaps automatically.
- Spot Healing Brush: The Spot Healing Brush tool lets you quickly remove small imperfections, blemishes, or unwanted objects. Simply brush over the area you want to remove, and Photoshop will analyze the surrounding pixels to create a seamless patch.
- Layers and Masks: When adding objects to your landscape, use layers and masks for a non-destructive workflow. Place the new object on a separate layer and use layer masks to blend it seamlessly into the scene, revealing and concealing parts as needed.
- Transform and Perspective Warp: When adding new objects, utilize the transform tools to adjust their size, position, and perspective. Perspective Warp is particularly useful for aligning objects with the perspective of the landscape, making them appear more realistic.
- Smart Objects: Convert added objects into Smart Objects to maintain their original quality and flexibility. Smart Objects retain their full editing capabilities, allowing you to make adjustments even after they have been placed in your landscape design.
With these techniques, you can easily add or remove objects in Photoshop to refine your landscape design. Whether you’re removing distractions or adding new elements to enhance the scene, take your time to ensure a seamless integration that appears natural and harmonious.
Creating Realistic Textures
Textures play a crucial role in adding realism and depth to your landscape design. Photoshop offers various tools and techniques to help you create realistic textures that bring your design to life. Here are some ways you can achieve realistic textures in your landscape:
- Texture Overlays: Overlaying textures on specific elements can add realism and visual interest. Use blending modes and opacity settings to blend textures seamlessly with the underlying elements. Experiment with textures like grass, stone, or wood to mimic real-world textures.
- Texture Brushes: Photoshop provides a wide range of texture brushes that can be used to add detailed textures to your landscape design. Create custom brushes or download texture brushes from online sources to paint in realistic textures on objects like trees, rocks, or water.
- Pattern Fill: Utilize pattern fill layers to add repeating textures, such as bricks, tiles, or foliage. Adjust the scale, rotation, and blending options to match the perspective and lighting of your landscape, creating a seamless and realistic effect.
- Displacement Maps: Displacement maps allow you to warp and distort images or layers to conform to the shape and texture of a surface. Use displacement maps to add texture and depth to flat surfaces like walls, grounds, or water.
- Filter and Adjustment Layers: Experiment with various filters and adjustment layers to enhance the texture and appearance of your landscape. Techniques like adding a subtle grain effect, applying a sharpening filter, or using the High Pass filter can add realism and texture to your design.
- Blend Modes and Opacity: Adjusting the blend modes and opacity of texture layers can significantly impact the appearance of textures in your landscape. Experiment with different blending settings to achieve the desired level of realism and blending with underlying elements.
By incorporating realistic textures into your landscape design, you can create a more immersive and visually appealing scene. Take the time to experiment with different techniques and settings to find the perfect balance that enhances the realism of your design.
Blending and Compositing Techniques
Blending and compositing is a critical aspect of landscape design in Photoshop. It allows you to seamlessly integrate multiple elements from different images to create a cohesive and realistic composition. Here are some blending and compositing techniques to help you achieve professional-looking results:
- Layer Masks: Layer masks allow you to selectively reveal or hide parts of a layer. Use them to blend different elements together, ensuring smooth transitions and seamless integration.
- Blend Modes: Blend modes control how layers interact with each other. Experiment with different blend modes to achieve the desired look. Commonly used blend modes for landscape design include Overlay, Soft Light, and Multiply, but don’t be afraid to try different modes to achieve unique effects.
- Opacity and Fill: Adjusting the opacity and fill of layers can help you control the visibility and intensity of blending. Decreasing the opacity can create more subtle and natural blends, while increasing the opacity can add bold and vibrant effects.
- Brush and Eraser Tools: Use the brush tool with soft edges and the eraser tool to refine your blending. Softly brush along edges where elements meet to create smooth transitions and eliminate harsh edges.
- Adjustment Layers: Adjustment layers can be used to fine-tune the colors, tones, and lighting of the different elements in your composition. Apply adjustment layers to specific layers or groups to ensure consistency and cohesiveness throughout your design.
- Guided Transform: The Guided Transform feature in Photoshop can help align and adjust elements accurately. Use it to correct perspective and size discrepancies when compositing objects into your landscape.
Mastering blending and compositing techniques will allow you to create seamless and realistic landscape designs. Don’t be afraid to experiment and practice with different methods to refine your skills and develop your unique style.
Applying Filters and Effects
Filters and effects can add a creative touch and enhance the visual impact of your landscape design. Photoshop offers a wide range of filters and effects that you can apply to your images to achieve various artistic and stylistic results. Here are some popular filters and effects you can experiment with:
- Blur Filters: Apply blur filters like Gaussian Blur or Lens Blur to create depth of field effects, simulate motion, or soften certain areas of your landscape design. Blurring can help create a sense of focus and draw attention to specific elements.
- Artistic Effects: Explore artistic filters such as Watercolor, Posterize, or Oil Paint to give your landscape design a unique and painterly look. These effects can add texture, brush strokes, and vibrant colors to your composition.
- Noise and Grain: Add noise or grain to your landscape to mimic the look of traditional film or add a vintage feel to your design. This can add character and bring a nostalgic touch to your images.
- Distortions: Experiment with distortion filters like Liquify to warp and manipulate elements in your landscape. This can create surreal or abstract effects, adding an element of visual interest and surprise to your design.
- Lighting Effects: Photoshop offers various lighting effects that you can apply to enhance the atmosphere of your landscape. Play around with options like Lighting Effects or Lens Flare to create dramatic or dreamy lighting scenarios.
- Gradient and Color Effects: Use gradient maps or color adjustment layers with blending modes to apply creative color toning effects to your landscape. Experiment with different color combinations to evoke different moods and enhance the overall aesthetic.
Remember, filters and effects can be used sparingly to enhance your landscape design without overpowering it. Adjust their settings and opacity to achieve the desired result, and don’t be afraid to experiment and combine different filters to create unique effects.
Read more: How To Use Pea Gravel In Landscaping
Final Touches and Exporting the Design
After you have applied all the necessary adjustments, enhancements, and effects to your landscape design in Photoshop, it’s time to add the final touches and prepare it for export. Here are some steps to consider as you finalize your design:
- Fine-Tuning: Take a step back and review your design as a whole. Look for any areas that may need additional adjustments or refinements. Pay attention to details such as color balance, sharpness, and overall composition.
- Text and Graphics: If you plan to include text or graphics in your design, now is the time to add them. Choose fonts and styles that complement the overall aesthetic of your landscape and ensure they are legible and appropriately placed within the composition.
- Organizing Layers: Make sure your layers are well-organized and labeled. Flatten or merge any unnecessary layers to reduce file size and optimize performance. Keeping a tidy layer structure will make it easier to make changes in the future if needed.
- Exporting Options: Decide on the appropriate file format and resolution for exporting your design. For sharing online or sending to clients, JPEG or PNG formats with a resolution of 72 DPI are typically sufficient. If you plan to print your design, consider using higher resolutions and formats like TIFF.
- Saving Variations: It’s a good practice to save different variations of your design. Create copies and experiment with different adjustments, color schemes, or effects. This will allow you to compare and choose the version that best captures your vision.
- Backing Up: As a final step, make sure to create backups of your design files. Store them in a secure location, whether it’s an external hard drive, cloud storage, or both. This ensures you have a copy in case of any unexpected incidents or future edits.
With the final touches added and your design prepared for export, you can share your masterpiece with the world. Whether it’s showcasing your work on a portfolio website, printing it as a stunning wall art piece, or using it in professional presentations, your landscape design is now ready to make an impact.
Frequently Asked Questions about How To Use Photoshop For Landscape Design
Was this page helpful?
At Storables.com, we guarantee accurate and reliable information. Our content, validated by Expert Board Contributors, is crafted following stringent Editorial Policies. We're committed to providing you with well-researched, expert-backed insights for all your informational needs.


0 thoughts on “How To Use Photoshop For Landscape Design”