Articles
How To Mark A Quilt
Modified: January 5, 2024
Learn how to mark a quilt with these helpful articles. Find step-by-step instructions, tips, and techniques for successful quilt marking.
(Many of the links in this article redirect to a specific reviewed product. Your purchase of these products through affiliate links helps to generate commission for Storables.com, at no extra cost. Learn more)
Introduction
Marking a quilt is an essential step in the quilting process, as it helps guide the quilting stitches and ensures a precise and beautiful finished product. Whether you’re a novice quilter or a seasoned pro, knowing how to mark a quilt effectively can greatly enhance the overall appearance of your project.
In this article, we will explore the various methods and tools used for marking a quilt, along with some handy tips and techniques to make the process easier. So, grab your quilting supplies and let’s dive into the world of quilt marking!
Before we begin, it’s important to note that the marking method you choose may depend on the type of quilt you’re working on, as well as personal preference. Some quilters prefer using traditional marking techniques, while others opt for modern methods. No matter your approach, the ultimate goal is to transfer the design onto the quilt fabric accurately.
Throughout this article, we’ll discuss different marking tools, explore design options, and look at the techniques used to transfer and trace the design onto the fabric. We’ll also cover how to correct any mistakes that may occur during the marking process. By the end, you’ll feel confident in marking your own quilts!
Before we dive into the marking techniques, there are a few basic supplies you’ll need:
Read more: How To Accurately Measure And Mark Lumber
Supplies Needed:
- Quilt fabric
- Quilt pattern or design
- Marking tools
- Tape measure or ruler
- Straight pins or fabric clips
Once you have gathered these supplies, you’ll be ready to begin marking your quilt. In the next section, we’ll explore the different marking tools available for quilting.
Key Takeaways:
- Master the art of quilt marking by selecting the right tools, preparing your fabric meticulously, and choosing the perfect design to bring your quilting vision to life.
- Embrace mistakes as opportunities for creativity, trust your instincts, and document your quilting journey for inspiration and growth. Happy quilting!
Supplies Needed
Before you begin marking your quilt, it’s essential to gather all the necessary supplies. Having the right tools on hand will make the marking process more seamless and ensure accurate results. Here are the supplies you’ll need:
- Quilt fabric: Choose a high-quality fabric that suits your quilting project. Consider factors such as color, pattern, and texture to achieve your desired aesthetic.
- Quilt pattern or design: Select a pattern or design that inspires you. This can be a pre-made pattern, a template, or a design you create yourself.
- Marking tools: There are various marking tools available for quilting. Some popular options include fabric markers, water-soluble pens, chalk pencils, and quilting stencils.
- Tape measure or ruler: A tape measure or ruler is handy for measuring and marking fabric dimensions accurately.
- Straight pins or fabric clips: These are useful for securing your fabric in place while marking the quilt.
Make sure to have these supplies readily available before you begin marking your quilt to avoid interruptions and ensure a smooth workflow. Now, let’s move on to the next section, where we’ll discuss the importance of proper preparation before marking.
Preparation
Before diving into the marking process, it’s crucial to prepare your quilt fabric properly. Taking the time to prepare your fabric will result in better marking and minimize any potential issues along the way. Here are a few essential steps to follow:
- Wash and press the fabric: If your quilt fabric is washable, it’s a good idea to wash it before marking. This will remove any sizing or chemicals that might interfere with the marking process. After washing, press the fabric with an iron to ensure it’s smooth and wrinkle-free.
- Trim the fabric: Trim the edges of your fabric to remove any frayed or uneven edges. This will make it easier to align and mark the quilt accurately.
- Secure the fabric: Before marking, secure the fabric to prevent shifting or movement. You can use straight pins or fabric clips to hold the fabric in place.
By following these preparation steps, you’ll be setting yourself up for success in the marking process. Now, let’s move on to explore the different marking tools available for quilting.
Marking Tools
When it comes to marking a quilt, you have a variety of tools to choose from. The type of marking tool you select will depend on factors such as the fabric color, personal preference, and the desired permanence of the markings. Here are some popular marking tools used in quilting:
- Fabric markers: Fabric markers are specially designed to leave permanent or semi-permanent marks on fabric. They come in a range of colors and tip sizes, making them versatile for different quilting projects. It’s important to test the fabric marker on a scrap piece of fabric to ensure it doesn’t bleed or fade.
- Water-soluble pens: These pens are a popular choice as they allow you to make visible marks on fabric that will vanish with water. They are ideal for temporary markings and can be easily removed by either dabbing the fabric with water or washing the quilt after quilting.
- Chalk pencils: Chalk pencils offer an excellent option for marking light-colored fabrics. The chalk markings are easily visible and can be brushed away or removed with a gentle wash.
- Quilting stencils: Quilting stencils are pre-made templates that allow you to trace specific designs onto your quilt. These come in a variety of shapes, sizes, and patterns, making them a great option for creating intricate and precise quilt designs.
It’s important to consider factors such as fabric type, color, and personal preference when selecting a marking tool. Remember to test the tool on a scrap piece of fabric before using it on your quilt to ensure it works well and doesn’t leave any unwanted marks. Now that you’re familiar with the marking tools, let’s move on to the next section where we’ll discuss how to choose the right design for your quilt.
Read more: How To Mark Ground For Landscaping
Choosing the Design
Choosing the right design for your quilt is an exciting part of the quilting process. The design you select will set the tone and visual impact of the finished quilt. There are several factors to consider when deciding on a design:
- Quilt purpose: Consider the purpose of your quilt. Is it intended for a special occasion, as a gift, or simply for decorative purposes? The design you choose should align with the quilt’s intended use.
- Quilt style: Define the style you want to achieve. Whether it’s traditional, modern, or somewhere in between, the design should reflect the overall aesthetic you’re aiming for.
- Quilt size: Take into account the size of your quilt. A smaller quilt may call for more intricate and detailed designs, while a larger quilt may allow for bolder and more expansive patterns.
- Personal preference: Consider your own personal taste and what designs resonate with you. Quilting is a form of self-expression, so choose a design that speaks to your creative vision.
Once you have established these factors, you can start looking for design inspiration. Browse through quilting books, websites, and magazines to find patterns and motifs that catch your eye. You can also create your own designs using graph paper or by combining various elements from different sources.
Remember that the design you choose will be transferred onto the quilt fabric, so consider how it will look and fit within the dimensions of your quilt. Take into account factors such as symmetry, balance, and repetition to create a visually pleasing and harmonious design.
Now that you have an idea of the design you want to create, let’s move on to the next section, where we will explore the various techniques for transferring the design onto the quilt fabric.
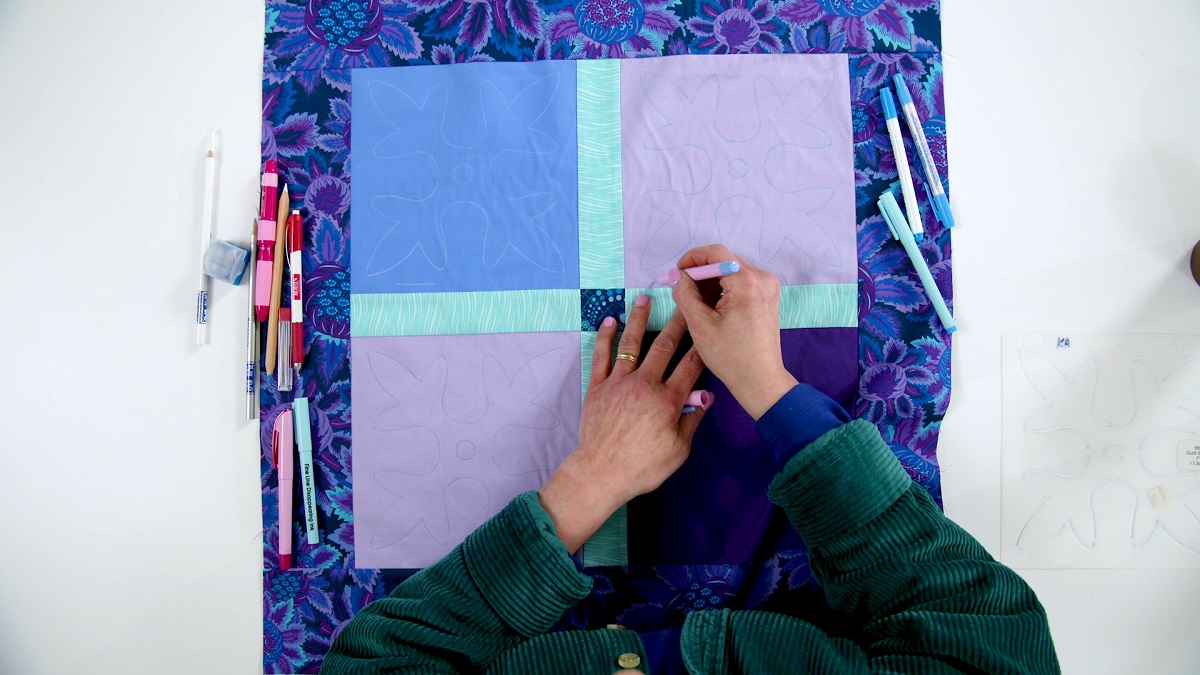
When marking a quilt, use a water-soluble fabric marker to ensure easy removal after quilting. Test the marker on a scrap fabric first to ensure it will wash out completely.
Transferring the Design
Once you have chosen a design for your quilt, the next step is to transfer that design onto the quilt fabric. There are several techniques you can use to accurately transfer the design. Here are a few commonly used methods:
- Tracing: One of the simplest ways to transfer a design is by tracing it directly onto the fabric. You can use a light source, such as a window or a light table, to place the design template on top of the fabric and trace over it using a marking tool of your choice.
- Transfer paper: Transfer paper is a useful tool for transferring patterns onto fabric. It typically comes in two colors – one side is used to trace the design, and the other side is placed face down on the fabric. When you trace over the design, the transfer paper leaves a temporary mark on the fabric.
- Quilting stencils: Quilting stencils can be an excellent option for precise and intricate designs. Place the stencil on top of the fabric and use a marking tool to trace the design. Stencils are available in various shapes and patterns, allowing you to create consistent and professional-looking designs.
- Freehand drawing: For more creative and customized designs, you can opt to freehand draw directly on the fabric. Use a marking tool that suits your fabric and draw the design with precision and control.
Whichever method you choose, it’s important to work carefully and accurately to ensure the design is transferred correctly. Practice on scrap fabric or make a test mark on a hidden part of the quilt to ensure the chosen marking tool works well and doesn’t bleed or fade.
Once the design has been transferred onto the fabric, review it and make any necessary adjustments or corrections. It’s easier to fix mistakes at this stage rather than after the quilting process has begun.
Now that you have successfully transferred the design onto the quilt fabric, it’s time to explore some effective marking techniques to bring your quilting project to life. Let’s move to the next section to learn more.
Marking Techniques
Now that you have transferred the design onto your quilt fabric, it’s time to explore different marking techniques to enhance the visibility and accuracy of your quilt markings. Here are some marking techniques commonly used in quilting:
- Single line markings: For simple designs that require straight lines, use a ruler or straight edge to mark single lines on the fabric. This technique ensures precision and consistency.
- Curved line markings: If your design requires curved lines or arcs, use a curved ruler or a flexible measuring tape to mark these lines. Take your time and follow the curve of the design carefully to maintain accuracy.
- Grid markings: Grid markings involve creating a grid pattern on the fabric to guide your quilting stitches. Use a ruler or a quilting stencil to mark evenly spaced horizontal and vertical lines. This technique is especially helpful for creating intricate and symmetrical designs.
- Pouncing: Pouncing is a technique that involves using a stencil and a pounce pad or powder to create marks on the fabric. Place the stencil on top of the fabric and pounce the pad or brush with powder over the stencil holes. This transfers the design onto the fabric as a dotted pattern.
Remember to choose a marking technique that suits your design and fabric type. Test the marking tools or techniques on a scrap piece of fabric before applying them to your quilt to ensure they work well and produce the desired effect.
While marking your quilt, it’s important to maintain a steady hand and work in a well-lit and comfortable environment. Take breaks as needed to prevent eye strain or hand fatigue, ensuring your markings remain accurate and consistent.
Now that you are familiar with different marking techniques, let’s move on to the next section where we’ll discuss how to correct any mistakes that may occur during the marking process.
Mistake Correction
Even the most experienced quilters can make mistakes during the marking process. But don’t worry if you find yourself in a situation where you need to correct a marking error. Here are some tips for fixing mistakes and ensuring your quilt comes out the way you envision:
- Lightly erase or brush away marks: If you made a marking error with a water-soluble pen or chalk pencil, you can try lightly erasing or brushing away the marks. Use a gentle touch to avoid damaging the fabric.
- Dab with water: For water-soluble pen marks that are more stubborn, you can try dabbing the marks with a small amount of water using a clean cloth or sponge. Test this method first on a scrap piece of fabric to ensure it doesn’t leave any unwanted residue or cause the colors to bleed.
- Use a fabric marker remover: If you made a mistake with a permanent fabric marker, there are fabric marker removers available that can help remove or lighten the marks. Always follow the manufacturer’s instructions and test the remover on a hidden part of the fabric before using it on your quilt.
- Embrace the mistake: Sometimes, mistakes can turn into design elements or happy accidents. Instead of trying to fix the mistake completely, consider incorporating it into your design or quilting pattern. View it as an opportunity to add unique character to your quilt.
- Adapt the design: If the marking mistake is significant and cannot be easily corrected, you can modify the design to accommodate the error. Adapt the quilting pattern or adjust the placement of motifs to work around the mistake and still create a visually pleasing quilt.
Remember, mistakes happen to the best of us, and the key is to approach them with creativity and flexibility. Don’t let a small marking error dampen your enthusiasm for quilting; instead, see it as an opportunity for growth and learning.
With these tips in mind, you can confidently tackle any marking mistakes and continue with the quilting process. In the next section, we’ll wrap up our discussion and share some final thoughts on marking a quilt.
Read more: How To Mark Your Power Tools
Final Thoughts
Marking a quilt is a crucial step in the quilting process that allows you to bring your design to life and ensure precise and beautiful stitching. By following the right techniques and using the appropriate marking tools, you can create a quilt that reflects your creativity and craftsmanship. Here are a few final thoughts to keep in mind:
- Practice makes perfect: As with any skill, practice is key. Take the time to practice different marking techniques on scrap fabric to refine your skills before working on your quilt. This will help you gain confidence and improve your accuracy.
- Be patient and take breaks: Marking a quilt can be a meticulous and time-consuming process, so it’s important to be patient with yourself. Take breaks as needed to rest your eyes and hands, ensuring you stay focused and maintain accuracy throughout.
- Trust your instincts: While there are guidelines and techniques to follow, don’t be afraid to trust your instincts and make creative choices. Quilting is an art form, and adding your personal touch and style can make your quilt truly unique and special.
- Document your process: Consider taking photos or creating a journal to document your marking process and design choices. This not only serves as a great way to track your progress, but it can also provide inspiration for future projects.
Remember, marking a quilt is just one part of the overall quilting journey. Embrace the process, enjoy the creativity it offers, and don’t be afraid to experiment and make it your own.
Now that you have a good grasp of the supplies needed, preparation steps, marking tools, design selection, transferring techniques, marking methods, mistake correction, and some final tips, you’re well-equipped to embark on your quilting journey and confidently mark your quilts. Happy quilting!
Frequently Asked Questions about How To Mark A Quilt
Was this page helpful?
At Storables.com, we guarantee accurate and reliable information. Our content, validated by Expert Board Contributors, is crafted following stringent Editorial Policies. We're committed to providing you with well-researched, expert-backed insights for all your informational needs.


0 thoughts on “How To Mark A Quilt”