Home>Garden Essentials>How To Mark Ground For Landscaping
Garden Essentials
How To Mark Ground For Landscaping
Modified: March 7, 2024
Learn how to mark ground for landscaping in your garden with our step-by-step guide. Create a beautiful outdoor space with clear boundaries and defined areas.
(Many of the links in this article redirect to a specific reviewed product. Your purchase of these products through affiliate links helps to generate commission for Storables.com, at no extra cost. Learn more)
Introduction
Welcome to the world of landscaping! Whether you’re a seasoned gardener or a novice looking to spruce up your outdoor space, marking the ground is an essential step in the landscaping process. Properly marking the ground helps you visualize and plan the layout of your garden, highlight key features, and ensure accuracy during the installation phase.
In this article, we will guide you on how to mark the ground for landscaping effectively. We will discuss various tools and materials needed, as well as different methods you can use to mark the ground. By the end, you’ll have the knowledge and confidence to tackle any landscaping project and create a beautiful and well-organized outdoor space.
So, let’s grab our tools and get started!
Key Takeaways:
- Plan and prepare: Gather tools like tape measure, spray paint, and flags. Clear the area, measure and mark boundaries, and ensure safety before marking the ground for landscaping.
- Choose the right method: Decide between spray paint, flags, twine, or temporary markers based on your project needs. Each method has its advantages for accurate and efficient ground marking.
Tools and Materials Needed
Before you begin marking the ground for your landscaping project, it’s important to gather the necessary tools and materials to ensure efficiency and accuracy. Here are the essential items you’ll need:
- Tape measure or measuring wheel: This will help you accurately measure the dimensions of your outdoor space.
- Garden stakes or flags: These are useful for marking key points, boundaries, and features.
- Spray paint: It’s an excellent option for marking large areas and creating straight lines.
- Twine or string: This is handy for creating straight lines or marking curved edges.
- Hammer or mallet: You’ll need this to secure the stakes or flags into the ground.
- Landscaping markers or pins: These temporary markers can be inserted into the ground to mark specific areas or features.
- Gloves and protective eyewear: Ensuring your safety during the marking process is crucial.
Additionally, depending on the specifics of your landscaping project, you may need other tools or materials such as a level, shovel, or garden hose. It’s always a good idea to plan ahead and prepare accordingly.
Once you have gathered all the necessary tools and materials, you can move on to preparing the ground for marking.
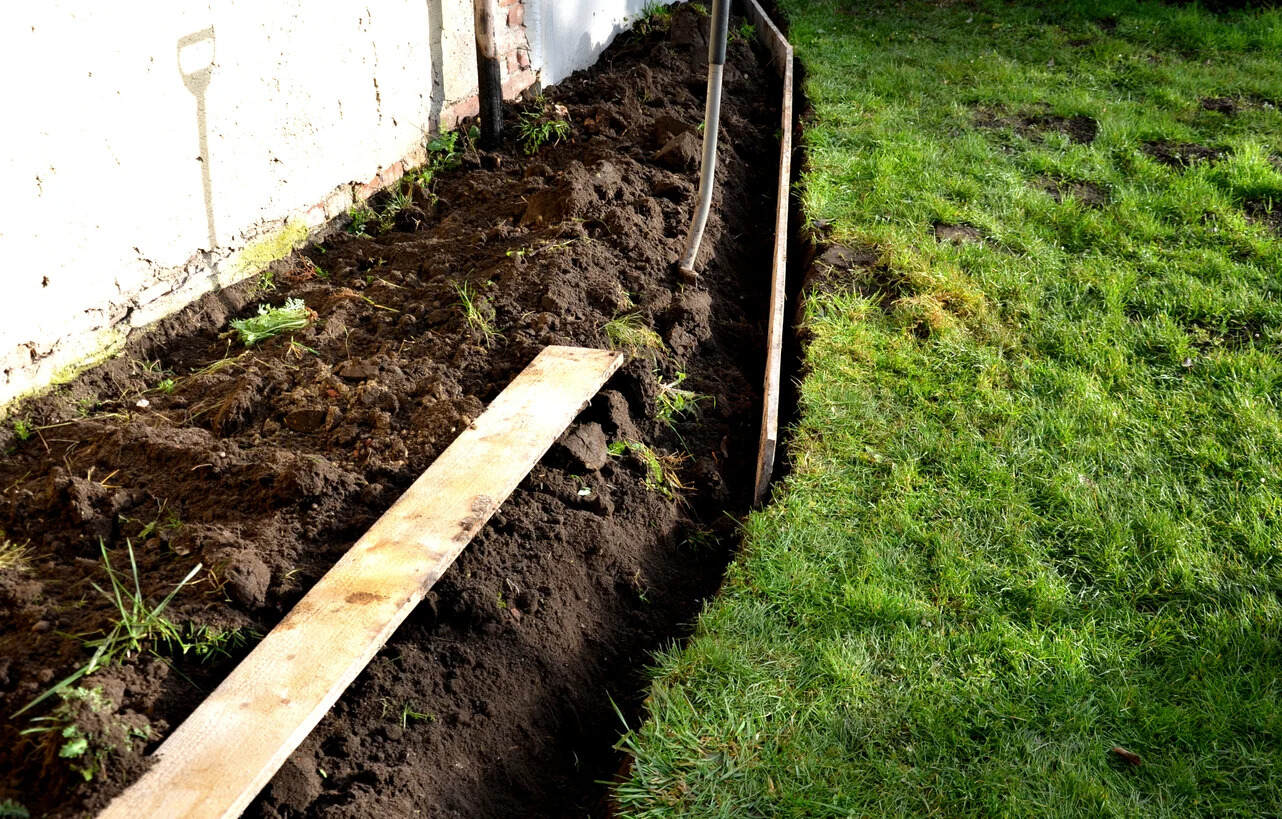
Preparing the Ground for Marking
Before you start marking the ground, it’s important to prepare the area to ensure accuracy and ease of marking. Here are the steps you should follow:
- Clean the area: Remove any debris, rocks, or plants from the area where you will be marking. This will help you get a clear and unobstructed view of the ground.
- Measure and mark the boundaries: Use the tape measure or measuring wheel to determine the exact dimensions of the area you’ll be working on. Mark the corners and edges with stakes or flags.
- Clear the vegetation: If there’s any grass, weeds, or other vegetation in the marked area, consider clearing it to create a clean surface. This will make the marking process easier and more accurate.
- Level the ground if needed: If the ground is uneven, use a shovel or rake to level it out. This will help ensure that your landscaping project is visually appealing and helps with water drainage.
- Inspect for buried utilities: Before you start marking the ground, it’s crucial to check for any buried utilities such as gas lines, electrical wires, or water pipes. Contact your local utility company to locate and mark these utilities if necessary. Safety should always be a top priority.
By following these steps, you will ensure that the ground is well-prepared for marking, allowing you to proceed with clarity and accuracy in the next steps.
Choosing the Right Marking Method
When it comes to marking the ground for landscaping, there are several methods you can choose from, depending on the nature of your project and your personal preference. Let’s explore some common marking methods:
Method 1: Using Spray Paint
Spray paint is a versatile and popular choice for marking large areas, such as when creating pathways or designating planting beds. It provides a clear and visible mark on the ground, making it easy to follow during the installation process. When using spray paint, make sure to select a color that contrasts with the surrounding environment for better visibility.
Method 2: Using Flags or Stakes
Flags or stakes are useful when marking specific points, such as the corners of your garden or the location of trees or shrubs. They can be easily inserted into the ground and act as visual cues during the installation process. Choose flags or stakes that are durable and easy to spot, especially if you’ll be working in an area with dense vegetation.
Method 3: Using Twine or String
Twine or string is an excellent option when you need to create straight lines or mark curved edges. It can be tied between two stakes or trees to accurately define boundaries or guide the placement of plants or landscape features.
Method 4: Using Temporary Landscaping Markers
Temporary landscaping markers, such as landscape pins or markers, are perfect for designating temporary features or areas that will be adjusted in the future. These markers can be easily inserted into the ground and removed when they are no longer needed.
It’s important to choose a marking method that suits your project’s requirements and aligns with your personal preferences. Consider the size of the area, the type of markings needed, and the visibility you desire when making your decision.
Now that you have an overview of the different marking methods, you can proceed to the specific method that best suits your landscaping project.
Method 1: Using Spray Paint
When it comes to marking large areas for landscaping projects, using spray paint can be a quick and effective method. Here’s a step-by-step guide on how to use spray paint for ground marking:
- Choose the right spray paint: Look for spray paint specifically designed for outdoor use and is suitable for marking on the ground. Select a color that contrasts well with the surrounding environment, making it easy to see and follow during the installation process.
- Prepare the can: Shake the spray paint can vigorously to ensure the paint is thoroughly mixed. Read and follow the instructions on the can for any specific preparation steps.
- Mark the boundaries: Start by marking the corners and edges of your desired area. Hold the spray can approximately 6-8 inches above the ground and spray short bursts of paint. Walk along the perimeter, creating a continuous line.
- Create pathways or designations: If you’re creating pathways or designating specific areas, use the spray paint to mark the desired lines or shapes. This can include outlining the shape of flower beds or marking the route of a walking path.
- Allow the paint to dry: Give the paint enough time to dry completely before proceeding with any installation or construction work. Follow the manufacturer’s instructions regarding drying time.
- Reapply if necessary: Depending on the type of paint and weather conditions, you may need to reapply the spray paint periodically to maintain its visibility. Keep an eye on the markings and refresh them as needed.
Using spray paint for ground marking provides a clear and visible indicator of the desired areas, making it easier to follow during the installation process. Ensure you work in a well-ventilated area and protect surrounding surfaces or plants from overspray.
Now that you know how to use spray paint for ground marking, you can confidently move on to marking your landscaping project with precision and accuracy.
Method 2: Using Flags or Stakes
When you need to mark specific points or boundaries in your landscaping project, using flags or stakes can provide a simple and effective solution. Here’s a step-by-step guide on how to use flags or stakes for ground marking:
- Select the appropriate flags or stakes: Choose flags or stakes that are sturdy, weather-resistant, and highly visible. Opt for bright colors that contrast well with the surrounding environment.
- Determine the points to mark: Identify the specific points or boundaries you want to mark in your landscaping project. This can include marking the corners of your garden, indicating the location of trees or shrubs, or designating specific areas for installation.
- Position the flags or stakes: Insert the flags or stakes vertically into the ground at the desired locations. Use a hammer or mallet if necessary to ensure they are securely anchored.
- Create lines if needed: If you need to connect multiple points or create a boundary line, use a string or twine to tie between the flags or stakes. This will help create a clear visual guide for the installation process.
- Double-check the accuracy: Take measurements and ensure that the flags or stakes are positioned correctly according to your design or plan. Adjust if necessary to ensure accuracy.
- Leave the markers in place: Unlike spray paint or temporary markers, flags or stakes are meant to stay in place throughout the project. They act as visual guides for the installation phase.
Using flags or stakes for ground marking provides a tangible and visible reference point for your landscaping project. It helps maintain accurate positioning and provides a clear visual cue during the installation process. Make sure to choose flags or stakes that are durable and easily visible, especially if you’ll be working in an area with dense vegetation.
With the help of flags or stakes, you can confidently proceed with the installation of your landscaping project, knowing that the marked points and boundaries are accurate and easily identifiable.
Use marking paint or flags to outline the area for landscaping. Measure and mark the boundaries accurately to ensure the desired layout and design.
Method 3: Using Twine or String
When you need to create straight lines or mark curved edges in your landscaping project, using twine or string can be a helpful method. Here’s a step-by-step guide on how to use twine or string for ground marking:
- Choose the right twine or string: Select a durable and weather-resistant twine or string that can withstand outdoor conditions. Make sure it is strong enough to hold its shape when stretched.
- Determine the desired lines or shapes: Decide on the lines or shapes you want to create using twine or string. This can include marking straight edges, outlining the shape of flower beds, or creating curved paths.
- Prepare the area: Clear any obstacles or debris from the ground where you’ll be marking with twine or string. This will ensure a smooth and accurate marking process.
- Secure the starting point: Choose a starting point for your line or shape and secure one end of the twine or string to a stake or other anchor point. Ensure it is firmly tied or secured in place.
- Stretch the twine or string: Holding the other end of the twine or string, walk towards the direction you want to mark and gently pull it taut. Keep it at the desired height or position above the ground.
- Position stakes or flags: As you walk, periodically position stakes or flags along the twine or string to mark the line or shape. These markers will serve as guides during the installation process.
- Create curves if needed: For curved lines or shapes, carefully manipulate the twine or string to follow the desired path. Secure it in place with stakes or flags as needed to maintain the shape.
- Double-check the alignment: Measure and ensure that the twine or string is aligned properly according to your design or plan. Make any adjustments as necessary to ensure accuracy.
Using twine or string for ground marking allows you to create precise lines and shapes, making it easier to visualize and implement your landscaping project. It provides a clear guide for the installation phase and ensures that your outdoor space is well-organized and visually appealing.
With the help of twine or string, you can confidently move forward with your landscaping project, knowing that the marked lines and shapes are accurately positioned and will guide your installation process.
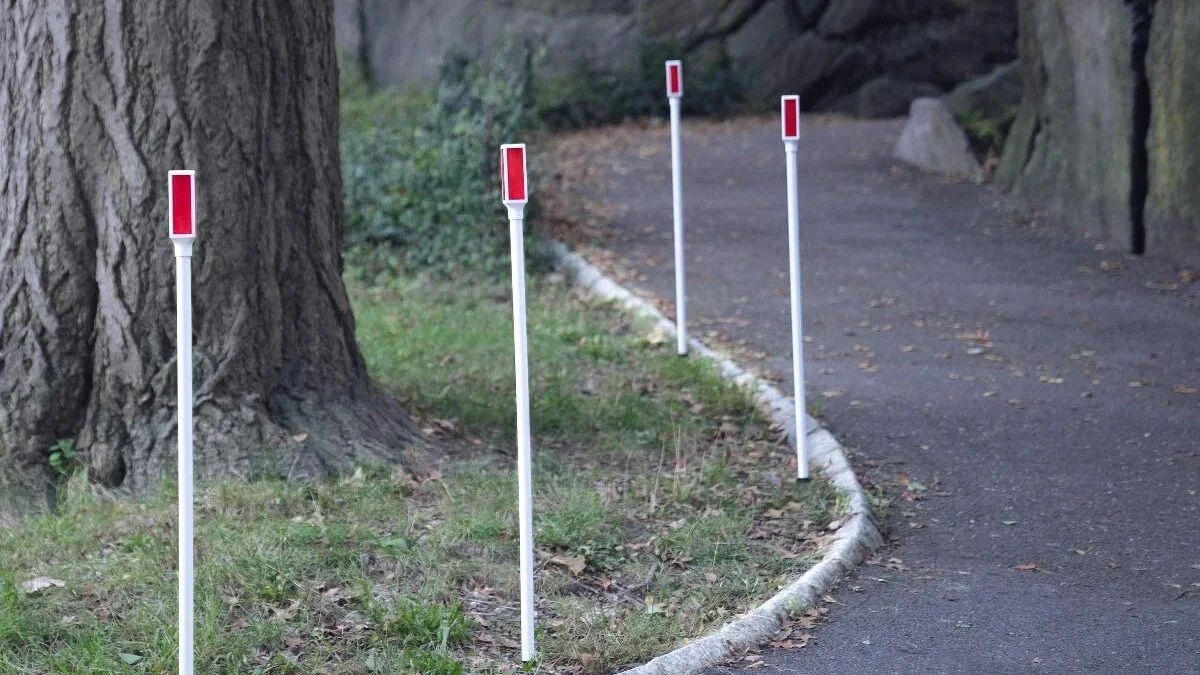
Method 4: Using Temporary Landscaping Markers
When you need to mark temporary features or areas that may be adjusted later in your landscaping project, using temporary landscaping markers can be a practical solution. Here’s a step-by-step guide on how to use temporary landscaping markers for ground marking:
- Choose the appropriate markers: Select temporary landscaping markers that are designed for outdoor use and can withstand different weather conditions. Look for markers that are easy to insert into the ground and remove when necessary.
- Identify the areas to mark: Determine the specific points, features, or areas that need temporary marking. This can include marking the location of plants, indicating where certain installations will be placed, or designating areas for future modifications.
- Insert the markers: Use your hands or a small mallet to gently insert the landscaping markers into the ground at the desired locations. Be careful not to damage any plants or existing structures.
- Double-check the placements: Take a step back and visually confirm that the markers are positioned accurately according to your plan. Adjust as needed to ensure proper alignment.
- Utilize different colors or shapes: To differentiate between different temporary markers or to indicate specific instructions, you can use markers of different colors or shapes. This will make it easier to identify and interpret the markings later.
- Take precautions for safety: If the temporary markers are being used in an area where people might walk or work, consider using markers with reflective properties or adding additional warning signs to ensure safety.
- Remove the markers when no longer needed: Once the temporary marking is no longer required or the designated work is completed, carefully remove the landscaping markers from the ground. Store them for future use if necessary.
Using temporary landscaping markers allows you to mark specific points or areas without the commitment of permanent markings. They provide the flexibility to make adjustments and modifications as needed throughout the landscaping project.
With the help of temporary landscaping markers, you can effectively plan and execute your landscaping project, ensuring that the designated areas are clearly marked and easily identifiable during the installation process.
Marking the Boundaries and Key Features
Once you have prepared the ground and chosen the appropriate marking method, it’s time to mark the boundaries and key features of your landscaping project. This step is crucial as it helps you visualize the layout and ensure accuracy during the installation process. Here are some tips on marking the boundaries and key features:
Identify the boundaries: Start by marking the boundaries of your outdoor space. Use the chosen method, such as spray paint, flags, stakes, or twine, to clearly define the edges of the area you’re working on. This will give you a clear visual guide for the rest of the project.
Highlight key features: Identify the key features you want to incorporate into your landscaping project, such as garden beds, pathways, seating areas, or water features. Use the marking method to outline and define these features, ensuring they are accurately positioned according to your design or plan.
Consider scale and proportion: Pay attention to the scale and proportion of your outdoor space when marking the boundaries and key features. Ensure that the dimensions and positioning of the markings align with the overall design and desired aesthetics of your landscaping project.
Measure and adjust: Take measurements to ensure the accuracy of the marked boundaries and key features. Use a tape measure or measuring wheel to verify distances, angles, and alignments. Make any necessary adjustments to ensure precision.
Document and label: Keep a record of the marked boundaries and key features, either through written documentation or photographs, to refer back to during the installation process. Label the markings with relevant information, such as the purpose or function of specific areas or features.
By marking the boundaries and key features of your landscaping project, you create a visual roadmap that guides the rest of the installation process. It helps you stay organized, maintain accuracy, and bring your design vision to life.
Take your time during this step to ensure that all the boundaries and key features are clearly marked and reflect your desired design. This will set the foundation for a successful and visually stunning landscaping project.
Read more: How To Mark A Quilt
Tips for Accurate and Efficient Ground Marking
Accurate and efficient ground marking is essential for a successful landscaping project. It ensures that your design is implemented precisely and helps streamline the installation process. Here are some tips to help you achieve accurate and efficient ground marking:
Plan and visualize: Before marking the ground, have a clear plan and visualization of your landscaping project. This will guide you in determining the boundaries, key features, and any other markings needed. Consider creating a sketch or using design software to help you visualize the layout.
Use measuring tools: Invest in proper measuring tools such as a tape measure or measuring wheel. Accurate measurements are crucial for marking precise boundaries and placing features correctly. Double-check your measurements to ensure accuracy.
Consider the terrain: Take into account the specific terrain and topography of your outdoor space. Adjust your marking method accordingly to accommodate slopes, uneven ground, or challenging areas. Use additional tools like a level or a string level to ensure level lines and markers.
Collaborate and communicate: If you’re working on a landscaping project with others, ensure that everyone is on the same page regarding the markings. Communicate the design plan, discuss the marking method, and clarify any questions or concerns. Collaboration helps maintain accuracy and consistency throughout the process.
Use contrasting colors: When using spray paint or flags, choose colors that contrast well with the surrounding environment. This makes the markings more visible and reduces the chance of confusion during installation. Opt for bright colors for increased visibility.
Regularly re-check and refresh markings: Over time, markings may fade or become less visible due to weather conditions or general wear. Regularly re-check and refresh the markings to ensure clarity and accuracy throughout the entire project.
Stay safe: Always prioritize safety when marking the ground. Wear gloves and protective eyewear when necessary, especially when working with spray paint or using tools. Be aware of your surroundings and any potential hazards.
Document and label: Keep a record of the markings and label them appropriately. This will help you and others involved in the project understand the purpose and location of specific markings. It also assists in future reference or adjustments.
Following these tips will ensure that your ground marking is accurate, efficient, and leads to a successful landscaping project. Taking the time to plan, measure, and communicate effectively will result in a visually pleasing and well-executed outdoor space.
Conclusion
Marking the ground for landscaping is a fundamental step in creating a beautiful and well-organized outdoor space. By using the right tools, choosing the appropriate marking method, and following careful planning, you can ensure accurate and efficient ground marking. This process allows you to visualize your design, define boundaries, highlight key features, and guide the installation process.
Whether you opt for spray paint, flags or stakes, twine or string, or temporary landscaping markers, each method has its advantages and can be tailored to your specific project needs. Take into consideration the size of the area, the nature of the landscaping project, and your personal preferences when selecting the marking method.
Throughout the marking process, it’s important to stay safe, measure accurately, and communicate effectively with any team members or stakeholders involved in the project. Regularly check and refresh your markings as needed to maintain their visibility and accuracy over time.
Remember, accurate and efficient ground marking sets the foundation for a successful landscaping project. It allows you to bring your design vision to life, maintain organization during installation, and create a visually stunning outdoor space. Take the time to plan, measure, and communicate effectively to ensure that your ground marking is precise and aligns with your design ambitions.
Now that you have a comprehensive understanding of the tools, methods, and tips for ground marking, you are ready to embark on your landscaping journey. So grab your tools, visualize your design, and get started on creating the garden of your dreams!
Frequently Asked Questions about How To Mark Ground For Landscaping
Was this page helpful?
At Storables.com, we guarantee accurate and reliable information. Our content, validated by Expert Board Contributors, is crafted following stringent Editorial Policies. We're committed to providing you with well-researched, expert-backed insights for all your informational needs.


0 thoughts on “How To Mark Ground For Landscaping”