Articles
How To Mark Driveway Entrance
Modified: August 22, 2024
Learn how to mark your driveway entrance with our informative articles. Find step-by-step guides and expert tips to enhance your curb appeal and ensure safety.
(Many of the links in this article redirect to a specific reviewed product. Your purchase of these products through affiliate links helps to generate commission for Storables.com, at no extra cost. Learn more)
Introduction
Welcome to our comprehensive guide on how to mark a driveway entrance. When it comes to enhancing the curb appeal and functionality of your property, a well-marked driveway entrance plays an essential role. Not only does it guide visitors and delivery vehicles, but it also adds a touch of elegance to your property’s overall appearance. Whether you are a homeowner looking to mark your residential driveway or a business owner needing to clearly designate an entrance for your customers, this article will provide you with step-by-step instructions for achieving a professional-looking and highly visible driveway entrance.
A properly marked driveway entrance serves multiple purposes. Firstly, it ensures that drivers can easily identify and access the driveway from the road. Secondly, it helps to prevent any accidental damage to your property, such as hitting fences, walls, or landscaping features. Lastly, it improves safety by providing a clear indication to pedestrians and cyclists about the presence of a driveway and the potential for vehicles entering or exiting.
While marking a driveway entrance may seem like a simple task, there are several important factors to consider. This includes determining the ideal location for the entrance, obtaining any necessary permits or permissions, and ensuring proper visibility both during the day and at night. Additionally, there are various materials and techniques that can be utilized to mark the driveway entrance, ranging from temporary markers to permanent gateposts.
Throughout this guide, we will walk you through each step of marking a driveway entrance, providing detailed instructions and expert tips along the way. By the end, you will have the knowledge and confidence to create an aesthetically pleasing and functional driveway entrance that will impress visitors and enhance the overall appeal of your property.
So let’s get started with the first step: determining the location of the driveway entrance.
Key Takeaways:
- Properly marking a driveway entrance involves determining the location, obtaining permits, clearing the area, marking the center line, and installing permanent markers. These steps ensure functionality, compliance, and visual appeal.
- In addition to marking the entrance, consider safety measures such as reflective markers, lighting, traffic signs, and clear line of sight. These enhance visibility and promote a safe environment for drivers and pedestrians.
Read more: How To Get Rid Of Tire Marks On Driveway
Determine the Location of the Driveway Entrance
Choosing the right location for your driveway entrance is crucial for accessibility and functionality. Here are some key factors to consider when determining where to mark your driveway entrance:
- Local Regulations: Before deciding on the location, check with your local municipality or homeowners’ association for any specific regulations or guidelines regarding driveway entrances. Some areas may have restrictions on the distance from intersections, minimum setback requirements, or maximum width allowances.
- Visibility: It is important to select a location that offers good visibility from the road. Ideally, the entrance should be visible from both directions, allowing drivers to easily spot it while approaching.
- Obstructions: Assess the area for any obstructions like trees, utility poles, or mailboxes that may hinder the visibility or the path to the entrance. You may need to clear or relocate these obstructions to ensure a clear and unobstructed entrance.
- Grade and Slope: Consider the grade and slope of your property when determining the location. It’s generally recommended to have a level or gently sloping area for the entrance to ensure easy access for vehicles and minimize the risk of accidents.
- Proximity to Intersections: Avoid positioning the driveway entrance too close to intersections or curves, as this can pose a safety hazard. It’s best to maintain a safe distance to allow sufficient visibility and maneuverability for vehicles entering or exiting.
- Utility Lines: Take note of any underground utility lines that may be present in the area where you plan to mark the entrance. Ensure you know the location of these utilities to prevent any damage during the marking process.
- Future Expansion: If you anticipate any expansion or modifications to your property in the future, consider how the driveway entrance may be affected. Plan the location in a way that allows for flexibility and potential adjustments down the line.
Keep in mind that these considerations may vary depending on your specific circumstances and local regulations. Carefully evaluate each factor and make a decision that ensures the safe and efficient use of your driveway entrance.
Once you have determined the location for your driveway entrance, you can proceed to the next step: obtaining necessary permits and permissions.
Obtain Necessary Permits and Permissions
Before proceeding with marking your driveway entrance, it’s important to check if any permits or permissions are required. The regulations regarding driveway entrances can vary depending on your location and local jurisdiction. Here are some steps to follow:
- Research Local Regulations: Start by researching the regulations that apply to driveway entrances in your area. This information can usually be found on your local municipality’s website or by contacting the appropriate department. Look for specific guidelines on dimension requirements, setback distances, and any other restrictions that may apply.
- Contact the Local Authorities: If you’re unsure about the regulations or have specific questions, reach out to the local authorities responsible for permitting for the area. This could be the transportation or public works department, zoning office, or homeowners’ association. Provide them with the necessary details about your proposed driveway entrance and ask about any permits or permissions required.
- Submit Permit Applications: If permits are required, follow the guidelines provided by the local authorities to submit the necessary applications. This may involve filling out forms, providing site plans or drawings, and paying any associated fees. Make sure to include all required documentation and allow adequate time for the review and approval process.
- Adhere to Conditions: If the permits are approved, make note of any specific conditions or requirements outlined by the local authorities. This may include the type of materials to be used for marking, setbacks from property lines, or installation specifications. Ensure that you comply with these conditions to avoid any potential issues in the future.
- Inspect and Finalize: Once your driveway entrance is marked, some jurisdictions may require a final inspection to ensure compliance with the approved permits. Schedule an inspection if necessary and address any corrective actions if identified during the inspection.
Remember, it’s crucial to follow all necessary permitting processes to ensure that your driveway entrance is legally compliant and meets the local regulations. Failure to obtain proper permits or permissions can result in fines, delays, or even the removal of the driveway entrance.
Once you have obtained the necessary permits and permissions, you can move on to the next step: clearing the area and preparing the ground.
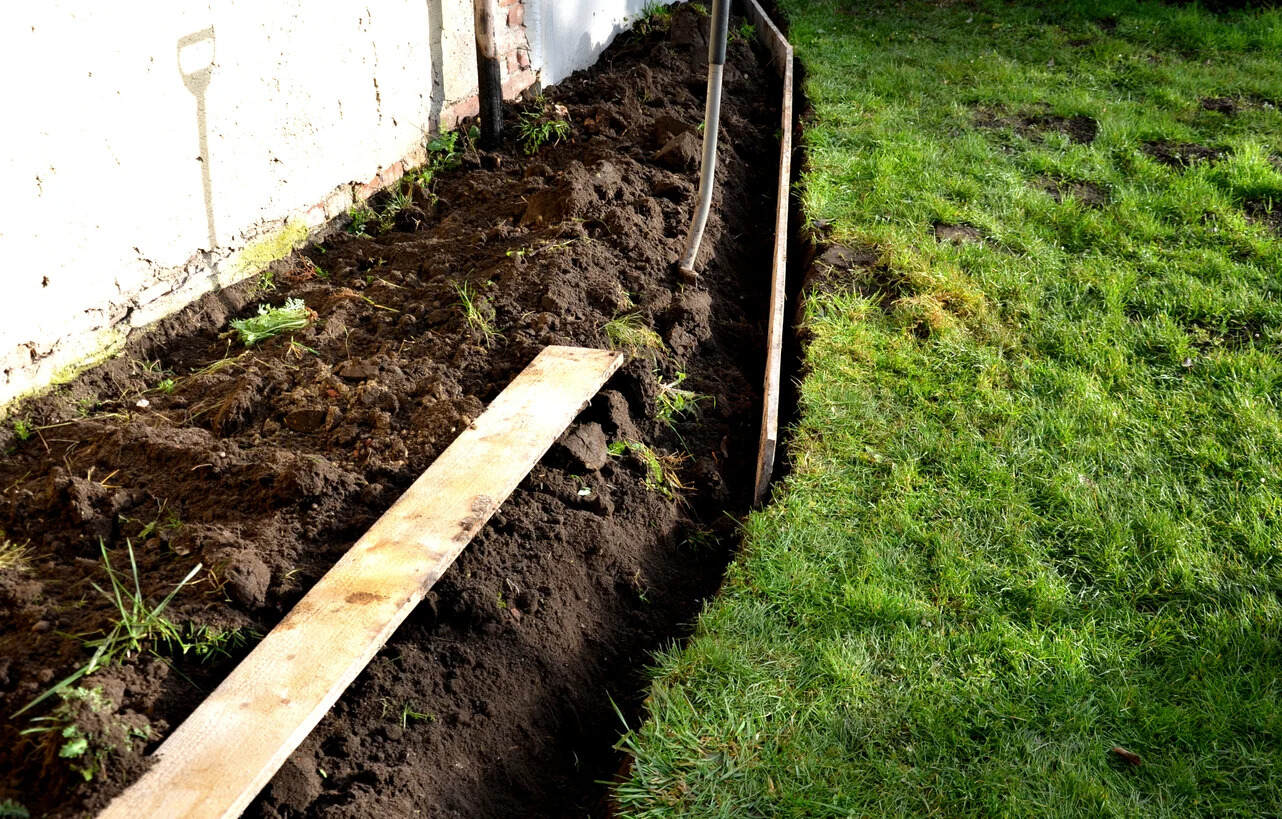
Clear the Area and Prepare the Ground
Now that you have determined the location and obtained the necessary permits for your driveway entrance, it’s time to clear the area and prepare the ground. This step is vital for ensuring a clean and stable foundation for marking your driveway entrance. Follow these steps to clear the area and prepare the ground:
- Remove Obstacles: Begin by removing any obstacles such as rocks, branches, or debris from the area where you plan to mark the driveway entrance. This will provide a clear and safe space to work in.
- Trim Vegetation: Trim any overhanging branches or vegetation that may obstruct the desired path of the driveway entrance. This will help to prevent damage to vehicles and ensure clear visibility.
- Excavate the Area: If the ground is uneven or needs leveling, consider excavating the area. Remove any excess soil or debris and ensure a smooth surface for marking the driveway entrance. Use a shovel, rake, or other appropriate tools to accomplish this task.
- Compact the Ground: After excavation, it’s important to compact the ground to provide stability and prevent future shifting. Use a plate compactor or a hand tamper to compact the soil, especially in areas where vehicles will be entering or exiting.
- Consider Drainage: Take into account the drainage patterns in the area. If possible, design the driveway entrance in a way that facilitates proper water runoff to prevent pooling or erosion issues. This may involve incorporating slight slopes or installing drainage channels.
- Mark the Boundaries: Once the ground has been cleared and prepared, use stakes or other markers to outline the boundaries of the driveway entrance. This will help you visualize the area and ensure accuracy when marking the center line later on.
By thoroughly clearing the area and preparing the ground, you are setting the stage for a smooth and successful marking process for your driveway entrance. Once the ground is ready, you can move on to the next step: marking the center line of the driveway.
Mark the Center Line of the Driveway
After clearing the area and preparing the ground, it’s time to mark the center line of the driveway. The center line provides a visual guide for vehicles and helps maintain a clear path for entering and exiting the driveway. Here’s how you can mark the center line:
- Gather the Necessary Tools: Before you begin, gather the tools you’ll need for marking the center line. These may include a measuring tape, chalk or marking paint, string or a long straight edge, and stakes.
- Measure and Plan: Start by determining the desired width of the driveway entrance. The standard width for a single-car driveway is typically around 9-10 feet, while a double-car driveway may require a width of 16-18 feet. Measure and mark the width on either side of the center line location.
- Find the Center Point: Measure the total width of the driveway entrance and divide it in half to find the center point. This is where you will mark the starting point for the center line.
- Attach a String or Straight Edge: Securely attach a string or a long straight edge at the center point. This will serve as a guide for creating a straight and accurate center line.
- Mark the Path: Using chalk or marking paint, carefully follow the string or straight edge to mark the center line of the driveway. Start from the center point and work your way outward, ensuring that the line is straight and consistent in width.
- Reposition the String or Straight Edge: Move the string or straight edge to the other side of the center point and repeat the marking process. This will help create a symmetrical center line for the entire width of the driveway entrance.
- Double-Check Measurements: Take a moment to double-check the width and alignment of the marked center line. Make any necessary adjustments to ensure accuracy and consistency throughout.
By marking the center line, you provide a clear visual reference for drivers, ensuring that they can navigate the driveway entrance with ease. Additionally, a properly marked center line can enhance the overall appearance and symmetry of the entrance.
With the center line marked, it’s time to move on to the next step: placing temporary markers or stakes to further define the driveway entrance.
When marking a driveway entrance, use reflective markers or posts to increase visibility, especially at night. Consider adding landscaping or lighting to further define the entrance and make it easier to spot.
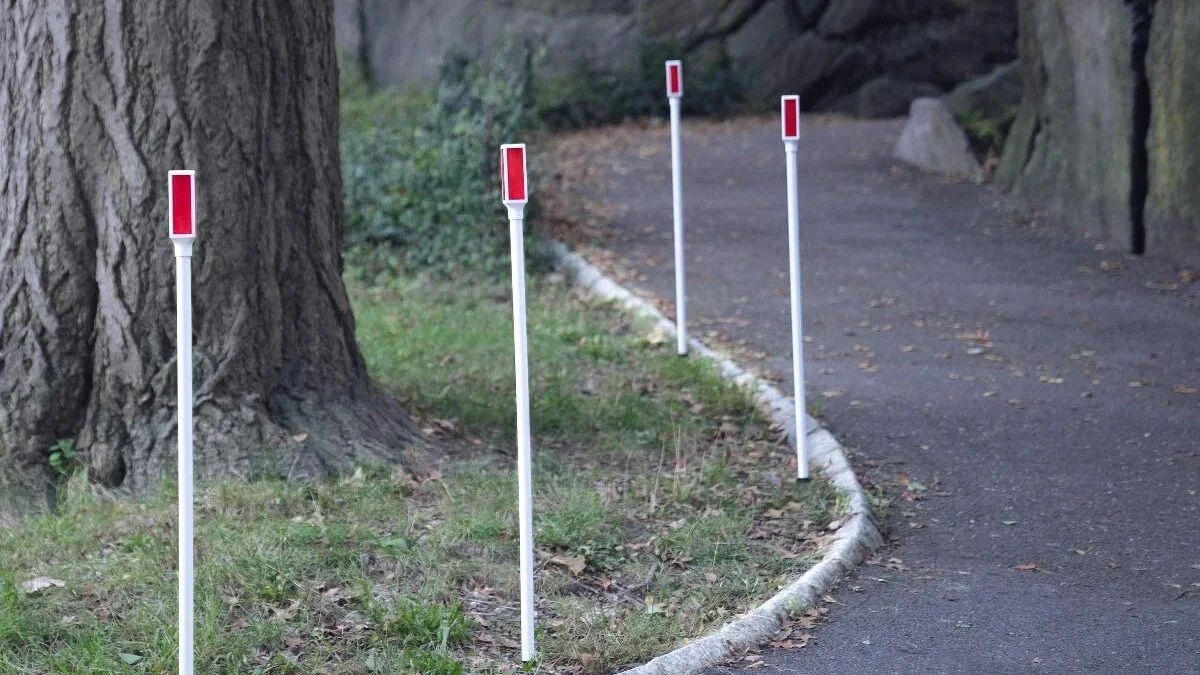
Place Temporary Markers or Stakes
Once you have marked the center line of the driveway, the next step is to place temporary markers or stakes along the edges of the entrance. These markers serve as a visual guide and provide a clear indication of the boundaries of the driveway. Here’s how you can place temporary markers or stakes:
- Gather the Necessary Equipment: Collect the required equipment, including temporary markers or stakes, a mallet or hammer, and a measuring tape.
- Determine the Marker Placement: Decide on the spacing and placement of the markers. Typically, placing them every 5-10 feet along the edges of the driveway entrance will provide sufficient guidance.
- Measure and Align: Using a measuring tape, measure the desired distance from the center line on each side and mark the spots where the markers will be placed. Ensure that they are aligned properly and evenly spaced.
- Insert the Markers: Using a mallet or hammer, carefully insert the temporary markers or stakes into the ground at the predetermined spots. Make sure they are firmly secured and at a consistent height above the ground.
- Adjust Alignment: Double-check the alignment of the markers to ensure that they form a straight and symmetrical boundary for the driveway entrance. Make any necessary adjustments if needed.
- Verify Visibility: Step back and verify the visibility of the markers from the road. They should be clearly visible to approaching drivers and pedestrians, providing clear guidance for entering the driveway.
- Consider Reflective Materials: If you want to enhance visibility, especially during nighttime, consider using temporary markers or stakes with reflective materials. This will make them more visible in low-light conditions.
Temporary markers or stakes help define the boundaries of the driveway entrance and ensure that it is easily identifiable to drivers. Although they are not a permanent solution, they serve as a visual reference during the marking process and can be replaced with permanent markers or gateposts in the next step.
With the temporary markers or stakes in place, we can now move on to the next step: installing permanent markers or gateposts for a more durable and long-lasting solution.
Install Permanent Markers or Gateposts
To provide a more durable and permanent solution, it’s time to install permanent markers or gateposts along the edges of the driveway entrance. These markers not only serve as a visual guide but also add a touch of style and elegance to your property. Follow these steps to install permanent markers or gateposts:
- Choose the Right Material: Select a material for your permanent markers or gateposts that complements the overall design and aesthetic of your property. Common options include metal, wood, stone, or concrete.
- Measure and Mark: Using a measuring tape, measure the desired distance from the center line on each side of the driveway entrance. Mark the exact spots where the markers or gateposts will be installed.
- Prepare the Ground: Dig holes at the marked spots. The holes should be deep enough to securely anchor the permanent markers or gateposts. The depth will depend on the material and size of the markers or gateposts.
- Install the Markers or Gateposts: Place the markers or gateposts into the holes, ensuring they are level and upright. Fill the holes with concrete or gravel to provide stability and allow for proper installation.
- Secure in Place: While the concrete or gravel is still wet, double-check the alignment and position of the markers or gateposts. Make any necessary adjustments to ensure they are securely in place and aligned with the driveway entrance.
- Consider Additional Features: Depending on your preference and needs, you can add additional features to your permanent markers or gateposts. This may include decorative elements, reflective strips for increased visibility, or even lighting fixtures for enhanced nighttime visibility.
- Maintain Regularly: Once the permanent markers or gateposts are installed, it’s important to maintain them regularly. Check for any signs of damage, rot, or wear and repair or replace them as needed to ensure they remain functional and visually appealing.
Installing permanent markers or gateposts adds a finishing touch to your driveway entrance, reinforcing its visibility and providing a long-lasting solution. Consider the style and material that best matches your property and personal preferences to create an impressive and inviting entrance.
With the permanent markers or gateposts in place, your driveway entrance is now marked with a professional and durable solution. However, there are additional safety measures you can take to further enhance the functionality and security, which we will discuss in the next step.
Consider Additional Safety Measures
Ensuring the safety of both drivers and pedestrians is of utmost importance when marking a driveway entrance. In addition to properly marking the entrance, there are additional safety measures you can consider implementing. These measures will not only enhance safety but also provide peace of mind. Here are some additional safety measures to consider:
- Install Reflective Markers: Enhance visibility, especially during low-light conditions, by installing reflective markers along the edges of the driveway entrance. These markers will reflect light from approaching vehicles, making the entrance more noticeable.
- Add Lighting Fixtures: Illuminate the driveway entrance with external lighting fixtures. This will increase visibility during nighttime and help drivers navigate the entrance safely. Use energy-efficient LED lights for cost-effective and long-lasting illumination.
- Implement Traffic Signs: Depending on the location and regulations, consider installing appropriate traffic signs such as “No Parking” or “Private Driveway” signs. These signs will inform drivers of any specific rules or restrictions in the area.
- Mark Pedestrian Crosswalks: If your property has frequent pedestrian traffic, consider marking designated pedestrian crosswalks where applicable. This will ensure that pedestrians have a clear and safe path to use when crossing the driveway entrance.
- Provide Clear Line of Sight: Trim any overgrown vegetation or trees that may obstruct the line of sight near the driveway entrance. This will enhance visibility for both drivers and pedestrians, reducing the risk of accidents.
- Add Speed Bumps or Speed Humps: If speeding is a concern in your area, consider installing speed bumps or speed humps before the driveway entrance. These physical traffic calming measures will help to reduce vehicle speeds and enhance safety.
- Consider Security Measures: If security is a concern, incorporate security features such as gates, surveillance cameras, or an intercom system into your driveway entrance design. These measures will provide an added layer of safety and control access to your property.
Implementing additional safety measures will contribute to a safer and more secure driveway entrance. It is important to assess your specific needs and tailor these measures accordingly to ensure the highest level of safety for your property and those who use the driveway entrance.
With the implementation of these additional safety measures, you have made your driveway entrance not only visually appealing but also optimized for safety. Let’s wrap up with a summary of the key steps we have covered in this guide.
Conclusion
Congratulations! You have successfully learned how to mark a driveway entrance to enhance its functionality, aesthetics, and safety. By following the steps outlined in this comprehensive guide, you have gained the knowledge and confidence to create a professional and visually appealing driveway entrance.
Starting with determining the location of the driveway entrance, you considered local regulations, visibility, obstructions, and other important factors. You then obtained the necessary permits and permissions to ensure compliance with local regulations.
Next, you cleared the area and prepared the ground by removing obstacles, trimming vegetation, excavating if needed, and ensuring proper drainage. You marked the center line with precision, providing a clear path for vehicles to enter and exit the driveway.
Afterward, you placed temporary markers or stakes along the edges to define the driveway entrance during the marking process. Finally, you installed permanent markers or gateposts, bringing durability and a touch of style to the entrance.
Additionally, you explored the importance of considering additional safety measures such as reflective markers, lighting fixtures, traffic signs, pedestrian crosswalks, and maintaining a clear line of sight. These measures enhance visibility and promote a safe environment for drivers and pedestrians alike.
Now that you have successfully marked your driveway entrance, remember to maintain it regularly to ensure functionality and visual appeal. Regularly inspect and repair any damage, and make necessary adjustments to suit changing needs.
By following this guide, you have transformed your driveway entrance into a well-marked, safe, and inviting space. Whether it’s for your residential property or business establishment, an aesthetically pleasing and properly marked driveway entrance not only enhances functionality but also adds value to your property.
Enjoy the benefits of your well-marked driveway entrance and the improved curb appeal it brings. Safe travels and a warm welcome await those who cross the threshold of your property!
Frequently Asked Questions about How To Mark Driveway Entrance
Was this page helpful?
At Storables.com, we guarantee accurate and reliable information. Our content, validated by Expert Board Contributors, is crafted following stringent Editorial Policies. We're committed to providing you with well-researched, expert-backed insights for all your informational needs.


0 thoughts on “How To Mark Driveway Entrance”