Home>Garden Essentials>How To Stack Landscaping Stones
Garden Essentials
How To Stack Landscaping Stones
Modified: October 18, 2024
Learn how to stack landscaping stones in your garden for a beautiful and unique touch. Get step-by-step instructions and expert tips to create the perfect stone arrangement.
(Many of the links in this article redirect to a specific reviewed product. Your purchase of these products through affiliate links helps to generate commission for Storables.com, at no extra cost. Learn more)
Introduction
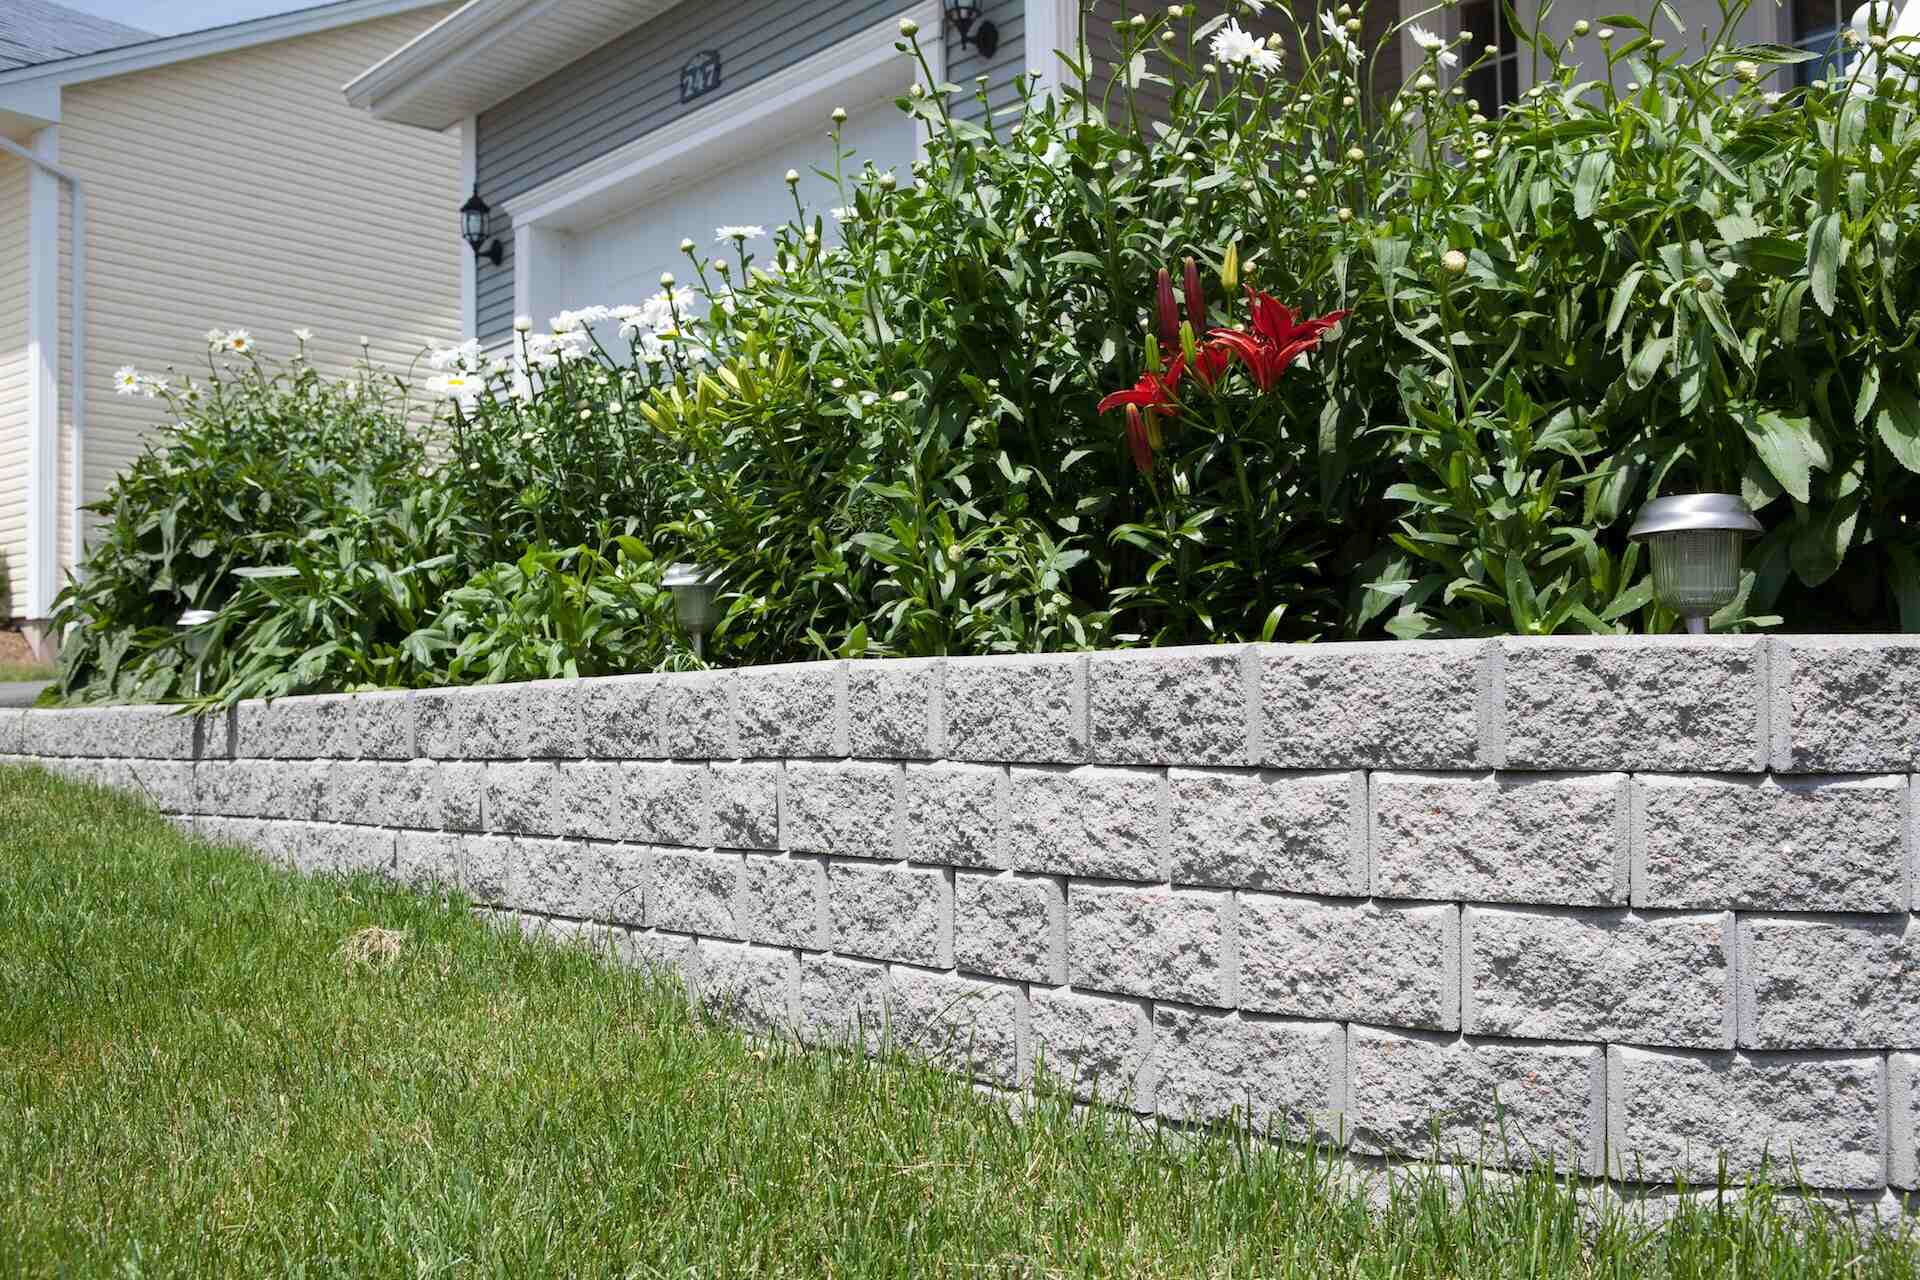
Garden landscaping is an art form that can transform any mundane outdoor space into a stunning oasis. One popular technique in landscaping design is the use of stacked landscaping stones. Whether you’re looking to create a retaining wall, a decorative garden border, or a pathway, stacking stones can add beauty, functionality, and structure to your garden.
In this article, we’ll guide you through the step-by-step process of stacking landscaping stones. We’ll cover everything from planning and preparation to securing the stones and adding the finishing touches. By the end, you’ll have the knowledge and tools to create a professional-looking landscaping feature that will enhance the overall aesthetic of your garden.
But before we dive in, let’s go over the materials and tools you’ll need to complete this project:
Key Takeaways:
- Stacking landscaping stones is a fun and rewarding way to transform your garden. From planning and preparation to securing the stones, each step is crucial for creating a beautiful and durable structure.
- Prioritize safety and take your time to carefully stack the stones, ensuring stability and levelness. Add finishing touches like plants or mulch for a polished and visually appealing result.
Read more: How To Install Stacked Stone Veneer
Materials and Tools Needed
- Landscaping stones: Choose stones that are suitable for stacking, such as natural stones or manufactured stones specifically designed for landscaping projects.
- Level: A level will help ensure that your stacked stones are straight and properly aligned.
- Landscape fabric: This will help prevent weed growth and keep the area underneath the stones stable.
- Shovel: You’ll need a shovel to excavate the area and remove any grass or dirt.
- Rubber mallet: A rubber mallet is essential for proper alignment and securing the stacked stones in place.
- Sand or gravel: This will provide a stable base for the stones and aid in leveling the ground.
- Safety gloves and goggles: These will protect your hands and eyes during the construction process.
Now that you have all the necessary materials and tools, let’s move on to the planning and preparation phase.
Key Takeaways:
- Stacking landscaping stones is a fun and rewarding way to transform your garden. From planning and preparation to securing the stones, each step is crucial for creating a beautiful and durable structure.
- Prioritize safety and take your time to carefully stack the stones, ensuring stability and levelness. Add finishing touches like plants or mulch for a polished and visually appealing result.
Read more: How To Install Stacked Stone Veneer
Materials and Tools Needed
When it comes to stacking landscaping stones, having the right materials and tools is crucial for a successful project. Here’s a breakdown of what you’ll need:
Landscaping stones:
The first and most important item on your list is, of course, the landscaping stones themselves. You can choose from a variety of options, including natural stones like granite, limestone, or sandstone, or you can opt for manufactured stones specifically designed for landscaping projects. Consider the look and style you want to achieve and select stones that complement your overall garden design.
Level:
To ensure that your stacked stones are straight and properly aligned, you’ll need a level. A level is a simple tool with a liquid-filled vial and a bubble inside. By placing the level against the stones, you can easily determine if they are horizontal or vertical. This will help create a neat and professional appearance.
Read more: Where To Buy Stacked Stone For Fireplace
Landscape fabric:
Landscape fabric is an essential material for stacking landscaping stones. Before placing the stones, it’s important to prepare the ground properly. Clear away any existing vegetation or debris, and then lay down a layer of landscape fabric. This fabric acts as a barrier, preventing weed growth and providing stability for the stones.
Shovel:
A good shovel is necessary for excavating the area where you plan to stack the stones. Use the shovel to remove any grass, weeds, or loose dirt. Level the ground as much as possible, creating a smooth and even surface for your stacked stones.
Rubber mallet:
A rubber mallet is an essential tool for stacking landscaping stones. As you place each stone, use the rubber mallet to tap it gently into position. The mallet will help secure the stones and ensure a tight fit between each layer. It’s important to use a rubber mallet to avoid damaging the stones.
Sand or gravel:
Creating a stable base for your stacked stones is crucial to ensure their longevity and stability. A layer of sand or gravel acts as a foundation, providing a solid surface for the stones to sit on. Additionally, it helps with leveling the ground and reducing the risk of sinking or shifting over time.
Read more: Where To Buy Stones For Landscaping
Safety gloves and goggles:
Last but not least, it’s important to prioritize safety when working with landscaping stones. Wear safety gloves to protect your hands from cuts or abrasions, especially when handling rough or sharp-edged stones. Safety goggles are also recommended to shield your eyes from any flying debris.
By gathering these materials and tools before starting your project, you’ll have everything you need to ensure a smooth and successful experience. Now that you’re well-equipped, it’s time to move on to the planning and preparation phase.
Planning and Preparation
Before you start stacking landscaping stones, it’s important to spend some time on planning and preparation. This will help ensure that your project turns out exactly the way you envision it. Here are the steps to follow:
Assessing the area:
First, take a good look at the area where you plan to stack the landscaping stones. Consider the size and shape of the space, as well as any existing features or obstacles such as trees, plants, or structures. This assessment will help you determine the scale and design of your project, taking into account the available space and any potential limitations.
Creating a design:
Once you have assessed the area, it’s time to get creative and design your landscaping stone arrangement. Think about the overall look and feel you want to achieve in your garden. Do you prefer a formal and structured design, or a more natural and organic arrangement? Look for inspiration online or in gardening books to get ideas and develop a design concept that fits your vision.
Marking the boundaries:
With your design in mind, it’s important to mark the boundaries of your project area. Use stakes or spray paint to outline the shape and size of your desired stone arrangement. This will serve as your guide when excavating and placing the stones, ensuring that you stay within the intended boundaries and maintain a cohesive design.
Clearing the area:
Before you can start stacking the stones, you need to prepare the area by clearing away any obstacles or unwanted vegetation. Remove any grass, weeds, rocks, or debris within the marked boundaries. Use a shovel or garden rake to level the ground as much as possible, ensuring a smooth surface for the stacked stones. This step is crucial for achieving a professional-looking result.
By carefully assessing the area, creating a design, marking boundaries, and clearing the space, you will set yourself up for success in the stacking process. Proper planning and preparation will save you time and ensure that your landscaping stone project is executed flawlessly. With the groundwork laid, it’s time to move on to preparing the base for your stacked stones.
Preparing the Base
Before you start stacking your landscaping stones, it’s essential to prepare the base properly. This will provide stability and ensure the longevity of your stacked stone structure. Here are the steps to follow:
Excavating the area:
First, use a shovel to excavate the area within the marked boundaries. Remove any grass, weeds, or debris, and dig down to a depth that allows for a stable foundation. The depth will depend on the type and size of the landscaping stones you’re using, but typically a depth of 4-6 inches is sufficient.
Read more: Where To Buy Large Stones For Landscaping
Leveling the ground:
Once the area is excavated, use a level and a straight-edged board to ensure that the ground is level. Check for any uneven spots and make adjustments as needed by adding or removing soil. A level base is important to create a stable and visually appealing stacked stone structure.
Installing landscape fabric:
To prevent weed growth and maintain stability, it’s recommended to install landscape fabric over the leveled ground. Lay the fabric within the excavated area, making sure it covers the entire space. Cut around any obstacles like trees or plants, and overlap the edges of the fabric to create a continuous barrier against weed growth.
Adding a layer of sand or gravel:
Once the landscape fabric is in place, it’s time to add a layer of sand or gravel. This layer will serve as a stable base for the stacked stones and aid in leveling the structure. Spread the sand or gravel evenly over the fabric, ensuring a consistent thickness of about 1-2 inches. Use a rake or the back of a shovel to smooth out the surface.
By properly excavating the area, leveling the ground, installing landscape fabric, and adding a layer of sand or gravel, you’re creating a solid foundation for your stacked stone structure. This will ensure the stones remain stable and secure over time. With the base prepared, it’s time to move on to the exciting part – stacking the landscaping stones!
Stacking the Landscaping Stones
Now that you have prepared the base, it’s time to start stacking the landscaping stones to create your desired structure. Follow these steps for a successful and visually appealing stacked stone arrangement:
Starting with the largest stones:
Begin by placing the largest stones as the foundation of your stack. These stones will provide stability and act as anchors for the rest of the structure. Arrange them according to your design, making sure they fit snugly together without any large gaps or wobbling.
Aligning the stones:
As you continue adding stones to your stack, it’s important to align them properly. Pay attention to the positioning of each stone and ensure that the edges are flush with one another. This will create a seamless and cohesive look.
Using a level to ensure proper alignment:
After adding each stone, use a level to check for proper alignment. Place the level across the top of the stones to ensure they are horizontal. Additionally, check the sides of the stack to ensure they are vertical. Make adjustments if needed to achieve a level and visually pleasing result.
Adjusting the stones as needed:
As you stack the stones, you may encounter some that don’t fit perfectly or require some modification. Use a rubber mallet to gently tap or adjust the stones as needed. This will help achieve a secure and stable stack.
Read more: How To Stack Jenga
Staggering the joints:
To create a stronger and more visually appealing structure, it’s important to stagger the joints between the stones. A staggered joint means that the seams between the stones in one layer do not align perfectly with the seams in the layer above or below it. This helps distribute weight evenly throughout the stack and adds visual interest to the structure.
Filling in gaps with smaller stones:
As you stack the larger stones, you may notice small gaps or spaces between them. Fill these gaps with smaller stones to create a more solid and polished appearance. Choose stones that match the color and texture of the larger stones to ensure a cohesive look.
By following these steps and taking your time to carefully stack the landscaping stones, you will create an impressive and durable structure. Remember to periodically step back and assess your progress to ensure the overall design is visually appealing and meets your desired outcome.
Securing the Stacked Stones
Once you have successfully stacked the landscaping stones, it’s important to secure them in place to ensure stability and longevity. Follow these steps to properly secure your stacked stone structure:
Tamping the stones with a rubber mallet:
After each stone is added to the stack, use a rubber mallet to gently tap it into place. This will help settle the stones and create a tight fit between each layer. Take care not to hit the stones too hard, as this can cause them to crack or break.
Read more: How To Stack Wood In A Fireplace
Checking for stability and levelness:
Periodically check the stability and levelness of your stacked stones as you progress. Use a level to ensure that the structure remains straight and even. If any stones seem wobbly or unstable, adjust them by tapping with a rubber mallet or adding extra sand or gravel beneath them for support.
Adding additional layers if desired:
If you want a higher or more layered look, you can add additional layers of stones on top of the base layer. Make sure each layer is properly aligned and secured before moving on to the next one. Take your time and pay attention to detail to create a visually appealing and structurally sound arrangement.
Using adhesive or mortar for added stability:
If you desire extra stability for your stacked stone structure, you can use adhesive or mortar to bond the stones together. This is especially important for taller structures or those subject to significant weight or movement. Apply the adhesive or mortar in between the stones, following the manufacturer’s instructions. Be cautious not to apply too much adhesive, as it may affect the appearance of the stones.
Securing the stacked stones will give you peace of mind, knowing that your structure is stable and resistant to shifting or toppling. Take the time to properly tamp the stones, check for stability and levelness, and consider using adhesive or mortar for added support if necessary. With the stacked stones secured, you’re now ready to add the finishing touches to your landscaping feature.
Finishing Touches
With the stacked stones securely in place, it’s time to add the finishing touches to your landscaping feature. These final steps will enhance the overall look of your project and give it a polished appearance. Follow these steps to complete your stacked stone structure:
Read more: How To Stack Wood In A Fire Pit
Backfilling the area around the stacked stones:
After securing the stacked stones, you’ll need to backfill the area surrounding them. Use soil or a mixture of soil and compost to fill in the gaps between the stones and the excavated area. This will provide support to the stacked stones and create a clean transition between the stonework and the surrounding landscape.
Adding plants or mulch around the edges:
To further enhance the aesthetic appeal of your stacked stone structure, consider adding plants or mulch around the edges. Choose plants that complement your garden design and thrive in the specific conditions of your site. Place them strategically around the stones to soften the edges and add a touch of natural beauty. Alternatively, you can spread a layer of mulch around the perimeter to give a neat and finished look.
Cleaning up the site:
Once your landscaping project is complete, take some time to clean up the site. Remove any tools, leftover materials, or debris from the area. Use a broom to sweep away loose dirt or excess sand/gravel. This final step will leave your project looking pristine and ready to enjoy.
Remember to step back and admire your finished stacked stone structure. The combination of the stacked stones, backfilled area, and added plants or mulch creates a visually appealing and harmonious feature within your garden. Take a moment to appreciate the hard work and creativity that went into creating your own stunning landscaping masterpiece.
With the finishing touches complete, your stacked stone structure is now ready to be enjoyed. Whether it’s a retaining wall, a garden border, or a pathway, your stacked stones will add beauty and functionality to your outdoor space for years to come.
Conclusion
Stacking landscaping stones is a rewarding and creative endeavor that can transform your garden into a captivating oasis. By following the steps outlined in this article, you now have the knowledge and tools to successfully complete a stacked stone project that will enhance the overall aesthetic of your outdoor space.
From the initial planning and preparation to the final finishing touches, every step of the process plays a crucial role in creating a visually appealing and structurally sound landscaping feature.
Remember to assess the area, create a design, and mark the boundaries before clearing the space and preparing the base. Carefully stack the stones, starting with the largest ones and aligning them properly. Utilize a level to ensure the stones are stable and level. Adjust as needed and fill in gaps with smaller stones for a seamless look. Secure the stacked stones by tamping them with a rubber mallet, checking for stability and levelness, and adding additional layers or using adhesive or mortar if desired.
To complete the project, backfill the area around the stones, add plants or mulch for a finishing touch, and clean up the site for a polished appearance. These final steps will enhance the overall aesthetic of your stacked stone structure.
Always prioritize safety by wearing gloves and goggles when working with landscaping stones. Take your time throughout the process to ensure a high-quality result.
By successfully stacking landscaping stones, you have created a visually captivating and functional feature in your garden. Whether it’s a retaining wall, a garden border, or a pathway, the stacked stones will add beauty, structure, and character to your outdoor space for years to come.
Now, it’s time to sit back, relax, and enjoy the fruits of your labor. Take pride in your stacked stone structure and revel in the joy and tranquility it brings to your garden. Happy landscaping!
Frequently Asked Questions about How To Stack Landscaping Stones
Was this page helpful?
At Storables.com, we guarantee accurate and reliable information. Our content, validated by Expert Board Contributors, is crafted following stringent Editorial Policies. We're committed to providing you with well-researched, expert-backed insights for all your informational needs.


0 thoughts on “How To Stack Landscaping Stones”