Home>Garden Essentials>How To Use A Grow Light To Germinate
Garden Essentials
How To Use A Grow Light To Germinate
Modified: October 20, 2024
Learn how to use a grow light to germinate seeds in your garden. Maximize your gardening success with our step-by-step guide.
(Many of the links in this article redirect to a specific reviewed product. Your purchase of these products through affiliate links helps to generate commission for Storables.com, at no extra cost. Learn more)
Introduction
Gardening is a delightful and rewarding hobby that allows us to connect with nature and enjoy the beauty of plants. Whether you have a spacious backyard or a small apartment balcony, growing your own garden can be a fulfilling experience. However, not all plants thrive in all environments, especially when it comes to germination. This is where grow lights come in handy.
Grow lights have revolutionized the way we grow plants indoors by providing the necessary light spectrum for photosynthesis. They are particularly helpful in germinating seeds, as they can provide consistent and optimal light conditions throughout the germination process. In this article, we will explore the ins and outs of using a grow light to germinate your seeds successfully.
Before we dive into the details, it’s important to understand the basics of grow lights. These lights are designed to mimic the natural sunlight that plants need to grow and thrive. They come in various types, including fluorescent, LED, and high-intensity discharge (HID) lights. Each type has its own advantages and considerations, but all provide the necessary light intensity and spectrum for plant growth.
Now that you have a basic understanding of grow lights, the next step is to choose the right one for your germination needs. It’s important to consider factors such as the types of seeds you are germinating, the available space, and your budget when making this decision. In the next section, we will discuss how to choose the right grow light for your germination setup.
Key Takeaways:
- Using a grow light for seed germination helps plants grow indoors by providing the right light spectrum, intensity, and duration, ensuring healthy and successful growth.
- Proper temperature, humidity, and troubleshooting common issues are essential for nurturing seedlings, leading to a rewarding gardening experience and beautiful, thriving plants.
Understanding Grow Lights
Grow lights are artificial light sources that emit specific wavelengths of light to promote plant growth. They are commonly used to supplement natural sunlight, especially in indoor gardening or in areas with limited access to sunlight. Understanding the key aspects of grow lights will help you make an informed decision when choosing the right one for your germination needs.
One of the most important factors to consider when understanding grow lights is the light spectrum. Plants require different wavelengths of light for different stages of growth. The two primary types of light in the spectrum that are crucial for plant growth are blue light and red light. Blue light promotes vegetative growth and is necessary for seed germination and early plant development. Red light stimulates flowering and fruiting and is crucial for the later stages of plant growth.
Another factor to consider is the light intensity or brightness of the grow light. Different plants require different light intensities at different stages of growth. Seedlings and young plants generally require higher light intensities, while mature plants may require lower light intensities. It’s important to choose a grow light with adjustable light output or one that can be positioned at an appropriate distance from the plants to ensure the right intensity for optimal growth.
The duration or photoperiod of light exposure is also important to consider. Plants require a certain amount of darkness for proper growth. Many plants require a period of darkness for photosynthesis and other physiological processes. Some grow lights come with built-in timers that allow you to set specific on/off schedules to mimic natural daylight and darkness cycles, which can be beneficial for plant growth.
Lastly, energy efficiency is a significant consideration when choosing a grow light. Traditional lighting systems, such as incandescent bulbs, can consume a lot of energy and generate excess heat. This can lead to higher electricity bills and potential damage to your plants. LED grow lights are known for their energy efficiency, as they produce less heat and consume less power compared to other types of grow lights.
By understanding these key aspects of grow lights – light spectrum, light intensity, photoperiod, and energy efficiency – you can make an informed decision when selecting a grow light for your germination area. In the next section, we’ll discuss the factors to consider when choosing the right grow light for successful seed germination.
Choosing the Right Grow Light
When it comes to choosing the right grow light for your germination needs, there are several factors to consider. Taking the time to evaluate these factors will help ensure that you provide your seeds with the optimal light conditions for successful germination and early growth.
Light Spectrum: The first factor to consider is the light spectrum of the grow light. As mentioned earlier, plants require both blue and red light for optimal growth. Look for a grow light that provides a balanced spectrum of these two colors. Some grow lights even offer full-spectrum options that mimic natural sunlight, which can be beneficial for overall plant health and development.
Light Intensity: The next factor to consider is the light intensity, which is usually measured in lumens or lux. Different plants have different light intensity requirements, so it’s essential to choose a grow light that can deliver the appropriate level of brightness. Seedlings generally require higher light intensities, while mature plants can thrive with lower light intensities. Look for a grow light that allows you to adjust the light intensity or position it at different distances from the plants.
Energy Efficiency: Another important consideration is the energy efficiency of the grow light. LED grow lights are known for their energy efficiency as they consume less power and produce less heat compared to other types of grow lights. This not only helps you save on electricity bills but also prevents the risk of heat damage to your plants.
Size and Coverage Area: The size of your germination area will determine the size and coverage area of the grow light you need. Measure the dimensions of your germination space and choose a grow light that can adequately cover the area. Keep in mind that some grow lights can be daisy-chained, allowing you to connect multiple lights for larger coverage areas.
Durability and Lifespan: Consider the durability and lifespan of the grow light before making a purchase. Look for lights made from high-quality materials that are built to last. LED grow lights, in particular, have a long lifespan and can last for several years with proper care.
Budget: Finally, consider your budget when choosing a grow light. There are grow lights available at various price points, so determine your budget and find a light that offers a good balance of features and affordability.
By considering these factors – light spectrum, light intensity, energy efficiency, size and coverage area, durability and lifespan, and budget – you can select the right grow light that meets your germination needs. In the next section, we will discuss how to set up your germination area using the chosen grow light.
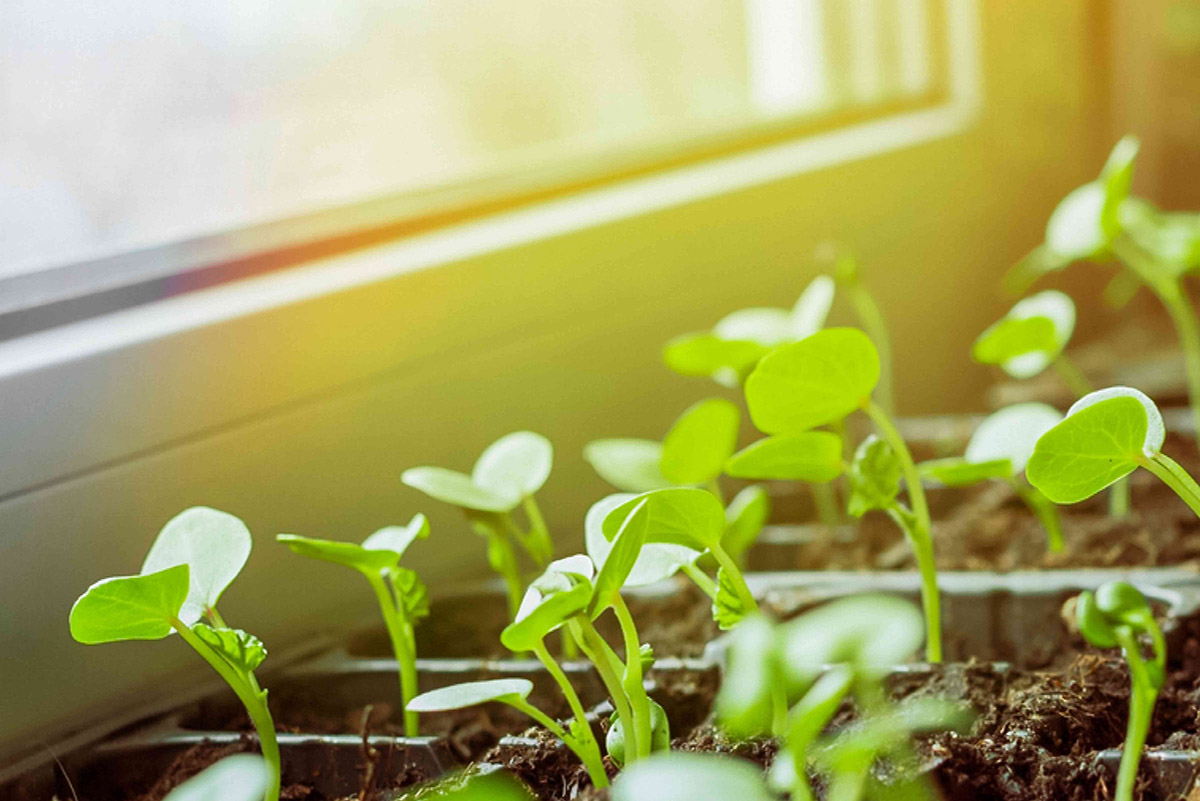
Setting Up Your Germination Area
Once you have chosen the right grow light for your germination needs, it’s time to set up your germination area. Creating a suitable environment is essential to ensure successful seed germination and healthy early plant growth. Follow these steps to set up your germination area:
1. Find a Suitable Location: Choose a location for your germination area that is close to a power source and where the grow light can provide consistent and adequate lighting. It should also be a space that is easily accessible for monitoring and adjusting the light as needed.
2. Clean and Sterilize: Clear the area of any debris or dirt and sterilize the surfaces to eliminate any potential pathogens that could harm your seeds or seedlings. Use a mild bleach solution or a commercial sterilizing agent to ensure a clean environment.
3. Set Up a Germination Tray: Place a waterproof tray or a seedling tray on the germination area to hold your seedlings. This tray should have drainage holes to prevent waterlogging and promote healthy root development. Ensure the tray is clean and sanitized before use.
4. Fill the Tray with Germination Medium: Fill the tray with a suitable germination medium such as seed-starting mix or a combination of vermiculite and perlite. Moisten the medium with water, ensuring it is evenly moist but not overly saturated.
5. Plant the Seeds: Follow the instructions on the seed packet to determine the appropriate depth and spacing for planting your seeds. Make small indentations in the germination medium and place the seeds accordingly. Cover the seeds lightly with the germination medium and gently press down to ensure good seed-to-soil contact.
6. Position the Grow Light: Hang or mount the grow light above the germination area at the recommended distance for the particular light you are using. The distance will depend on the light intensity and the specific recommendations provided by the manufacturer. Ensure the light covers the entire germination area evenly.
7. Set Up a Timer: If your grow light has a built-in timer or you are using an external timer, set it to provide the appropriate photoperiod for seed germination. Most seeds require around 12-16 hours of light per day. The timer will automatically turn the light on and off at the desired intervals.
8. Monitor and Adjust: Regularly monitor the germination area to ensure that the seeds are receiving adequate light and maintaining the right moisture levels. Adjust the height of the grow light or the light intensity if necessary to ensure optimal conditions for germination.
9. Water as Needed: Keep the germination medium evenly moist by watering as needed. Avoid overwatering, as excessive moisture can lead to fungus or rot. Use a spray bottle or a gentle watering can to prevent disturbing the seeds or seedlings.
By following these steps and setting up your germination area properly, you will create an environment that promotes successful seed germination and healthy plant growth. In the next section, we will discuss how to prepare your seeds for germination.
Preparing Your Seeds
Before you can begin the germination process, it’s crucial to properly prepare your seeds. This preparation ensures that the seeds are in the best possible condition for successful germination. Follow these steps to prepare your seeds:
1. Gather Your Seeds: Collect the seeds you plan to germinate. These can be seeds from your own garden or purchased from a reputable seed supplier. Make sure the seeds are fresh, as older seeds may have a lower germination rate.
2. Perform a Seed Viability Test: If you are unsure about the viability of your seeds, you can perform a simple seed viability test. Place a few seeds on a damp paper towel or cotton pad and seal them in a plastic bag. Keep the bag in a warm location for a few days and check for signs of germination. If a significant number of seeds sprout, then your seeds are viable and ready for germination.
3. Check for Seed Quality: Inspect the seeds for signs of damage or disease. Discard any seeds that appear moldy, discolored, or physically damaged. It’s important to work with high-quality, healthy seeds for the best germination results.
4. Soak the Seeds (if necessary): Some seeds benefit from a soaking period before germination. This can help soften the seed coat and facilitate the germination process. Research the specific requirements of your seeds, as not all seeds should be soaked. Seeds like beans, peas, and sunflowers can benefit from soaking overnight in water, which can speed up germination.
5. Scarify the Seeds (if necessary): Some seeds have hard seed coats that can inhibit germination. Scarification involves breaking or weakening the seed coat to facilitate water absorption. This can be done by gently rubbing the seeds with sandpaper or nicking them with a knife. Remember to handle the seeds with care to avoid damage.
6. Stratify the Seeds (if necessary): Certain seeds, particularly those from plants that naturally experience cold winters, require a period of cold stratification before they can germinate. This mimics the natural conditions they would encounter in nature. Place the seeds in a moist medium or wrap them in a damp paper towel, then seal them in a plastic bag and keep them in the refrigerator for the recommended period. This process can break seed dormancy and promote germination.
7. Label and Organize: As you prepare your seeds, it’s essential to label each variety and organize them accordingly. This will help you keep track of which seeds belong to which plant and ensure proper care and identification throughout the germination process.
By following these steps to prepare your seeds, you increase their chances of successful germination. Once your seeds are ready, it’s time to proceed with germinating them using a grow light. In the next section, we will discuss the process of germinating seeds with a grow light.
Read more: When To Germinate Outdoor Grow
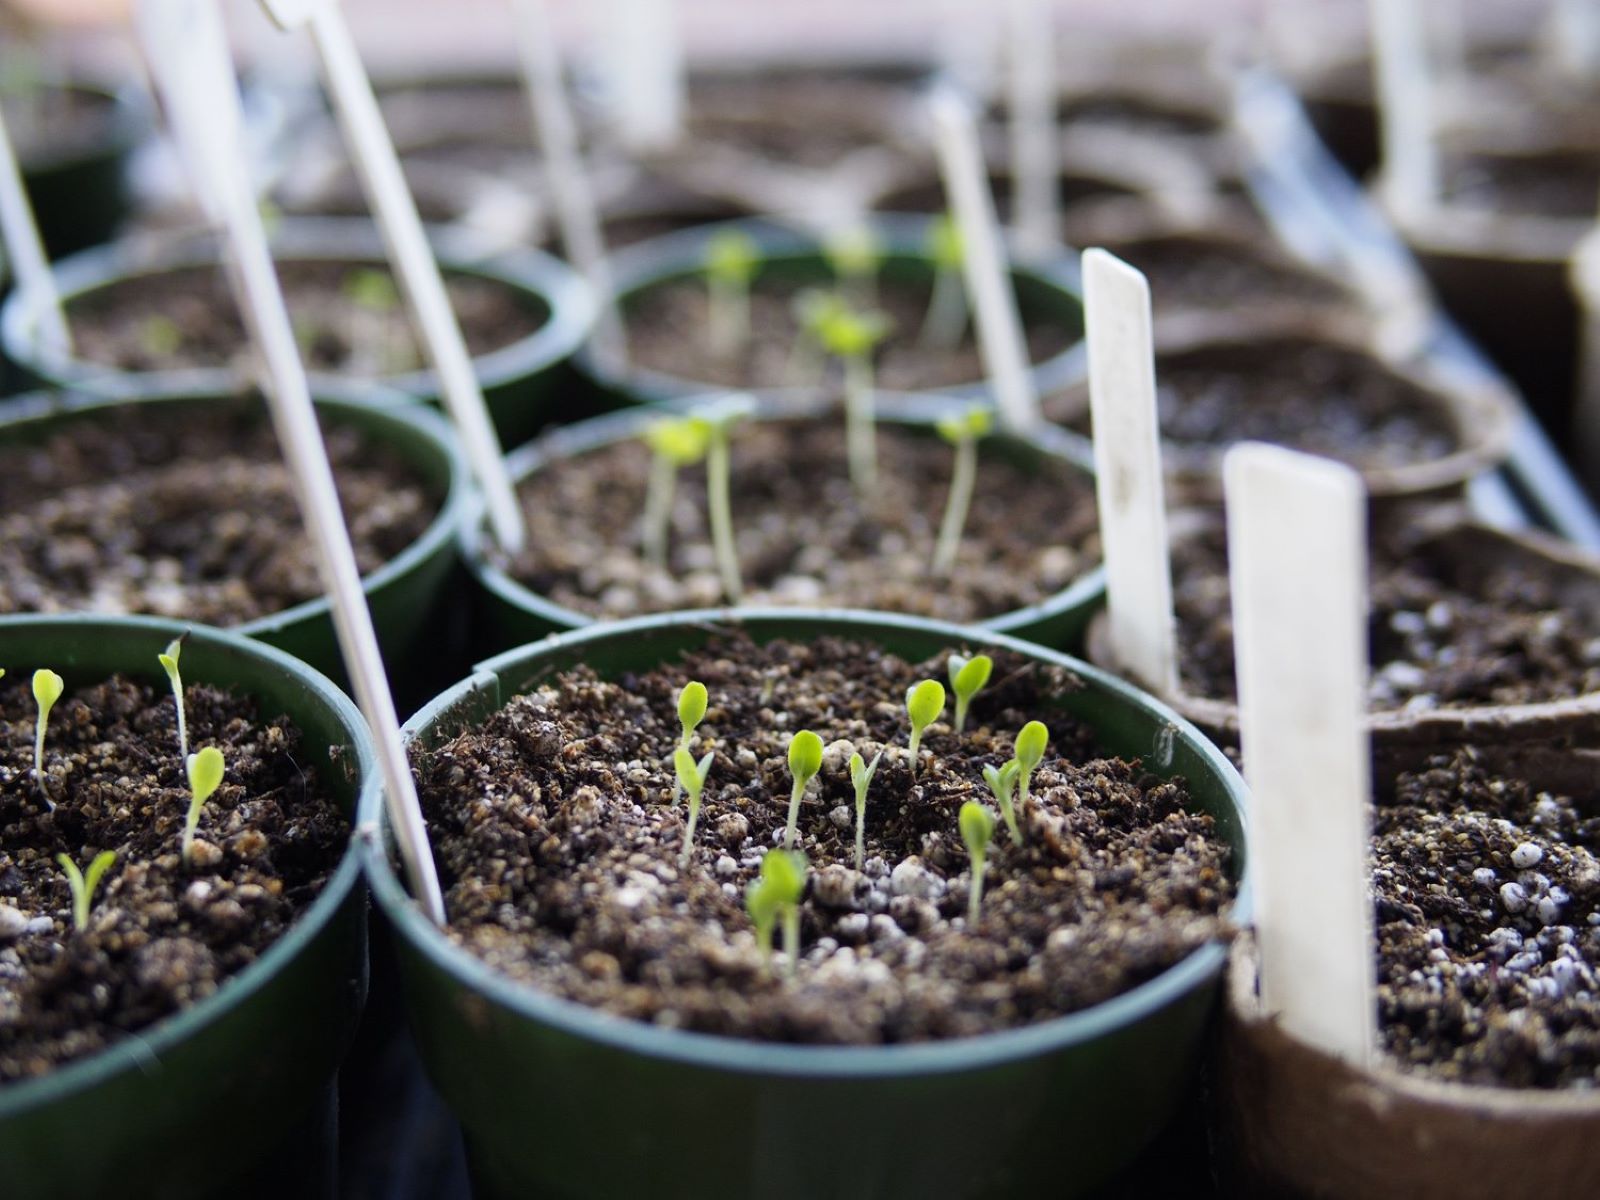
Germinating Seeds with a Grow Light
Germinating seeds with a grow light is a reliable and effective way to ensure successful seed germination. By providing the right light spectrum, intensity, and duration, you can create optimal conditions for your seeds to sprout and grow into healthy seedlings. Follow these steps to germinate seeds using a grow light:
1. Prepare the Germination Medium: Fill a germination tray or individual seedling pots with a suitable germination medium such as seed-starting mix or a combination of vermiculite and perlite. Moisten the medium with water until it’s evenly moist, but not waterlogged.
2. Plant the Seeds: Using your fingertips or a dibber, create small holes or indentations in the germination medium. Place one or two seeds in each hole, following the recommended planting depth specified on the seed packet. Cover the seeds lightly with the germination medium and gently press it down for proper seed-to-soil contact.
3. Position the Grow Light: Hang or mount the grow light above the germination tray or seedling pots. Keep it at the recommended distance from the top of the plants to achieve the right light intensity. Adjust the height or angle of the light as needed to ensure even coverage of the seedlings.
4. Set the Light Schedule: Determine the ideal photoperiod for seed germination based on the specific plant’s requirements. Most seeds will benefit from approximately 12-16 hours of light per day. Set a timer or adjust the settings of your grow light to provide the desired light schedule. Ensure that the seedlings also have a period of darkness for proper growth and development.
5. Monitor the Germination Process: Regularly check on the germination progress of your seeds. Keep a close eye on the moisture level of the germination medium and adjust watering accordingly to keep it moist but not overly saturated. Monitor the temperature and humidity levels in the germination area to ensure optimal conditions for seed germination.
6. Remove any Weak Seedlings: As the seeds germinate and seedlings begin to emerge, carefully inspect them to ensure healthy growth. If any weak or diseased seedlings appear, gently remove them to prevent the spread of pathogens. This will allow the remaining seedlings to thrive.
7. Adjust the Light Position: As the seedlings grow, it’s important to adjust the position of the grow light to maintain the appropriate distance and light coverage. Raise the light gradually to accommodate the increasing height of the seedlings. This will prevent them from stretching or becoming leggy.
8. Transition to Natural Light: Once the seedlings have developed their first true leaves and are well-established, gradually transition them to natural sunlight if you plan to transplant them outdoors. Begin by exposing them to a few hours of sunlight per day, gradually increasing the duration over the course of several days.
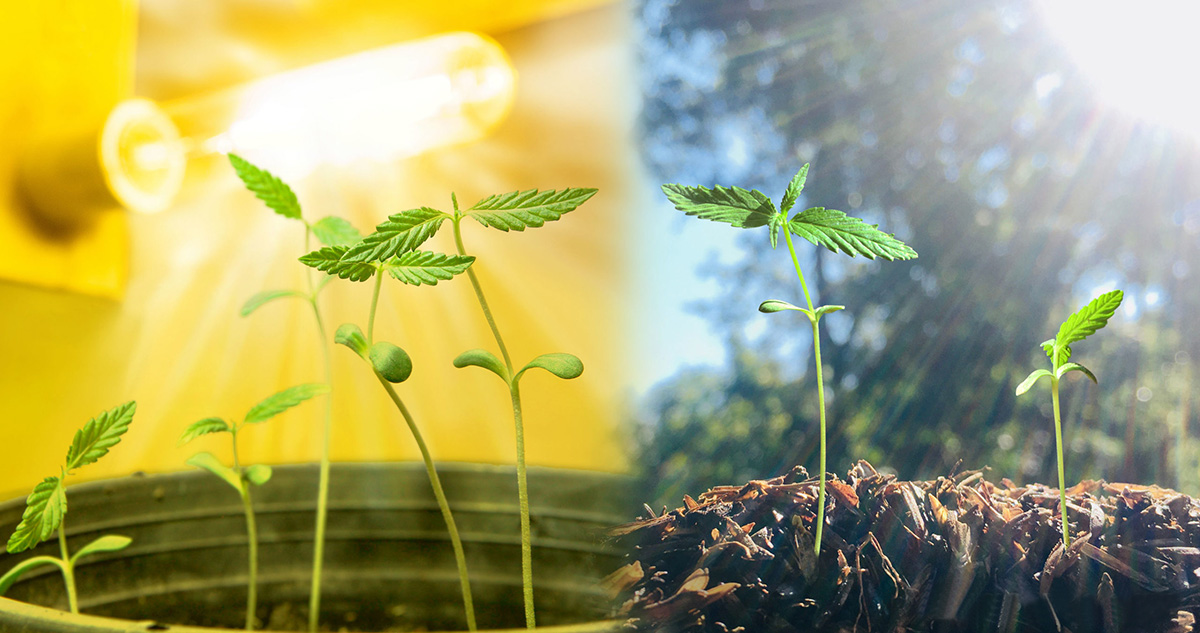
By following these steps, you will promote successful seed germination and healthy seedling growth with the help of a grow light. Remember to adjust the light intensity, photoperiod, and light position as needed to provide the best conditions for your seeds. In the next section, we will discuss the importance of providing proper lighting conditions for your germinating seeds.
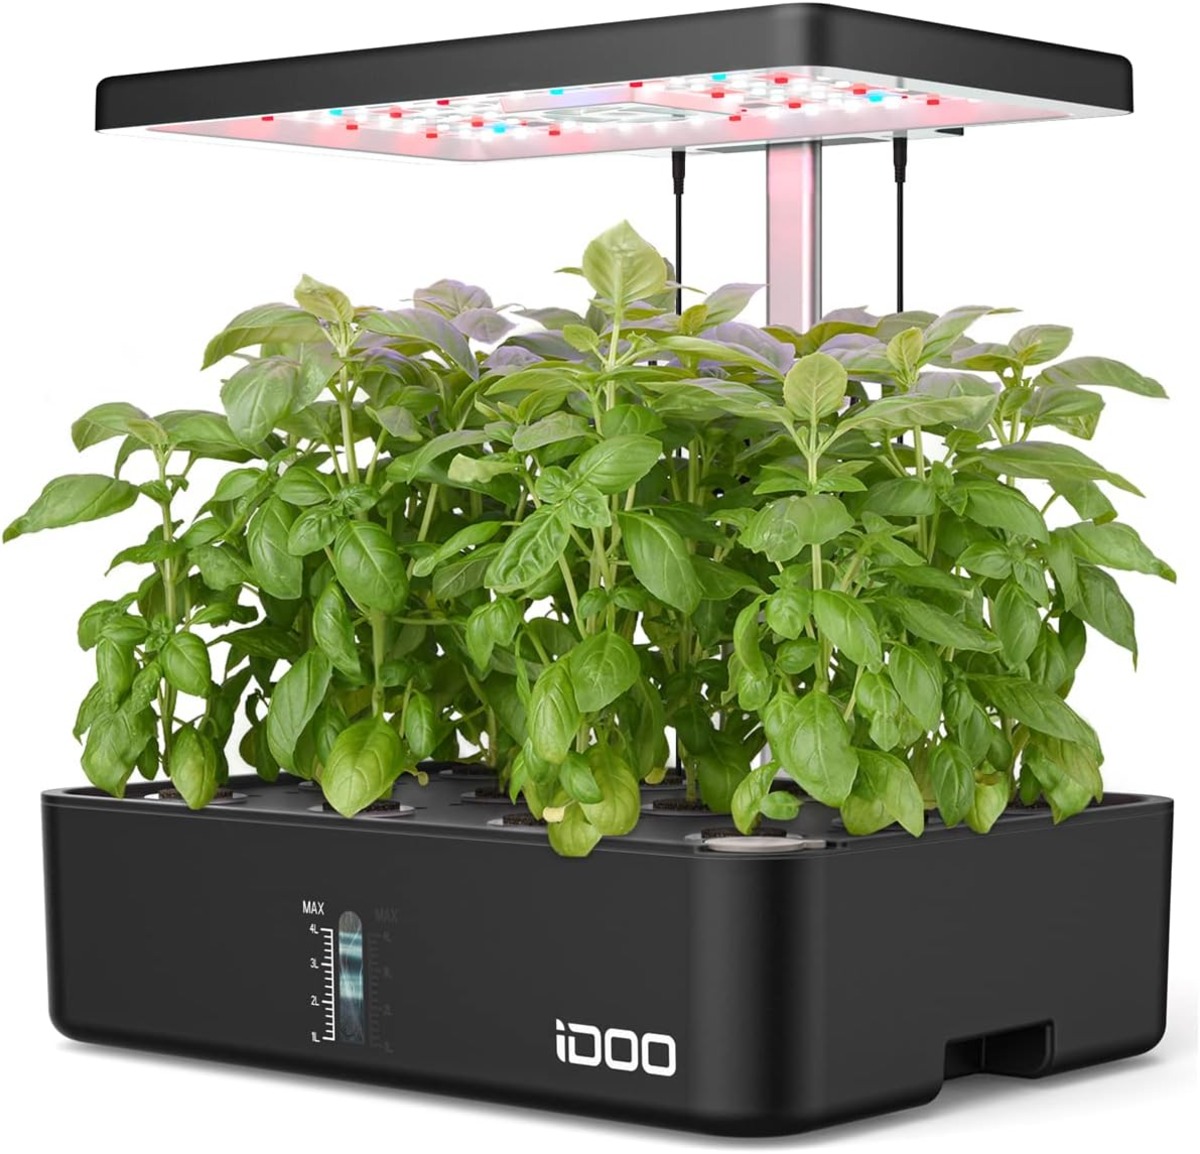
Place the grow light 2-3 inches above the soil to provide the right amount of light for germination. Keep the light on for 16-18 hours a day to mimic natural sunlight.
Providing Proper Lighting Conditions
Proper lighting conditions are essential for successful seed germination and healthy early plant growth. When using a grow light, it’s important to ensure that your seeds receive the right amount of light, at the correct intensity and duration. Here are some key considerations for providing proper lighting conditions:
1. Optimal Light Spectrum: Different stages of plant growth require different wavelengths of light. For seed germination and early growth, plants rely heavily on blue light. Blue light promotes strong stem and leaf development. Make sure your grow light provides a balanced spectrum that includes a sufficient amount of blue light to support healthy seedling growth.
2. Adequate Light Intensity: Providing the right light intensity is crucial for the success of seed germination. The light intensity should be strong enough to stimulate photosynthesis and promote healthy growth without causing damage to the delicate seedlings. Adjust the height of your grow light or the light output, if possible, to achieve the appropriate light intensity for your specific plants.
3. Duration of Light Exposure: The duration of light exposure is also important for seed germination. Most seeds require around 12-16 hours of light per day during the germination stage. Using a timer or setting the appropriate light schedule on your grow light ensures that the seedlings receive the necessary amount of light exposure. Remember that plants also require a period of darkness for proper growth and development.
4. Consistent Lighting: Providing consistent lighting is crucial for seedlings. Avoid uneven lighting conditions, such as placing the grow light too close to some seedlings while leaving others in shadow. Rotate the trays or adjust the light position regularly to ensure even light distribution among all the seedlings. This will help prevent leggy growth and promote uniform development.
5. Avoid Excessive Heat: While grow lights generate some amount of heat, it’s important to ensure that it does not become excessive. Excess heat can damage seedlings and affect germination. Monitor the temperature in the germination area and adjust the placement of the grow light or provide additional ventilation if needed to maintain a suitable temperature range.
6. Supplement with Natural Light: While using a grow light provides adequate lighting conditions, supplementing with natural light can benefit seedling development. If possible, place the germination area near a window or provide some exposure to natural sunlight. Gradually introduce the seedlings to outdoor conditions, allowing them to acclimate before transplanting them into the garden.
7. Regular Monitoring and Adjustment: Regularly monitor the seedlings’ response to the light conditions. Observe their growth patterns, leaf coloration, and overall health. Adjust the position and height of the grow light, as well as the light intensity and duration, if needed, based on the specific requirements of your plants.
By providing proper lighting conditions, you create an environment that promotes successful seed germination and healthy seedling growth. Remember to consider the specific light spectrum, intensity, duration, and consistency required for your plants. In the next section, we will discuss how to monitor and adjust light intensity for optimal results.
Monitoring and Adjusting Light Intensity
Monitoring and adjusting the light intensity is a crucial aspect of providing optimal lighting conditions for your germinating seeds. Proper light intensity ensures that the seedlings receive the right amount of light for healthy growth without causing stress or damage. Here are some tips for monitoring and adjusting light intensity:
1. Observe Seedling Response: Pay attention to the growth patterns and appearance of your seedlings. If they appear elongated, thin, or leggy, it could be a sign of insufficient light intensity. On the other hand, if the leaves are yellowing, scorched, or shriveling, it may indicate excessive light intensity. Regular observation allows you to identify any issues and make necessary adjustments.
2. Measure Light Intensity: Use a light meter or lux meter to measure the light intensity at the canopy level of your seedlings. This will give you a precise measurement of the illumination they are receiving. Different plants have different light intensity requirements, so consult the specific recommendations for your plant species to ensure you are providing the right level of light.
3. Adjust Light Position: If you find that the light intensity is too low, you can adjust the position of the grow light to lower the distance between the light and the seedlings. If the light intensity is too high and causing stress to the seedlings, raise the height of the grow light or diffuse the light by using a sheer curtain or diffusing material. Properly positioning the grow light will help achieve the desired light intensity for optimal growth.
4. Use Dimmable Lights: If your grow light has dimming capabilities, take advantage of this feature to adjust the light intensity. This allows you to fine-tune the brightness to meet the specific needs of your seedlings. Start with a lower intensity and gradually increase it as the seedlings grow and their light requirements change.
5. Time the Light Exposure: In addition to adjusting the light intensity, controlling the duration of light exposure is important for regulating the overall energy input. If you notice signs of stress or if the seedlings are growing too quickly, consider reducing the daily light exposure. On the other hand, if the seedlings appear weak or pale, increasing the duration of light exposure can provide them with more energy for growth.
6. Monitor Seedling Growth: Regularly monitor the growth and development of your seedlings to ensure they are responding positively to the adjusted light intensity. Healthy growth, vibrant green leaves, and sturdy stems are indicators that the light conditions are suitable. If necessary, continue making small adjustments to fine-tune the light intensity as the seedlings progress.
7. Consider Light Diffusion: If you notice that some seedlings are receiving more light than others due to their position under the grow light, you can use reflective surfaces or light diffusing materials to distribute the light more evenly. This ensures that all seedlings receive a consistent and balanced amount of light, promoting uniform growth.
By actively monitoring and adjusting the light intensity, you can provide your seedlings with the optimal lighting conditions for healthy and vigorous growth. Regular observation, measurement, and appropriate adjustments based on the specific needs of your plants will help ensure successful germination and development. In the next section, we will discuss the importance of maintaining proper temperature and humidity for your germinating seeds.
Maintaining Proper Temperature and Humidity
Maintaining the proper temperature and humidity in your germination area is essential for the successful development of your seeds and seedlings. Temperature and humidity levels directly impact seed germination, root growth, and overall plant health. Here are some important factors to consider:
Temperature:
- The optimal temperature for seed germination varies depending on the plant species. Most commonly, temperatures between 65°F and 75°F (18°C to 24°C) are suitable for a wide range of seeds.
- Use a thermometer to monitor the temperature in your germination area regularly. Place the thermometer near the seedlings to get an accurate reading.
- Avoid extreme temperature fluctuations, as they can stress or damage the seedlings. Maintain a consistent temperature to promote healthy growth.
- If the temperature is too low, consider using a heating pad, heat mat, or a small space heater to raise the temperature. Be cautious not to overheat the seedlings, as this can also be detrimental.
Humidity:
- During the germination process, maintaining a moderate level of humidity is important to keep the seedlings hydrated and prevent them from drying out.
- The ideal humidity level for seed germination typically ranges between 60% and 70%. However, some plant species may have specific humidity requirements, so it’s important to research their preferences.
- Use a hygrometer or a humidity monitor to measure the humidity level in your germination area. Place it at plant height for an accurate reading of the immediate environment surrounding the seedlings.
- To increase humidity, you can use a humidity dome, a plastic cover, or a spray bottle to provide a mist of water. Alternatively, place a tray of water near the seedlings to create a moist microclimate.
- If the humidity is too high, you can reduce it by providing proper ventilation or using a dehumidifier. Excess humidity can lead to fungal diseases or damping-off.
Air Circulation:
- Air circulation is crucial for maintaining optimal temperature and humidity levels and preventing the growth of mold or mildew.
- Use fans or open windows to ensure proper air circulation in your germination area. This helps to prevent stagnant air and promotes healthy plant growth.
- Be mindful of placing the fans at an appropriate distance from the seedlings to prevent excessive drying or agitation. Gentle airflow is sufficient to promote good air circulation.
Frequent Monitoring and Adjustment:
- Regularly monitor the temperature and humidity levels in your germination area to ensure they remain within the optimal ranges for your seeds and seedlings.
- Make necessary adjustments to maintain the desired temperature and humidity levels. This may include adjusting heating or cooling devices, misting the seedlings with water, or providing additional humidity sources.
- Monitor the seedlings’ response to the environmental conditions. If they appear stressed, wilted, or discolored, it may indicate a need for temperature or humidity adjustments.
By maintaining proper temperature and humidity levels, you provide an environment that supports healthy seed germination and seedling development. Each plant species may have specific requirements, so it’s important to research and cater to their individual needs. In the next section, we will discuss the process of transferring seedlings to a grow medium.
Read more: What Herbs Need Light To Germinate
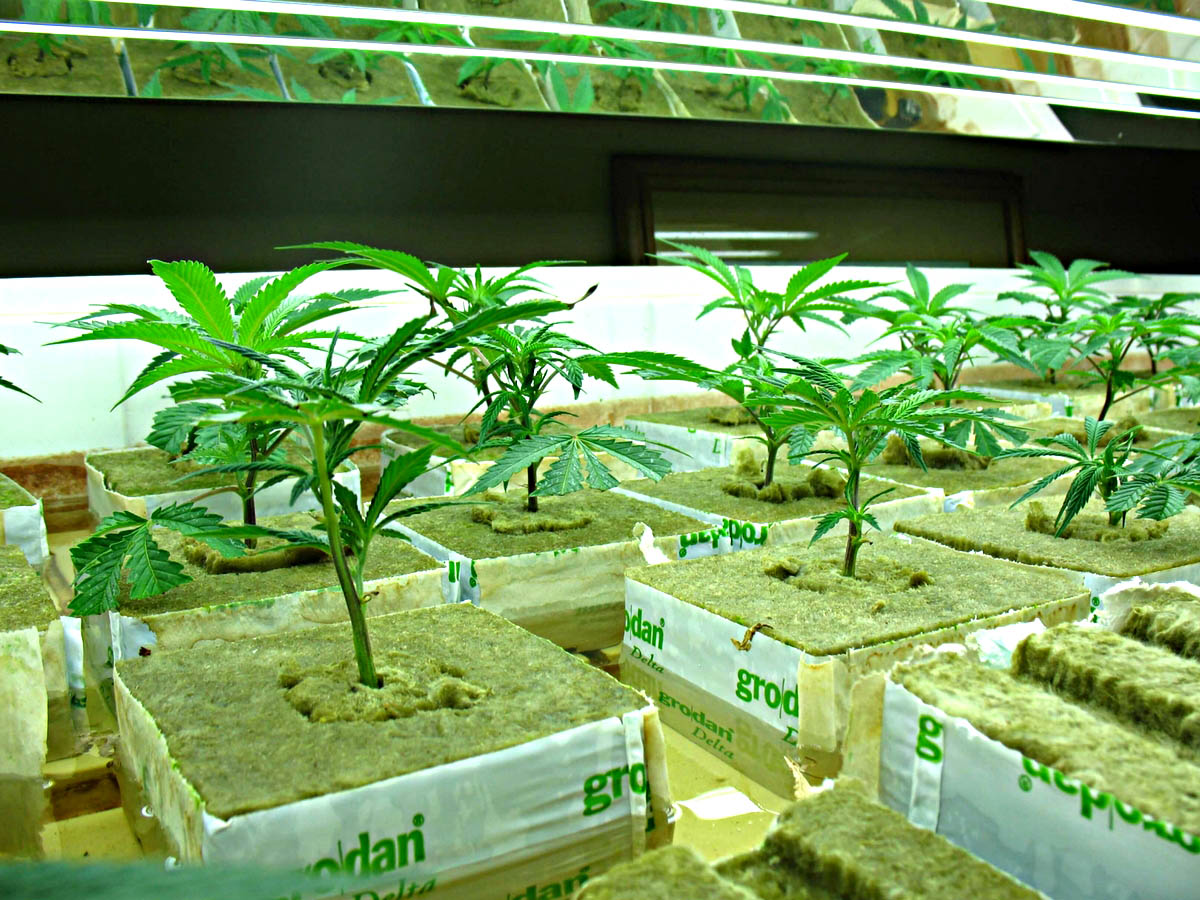
Transferring Seedlings to a Grow Medium
Once your seedlings have developed their first set of true leaves and are sturdy enough to handle, it’s time to transfer them to a larger container or grow medium. This process, known as transplanting, provides the seedlings with more space for root growth and allows them to continue their journey towards becoming mature plants. Here are the steps to successfully transfer seedlings to a grow medium:
1. Prepare the Grow Medium:
- Choose a suitable grow medium based on the needs of your plants. This can include potting soil, a soilless mix, or a specialized growing medium depending on the specific requirements of your plants.
- Moisten the grow medium prior to transplanting to ensure it provides a damp but not waterlogged environment for the seedlings.
- If using containers, make sure they have drainage holes to prevent waterlogged soil and promote healthy root development.
2. Water the Seedlings:
- Gently water the seedlings a few hours before transplanting. This helps hydrate the root ball and prevents unnecessary stress during the transplanting process.
- Watering the seedlings also helps the soil cling to the roots, making the transplanting process smoother and less disruptive to the delicate roots.
3. Loosen the Soil:
- Using a small garden trowel or your fingers, carefully loosen the soil around the base of the seedlings, being careful not to damage the roots.
- Apply gentle pressure on the sides of the container to loosen the soil and help ease the seedlings out. If planted in a common tray, gently separate the seedlings from each other, ensuring each one has enough space for its roots to grow.
4. Transplant the Seedlings:
- Make a hole in the grow medium that is slightly larger than the root ball of the seedling.
- Gently place the seedling into the hole, ensuring that the top of the root ball is level with or slightly below the surface of the grow medium.
- Carefully backfill the hole with the grow medium, ensuring that the roots are covered and supported by the soil. Gently press down the soil around the base of the seedling to secure it.
5. Water and Settle the Seedlings:
- After transplanting, water the seedlings thoroughly but gently to settle the soil around the roots and eliminate any air pockets.
- Avoid overwatering, as excessive moisture can lead to root rot or other issues. Maintain a consistent level of moisture in the grow medium as the seedlings establish themselves.
6. Provide Proper Care:
- Place the newly transplanted seedlings in an area with appropriate lighting conditions, ensuring they receive the optimal amount of light.
- Continue to monitor and maintain the temperature and humidity levels in the growing area, making any necessary adjustments to promote healthy growth.
- Regularly inspect the seedlings for any signs of stress, pests, or diseases. Take appropriate action if any issues arise to protect the wellbeing of the seedlings.
Transferring seedlings to a larger container or grow medium allows them to continue their growth and development in a more spacious environment. With proper care and attention, your transplanted seedlings will thrive and progress towards becoming mature, productive plants. In the next section, we will address some common issues that may occur during the germination and seedling stage and how to troubleshoot them.
Troubleshooting Common Issues
During the germination and seedling stage, it’s common to encounter various issues that can hinder the growth and development of your plants. However, with timely intervention and proper troubleshooting, you can address these issues and help your seedlings thrive. Here are some of the most common issues and how to troubleshoot them:
1. Damping-Off:
- Symptoms: Seedlings suddenly collapse at the base, show signs of rotting, and may have a mushy appearance.
- Cause: Damping-off is typically caused by fungal pathogens in overly moist and poorly ventilated conditions.
- Solution: Improve air circulation around the seedlings by providing gentle airflow or using a fan. Ensure proper drainage and avoid overwatering. Consider using a sterile growing medium and sanitize any equipment used to minimize the risk of fungal infection.
2. Leggy Seedlings:
- Symptoms: Seedlings grow tall and thin with weak stems, often reaching towards the light source.
- Cause: Leggy seedlings are a result of insufficient light or excessive distance between the grow light and the seedlings.
- Solution: Increase the light intensity or decrease the distance between the grow light and the seedlings to promote sturdy growth. Consider using supplemental lighting or using reflective surfaces to ensure uniform light distribution.
3. Poor Germination:
- Symptoms: Seeds fail to sprout or have very low germination rates.
- Cause: Poor germination can be caused by a variety of factors, including old or low-quality seeds, improper temperature or moisture levels, or inadequate light conditions.
- Solution: Use fresh and high-quality seeds from a reputable source. Ensure proper environmental conditions, including temperature, moisture, and light. Consider performing a seed viability test or adjusting the germination process based on the specific requirements of the plant species.
4. Yellowing Leaves:
- Symptoms: The leaves of the seedlings turn yellow, indicating nutrient deficiencies, overwatering, soil imbalances, or inadequate light.
- Cause: Yellowing leaves can be a sign of poor nutrition uptake, excess moisture leading to root rot, nutrient imbalances, or insufficient light for photosynthesis.
- Solution: Address any issues with overwatering, provide appropriate drainage, and adjust watering frequency and amount. Ensure a balanced nutrient supply by using a suitable fertilizer or amending the soil as needed. Evaluate the light conditions and adjust the intensity or duration accordingly.
5. Pests and Diseases:
- Symptoms: Presence of pests such as aphids, mites, or fungal diseases, causing damage to the seedlings.
- Cause: Pests and diseases can be introduced through contaminated soil, airborne pathogens, or improper hygiene practices.
- Solution: Regularly inspect the seedlings for any signs of pests or diseases, such as discolored leaves or visible insects. Use organic pest control methods or appropriate fungicides to address the specific issue. Practice good hygiene, sanitize tools, and ensure proper ventilation to minimize the risk of infestation or disease spread.
By promptly identifying and addressing these common issues during the germination and seedling stage, you can increase the chances of success and help your seedlings grow into healthy, thriving plants. Focus on providing optimal growing conditions, regular monitoring, and taking appropriate action when necessary. In the next section, we will conclude our discussion on germinating seeds with a grow light.
Conclusion
Growing plants from seeds is a rewarding and fulfilling experience, and using a grow light to germinate seeds can greatly enhance your gardening success. By understanding grow lights, choosing the right one, and setting up a proper germination area, you can provide optimal light conditions for your seeds to sprout and thrive.
Throughout the germination process, it’s important to monitor and adjust the light intensity, ensuring that your seedlings receive the right amount of light for healthy growth. By maintaining proper temperature and humidity levels, you create an environment that promotes successful germination and supports the overall health of your seedlings.
Transferring the seedlings to a suitable grow medium at the appropriate time allows them to continue their growth journey. With proper care and attention, your seedlings will develop into strong, mature plants ready for transplanting into your garden or containers.
Of course, it’s important to address any common issues that may arise during the germination and seedling stage. By troubleshooting problems such as damping-off, leggy seedlings, poor germination, yellowing leaves, pests, and diseases, you can ensure the best possible outcomes for your plants.
Remember, gardening is a continuous learning process. Pay attention to the specific needs of your plant species and be attentive to their growth patterns. Adapt and adjust your approach as needed to provide the optimal conditions for successful seed germination and healthy seedling development.
With the knowledge gained from this comprehensive guide, you are well-equipped to take on the exciting journey of germinating seeds with a grow light. Enjoy the wonder and satisfaction of watching your seeds transform into beautiful, thriving plants, adding greenery and beauty to your home or garden.
Frequently Asked Questions about How To Use A Grow Light To Germinate
Was this page helpful?
At Storables.com, we guarantee accurate and reliable information. Our content, validated by Expert Board Contributors, is crafted following stringent Editorial Policies. We're committed to providing you with well-researched, expert-backed insights for all your informational needs.


0 thoughts on “How To Use A Grow Light To Germinate”