Home>Garden Essentials>How To Use SketchUp For Landscape Design
Garden Essentials
How To Use SketchUp For Landscape Design
Modified: October 20, 2024
Learn how to use SketchUp for landscape design and create stunning garden layouts. Transform your outdoor space with this powerful design software.
(Many of the links in this article redirect to a specific reviewed product. Your purchase of these products through affiliate links helps to generate commission for Storables.com, at no extra cost. Learn more)
Introduction
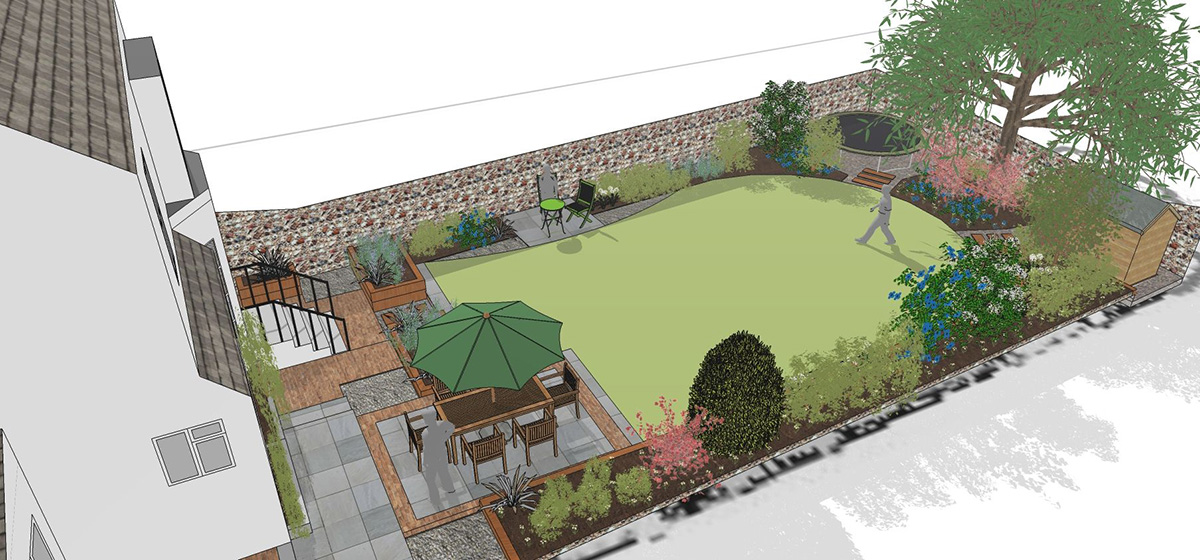
Welcome to the world of landscape design! Whether you’re a professional designer or an enthusiastic homeowner, using the right tools is essential to create stunning outdoor spaces. One tool that has gained popularity among designers is SketchUp. SketchUp is a powerful 3D modeling software that allows you to bring your landscape design ideas to life.
In this article, we will explore how to use SketchUp for landscape design. We’ll cover the basics of SketchUp, guide you through the process of getting started, and introduce you to the various tools and techniques you can use to create breathtaking landscapes. Whether you want to design a small backyard or a large-scale outdoor project, SketchUp is the perfect tool to help you visualize and plan your ideas.
Before we dive into the details, let’s first understand what SketchUp is all about.
Key Takeaways:
- SketchUp is a powerful 3D modeling software that empowers designers to create realistic and detailed landscapes, offering intuitive tools and versatile features for visualizing and planning outdoor spaces.
- With SketchUp, designers can easily incorporate elements such as vegetation, hardscape features, water elements, outdoor furniture, and lighting effects to create captivating and functional outdoor environments.
Read more: How To Use Sketchup For Woodworking
Understanding SketchUp
SketchUp is a user-friendly 3D modeling software that is widely used in various industries, including architecture, interior design, and of course, landscape design. Developed by Trimble Inc., SketchUp provides a versatile platform for creating 3D models of structures, landscapes, and objects.
One of the reasons why SketchUp is so popular among designers is its intuitive interface and ease of use. Even if you have no prior experience with 3D modeling software, you can quickly get the hang of SketchUp and start creating impressive designs.
Key features of SketchUp include:
- Powerful modeling tools: SketchUp offers a wide range of tools that allow you to create complex shapes and geometries with ease.
- 3D Warehouse: The 3D Warehouse is a vast online repository of pre-made 3D models, including plants, furniture, and other elements that you can incorporate into your designs.
- Material editor: SketchUp provides a comprehensive material editor, allowing you to apply textures and colors to your models to achieve the desired look.
- Shadow analysis: With SketchUp’s shadow analysis tool, you can simulate the sun’s position at different times of the day and year, helping you optimize the placement of elements in your design.
- Rendering capabilities: While SketchUp itself does not have advanced rendering capabilities, you can easily export your models to other rendering software to create stunning visualizations.
Now that you have an overview of SketchUp, let’s move on to getting started with the software.
Key Takeaways:
- SketchUp is a powerful 3D modeling software that empowers designers to create realistic and detailed landscapes, offering intuitive tools and versatile features for visualizing and planning outdoor spaces.
- With SketchUp, designers can easily incorporate elements such as vegetation, hardscape features, water elements, outdoor furniture, and lighting effects to create captivating and functional outdoor environments.
Read more: How To Use Sketchup For Woodworking
Understanding SketchUp
SketchUp is a versatile 3D modeling software that is widely used in various industries, including architecture, interior design, and landscape design. It provides a powerful platform for creating realistic 3D models of structures, landscapes, and objects.
Overview of SketchUp
SketchUp was originally developed by @Last Software and later acquired by Google in 2006. It gained widespread popularity due to its user-friendly interface and intuitive tools. In 2012, SketchUp was acquired by Trimble Inc., who continues to develop and improve the software.
SketchUp comes in two versions: SketchUp Free (previously known as SketchUp Make) and SketchUp Pro. SketchUp Free is a web-based application that allows you to create basic 3D models for personal use. It is free to use, but it has some limitations compared to SketchUp Pro. SketchUp Pro, on the other hand, is a professional-grade software with advanced features and capabilities.
Key Features of SketchUp
SketchUp offers a wide range of features that make it a preferred choice for designers. Here are some key features of SketchUp:
- Intuitive interface: SketchUp has a user-friendly interface that is easy to navigate, making it accessible to beginners and professionals alike.
- 3D modeling tools: SketchUp provides a robust set of tools for creating 3D models, including drawing tools, push/pull functionality, and a 3D warehouse where you can access pre-made models.
- Extensions and plugins: SketchUp has a vibrant community of developers who have created extensions and plugins to enhance its functionality. These extensions allow you to add specialized tools and features to customize your workflow.
- Dynamic components: SketchUp allows you to create dynamic components that can be easily modified and manipulated. This makes it easier to design and visualize different variations of your models.
- Material editor: With SketchUp’s material editor, you can apply textures and colors to your models, giving them a realistic appearance. You can also import custom textures or use textures from the 3D warehouse.
- Integration with other software: SketchUp allows for seamless integration with other software, such as rendering engines and CAD programs. This enables you to create high-quality renderings and export your models to other design tools.
Read more: How To Use Sketchup To Design A Tiny House
System Requirements
Before you start using SketchUp, it’s essential to ensure that your computer meets the minimum system requirements. This will ensure that the software runs smoothly and you have a seamless design experience. Here are the recommended system requirements for SketchUp:
- Operating system: SketchUp is compatible with both Windows and macOS operating systems.
- Processor: A 2+ GHz processor is recommended for optimal performance.
- RAM: At least 8 GB of RAM is recommended, although SketchUp can run with 4 GB.
- Graphics card: A dedicated graphics card with at least 1 GB of VRAM is essential for smooth navigation and rendering of 3D models.
- Hard disk space: SketchUp requires a minimum of 700 MB of available hard disk space for installation.
By ensuring that your computer meets these system requirements, you can enjoy a seamless experience when using SketchUp for your landscape design projects.
Getting Started with SketchUp
Now that you have an understanding of SketchUp, let’s dive into the process of getting started with the software. This section will guide you through downloading and installing SketchUp, provide a walkthrough of the SketchUp interface, and show you how to navigate and customize your workspace.
Downloading and Installing SketchUp
The first step in using SketchUp is to download and install the software on your computer. Here’s how you can do it:
- Go to the official SketchUp website (www.sketchup.com) and navigate to the Downloads section.
- Choose the version of SketchUp that is compatible with your operating system (Windows or macOS).
- Click on the Download button and follow the on-screen instructions to save the installation file to your computer.
- Once the download is complete, locate the installation file and double-click on it to start the installation process.
- Follow the prompts and instructions provided by the SketchUp installer to complete the installation.
After successful installation, you can launch SketchUp and start exploring its features and tools.
SketchUp Interface Walkthrough
When you first open SketchUp, you will be greeted with its user-friendly interface. Here’s a brief walkthrough of the main components of the SketchUp interface:
- Menu bar: The menu bar at the top of the screen contains various menus, including File, Edit, View, and Tools. These menus provide access to different features and tools in SketchUp.
- Toolbars: Toolbars contain icons representing different tools and commands in SketchUp. You can customize which toolbars are displayed by right-clicking on the toolbar area and selecting the desired toolbars.
- Drawing area: The drawing area is the main workspace where you create and modify your models. It occupies the central part of the SketchUp window.
- Default tray: The default tray is located on the right side of the SketchUp window. It provides access to various panels, such as the Layers panel, Materials panel, and Outliner panel. You can customize which panels are displayed in the default tray.
- Instructor: The Instructor panel is a helpful feature that provides context-sensitive guidance and tutorials as you work in SketchUp.
Read more: How To Design A Low-Maintenance Landscape
Navigating in SketchUp
SketchUp provides intuitive navigation tools that allow you to explore and navigate your 3D models effortlessly. Here are some common navigation techniques in SketchUp:
- Orbit: To orbit around your model, hold the Shift key and click and drag with the left mouse button.
- Zoom: To zoom in or out, roll the scroll wheel on your mouse or use the Zoom tool from the toolbar.
- Pan: To pan your view, hold the Shift key and click and drag with the middle mouse button or use the Pan tool from the toolbar.
- Walk and Look Around: If you’re working on a detailed interior or navigating a complex scene, you can use the Walk and Look Around tools to move within your model and change your perspective.
Customizing SketchUp Workspace
SketchUp allows you to customize your workspace to suit your preferences and streamline your workflow. Here are some ways you can customize your SketchUp workspace:
- Toolbars: You can customize which toolbars are displayed by right-clicking on the toolbar area and selecting the desired toolbars.
- Default tray: To customize the default tray, click on the Window menu, select Default Tray, and choose the panels you want to display.
- Keyboard shortcuts: SketchUp provides a wide range of keyboard shortcuts that allow you to perform common tasks quickly. You can customize these shortcuts by going to the Window menu, selecting Preferences, and navigating to the Shortcuts tab.
- Templates: SketchUp offers various templates with different settings and units. You can choose a template that best suits your project requirements by going to the File menu and selecting New.
By customizing your SketchUp workspace, you can create a setup that allows you to work efficiently and comfortably.
SketchUp Tools for Landscape Design
SketchUp offers a wide range of tools that are specifically designed to assist in landscape design projects. These tools enable you to create, modify, and measure different elements of your landscape design. Let’s explore some of the essential tools you can utilize in SketchUp for your landscape design projects:
Selection Tools
The selection tools in SketchUp allow you to select and manipulate objects within your model. Here are some of the key selection tools:
- Select: This tool enables you to select individual objects or multiple objects within your model.
- Move: Once you’ve selected an object, the move tool allows you to move it to a new position within your design.
- Rotate: The rotate tool allows you to rotate selected objects around a specific point or axis.
- Scale: With the scale tool, you can resize objects while maintaining their proportions.
Read more: How To Use Rocks For Landscaping
Drawing Tools
The drawing tools in SketchUp are essential for creating the various elements of your landscape design. Here are some of the commonly used drawing tools:
- Line: The line tool enables you to draw straight lines and create simple shapes.
- Rectangle: Use the rectangle tool to draw rectangular shapes, such as patio areas or garden beds.
- Circle: The circle tool allows you to draw circles, which can be used to represent trees or circular features in your design.
- Polygon: With the polygon tool, you can draw polygons of various sides, which can be useful for creating irregular shapes or paving patterns.
- Arc: Use the arc tool to draw curved lines and create arcs or circular elements in your design.
Modification Tools
The modification tools in SketchUp enable you to edit and manipulate existing objects within your landscape design. Here are some commonly used modification tools:
- Push/Pull: The push/pull tool is a powerful tool in SketchUp that allows you to extrude or depress surfaces, making it ideal for creating terrain contours or adding depth to objects.
- Offset: With the offset tool, you can create parallel lines or edges at a specified distance from existing lines or edges. This is useful for creating borders or pathways.
- Follow Me: The follow me tool enables you to create continuous profiles along a path. This can be helpful in creating complex shapes or adding decorative details to elements in your design.
- Intersect Faces: The intersect faces tool allows you to create new edges or surfaces by intersecting existing ones. This can be handy when you want to merge or divide objects.
Measurement Tools
The accuracy of measurements is crucial in landscape design, and SketchUp provides various measurement tools to help you ensure precise dimensions. Here are some measurement tools within SketchUp:
- Tape Measure: The tape measure tool allows you to measure distances within your model. You can use it to set the scale, measure dimensions, or align objects accurately.
- Dimension: With the dimension tool, you can add dimensions to your models, providing clear indications of lengths, heights, and widths.
- Protractor: The protractor tool allows you to measure angles accurately, which can be useful when planning inclined surfaces or determining the position of objects.
Grouping and Component Tools
Grouping and component tools in SketchUp are essential for organizing and managing complex designs. These tools allow you to create reusable elements and simplify the editing process. Here are the grouping and component tools:
- Group and Ungroup: The group tool allows you to select multiple objects and group them together. This is useful for creating distinct elements within your design that can be easily manipulated or modified as a single entity.
- Make Component: With the make component tool, you can create reusable components within your design. This is beneficial when you need to replicate objects or maintain consistency across your landscape design.
- Copy and Paste in Place: These tools make it easy to duplicate objects or components within your design without disrupting their position or orientation.
By mastering these essential tools in SketchUp, you can efficiently design and modify your landscape projects, bringing your creative vision to life.
Read more: How To Use Pea Gravel In Landscaping
Creating Base Terrain
Creating a realistic terrain is a crucial step in landscape design, as it provides the foundation for your entire project. In SketchUp, there are several ways to create base terrain, whether by importing existing terrain data, drawing custom terrains, or modifying terrain contours. Let’s explore these methods in detail:
Importing Terrain Data
A convenient way to create base terrain in SketchUp is by importing external terrain data. This can be done by using various file formats, such as Digital Elevation Models (DEMs) or Geographic Information System (GIS) data. Here’s how you can import terrain data into SketchUp:
- Obtain a terrain data file, usually in the form of a DEM or GIS file.
- Open SketchUp and navigate to the File menu, then select Import.
- In the file import dialog, choose the appropriate file format and locate the terrain data file on your computer.
- Select the options for importing the terrain data, which may include adjusting the scale or coordinate system.
- Click OK to import the terrain data into your SketchUp model.
Once imported, you can manipulate the terrain using the tools available in SketchUp to further refine the landscape design.
Drawing Custom Terrains
If you prefer to create your own custom terrain from scratch, SketchUp provides drawing tools that allow you to model terrains according to your design vision. Here’s how you can draw custom terrains in SketchUp:
- Select the Line tool from the toolbar.
- Draw a series of lines to outline the desired shape and contours of the terrain.
- Select the Push/Pull tool from the toolbar.
- Click on the enclosed area defined by the lines and use the push/pull tool to extrude the surface and create the desired height and shape for the terrain.
- Repeat this process for different areas of the terrain to create varying elevations and slopes.
By employing this method, you can have complete control over the design of your terrain, allowing you to create unique and customized landscapes.
Modifying Terrain Contours
If you already have a rough terrain model or imported terrain data but want to refine the contours to better match your design, SketchUp offers tools for modifying terrain contours. Here’s how you can modify terrain contours in SketchUp:
- Select the terrain surface or component that you want to modify.
- Use the Move tool to adjust the position of vertices or edges, reshaping the terrain to align with your design intentions.
- Use the Push/Pull tool to raise or lower specific areas of the terrain to create desired elevations or depressions.
- Utilize the Smooth tool to smooth out jagged edges or rough transitions between different areas of the terrain.
- Continue making adjustments until the terrain contours align with your desired landscape design.
Modifying terrain contours allows you to fine-tune the shape and characteristics of the terrain to achieve the desired aesthetic and functional elements in your landscape design.
By using these methods to create base terrain in SketchUp, you can establish a realistic and accurate landscape foundation for your design. Whether by importing existing terrain data, drawing custom terrains, or modifying terrain contours, SketchUp provides the tools and flexibility to bring your landscaping ideas to life.
Read more: What Is A Landscaping Rake Used For
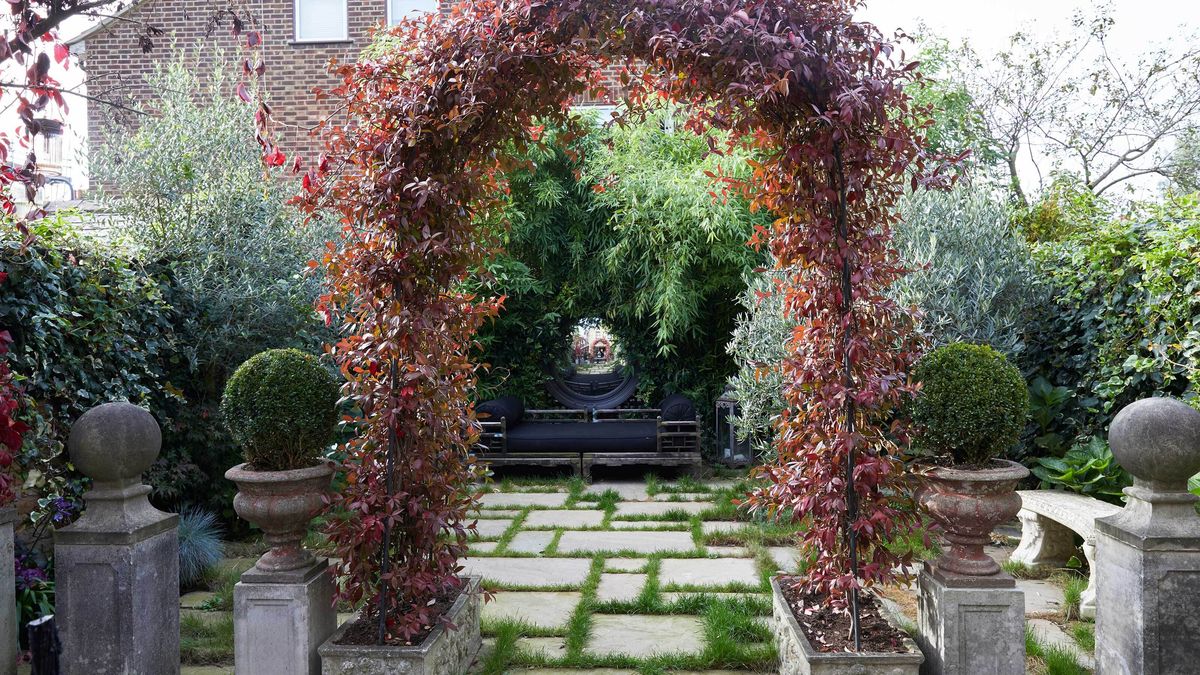
Adding Vegetation
A beautiful landscape design is incomplete without lush vegetation. Adding trees, plants, and other greenery brings life and vibrancy to your outdoor spaces. In SketchUp, you have various options for incorporating vegetation into your landscape design. Let’s explore how you can place trees and plants, customize their properties, and utilize pre-made plant libraries:
Placing Trees and Plants
SketchUp offers several ways to place trees and plants within your landscape design. Here are a few methods you can use:
- Importing 3D Models: You can import pre-made 3D models of trees and plants into SketchUp from online resources or the SketchUp 3D Warehouse. Simply download the desired model and import it into your SketchUp model.
- Creating Your Own: If you have the skills, you can create your own 3D models of trees and plants using SketchUp’s modeling tools. This allows you to have complete control over the size, shape, and details of each plant.
- Using Components: SketchUp components are reusable objects that can be easily replicated and modified. You can create a component of a tree or plant and place it multiple times within your design, saving time and effort.
- Painting with the Paint Bucket Tool: The Paint Bucket tool in SketchUp also allows you to apply materials with images of trees and plants to faces or surfaces, creating an instant visual representation of vegetation.
Customizing Plant Properties
Once you’ve placed trees and plants in your landscape design, you can customize their properties to achieve the desired look and feel. Here are some key plant properties you can modify in SketchUp:
- Size and Scale: Adjust the dimensions of trees and plants to match their real-world proportions or scale them to suit the aesthetic of your design.
- Position and Orientation: Ensure that trees and plants are correctly positioned and oriented within your design to create a natural appearance.
- Material and Texture: Apply appropriate materials and textures to the foliage, bark, or flowers of the plants to enhance their realism.
- Color and Shade: Adjust the colors and shading of the plants to simulate different seasons or lighting conditions in your landscape.
By customizing these plant properties, you can create a diverse array of vegetation that adds depth and detail to your landscape design.
Using Pre-made Plant Libraries
If you’re looking to save time and effort, SketchUp provides access to pre-made plant libraries that contain a wide variety of trees, shrubs, flowers, and other vegetation. These libraries offer a comprehensive collection of 3D models that you can easily import into your SketchUp model. The SketchUp 3D Warehouse is a great resource for finding pre-made plant models created by other users. Simply search for the desired plant species, choose a model that fits your design vision, and import it into your model. This allows you to populate your landscape design with realistic and accurate representations of vegetation without having to create them from scratch.
Using pre-made plant libraries not only saves time but also ensures that your vegetation models are of high quality and accurately represent the desired species. It also provides the added benefit of being able to explore a wide range of plant options to find the perfect fit for your landscape design.
By incorporating trees, plants, and vegetation into your SketchUp landscape design, you can create a vibrant and realistic outdoor environment. Whether you choose to place 3D models, create your own components, or utilize pre-made plant libraries, SketchUp offers the tools and resources to bring your landscape design to life with stunning vegetation.
Read more: How To Use Railroad Ties For Landscaping
Designing Hardscape Elements
In landscape design, hardscape elements are essential for creating functional and visually appealing outdoor spaces. These elements include paths, walkways, patios, decks, fences, and walls. SketchUp offers a range of tools and techniques that allow you to design and incorporate these hardscape elements into your landscape projects. Let’s explore how you can use SketchUp to draw paths and walkways, create patios and decks, and add fences and walls:
Drawing Paths and Walkways
Paths and walkways add structure and guide people through your landscape design. SketchUp provides various tools that make it easy to draw paths and walkways. Here’s how:
- Line Tool: The Line tool allows you to draw straight paths or walkways by clicking points along the desired path.
- Follow Me Tool: The Follow Me tool is useful for creating curved paths or walkways. Start by drawing a profile of the path, such as a rectangle or an arc, and then use the Follow Me tool to extrude the profile along the desired path.
- Offset Tool: The Offset tool allows you to create parallel lines or edges at a specified distance from an existing path or walkway. This is handy for creating borders or widening existing paths.
- Materials and Textures: To enhance the appearance of paths and walkways, you can apply appropriate materials and textures to the surfaces. Use the Paint Bucket tool to select and apply the desired material or texture.
By using these tools and techniques, you can create well-defined paths and walkways that enhance both the functionality and aesthetics of your landscape design.
Creating Patios and Decks
Patios and decks provide outdoor living spaces for relaxation, dining, and entertainment. In SketchUp, you can design and create patios and decks with ease. Here’s how you can do it:
- Rectangle Tool: The Rectangle tool is useful for creating the base shape of the patio or deck. Click and drag to define the dimensions of the rectangle.
- Push/Pull Tool: Use the Push/Pull tool to extrude the rectangle, giving it the desired height and thickness to create the patio or deck surface.
- Materials and Textures: Apply appropriate materials and textures to the patio or deck surfaces to achieve the desired look and feel.
- Components: Create components of furniture, outdoor appliances, and other elements to populate the patio or deck, making it a functional and inviting space.
By utilizing these tools and techniques, you can design beautiful patios and decks that seamlessly integrate with the overall landscape design, providing comfortable outdoor living areas for enjoyment and relaxation.
Adding Fences and Walls
Fences and walls can serve as boundaries, provide privacy, or add architectural interest to your landscape design. SketchUp offers tools that allow you to create fences and walls easily. Here’s how:
- Line and Rectangle Tools: These tools help you draw lines and rectangles to define the boundaries and layout of the fence or wall.
- Push/Pull Tool: Use the Push/Pull tool to extrude the lines or rectangles and create the height and thickness of the fence or wall.
- Components: Create components of fence panels, gates, or decorative elements that can be easily replicated and modified to construct the fence or wall.
- Materials and Textures: Apply appropriate materials and textures to the fence or wall surfaces to achieve the desired appearance.
By employing these tools and techniques, you can design fences and walls that complement the overall design of your landscape, creating boundaries and architectural features that enhance the outdoor space.
With SketchUp’s versatile tools, you can confidently design and incorporate hardscape elements such as paths, walkways, patios, decks, fences, and walls into your landscape projects. These elements not only add functionality but also contribute to the overall aesthetics of your outdoor spaces, helping you create a harmonious and inviting landscape design.
Read more: How To Use Scale In Landscape Design
Incorporating Water Features
Water features bring a sense of tranquility and beauty to outdoor spaces, creating a focal point and adding an element of visual interest to landscape designs. Whether it’s a serene pond, a shimmering pool, or the soothing sound of a water fountain or waterfall, SketchUp offers tools and techniques to help you incorporate captivating water features into your landscape projects. Let’s explore how you can design ponds and pools, add fountains and waterfalls, and simulate water bodies using SketchUp:
Designing Ponds and Pools
Ponds and pools can serve as captivating focal points, offering a refreshing element to your landscape design. SketchUp provides the tools to design and visualize these water features. Here’s how you can create ponds and pools:
- Drawing Tools: Use the drawing tools in SketchUp, such as the Circle or Rectangle tools, to create the shape and outline of the pond or pool.
- Push/Pull Tool: Utilize the Push/Pull tool to extrude the shape, creating the depth and volume of the pond or pool.
- Materials and Textures: Apply appropriate materials and textures to the pond or pool surfaces to simulate water and achieve the desired visual effect.
- Components: Add components of aquatic plants, rocks, or other elements to enhance the realism and natural appearance of the pond or pool.
By using these tools and techniques, you can create stunning ponds and pools that enhance the overall aesthetics of your landscape design.
Adding Fountains and Waterfalls
Fountains and waterfalls add a dynamic and enchanting element to outdoor spaces, creating a sense of movement and sound. SketchUp allows you to incorporate fountains and waterfalls into your landscape design. Here’s how you can do it:
- Components: Utilize pre-made 3D models of fountains or waterfalls from the SketchUp 3D Warehouse or other online resources. Import the models into your SketchUp project and position them accordingly.
- Custom Modeling: If you prefer, you can create your own fountain or waterfall components using SketchUp’s drawing and modeling tools. This allows you to have complete control over the design and details.
- Materials and Textures: Apply appropriate materials and textures to the fountain or waterfall components to simulate water flow or cascades.
- Animation Extensions: SketchUp has various animation extensions that can simulate water movement, allowing you to create the illusion of flowing water for your fountains or waterfalls.
By incorporating these elements into your landscape design, you can bring a sense of elegance and serenity to your outdoor spaces.
Simulating Water Bodies
In addition to specific water features like ponds and pools, SketchUp offers techniques to simulate larger bodies of water, such as lakes, rivers, or oceans. Here’s how you can simulate water bodies in SketchUp:
- Materials and Textures: Apply materials and textures with water-like colors and reflections to large flat surfaces, giving the illusion of water.
- Plugins and Extensions: SketchUp has a range of plugins and extensions that can help simulate water bodies more realistically, including ones that animate water surfaces or create dynamic reflections.
- Specialized 3D Models: For larger water bodies, you may find pre-made 3D models of waves, ripples, or water surfaces. Importing these models can provide a more detailed and accurate representation of water.
Simulating water bodies in SketchUp allows you to visualize the overall landscape design and its interaction with surrounding natural elements.
By incorporating water features into your landscape design using SketchUp, you can create captivating outdoor spaces that evoke a sense of tranquility and add a touch of elegance. Whether it’s designing ponds and pools, adding fountains and waterfalls, or simulating water bodies, SketchUp provides the tools and resources to bring your vision of water features to life.
Read more: How To Use A Laser Level For Landscaping
Enhancing with Outdoor Furniture
Outdoor furniture plays a vital role in creating functional and inviting outdoor spaces. It provides comfort, enhances aesthetics, and allows for relaxation and socializing. With SketchUp, you can easily incorporate outdoor furniture into your landscape design to elevate the overall look and feel. Let’s explore how you can place furniture elements, customize materials and textures, and arrange seating areas to enhance your design:
Placing Furniture Elements
SketchUp offers various methods to place furniture elements within your landscape design. Here are a few techniques you can use:
- Importing 3D Models: You can import pre-made 3D models of outdoor furniture from online resources or the SketchUp 3D Warehouse. Download the desired models and import them into your SketchUp model.
- Creating Your Own Furniture: If you have the skills, you can create your own 3D models of outdoor furniture using SketchUp’s modeling tools. This allows you to have complete control over the size, design, and details of each furniture piece.
- Components: SketchUp components are reusable objects that can be easily duplicated and modified. You can create components of different types of outdoor furniture, allowing you to quickly populate your landscape design with realistic seating and lounging options.
- Paint Bucket Tool: You can use the Paint Bucket tool to apply appropriate materials and textures to represent different materials (e.g., wood, metal, wicker) used in outdoor furniture.
By using these methods, you can create inviting outdoor spaces that feature a variety of furniture elements that suit your design vision.
Customizing Materials and Textures
Customizing materials and textures for outdoor furniture allows you to achieve a desired look and match the design style of your landscape. Here’s how you can customize materials and textures in SketchUp:
- Applying Materials: Use the Paint Bucket tool to apply appropriate materials to the surfaces of the furniture. This may include wood textures for chairs or tables, cushion textures for seating, or metal textures for the frame of furniture.
- Custom Textures: If you want to use specific textures or patterns for your furniture, you can import custom textures into SketchUp and apply them to the corresponding surfaces.
- Texture Positioning and Scaling: Adjust the position and scale of textures to match the dimensions and proportions of the furniture. This ensures that textures appear realistically and accurately on the furniture surfaces.
- Material Editor: Utilize the material editor in SketchUp to adjust properties like reflectivity, shininess, or transparency to further customize the appearance of materials.
By customizing materials and textures, you can create outdoor furniture that perfectly complements your landscape design and evokes the desired atmosphere.
Arranging Seating Areas
Arranging seating areas strategically is essential for creating comfortable and functional outdoor spaces. Here are some tips for arranging seating areas in SketchUp:
- Consider Functional Needs: Determine the purpose of each seating area. Create distinct areas for dining, lounging, or conversation, and ensure that each area has enough space and appropriate furniture to accommodate its intended use.
- Furniture Placement: Group furniture pieces together to form cozy seating arrangements. Consider factors like comfort, flow, and visual appeal when arranging furniture, ensuring that there is ample room for movement around the seating areas.
- Add Accessories: Enhance the seating areas with accessories like cushions, pillows, or outdoor rugs, adding extra comfort and style.
- Landscape Considerations: Take into account the surrounding landscape elements, such as views, shade, or focal points, when positioning seating areas. Capitalize on natural features and incorporate them into the seating arrangement.
By thoughtfully arranging seating areas, you can create functional and inviting outdoor spaces that encourage relaxation, entertainment, and enjoyment in your landscape design.
With SketchUp’s versatile tools, you can easily incorporate outdoor furniture into your landscape design projects. By placing furniture elements, customizing materials and textures, and arranging seating areas strategically, you can make your outdoor spaces comfortable, stylish, and welcoming.
Read more: How To Use Photoshop For Landscape Design
Adding Lighting Effects
Lighting is an essential element in landscape design, as it can enhance the aesthetics, functionality, and ambiance of outdoor spaces. With SketchUp, you can easily incorporate lighting effects into your landscape projects. Let’s explore how you can install outdoor lighting, use various light sources, and adjust light intensity and color to create captivating lighting effects:
Installing Outdoor Lighting
Installing outdoor lighting helps to illuminate specific areas in your landscape design and create a welcoming atmosphere. While SketchUp is primarily a 3D modeling software, you can still represent lighting elements in your design visually. Here’s how:
- Create Point Lights: Use the Point Light tool or create your own custom light components to represent light sources within your landscape design.
- Position Lights: Place the point lights in appropriate locations within your design, such as near pathways, seating areas, or architectural features, to add emphasis and create guiding illumination.
- Adjust Intensity: Configure the brightness or intensity of the lights using the settings available in SketchUp extensions or rendering plugins.
While SketchUp doesn’t offer the capability to physically install outdoor lighting, you can use visual representations of lights to envision the overall lighting design and its impact on your landscape.
Using Various Light Sources in Designs
SketchUp provides flexibility in creating various light sources within your landscape design, allowing you to experiment with different lighting effects. Here are some common light sources that you can incorporate into your design:
- Point Lights: These are omnidirectional light sources that emit light evenly in all directions. They are suitable for creating general illumination or highlighting specific areas.
- Spotlights: Spotlights emit light in a narrow and focused beam, allowing you to highlight specific objects or features within your design.
- Light Strings: Light strings or fairy lights can add a whimsical touch to your outdoor spaces. Simulate their effect by using line segments to represent the strings and point lights to represent the individual bulbs.
- Lanterns or Lamps: Add charm and character to your design by placing lanterns or lamps in key areas. Design or import 3D models that resemble these fixtures and add point lights within them to simulate the illumination.
By utilizing various light sources, you can experiment with different lighting effects and create the desired ambiance in your landscape design.
Adjusting Light Intensity and Color
Adjusting the intensity and color of the lighting is essential for achieving the desired mood and atmosphere in your landscape design. Here’s how you can adjust light intensity and color in SketchUp:
- Rendering Plugins: If you use rendering plugins in SketchUp, you can access their settings to adjust the intensity and color of the lights within your design. These plugins offer additional control and realistic rendering capabilities.
- Material Editor: Apply different materials and textures to the light sources in your design to represent their color. Experiment with warm or cool colors to create the desired lighting effect.
- Post-Processing Software: After exporting your SketchUp model, you can further adjust the light intensity and color using post-processing software. This gives you additional control over the final lighting effects in your rendered images.
By fine-tuning the intensity and color of lighting sources, you can create captivating lighting effects that elevate the visual appeal and ambiance of your landscape design.
While SketchUp provides you with the visual representation of lighting effects in your landscape design, it is important to consult with lighting professionals or electricians for the physical installation of outdoor lighting to ensure safety and compliance with electrical codes and regulations.
With SketchUp’s tools and techniques, you can incorporate lighting effects into your landscape design to create visually stunning outdoor spaces that are both functional and captivating.
Finalizing the Landscape Design
As you near the end of your landscape design project in SketchUp, it’s time to finalize the design by reviewing and making necessary modifications. This final step ensures that your design is well-executed and meets your vision. Once complete, you can present the final design to clients, stakeholders, or use it as a reference for implementation. Let’s explore the process of finalizing the landscape design:
Reviewing the Design
Before making any modifications, take some time to review your landscape design in SketchUp. Carefully examine each element, including plants, hardscape features, water elements, furniture, and lighting effects. Evaluate the overall layout, balance, and coherence of the design. Consider how well it aligns with your initial goals and vision.
During the review, ask yourself the following questions:
- Does the design reflect the desired style and theme?
- Does the layout meet the functional needs and flow well?
- Are the proportions of different elements harmonious?
- Is the color palette cohesive and pleasing to the eye?
- Do the plants and materials chosen thrive in the intended environment?
Take notes on areas that need improvement or further refinement as you review the design.
Making Necessary Modifications
Using the feedback and observations from the review, make the necessary modifications to your landscape design in SketchUp. This step allows you to fine-tune and enhance your design to achieve the desired results.
- Adjust the sizes, positions, or orientations of elements to optimize their visual impact or functionality.
- Refine the materials and textures to improve realism and reflect the desired aesthetic.
- Ensure that the chosen plant species are appropriate for the intended environment, making modifications as needed.
- Edit walkways, paths, or hardscape elements to improve circulation and accessibility.
- Make any required modifications to lighting effects to enhance the desired ambiance.
Take your time during this stage, as these modifications will ultimately contribute to the success of your final design.
Presenting the Final Design
Once you’re satisfied with the design modifications in SketchUp, you can present the final landscape design to clients, stakeholders, or use it for implementation purposes. There are several ways you can present the final design:
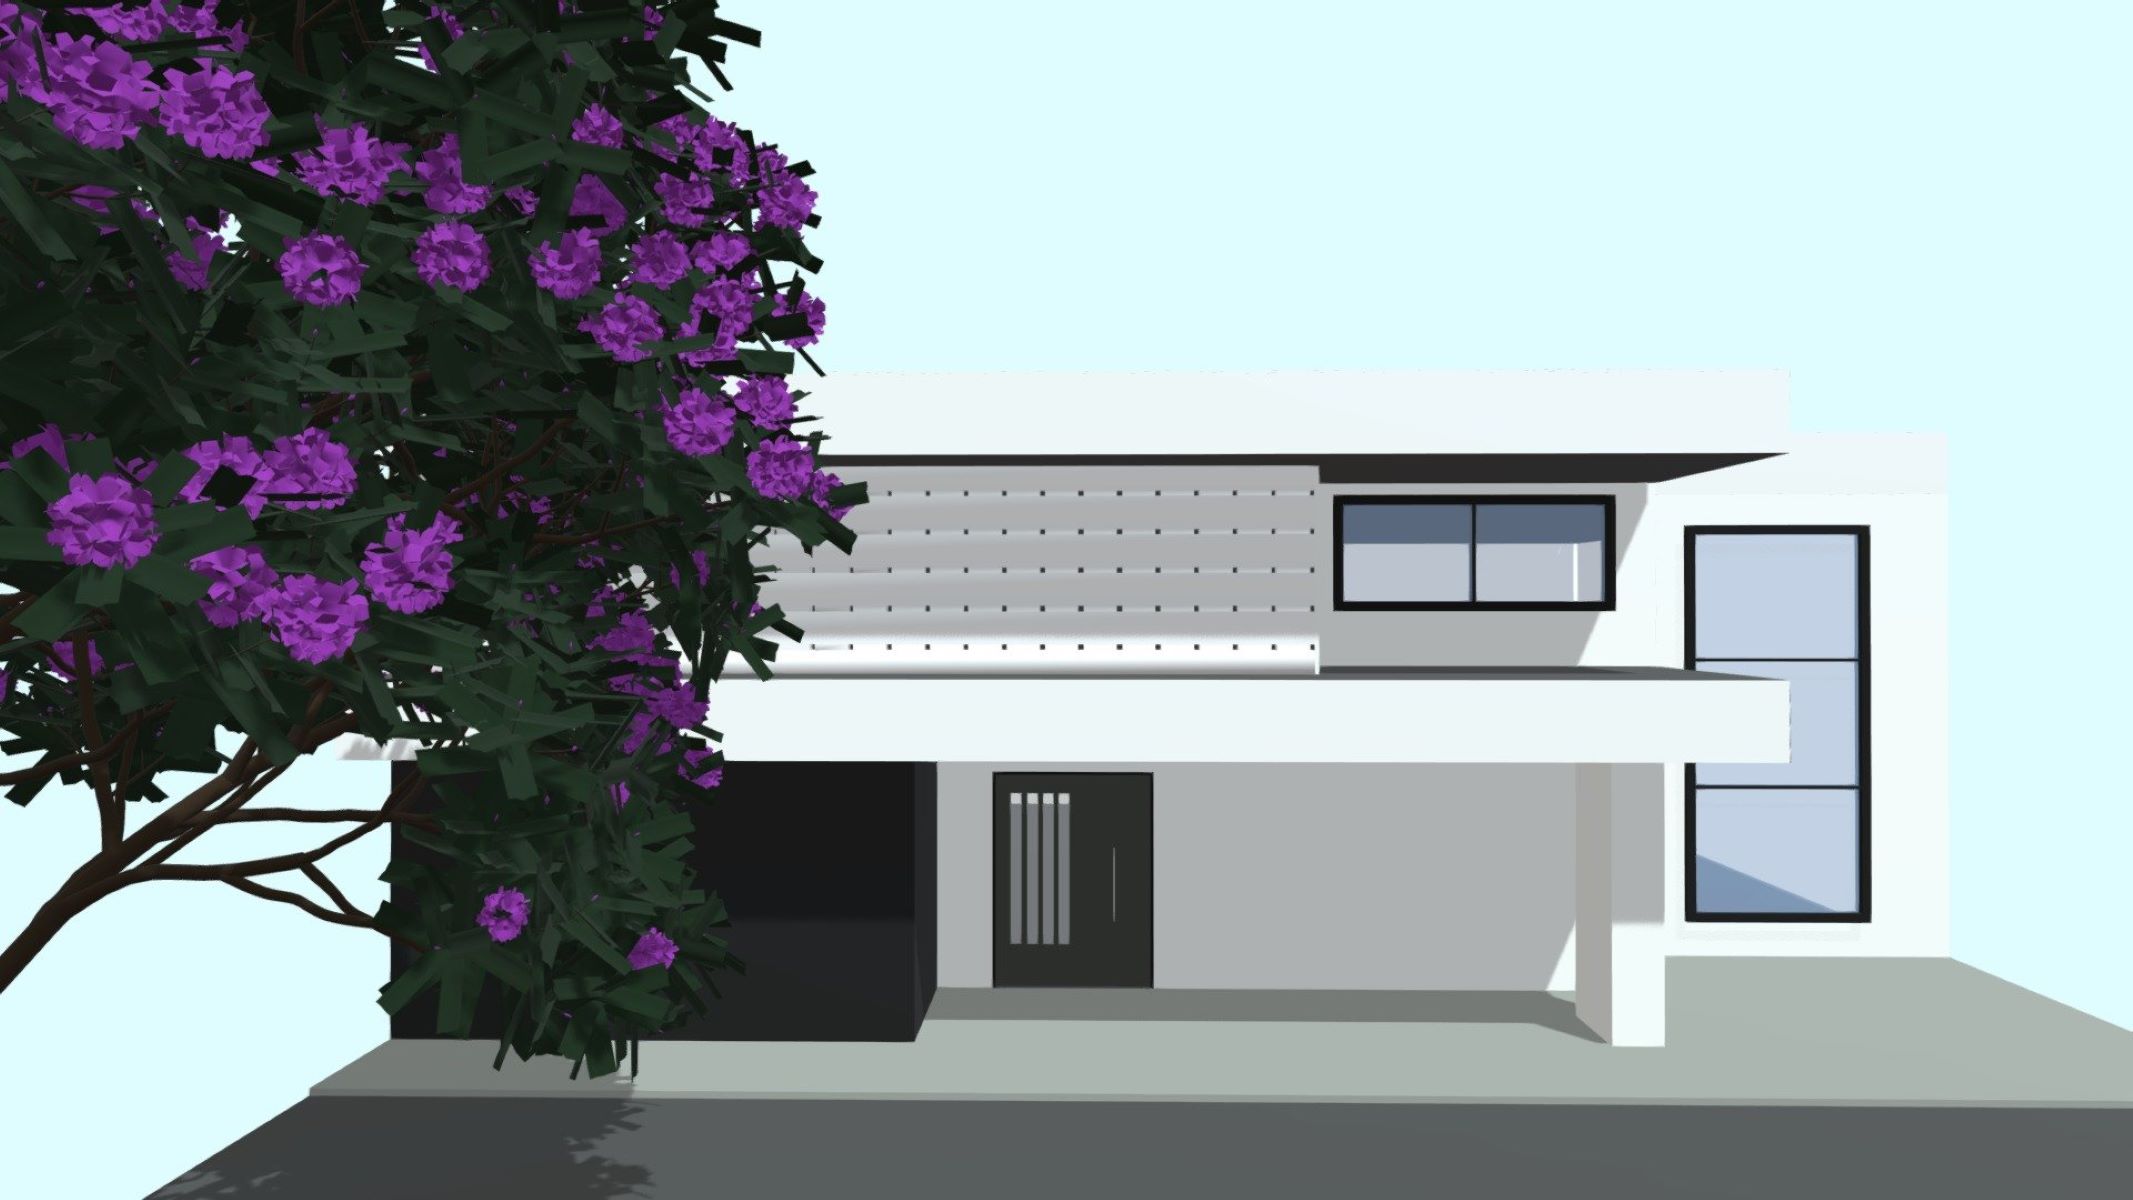
- Create high-quality renderings using SketchUp’s rendering plugins or export the design to a rendering software for realistic visualizations.
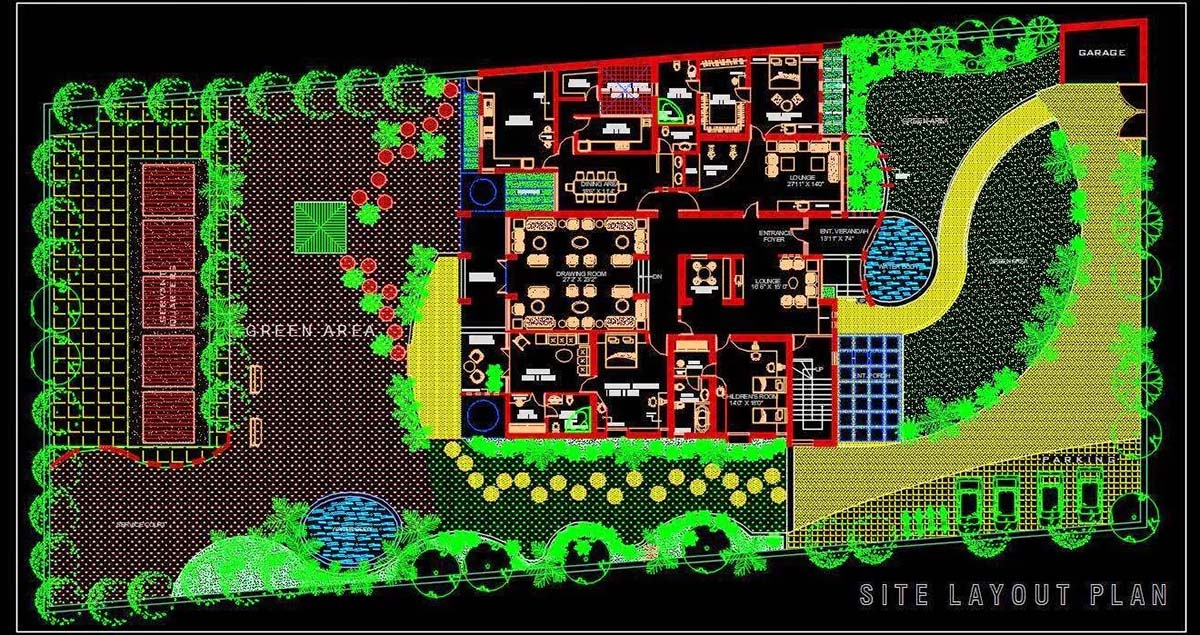
- Generate 2D plans or elevations from the 3D model to provide a comprehensive overview of the design.
- Produce walkthrough animations that simulate the experience of moving through the landscape design, showcasing different elements and perspectives.
- Prepare presentation boards or slideshows that feature key views, plant palettes, materials, and other design details.
The presentation of your final design should effectively convey the overall concept, functionality, and aesthetic qualities of your landscape design. Consider the preferences and objectives of your audience and tailor your presentation accordingly. This will help them understand and appreciate the design vision you’ve brought to life in SketchUp.
By meticulously reviewing the design, making necessary modifications, and presenting the final design, you can ensure that your landscape design is well-executed, visually appealing, and aligned with your original vision. SketchUp offers a versatile platform to help you bring your landscape design projects to completion and ready for implementation.
Conclusion
Designing landscapes is a creative and rewarding process, and SketchUp provides the necessary tools to bring your ideas to life in a digital environment. Whether you’re an experienced designer or a passionate homeowner, SketchUp offers a powerful platform for visualizing, planning, and presenting your landscape designs. Through its intuitive interface and versatile features, SketchUp allows you to create realistic and detailed 3D models of your outdoor spaces.
Throughout this article, we explored various aspects of using SketchUp for landscape design. We discussed how to understand SketchUp’s features and system requirements, how to get started with the software, and the importance of customizing your workspace for optimal workflow. We also covered specific techniques for creating base terrain, adding vegetation, designing hardscape elements, incorporating water features, enhancing with outdoor furniture, adding lighting effects, and finalizing the landscape design with a thorough review and necessary modifications.
By leveraging the capabilities of SketchUp, you can easily create accurate representations of your landscape design and explore different perspectives to ensure your vision is fully realized. SketchUp empowers you to experiment with a wide range of tools, techniques, and components to create breathtaking landscapes that suit your style, functional needs, and aspirations.
Remember that landscape design is a dynamic process, allowing for continuous iterations and improvements. SketchUp provides the flexibility to refine your design, make modifications, and adapt to changing requirements. As you advance your skills in SketchUp, you’ll find yourself creating increasingly intricate and captivating landscape designs.
Now it’s time to take the wealth of knowledge you’ve gained and start applying it to your own landscape design projects. Embrace your creativity, experiment with different elements and design choices, and let SketchUp be your trusty companion and canvas for bringing your landscape visions to life.
So let’s grab our virtual shovels, dig into SketchUp, and create stunning outdoor spaces that inspire and delight!
Frequently Asked Questions about How To Use SketchUp For Landscape Design
Was this page helpful?
At Storables.com, we guarantee accurate and reliable information. Our content, validated by Expert Board Contributors, is crafted following stringent Editorial Policies. We're committed to providing you with well-researched, expert-backed insights for all your informational needs.

0 thoughts on “How To Use SketchUp For Landscape Design”