Home>diy>Architecture & Design>How To Make A 3D Floor Plan In Photoshop
Architecture & Design
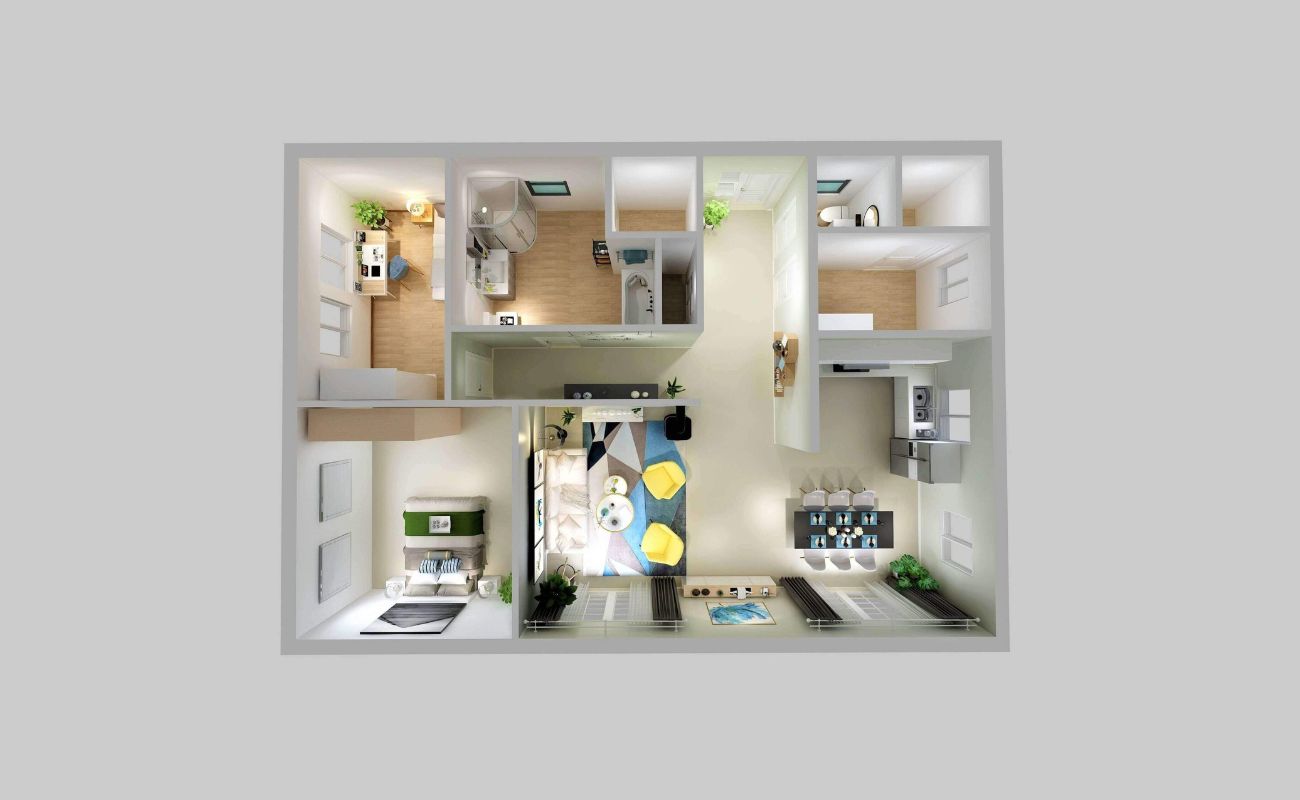
How To Make A 3D Floor Plan In Photoshop
Modified: January 19, 2024
Learn how to create stunning 3D floor plans in Photoshop with this step-by-step guide. Transform your architecture designs and unleash your creativity!
(Many of the links in this article redirect to a specific reviewed product. Your purchase of these products through affiliate links helps to generate commission for Storables.com, at no extra cost. Learn more)
Introduction
Welcome to our easy-to-follow guide on how to create a stunning 3D floor plan using Photoshop. Whether you’re an aspiring architect, interior designer, or simply someone who loves to dabble in digital design, this tutorial will walk you through the step-by-step process of transforming a 2D floor plan into an engaging and realistic 3D visualization.
With the advancement of technology, creating a 3D floor plan has become more accessible and intuitive than ever before. Gone are the days of relying solely on complex software or hiring expensive professionals. With some basic knowledge of Photoshop and an eye for design, you can bring your floor plan to life and impress others with your creativity.
Visualizing a space in 3D offers numerous benefits. For architects and designers, it provides a better understanding of the spatial layout, allowing them to optimize the design for functionality and aesthetics. Clients can also benefit as they can visualize their dream space, making it easier to provide feedback and make informed decisions.
In this guide, we will cover everything you need to know to create a 3D floor plan in Photoshop. From setting up the workspace to adding furniture, textures, lighting effects, and more, each step will bring us closer to our goal of a photorealistic 3D floor plan.
So, let’s roll up our sleeves and get started on this exciting journey of turning a flat floor plan into a multidimensional masterpiece!
Key Takeaways:
- Unleash your creativity and bring your design vision to life by transforming 2D floor plans into captivating 3D visualizations using Photoshop. Elevate your architectural and interior design skills with this comprehensive guide.
- Master the art of creating harmonious and visually appealing 3D floor plans by leveraging Photoshop’s tools and techniques. From setting up the workspace to adding lighting effects, this tutorial equips you with valuable skills for future design projects.
Read more: How To Make 3D Grass
Step 1: Setting up the workspace
Before we begin creating our 3D floor plan, it’s important to ensure that our workspace is properly set up in Photoshop. This will help us work efficiently and make the design process smoother.
The first thing we need to do is open Photoshop and create a new document. Go to File > New to open the New Document dialog box. Here, you can set the dimensions and resolution for your floor plan. It’s best to use a higher resolution to maintain the quality of your design.
Next, we need to customize our workspace to suit our needs. Photoshop offers different workspace layouts, such as Essentials, Photography, Painting, and more. You can choose the workspace layout that you find most comfortable or create your own custom workspace by rearranging panels and toolbars.
It’s also a good idea to organize our layers from the start. Create separate layers for the floor plan, walls, furniture, textures, and any other elements you plan to add. This will make it easier to edit and manage individual elements as we progress with our design.
Lastly, we should familiarize ourselves with the tools and shortcuts that will come in handy during the design process. Tools like the Move Tool, Brush Tool, and Pen Tool will be essential in creating and manipulating our 3D floor plan. Learning shortcut keys for commonly used actions will save us time and make our workflow more efficient.
With our workspace properly set up, we’re now ready to move on to the next step: importing the floor plan image. This is where we’ll lay the foundation for our 3D design, so let’s dive right in!
Step 2: Importing the floor plan image
After setting up our workspace, the next step in creating our 3D floor plan is to import the floor plan image into Photoshop. This image will serve as the base upon which we’ll build our 3D design.
Begin by locating the floor plan image file on your computer and open it in Photoshop. To do this, click on File > Open and navigate to the location where the image is saved. Once you’ve selected the image file, click on the Open button.
As the floor plan image opens in Photoshop, it’s crucial to ensure that the image is properly aligned and scaled to match the dimensions of our workspace. To do this, go to View > Fit on Screen to ensure the image is fully visible within the workspace.
If necessary, you can adjust the size of the floor plan image by using the Image Size option under the Image menu. Resize the image to fit within the canvas dimensions you set when creating the new document in step 1. This will ensure that the floor plan is displayed accurately and proportionally.
Once you’re satisfied with the placement and size of the floor plan image, create a new layer above it. This will be the layer where you’ll start building the 3D elements of the floor plan. To add a new layer, go to Layer > New > Layer or simply press Shift + Ctrl + N (Windows) or Shift + Command + N (Mac).
It’s important to keep the original floor plan image on a separate layer so that you can refer back to it as needed. This will help you accurately position and align the 3D elements as you continue to work on your design.
With the floor plan image imported into Photoshop and ready for reference, we can now move on to the next step: creating the walls of our 3D floor plan. Let’s dive in and bring our design to life!
Step 3: Creating the walls
Now that we have our floor plan image imported into Photoshop, it’s time to start building the walls of our 3D floor plan. This step will involve using shapes and lines to outline the walls and define the layout of the space.
Begin by selecting the Pen Tool from the toolbar. This tool allows you to draw custom shapes and paths with precision. Make sure your new layer, created in the previous step, is selected as the active layer.
Using the Pen Tool, trace the walls of the floor plan by clicking to create anchor points and dragging to create curves. Follow the lines and dimensions of the floor plan image as closely as possible to ensure accuracy. As you go along, you can adjust the shape or position of the anchor points by clicking and dragging them.
Remember to create separate paths for each wall segment to maintain flexibility in editing and styling. Once you have completed outlining the walls, you can fill them in with a solid color to distinguish them from the rest of the design. Select the shape or path you created and choose a color from the Color Picker tool.
If you want to add thickness and depth to the walls, you can duplicate the shape or path and move it slightly down or to the side. Adjust the color of the duplicated shape to create a shadow or highlight effect. This will give the walls a more realistic and three-dimensional appearance.
For added realism, you can also add texture or patterns to the walls. This can be achieved by applying a texture image or using Photoshop’s pattern fill options. Experiment with different textures and patterns to find the one that suits your design aesthetic.
As you work on creating the walls, remember to save regularly to avoid losing any progress. It’s also a good idea to keep organized layers for the walls, such as naming them “Wall 1,” “Wall 2,” and so on, to easily distinguish and manage them.
With the walls now in place, our 3D floor plan is beginning to take shape. In the next step, we’ll add doors and windows to provide access and natural light to the space. Let’s move on and continue building our design!
Step 4: Adding doors and windows
Now that we have created the walls of our 3D floor plan, it’s time to add doors and windows to provide access, ventilation, and natural light to the space. Doors and windows not only enhance the functionality of the design but also contribute to its visual appeal.
To begin, select the Rectangle Tool from the toolbar. This tool allows you to quickly draw rectangular shapes, which will serve as the frames for our doors and windows. Make sure your wall layer is selected as the active layer.
Using the Rectangle Tool, draw a shape that represents the size and dimensions of your desired door or window. Place the shape along the wall where you want to add the opening. You can use the Move Tool to position and align the shape accurately.
Next, switch to the Path Selection Tool. This tool allows you to manipulate the shape you just created by adjusting its anchor points and handles. You can resize, reshape, or rotate the shape to match your desired door or window design.
Once you’re satisfied with the shape, you can either fill it with a solid color or apply a texture or pattern that resembles the material of the door or window frame. This will help differentiate the opening from the surrounding walls.
To add depth and dimension to the door or window, you can create a duplicate shape and move it slightly behind the original shape. Adjust the color, opacity, or shadow of the duplicated shape to create shading or reflections, giving it a more realistic appearance.
If you want to further enhance the look of the door or window, you can add details such as doorknobs, handles, or glass panes. Use the Shape Tool or the Pen Tool to draw these additional elements, making sure to pay attention to proportions and scale.
Repeat these steps to add all the doors and windows to your 3D floor plan. Remember to save your progress regularly and keep your layers organized for easy management and editing.
With doors and windows now integrated into our floor plan, we have achieved a more functional and visually appealing design. In the next step, we’ll take our 3D floor plan to the next level by adding furniture and fixtures. Let’s continue our creative journey!
Read more: How To Make 3D Printer Faster
Step 5: Adding furniture and fixtures
Adding furniture and fixtures to our 3D floor plan is an essential step in bringing the space to life and creating a realistic representation of how it will be used. Furniture and fixtures not only provide functionality but also contribute to the overall aesthetic appeal and ambiance of the design.
Begin by searching for images or references of the furniture and fixtures you want to include in your floor plan. Look for images that match the style and theme of your design. Alternatively, you can also create your own custom furniture using Photoshop’s drawing tools.
Once you have your furniture and fixture images ready, open them in Photoshop and use the selection tools to isolate them from their background. You can use the Quick Selection Tool, Magic Wand Tool, or Pen Tool to create precise selections.
Copy and paste the selected furniture or fixtures onto a separate layer in your floor plan document. Use the Move Tool to position them in the appropriate locations within the space. Pay attention to scale and proportion to ensure that the furniture fits realistically within the floor plan.
To further enhance the realism of the furniture and fixtures, you can apply shadows underneath them. Create a new layer below each item and use the Brush Tool with a soft black brush to paint the shadows. Adjust the opacity and blur of the shadow layer to achieve a natural and convincing effect.
When adding furniture, consider the flow and functionality of the space. Arrange the furniture as you would in a real-life setting, ensuring that there is enough space for movement and that the arrangement is aesthetically pleasing.
Incorporate different types of furniture and fixtures to create a well-rounded and functional floor plan. Include items such as sofas, tables, chairs, beds, cabinets, and lighting fixtures to bring the space to life.
Remember, you can experiment with different furniture styles, colors, and arrangements to find the perfect combination that suits your design vision. Don’t be afraid to explore different options and make adjustments as needed.
As always, save your progress regularly and keep your layers organized for easy management and editing. With furniture and fixtures now added to our 3D floor plan, we’re one step closer to a visually stunning and functional design. In the next step, we’ll explore how to add textures and colors to give our floor plan depth and personality. Let’s continue our creative journey!
When creating a 3D floor plan in Photoshop, use the vanishing point filter to accurately place objects in perspective. This will give your floor plan a realistic and professional look.
Step 6: Adding textures and colors
Now that we have the basic elements of our 3D floor plan in place, it’s time to add textures and colors to bring depth and personality to the design. Textures can mimic various materials like wood, stone, or fabric, while colors can set the mood and create a cohesive visual theme.
To add textures, start by finding images or patterns that represent the desired material. These can be sourced from stock photo websites or created from scratch using Photoshop’s built-in patterns and textures. Import the chosen texture into your floor plan document.
Select the layer or object that you want to apply the texture to, then go to Layer > Layer Style > Blending Options. In the Layer Style dialog box, tick the “Pattern Overlay” option, and choose the desired texture from the drop-down menu. Adjust the scale and opacity to your liking. This will give the object or layer the appearance of the chosen texture.
For example, you can apply a wood texture to furniture, a marble texture to countertops, or a carpet texture to the floor. Experiment with different textures and settings to achieve the desired effect.
In addition to textures, colors play an important role in setting the overall mood and aesthetic of our floor plan. Decide on a color scheme that complements the style and purpose of your design. Consider using color theory principles to create a harmonious palette, using complementary or analogous colors.
To apply colors, select the object or layer that you want to colorize and choose the desired color from the Color Picker tool. You can also use Photoshop’s Gradient tool to create gradient fills or apply gradients to specific layers or objects.
Keep in mind that colors can be used strategically to emphasize certain elements or create focal points within the floor plan. Use colors to guide the viewer’s eyes towards important areas, such as a feature wall, a focal point piece of furniture, or a statement accessory.
Remember to keep consistency in mind when applying textures and colors. Establish a cohesive visual theme throughout the floor plan by using similar textures and colors across different elements. This will create a sense of unity and cohesiveness in the design.
As always, save your progress regularly. With textures and colors added to our 3D floor plan, we’re now ready to move on to the next step: adding lighting effects to enhance the overall ambiance of the space. Let’s continue our creative journey!
Step 7: Adding lighting effects
Lighting plays a crucial role in setting the mood and atmosphere of any space, and our 3D floor plan is no exception. By adding lighting effects, we can enhance the realism and ambiance of our design, creating a more immersive experience for the viewer.
Start by creating a new layer above all other layers in your floor plan document. This will be the layer where you’ll apply the lighting effects. Name this layer “Lighting” for easy reference.
Next, select the Brush Tool and choose a soft, white brush with a low opacity. This will allow us to create soft and subtle lighting effects. Adjust the brush size according to the area you want to illuminate.
Think about where the light would naturally come from in your floor plan. Areas near windows and doors are likely to have more natural light, while other areas may need artificial lighting sources like lamps or ceiling lights. Begin by painting these areas with soft white brush strokes.
For a more realistic effect, consider adding additional layers for different lighting sources. Adjust the opacity and brush size as you paint the lighting effects, creating variations in intensity and direction.
If you want to simulate natural light streaming through windows, you can use Photoshop’s Gradient tool. Choose a gradient that transitions from a light color to transparent, and apply it to the window areas. This will create a gentle and diffused lighting effect.
Remember to experiment with different lighting angles and intensities to achieve the desired atmosphere. You can also add additional lighting elements such as lamps or chandeliers as needed, using the same techniques as above.
Additionally, consider adding reflections or glow effects to enhance the lighting realism. You can achieve this by duplicating the lighting layer, applying a Gaussian Blur to the duplicated layer, and adjusting the blending mode and opacity to create a soft glow effect.
Keep in mind that lighting effects can greatly impact the overall mood and visual appeal of your 3D floor plan. Be sure to save your work regularly to avoid losing any progress.
With the lighting effects added, our 3D floor plan is becoming more dynamic and lifelike. In the next step, we’ll explore how to add shadows and reflections to further enhance the realism of our design. Let’s continue our creative journey!
Step 8: Adding shadows and reflections
Adding shadows and reflections to our 3D floor plan is an important step in creating depth and realism. Shadows and reflections help ground the objects within the space and make them appear more integrated and natural.
Start by creating a new layer above the furniture and fixture layers in your floor plan document. Name this layer “Shadows” for easy reference.
Select the Brush Tool and choose a soft, black brush with a low opacity. Adjust the brush size according to the object you want to create a shadow for. Paint subtle shadows beneath the furniture and fixtures to simulate the interaction of light with the objects.
Consider the direction and intensity of the lighting effects you added in the previous step. Shadows should be cast in the opposite direction of the light source. Vary the opacity and brush size to create realistic shadow effects.
In addition to shadows, adding reflections can enhance the overall realism of our floor plan. To create reflections, duplicate the furniture or fixture layer you want to create a reflection for. Flip the duplicated layer vertically, and then lower its opacity to make it look like a reflection.
Position the reflection layer below its original object and adjust its position to simulate the surface it reflects upon. Use the Transform tools to resize and align the reflection with the object, ensuring that it looks natural and proportional.
Experiment with the opacity and blending modes of the reflection layer to achieve the desired effect. Remember that reflections may appear more pronounced on certain surfaces like glossy floors or shiny countertops.
To enhance the realism of the shadows and reflections, consider applying a Gaussian Blur to the shadow and reflection layers. This will soften the edges and create a more natural appearance.
Remember to save your progress regularly. With shadows and reflections added, our 3D floor plan is becoming even more realistic and visually engaging. In the next step, we’ll fine-tune and make any necessary adjustments to ensure a polished final result. Let’s continue our creative journey!
Step 9: Fine-tuning and adjustments
As we near the completion of our 3D floor plan, it’s essential to perform some fine-tuning and make any necessary adjustments to ensure a polished and cohesive final result. This step involves reviewing and refining various aspects of the design to create a harmonious and visually appealing composition.
First, take a step back and evaluate the overall composition of your floor plan. Pay attention to the balance, scale, and proportions of the elements within the space. Make adjustments if necessary, such as resizing or repositioning furniture, to create a more visually pleasing arrangement.
Next, examine the color palette used throughout the design. Ensure that the colors complement each other and contribute to the desired mood or theme of the space. Fine-tune the colors of individual elements if needed, making sure they harmonize with the overall color scheme.
Continue to scrutinize the lighting effects, shadows, and reflections within the floor plan. Assess their placement, intensity, and realism. Make any necessary adjustments to achieve a natural and cohesive lighting scenario, ensuring that shadows and reflections align with the light sources.
Take the time to examine the textures applied to the various elements in the design. Consider if any adjustments are needed to create a more realistic representation of the materials. You can experiment with different textures or refine existing ones to achieve the desired effect.
Review the positioning of doors, windows, and other architectural elements. Ensure that they align properly with the walls and that the proportions are accurate. Make any necessary adjustments to achieve a balanced and visually pleasing layout.
Fine-tune any other details that may require attention, such as adding additional accessories or decorative elements. These extra touches can contribute to the overall ambiance of the space and add a sense of realism and personalization.
Finally, step back and critically assess the design as a whole. Pay attention to any areas that may need further refinement or modification. It can be helpful to take breaks and revisit the project with fresh eyes to spot any overlooked issues.
Throughout this process, remember to save your progress regularly and keep your layers organized for easy management and editing.
With these fine-tuning and adjustments, our 3D floor plan is ready to be presented and admired. Congratulations on your accomplishment! Take the time to appreciate your creativity and meticulous attention to detail. Your 3D floor plan now serves as a stunning representation of your design vision.
If desired, you can further refine the presentation by adding annotations or labels to identify specific elements or areas within the floor plan. This can help convey additional information and make the design more understandable to others.
Thank you for joining us on this creative journey of transforming a 2D floor plan into a captivating and realistic 3D visualization. We hope you’ve enjoyed the process and feel accomplished in your newfound skills in using Photoshop for architectural designs. Happy designing!
Conclusion
Congratulations on completing your journey of creating a 3D floor plan using Photoshop! You’ve learned how to transform a 2D floor plan into a visually stunning and realistic representation of a space. Through each step, you’ve gained valuable insights into the process of setting up the workspace, importing the floor plan image, creating walls, adding doors and windows, incorporating furniture and fixtures, applying textures and colors, adding lighting effects, including shadows and reflections, and fine-tuning the design.
By leveraging the power of Photoshop, you’ve been able to unleash your creativity and bring your design vision to life. Creating a 3D floor plan offers numerous benefits, allowing architects, interior designers, and even homeowners to better understand the spatial layout, optimize functionality, and make informed decisions about their space.
Throughout this process, you’ve learned how to utilize various Photoshop tools and techniques to create and manipulate shapes, apply textures, adjust lighting effects, and add shadows and reflections. These skills will serve as a valuable foundation for any future design projects you embark on.
Remember, the key to a successful 3D floor plan is a marriage between functionality and aesthetics. Consider the flow of the space, the placement of furniture, and the use of colors and textures to create a harmonious and visually appealing design.
As you continue to refine your skills in Photoshop and explore other design techniques, don’t be afraid to experiment, think outside the box, and push the boundaries of your creativity. The possibilities are endless when it comes to creating captivating and innovative floor plans.
We hope this comprehensive guide has provided you with the knowledge and inspiration to create stunning 3D floor plans. The journey from a flat floor plan to a multidimensional masterpiece is an exciting one, and we’re thrilled to have been a part of your creative process.
Now, armed with your new skills and insights, go forth and unleash your imagination. Embrace the power of 3D floor plan visualization, and let your designs come to life in ways that will captivate and inspire others. Happy designing!
Frequently Asked Questions about How To Make A 3D Floor Plan In Photoshop
Was this page helpful?
At Storables.com, we guarantee accurate and reliable information. Our content, validated by Expert Board Contributors, is crafted following stringent Editorial Policies. We're committed to providing you with well-researched, expert-backed insights for all your informational needs.


0 thoughts on “How To Make A 3D Floor Plan In Photoshop”