Home>Garden Essentials>How Much Infill Should I Use For Printing A Lithophane
Garden Essentials
How Much Infill Should I Use For Printing A Lithophane
Modified: August 28, 2024
Learn how much infill you should use for printing a stunning garden lithophane. Discover the optimal infill settings for achieving the perfect balance of detail and strength.
(Many of the links in this article redirect to a specific reviewed product. Your purchase of these products through affiliate links helps to generate commission for Storables.com, at no extra cost. Learn more)
Introduction
Gardening is a wonderful hobby that allows us to connect with nature, grow our own food, and create beautiful outdoor spaces. Whether you have a large backyard or a small balcony, there is always an opportunity to create a thriving garden that brings joy and serenity to your life.
However, in our increasingly digital world, it can be challenging for gardeners to stand out and reach their intended audience. This is where search engine optimization (SEO) comes into play. By understanding how to optimize your garden-related content for search engines, you can increase the visibility of your website, attract more visitors, and ultimately grow your online presence.
In this comprehensive guide, we will explore the key principles of SEO and how they can be applied to garden-related content. From understanding keyword research to creating engaging and informative articles, you will learn valuable tactics to boost the visibility of your garden blog or website. So, grab your gardening tools and let’s dig into the world of SEO for gardeners!
Key Takeaways:
- When printing a lithophane, the amount of infill used affects its strength, detail, and light transmission. Balancing infill density is crucial for achieving the best visual and structural results.
- Consider image complexity, material properties, print size, and intended use when determining the infill amount for lithophane printing. Experiment with different infill settings to find the perfect balance for your specific project.
Read more: What Infill Density Should I Use
Understanding Lithophanes
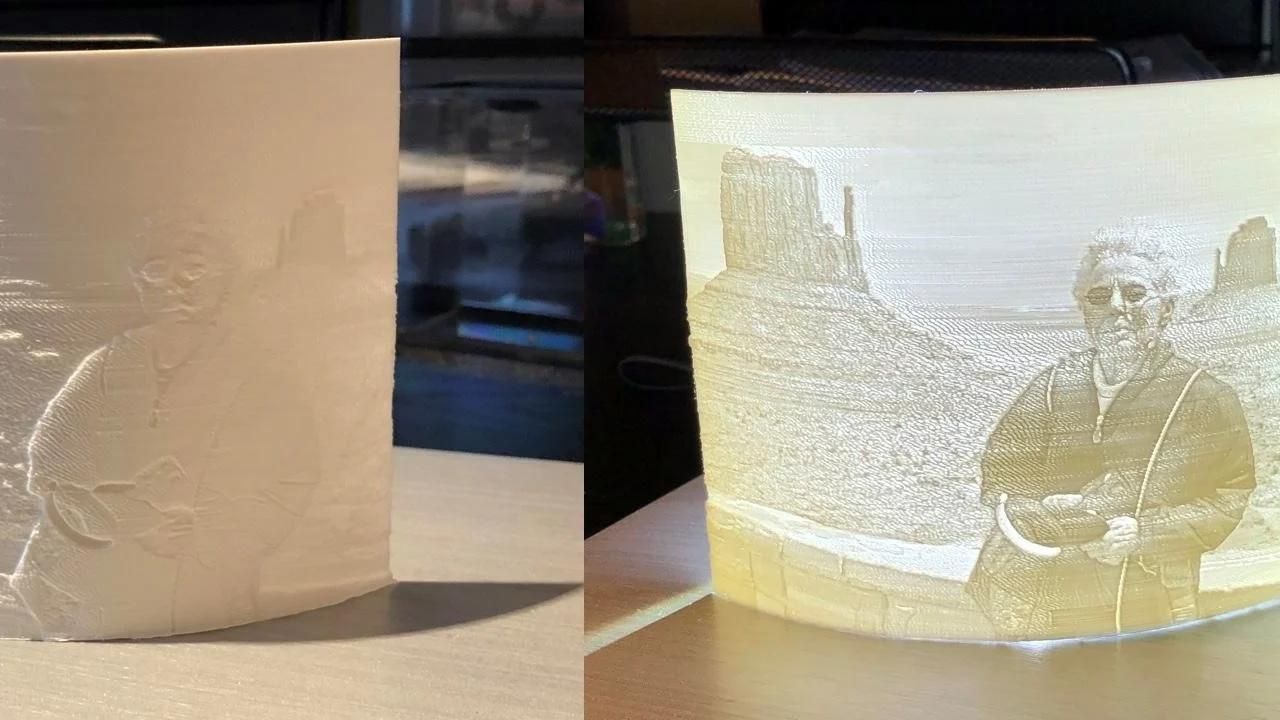
If you are a fan of unique and captivating artwork, you may already be familiar with lithophanes. A lithophane is a three-dimensional image that can only be seen clearly when illuminated from behind. It is created using a combination of light and shadow to bring intricate designs to life.
Lithophanes have a rich history dating back to the 19th century. Originally made from porcelain, they were highly prized for their delicate beauty and detailed craftsmanship. Today, lithophanes can be created using modern technologies such as 3D printing, making it possible for anyone to enjoy the magic they bring.
When it comes to 3D printing lithophanes, the process involves converting an image or design into a printable file. The image is then printed layer by layer, with each layer representing a different level of opacity. This creates the desired effect of light passing through the transparent areas and being blocked by the opaque areas.
The result is a stunning piece of art that plays with light and shadow, revealing intricate details and depth. Lithophanes can be used to create personalized gifts, decorative items, or even functional objects such as lampshades and nightlights.
It’s important to note that the success of printing a lithophane depends on various factors, including the quality of the image, the printer’s capabilities, and the material used. However, one often overlooked aspect that plays a crucial role in achieving optimal results is the amount of infill used during the printing process.
Importance of Infill in Lithophane Printing
When it comes to 3D printing, the “infill” refers to the internal structure or fill density of the printed object. In the context of lithophane printing, the infill refers to the amount of material that is present within the opaque areas of the image. In other words, it determines how solid or hollow the printed lithophane will be.
The infill plays a crucial role in determining the strength, stability, and overall quality of the lithophane. It affects the amount of light that can pass through the image, as well as its structural integrity. Therefore, finding the right balance of infill density is essential to achieve the desired visual and functional properties of the lithophane.
Using too little infill can result in a weak and fragile lithophane that lacks detail and may collapse under its own weight. On the other hand, using too much infill can make the lithophane unnecessarily heavy and block excessive amounts of light, diminishing its visual appeal.
Additionally, the infill density can also affect the printing time and material consumption. A higher infill density will require more time to print and use more material, while a lower density can lead to faster print times and less material usage.
It’s important to note that there is no one-size-fits-all approach to determining the ideal infill density for lithophane printing. The optimal amount of infill will depend on various factors such as the printer’s capabilities, the desired level of detail, the material being used, and the intended purpose of the lithophane. However, by understanding these factors and making informed decisions, you can achieve outstanding results with your lithophane prints.
Factors to Consider When Determining Infill Amount
When deciding on the infill amount for lithophane printing, it’s important to consider several factors that will influence the final outcome. These factors will help you determine the optimal infill density that strikes a balance between structural integrity, visual appeal, and printing efficiency. Here are some key factors to consider:
- Image Complexity: The complexity of the image or design will impact the required infill density. Images with intricate details and fine lines will generally benefit from higher infill densities to ensure the structural integrity of the lithophane.
- Material Properties: Different 3D printing materials have varying levels of stiffness and strength. Some materials, like PLA, may require higher infill densities for proper support, while others, like PETG, may perform well with lower infill densities. Consider the material’s characteristics when determining the infill amount.
- Print Size: The size of the lithophane will also influence the infill density. Larger lithophanes may require higher infill densities to prevent sagging or collapse. Smaller lithophanes, on the other hand, can often be printed with lower infill densities without sacrificing structural stability.
- Intended Use: Consider how the lithophane will be used. If it is a decorative item that will be displayed on a shelf, a lower infill density may be suitable. However, if the lithophane will be handled frequently or subjected to more demanding conditions, a higher infill density may be necessary for added durability.
- Printing Time: The infill density will affect the printing time. Higher infill densities result in longer print times, so consider your time constraints when determining the infill amount. You may need to find a balance between print speed and the desired level of quality.
By considering these factors and evaluating the specific requirements of your lithophane project, you will be able to make educated decisions regarding the optimal infill amount. Keep in mind that experimentation and fine-tuning may be necessary to achieve the best results for your unique circumstances.
Use a low infill percentage (10-20%) for lithophane printing to allow light to pass through and create the image. Higher infill can make the image appear too dark.
Recommended Infill Amounts for Lithophane Printing
While the optimal infill density for lithophane printing can vary depending on the specific factors mentioned earlier, there are general guidelines that can serve as a starting point. These recommended infill amounts have been proven to yield good results for many lithophane printing projects:
- Medium Infill Density (20-40%): This is a commonly used infill range for lithophanes. It provides a good balance between structural stability, detail retention, and light transmission. Medium infill can help ensure that the lithophane is sturdy enough to withstand handling and maintain its shape while allowing an adequate amount of light to pass through, resulting in a clear and beautiful image.
- High Infill Density (40-60%): If you’re printing large or complex lithophanes, or if you prioritize maximum strength and durability, a higher infill density may be recommended. This higher density provides increased structural support and helps prevent sagging or deformation over time. However, keep in mind that higher infill densities can also reduce the amount of light passing through the lithophane, potentially making the image slightly darker.
- Low Infill Density (10-20%): For smaller lithophanes or designs with less intricate details, a lower infill density may be sufficient. This can help reduce printing time and material consumption while still maintaining a satisfactory level of structural integrity. However, be cautious when using low infill densities for larger or more complex lithophane prints, as they may become fragile or lose definition.
It’s important to note that these recommended infill amounts serve as general starting points, and adjusting the infill density may be necessary based on factors specific to your lithophane project. Additionally, it’s always a good idea to test different infill densities and evaluate the results to find the perfect balance between strength, clarity, and efficiency for your specific needs.
Read more: What Infill Should I Use For A Benchy
Effect of Infill Amount on Lithophane Quality
The infill amount in lithophane printing plays a significant role in determining the overall quality of the finished product. It directly impacts various aspects, including structural integrity, detail retention, light transmission, and visual appeal. Here are some key effects of infill amount on lithophane quality:
- Structural Stability: The infill amount affects the strength and stability of the lithophane. Higher infill densities provide more support and prevent the lithophane from sagging or collapsing. On the other hand, lower infill densities may result in a more fragile lithophane. Finding the right balance is crucial to ensure the lithophane maintains its shape and durability.
- Detail Retention: The infill amount can impact the level of detail that can be achieved in the lithophane. Higher infill densities help preserve finer details and intricate designs, resulting in a crisper and more defined image. Conversely, lower infill densities may sacrifice some detail, particularly in small or complex areas of the lithophane.
- Light Transmission: The infill amount directly affects the amount of light that can pass through the lithophane. Higher infill densities reduce the amount of light transmission, making the lithophane appear darker when illuminated. In contrast, lower infill densities allow more light to pass through, resulting in a brighter image. Adjusting the infill can help achieve the desired level of light transmission based on the intended effect.
- Visual Appearance: The infill amount contributes to the overall visual appeal of the lithophane. An optimal infill density ensures that the lithophane appears solid and well-constructed. Too little infill can make the lithophane look hollow and incomplete, while excessive infill can make it overly dense and opaque. Finding the right balance enhances the beauty and aesthetics of the lithophane.
- Printing Time and Material Usage: The infill amount affects the printing time and material consumption. Higher infill densities require more time to print and utilize more material. Lower infill densities result in faster printing times and less material usage. Balancing the desired quality with time and cost considerations is important when selecting the infill amount.
By understanding the impact of infill amount on lithophane quality, you can make informed decisions to achieve the intended visual and structural results. It is essential to experiment with different infill densities and evaluate the outcomes to find the ideal balance that suits your specific lithophane project.
Tips for Adjusting Infill Amount in Lithophane Printing
Adjusting the infill amount in lithophane printing can have a significant impact on the final result. To help you achieve the desired quality and optimize your lithophane prints, here are some valuable tips for adjusting the infill amount:
- Start with recommended infill ranges: Begin with the recommended infill ranges mentioned earlier as a starting point. These ranges have been proven to work well for many lithophane projects. From there, you can fine-tune the infill amount based on your specific requirements.
- Consider the image complexity: Take into account the level of detail and complexity in your lithophane design. For intricate and highly detailed images, higher infill densities are generally recommended. Simpler designs may work well with lower infill densities.
- Balance strength and light transmission: Find the optimal balance between structural integrity and light transmission. Higher infill densities offer better strength and stability but may reduce light transmission. Lower infill densities increase light transmission but may compromise the durability of the lithophane.
- Experiment with different infill settings: Don’t be afraid to experiment with different infill densities to find the perfect balance for your specific lithophane. Print a few test pieces with varying infill amounts to evaluate the results and make adjustments as needed.
- Consider the size of the lithophane: Keep in mind that the size of the lithophane can influence the required infill density. Larger lithophanes may require higher infill densities to prevent sagging or collapsing, while smaller ones may fare well with lower densities.
- Know your printer’s capabilities: Understand the capabilities of your 3D printer, including its maximum infill density and layer height. Some printers may have limitations or perform better with specific infill settings. Optimize your print settings accordingly.
- Iterate and evaluate: Iterate and evaluate your lithophane prints to understand how different infill amounts impact the final result. Assess the level of detail, light transmission, structural integrity, and overall visual appeal to fine-tune your infill settings and achieve the desired outcome.
- Document and learn: Document your experimentation process and take note of your findings. This will help you build a repository of knowledge and reference for future lithophane projects.
By following these tips and understanding the nuances of adjusting the infill amount in lithophane printing, you can optimize your prints to achieve the best possible results. Remember that finding the perfect infill density may require some trial and error, so embrace the iterative process and enjoy the journey of creating stunning lithophanes.
Conclusion
Optimizing your garden-related content for search engines can significantly enhance your online presence and connect you with a wider audience of gardening enthusiasts. By implementing SEO strategies effectively, you can increase visibility, attract organic traffic, and establish yourself as a trusted authority in the gardening community.
Throughout this comprehensive guide, we have explored the key principles of SEO for gardeners. From understanding the importance of keyword research to creating engaging and informative articles, we have covered valuable tactics to help you succeed in the digital gardening landscape.
Remember, SEO is an ongoing process, and it requires consistent effort and adaptation to stay ahead of the competition. Continuously monitor and analyze your website’s performance, refine your keyword strategy, and keep up with the evolving SEO trends in the gardening niche.
As you implement SEO techniques into your gardening website or blog, always keep in mind the importance of providing high-quality, valuable content to your readers. Ultimately, search engine optimization is just one tool in your arsenal to attract and engage visitors. Combine SEO with your passion and expertise in gardening to create a truly remarkable online experience.
So, grab your gardening gloves and get ready to sow the seeds of success in the digital world. With a solid understanding of SEO principles and a dedication to producing valuable content, your online garden will flourish, and your digital presence will bloom.
Happy gardening and happy optimizing!
Frequently Asked Questions about How Much Infill Should I Use For Printing A Lithophane
Was this page helpful?
At Storables.com, we guarantee accurate and reliable information. Our content, validated by Expert Board Contributors, is crafted following stringent Editorial Policies. We're committed to providing you with well-researched, expert-backed insights for all your informational needs.


0 thoughts on “How Much Infill Should I Use For Printing A Lithophane”