Home>Gardening & Outdoor>Outdoor Entertaining>How To Make A Folding Picnic Table

Outdoor Entertaining
How To Make A Folding Picnic Table
Modified: February 18, 2024
Learn how to make a folding picnic table for your outdoor entertaining needs. This DIY project is perfect for hosting gatherings in your backyard or patio.
(Many of the links in this article redirect to a specific reviewed product. Your purchase of these products through affiliate links helps to generate commission for Storables.com, at no extra cost. Learn more)
Introduction
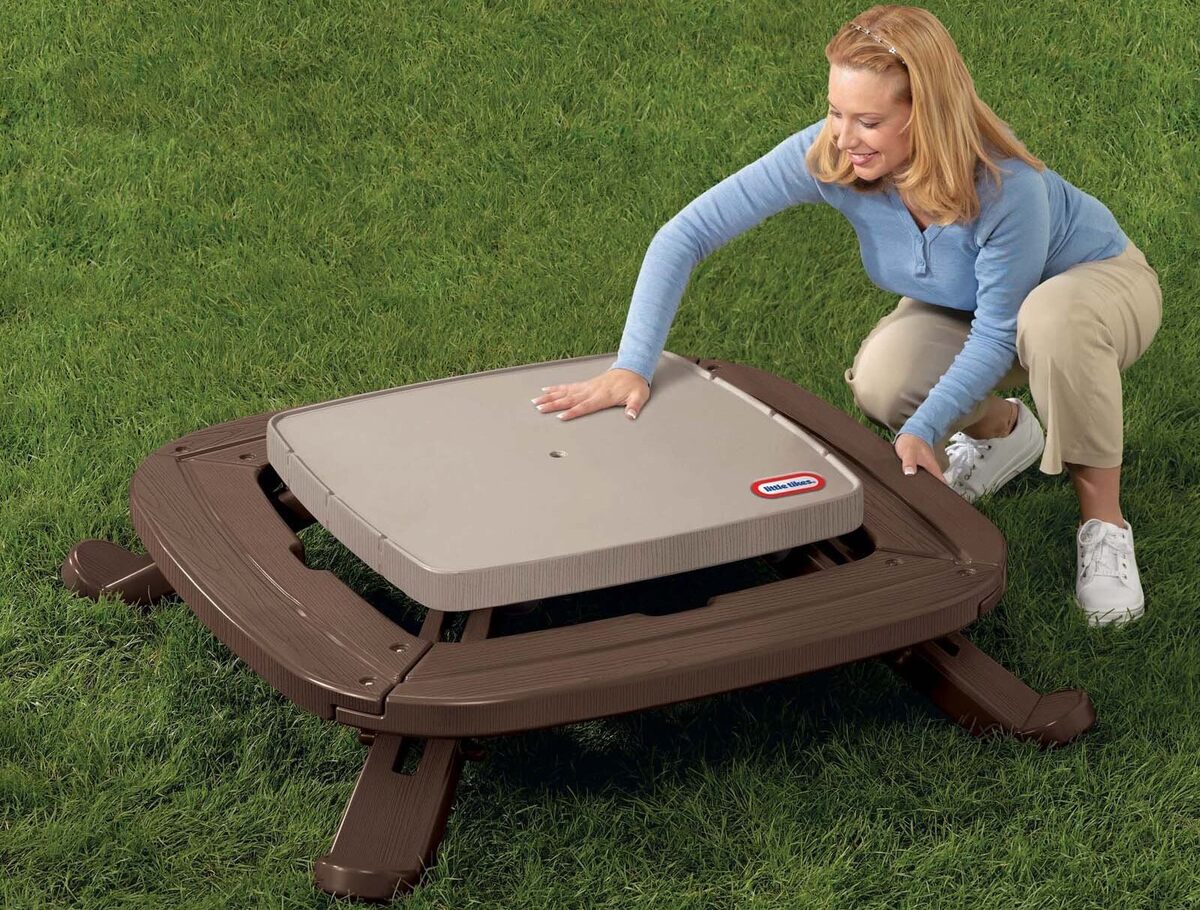
Are you ready to elevate your outdoor entertaining game with a versatile and space-saving solution? A folding picnic table is a fantastic addition to any backyard, patio, or deck, offering a convenient and practical surface for dining, playing games, or simply enjoying the great outdoors. The beauty of a folding picnic table lies in its adaptability – it provides ample seating and a sturdy tabletop for al fresco gatherings, and when not in use, it conveniently folds into a compact unit for easy storage.
In this guide, we will walk you through the step-by-step process of constructing your own folding picnic table. Whether you are a seasoned DIY enthusiast or a novice looking to embark on a fulfilling woodworking project, this guide is designed to help you create a functional and stylish piece of outdoor furniture. By following these instructions and tapping into your creativity, you can customize your folding picnic table to suit your unique preferences and outdoor space.
Get ready to roll up your sleeves, unleash your inner craftsman, and embark on a rewarding journey of building a folding picnic table that will be the centerpiece of your outdoor entertaining for years to come. Let's gather the materials and tools needed to bring this project to life!
Key Takeaways:
- Elevate your outdoor entertaining with a DIY folding picnic table. It’s versatile, space-saving, and customizable to suit your unique outdoor space and preferences.
- Crafting a folding picnic table is a rewarding woodworking project. Enjoy the process, personalize your creation, and cherish the memories made around it.
Read more: How To Fold A Picnic Blanket
Materials Needed
Before diving into the construction process, it’s essential to gather all the necessary materials to ensure a smooth and efficient build. Here’s a comprehensive list of the materials required to construct your folding picnic table:
- Pressure-treated lumber or cedar boards: These will serve as the primary building material for the table and benches, offering durability and resistance to outdoor elements.
- Wood screws: Select corrosion-resistant screws to secure the various components of the table firmly.
- Hinges: Opt for heavy-duty hinges to facilitate the folding mechanism while providing stability when the table is in use.
- Wood glue: A reliable wood adhesive will reinforce joints and enhance the overall sturdiness of the table.
- Wood stain or outdoor sealant: Applying a protective finish will shield the table from moisture, UV rays, and general wear and tear, prolonging its lifespan.
- Sandpaper: Prepare the wood surfaces by smoothing out rough edges and achieving a uniform finish.
- Wood filler: This will come in handy for filling in any gaps or imperfections in the wood, ensuring a polished final appearance.
- Paintbrushes or applicators: Use these to apply the wood stain or sealant evenly across the surfaces of the table and benches.
- Measuring tape and carpenter’s square: Accurate measurements and precise angles are crucial for constructing a stable and symmetrical picnic table.
- Safety goggles and ear protection: Prioritize safety by equipping yourself with protective gear to shield your eyes and ears during the construction process.
By ensuring that you have all the necessary materials on hand, you can streamline the building process and minimize interruptions. With the materials in place, it’s time to gather the essential tools that will aid in the construction of your folding picnic table.
Tools Required
Equipping yourself with the right tools is a crucial aspect of any woodworking project. Here’s a comprehensive list of the essential tools required to construct your folding picnic table:
- Power saw: Whether you opt for a circular saw, miter saw, or table saw, having a reliable power saw will facilitate precise and efficient wood cutting.
- Drill and bits: A versatile drill with an assortment of drill bits will be used for creating pilot holes and driving screws into the wood.
- Screwdriver: While a power drill is indispensable, a manual screwdriver will come in handy for certain tasks that require a more delicate touch.
- Sanding block or orbital sander: These tools will expedite the sanding process, ensuring that the wood surfaces are smooth and free of splinters.
- Clamps: Use clamps to hold wood pieces together securely during assembly, promoting accurate and stable joints.
- Carpenter’s level: Achieving a level tabletop and benches is essential for both aesthetic appeal and practical functionality.
- Painting supplies: Depending on your chosen finish, gather the necessary supplies for applying wood stain, sealant, or paint to the picnic table and benches.
- Workbench or sawhorses: A stable work surface is essential for safely and effectively maneuvering and assembling the wood components.
- Safety equipment: Prioritize safety by wearing protective goggles, a dust mask, and ear protection to safeguard yourself during the construction process.
By ensuring that you have the requisite tools at your disposal, you can approach the construction of your folding picnic table with confidence and efficiency. With the materials and tools gathered, it’s time to embark on the step-by-step process of bringing your vision to life.
Step 1: Cutting the Wood
Before delving into the assembly process, precision in cutting the wood is paramount to ensure that the components fit together seamlessly, resulting in a sturdy and visually appealing folding picnic table. Follow these steps to effectively cut the wood for the tabletop and benches:
- Measure and mark: Begin by carefully measuring and marking the lumber according to the dimensions specified in your chosen folding picnic table plan. Accurate measurements are essential for achieving a cohesive and well-proportioned final product.
- Cut the tabletop and bench pieces: Utilize a power saw, such as a circular saw or table saw, to make precise cuts along the marked lines. Exercise caution and ensure that the saw blade is set to the appropriate depth to achieve clean and accurate cuts.
- Create smooth edges: After cutting the wood pieces, use sandpaper or an orbital sander to smooth out any rough edges or surfaces. This step not only enhances the tactile appeal of the table but also minimizes the risk of splinters.
- Pre-drill holes: To prepare for the assembly phase, use a drill and the appropriate drill bit to create pilot holes in the wood pieces where screws will be inserted. Pre-drilling helps prevent the wood from splitting and facilitates precise screw placement during assembly.
By meticulously executing the wood-cutting process, you set the stage for a seamless and efficient assembly phase, ensuring that the tabletop and benches come together with precision and stability. With the wood pieces prepared, it’s time to move on to assembling the tabletop of your folding picnic table.
Step 2: Assembling the Tabletop
As the central focal point of your folding picnic table, the tabletop plays a pivotal role in providing a stable and spacious surface for dining and various outdoor activities. Follow these steps to effectively assemble the tabletop with precision and attention to detail:
- Arrange the tabletop boards: Lay out the cut tabletop boards on a flat and stable surface, ensuring that the edges align seamlessly to create a uniform surface. This step is crucial for achieving a visually appealing and structurally sound tabletop.
- Apply wood glue: Prior to securing the boards together, apply a thin and even layer of high-quality wood glue along the edges that will be joined. The wood glue enhances the bonding strength of the tabletop, contributing to its overall stability.
- Secure the boards: Using wood screws and a drill, carefully secure the tabletop boards together, ensuring that the screws are driven in at regular intervals along the length of the boards. This step reinforces the bond between the boards, creating a cohesive tabletop structure.
- Smooth the surface: Once the tabletop boards are securely joined, use sandpaper to smooth out any uneven surfaces or protruding screw heads. This final touch enhances the aesthetic appeal of the tabletop and ensures a comfortable dining and gathering surface.
By meticulously assembling the tabletop, you lay the foundation for a robust and visually pleasing centerpiece for your folding picnic table. With the tabletop taking shape, it’s time to proceed to the next crucial phase: constructing the benches that will complement the functionality and style of the table.
When making a folding picnic table, make sure to use sturdy and weather-resistant materials to ensure durability. Additionally, consider adding a locking mechanism to keep the table securely in place when in use.
Read more: How To Fold A Picnic Blanket With Zipper
Step 3: Building the Benches
Complementing the functionality and aesthetic appeal of the tabletop, the benches of your folding picnic table provide comfortable seating for outdoor gatherings. Follow these steps to effectively construct the benches with precision and attention to detail:
- Prepare the bench components: Lay out the pre-cut bench pieces on a flat and stable surface, ensuring that they are arranged according to the bench design specifications. This initial step sets the stage for a systematic and efficient bench assembly process.
- Apply wood glue and secure the bench components: Prior to joining the bench pieces, apply wood glue along the mating surfaces to reinforce the structural integrity of the benches. Subsequently, use wood screws and a drill to securely fasten the bench components together, creating sturdy and reliable seating surfaces.
- Smooth and finish the benches: Once the bench components are assembled, use sandpaper to smooth out any rough edges or surfaces. This step contributes to the overall comfort and visual appeal of the benches, ensuring an inviting seating area for outdoor gatherings.
By meticulously constructing the benches, you enhance the functionality and comfort of your folding picnic table, providing ample seating for your outdoor activities. With the benches completed, the next phase involves integrating the folding mechanism that will enable convenient storage and transportation of the table.
Step 4: Attaching the Hinges
The hinges play a pivotal role in enabling the folding functionality of your picnic table, allowing for convenient storage and transportation. Follow these steps to effectively attach the hinges with precision and attention to detail:
- Position the tabletop and bench assembly: Place the assembled tabletop and benches on a stable surface, ensuring that they are aligned and oriented as they would be when the picnic table is in use. This step provides a clear perspective for hinge placement and alignment.
- Attach the hinges to the tabletop: Position the hinges along the underside of the tabletop, ensuring equal spacing and alignment. Secure the hinges in place using the appropriate screws, taking care to maintain a consistent and level attachment to the tabletop.
- Connect the benches with the tabletop: Align the corresponding hinges on the benches with those attached to the tabletop. Secure the hinges in place, ensuring that the benches are seamlessly integrated with the tabletop and can pivot smoothly for the folding mechanism.
- Test the folding mechanism: Once the hinges are securely attached, carefully test the folding mechanism to ensure that the tabletop and benches can be easily folded and unfolded without obstruction. Make any necessary adjustments to the hinge alignment or tension to optimize the folding functionality.
By skillfully attaching the hinges, you bring the transformative folding feature to life, enhancing the versatility and convenience of your picnic table. With the hinges in place, the final phase involves adding the finishing touches to complete your folding picnic table.
Step 5: Finishing Touches
Adding the finishing touches to your folding picnic table not only enhances its visual appeal but also contributes to its longevity and resilience in outdoor settings. Follow these steps to complete your project with attention to detail and craftsmanship:
- Apply wood stain or sealant: Choose a high-quality outdoor wood stain or sealant to protect the picnic table from the elements. Apply the stain or sealant evenly across all exposed surfaces of the table and benches, following the manufacturer’s instructions for optimal coverage and protection.
- Inspect and reinforce connections: Thoroughly examine all the joints, screws, and hinges to ensure that they are securely fastened. Reinforce any connections that may require additional screws or adjustments to promote the stability and longevity of the picnic table.
- Smooth and polish the surfaces: Utilize fine-grit sandpaper to smooth out any remaining rough areas and ensure a uniform and tactilely pleasing finish. Pay attention to details such as rounded edges and corners to minimize the risk of splinters.
- Add aesthetic details: Consider personalizing your picnic table by adding decorative elements such as carved designs, engraved patterns, or a custom paint finish. These creative touches can infuse your picnic table with character and charm, making it a standout feature in your outdoor space.
- Perform a final quality check: Before putting your folding picnic table into regular use, conduct a comprehensive quality check to verify that all components are in place, the finish is uniform, and the folding mechanism operates smoothly. Address any remaining imperfections or adjustments to ensure a flawless final product.
By meticulously attending to the finishing touches, you elevate the visual appeal and durability of your folding picnic table, creating a functional and aesthetically pleasing addition to your outdoor entertaining space. With the completion of these steps, you are now ready to enjoy the versatility and convenience of your handcrafted folding picnic table.
Conclusion
Congratulations on successfully crafting your own folding picnic table! By embarking on this woodworking journey, you have not only created a practical and versatile outdoor furniture piece but also honed your skills as a craftsman. The folding picnic table you’ve constructed is a testament to your dedication, precision, and creativity, and it is poised to become a cherished centerpiece of your outdoor gatherings for years to come.
As you reflect on the process of bringing your vision to life, remember the meticulous measurements, the careful cuts, and the thoughtful assembly that culminated in a functional and visually appealing picnic table. The incorporation of high-quality materials, precise craftsmanship, and attention to detail has resulted in a durable and reliable outdoor furnishing that will serve as a hub for memorable moments and convivial gatherings.
Whether it’s hosting a leisurely outdoor brunch, engaging in lively conversations over a shared meal, or simply basking in the natural beauty of your surroundings, your folding picnic table stands ready to accommodate and enhance these experiences. Its transformative folding mechanism ensures seamless storage and portability, making it an ideal companion for picnics, barbecues, camping trips, and other outdoor adventures.
As you introduce your handcrafted folding picnic table to your outdoor space, take pride in the craftsmanship and care that went into its creation. Embrace the opportunity to customize and personalize it further, making it a reflection of your unique style and preferences. Whether you choose to embellish it with decorative accents, incorporate vibrant colors, or simply let the natural beauty of the wood shine through, your picnic table is a canvas for self-expression and creativity.
As you revel in the joy of outdoor entertaining and the camaraderie it fosters, your folding picnic table will stand as a symbol of craftsmanship, functionality, and the simple pleasures of al fresco living. Cherish the memories made around it, the laughter shared, and the connections forged, knowing that your handcrafted creation has played a central role in facilitating these meaningful experiences.
With your folding picnic table ready to enhance your outdoor lifestyle, may it continue to be a source of joy, utility, and inspiration, embodying the spirit of craftsmanship and the art of outdoor entertaining.
Frequently Asked Questions about How To Make A Folding Picnic Table
Was this page helpful?
At Storables.com, we guarantee accurate and reliable information. Our content, validated by Expert Board Contributors, is crafted following stringent Editorial Policies. We're committed to providing you with well-researched, expert-backed insights for all your informational needs.


0 thoughts on “How To Make A Folding Picnic Table”